Electric Bottle Warmer
INSTRUCTIONS FOR USE(these instructions can also be found at tommeetippee.cn)
IMPORTANT WARNINGS!
Keep this instruction sheet for future reference as it includes important information.
- This appliance is intended for household use only. Do not use outdoors.
- Before plugging in the Bottle Warmer for the first time ensure that the voltage is compatible with your electricity supply by checking the label on the base of the unit.
- Ensure water has been added to the unit before switching the unit on.
- Do not immerse in water, to protect against fire, electric shock and injury to persons. Do not immerse cord, plugs or other parts of the unit in water or other liquid.
- Misuse of the product may result in the risk of fire, electric shock and/or personal injury.
- This appliance can be used by children aged from 14 years and above if they have been given supervision or instruction concerning use of the appliance in a safe way and understand the hazards involved.
- Cleaning and user maintenance shall not be made by children unless they are aged 14 years and above and supervised.
- Keep the appliance and its cord out of reach of children aged less than 3 years.
- Appliances can be used by persons with reduced physical, sensory or mental capabilities or lack of experience and knowledge if they have been given supervision or instruction concerning use of the appliance in a safe way and understand the hazards involved.
- Children shall not play with this appliance.
- The heating element surface is subject to residual heat after use.
- Do not touch hot surfaces use handles and knobs.
- Ensure that the heating guidelines are followed to ensure that the food is not heated for too long. For your child’s safety –Always check food temperature before feeding by testing on a sensitive part of your skin.
- Do not operate any appliance with a damaged cord or plug or after the appliance malfunctions or has been damaged in any manner. If the supply cord is damaged it must be changed by a qualified person in order to avoid a hazard. If the damage is from new the unit must be returned to the manufacturer. If within a retail warranty period this product should be exchanged at place of purchase.
- Always use on a flat heat resistant surface.
- Do not move appliance when in use.
- Do not let the cord hang over edge of kitchen work surface or touch hot surfaces. The product has been fitted with a cord wind on the base of the unit to allow you to adjust the length of the cord safely. It is recommended that the cord be kept as short as possible.
- Do not use any accessories other than those supplied with this appliance.
- When the feed has reached the desired temperature, remove immediatley. If left in the warmer, the temperature of the feed will continue to increase.
HOW TO USE
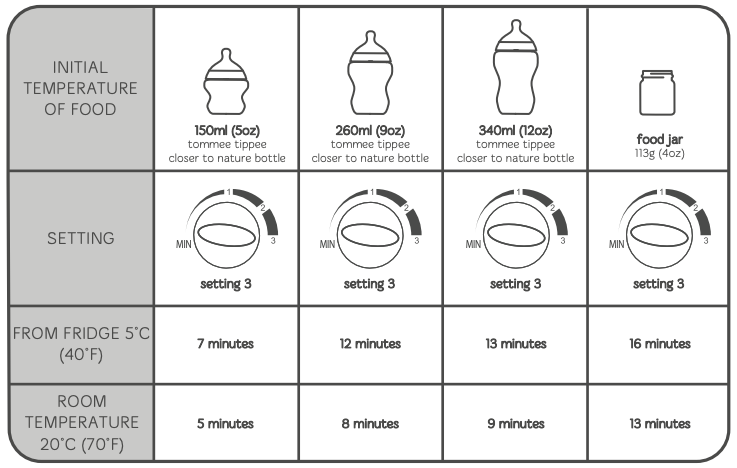
The speed at which the warmer heats the milk or food will depend on the size of the bottle or container and the starting temperature of the milk or food (e.g. room temperature 20˚C or from the refridgerator 5˚C).
We recommend that setting 3 is always used for heating up, and settings 2 and 1 are used for keeping warm only. MILK OR FOOD SHOULD NOT BE HEATED FOR OVER 30 MINUTES.
The guide gives an indication of the time you can expect the warmer to take. Average stabilized temperature for Setting 1, 2 and 3 is approximately 40c, 55c and 85c respectively.
FOR FEEDING BOTTLES
- Place filled bottle in warmer.
- Fill the warmer with water to approximately 10mm below the rim of the warmer. Never let the water overflow or rise above the neck of the bottle. For larger bottles, fill to 12mm below the rim of the warmer.
- Before plugging in, make sure the bottle warmer is switched to the “MIN” setting.
- Plug in unit. The red light will turn on to indicate the warmer is switched on.
- Turn dial to appropriate 3. The light will turn green as the water is heating up.
- Once the water is heated, the light will change from green to red to indicate that the thermostat will maintain the temperature of the water. It does not indicate that the milk is ready. To ensure that the food stays at the temperature you have selected, the thermostat will maintain the temperature of the water. In doing this the indicator light may change from red to green whilst you are heating the food.
- Heat the milk to the desired temperature.
- Take care when removing the bottle, as it and the surrounding water will be hot.
- Always gently shake the bottle and check the temperature of the milk by sprinkling a few drops on to your wrist before feeding your baby. Take care not to overheat the milk.
- In between feeding the bottle can be placed in the warmer in order to maintain drinking temperature.
- Turn back the dial to ”MIN” setting and unplug the unit after feeding.
FOR BABY JARS
- Place the food pot tray in the warmer.
- Remove the lid and place the jar in warmer.
- Fill the warmer with water to approximately 10mm below the rim of the water.
- Before plugging in, make sure the bottle warmer is switched to the ”MIN” setting.
- Plug in the unit. The red light will turn green as the water is heating up.
- Turn dial to appropriate setting. The light will turn green as the water is heating up.
- Once the water is heated, the light will change from green to red to indicate that the thermostat will maintain the temperature of the water. It does not indicate that the food is ready.
- Heat food to the desired temperature.
- Take care when removing the jar, as it and the surrounding water will be hot.
- Always stir food and taste to test to ensure that it is not too hot for your baby. Take care not to overheat the food.
- In between feeding the jar can be placed back in the warmer in order to maintain food temperature.
- Turn back the dial to ”MIN” setting and unplug the unit after feeding.
CLEANING YOUR BABY BOTTLE AND FOOD WARMER
Unplug and allow to cool before cleaning, Wipe with a damp cloth only. Do not clean with abrasive cleaners or allow to come into contact with solvents or harsh chemicals, damage could result.
DE-SCALING
De-scale your bottle warmer every 4 weeks to ensure it continues to work efficiently. To de-scale your bottle warmer, use de-scaling sachets, follow the manufacturers instructions on the packet carefully.
Tommee Tippee 431211C Electric Bottle Warmer Instructions Manual – Tommee Tippee 431211C Electric Bottle Warmer Instructions Manual –
[xyz-ips snippet=”download-snippet”]