
![]()
baby food steamer blenderINSTRUCTIONS FOR USE
IMPORTANT NOTICE FOR CLEANING AND REASSEMBLYThe knife blade, sealing ring and locking ring are not dishwasher safe. If you notice any wear and tear to your unit, discontinue to use and contact us at www.tommeetippee.com
IMPORTANT WARNINGS!.These instructions can also be found at www.tommeetippee.comKeep this instruction sheet for future reference as it includes important information.This appliance is intended for household use only. Do not use the outdoors.Before plugging in the Steamer Blender for the first time ensure that the voltage is compatible with your electricity supply by checking the label on the base of the unit.Ensure water has been added to the unit before switching the unit on.Do not immerse in water, to protect against fire, electric shock, and injury to persons. Do not immerse cord, plugs, or other parts of the unit in water or other liquid. Misuse of the product may result in the risk of fire, electric shock, and/or personal injury.This appliance shall not be used by children. Keep the appliance and its cord out of reach of children. Do not let the cord hang over edge of kitchen work surface or touch hot surfaces. The product has been fitted with a cord wind on the base of the unit to allow you to adjust the length of the cord safely. It is recommended that the cord be kept as short as possible.Appliances can be used by persons with reduced physical, sensory or mental capabilities or lack of experience and knowledge if they have been given supervision or instruction concerning use of the appliance in a safe way and understand the hazards involved.Children shall not play with this appliance.User maintenance other than cleaning and descaling is not required for this product. Cleaning and user maintenance shall not be made by children.The surfaces are liable to get hot during use![]() The heating element surface is subject to residual heat after use.Do not touch hot surfaces use handles and knobs.When in use the steamer blender contains hot water and steam. Keep hands away from steam vents as it can cause burns and scalds. Use in a well ventilated area. Be careful if hot liquid is poured into the blender as it can be ejected out of the appliance due to a sudden steaming.Ensure that the heating guidelines are followed to ensure that the food is not heated for too long.Always check food temperature before feeding. Always stir heated food to ensure even heat distribution and test the temperature before serving.Do not operate any appliance with a damaged cord or plug or after the appliance malfunctions or has been damaged in any manner. If the supply cord is damaged it must be changed by a qualified person in order to avoid a hazard.Always use on a flat heat-resistant surface.Do not move the appliance when in use.Do not use any accessories other than those supplied with this appliance. Always disconnect the appliance from the supply if it is left unattended and before assembling, disassembling, or cleaning. Switch off the appliance and disconnect from the supply before changing accessories or approaching parts that move in use. Allow to cool before putting on or taking off parts and before cleaning the appliance.Handle the knife blade carefully as it is extremely sharp. Care shall be taken when handling the sharp cutting blades, empty the bowl, and during cleaning.Before first use, before each use, and after every use wash the bowl and lid in warm soapy water or use a dishwasher (top shelf only) and dry thoroughly. Wash the knife blade in warm soapy water and dry thoroughly. The knife blade is not dishwasher safe.Do not fill above the maximum fill level indicated on the product by Max, 500ml.
The heating element surface is subject to residual heat after use.Do not touch hot surfaces use handles and knobs.When in use the steamer blender contains hot water and steam. Keep hands away from steam vents as it can cause burns and scalds. Use in a well ventilated area. Be careful if hot liquid is poured into the blender as it can be ejected out of the appliance due to a sudden steaming.Ensure that the heating guidelines are followed to ensure that the food is not heated for too long.Always check food temperature before feeding. Always stir heated food to ensure even heat distribution and test the temperature before serving.Do not operate any appliance with a damaged cord or plug or after the appliance malfunctions or has been damaged in any manner. If the supply cord is damaged it must be changed by a qualified person in order to avoid a hazard.Always use on a flat heat-resistant surface.Do not move the appliance when in use.Do not use any accessories other than those supplied with this appliance. Always disconnect the appliance from the supply if it is left unattended and before assembling, disassembling, or cleaning. Switch off the appliance and disconnect from the supply before changing accessories or approaching parts that move in use. Allow to cool before putting on or taking off parts and before cleaning the appliance.Handle the knife blade carefully as it is extremely sharp. Care shall be taken when handling the sharp cutting blades, empty the bowl, and during cleaning.Before first use, before each use, and after every use wash the bowl and lid in warm soapy water or use a dishwasher (top shelf only) and dry thoroughly. Wash the knife blade in warm soapy water and dry thoroughly. The knife blade is not dishwasher safe.Do not fill above the maximum fill level indicated on the product by Max, 500ml.
Any questions? Visit our website www.tommeetippee.com
SETUP
Please refer to the instructions leaflet before use and remember to clean and descale your unit regularly
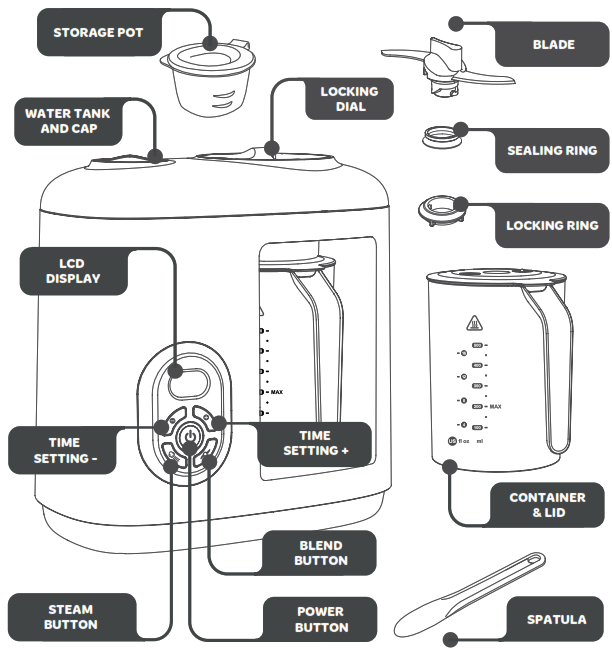
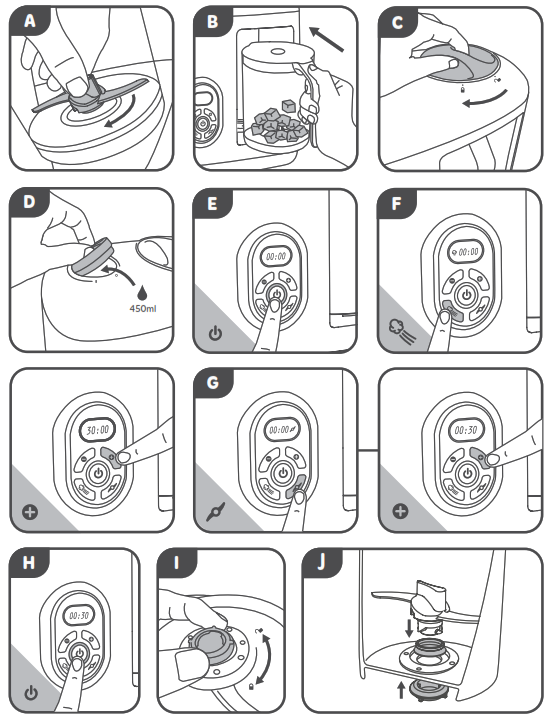
- Wash blade, container and lid in soapy water, dry and place unit on a clean, dry kitchen work surface. To remove blade, hold the blade tab inside the unit while turning the locking ring on the bottom of the container. (I) This will remove the locking ring and the blade will split into two parts. To re-assemble, reverse these steps.WARNING! Handle the knife blade carefully as it is extremely sharp. Care shall be taken when handling the sharp cutting blades, emptying the bowl, and during cleaning.Place the container with a lid on in unit and lock in place using the locking dial. (B + C)
- Fill the water tank with 450ml of cold water and replace the cap. (D)
- Plug unit into the mains power supply, the power button LED will be flashing. Press the power button to turn on the unit. The power button LED will continue to flash and the LCD display will illuminate. (E)
- Press the steam button and set the steam time to 30 minutes using the + buttons. (F)
- Press the blend button and set the blend time to 30 seconds using the + buttons. (G)
- Press the power button to start. (H)The unit will now run the steam and blend cycle automatically.
- When the cycle has finished the unit will beep, the LCD display will turn off and the power button will flash.Turn off at the power supply, unplug the unit and allow the unit to cool completely. Unlock container and remove residual water and clean container following instructions in the cleaning section. Discard any remaining water from the water tank by tipping the unit sideways over a sink.
- The unit is now ready to use.
CLEANING AND DESCALING
The descaling process will remove deposits of calcium and other minerals in the system that may affect its performance
CLEANINGTurn off at the power supply, unplug the unit and allow unit to cool down completely before cleaning. Before first use, before each use and after every use wash the container and lid in warm soapy water or use a dishwasher (top shelf only) and dry thoroughly. Wash the blade, sealing ring and locking ring in warm soapy water and dry thoroughly.PLEASE NOTE THE BLADE, SEALING RING, AND LOCKING RING ARE NOT DISHWASHER SAFE.WARNING! Handle the knife blade carefully as it is extremely sharp. Care shall be taken when handling the sharp cutting blades, emptying the bowl, and during cleaning.After every use wipes the entire base with a damp cloth but does not submerge in water.Do not clean with abrasive cleaners or allow to come in to contact with solvents or harsh chemicals, damage could result.
DESCALINGWe recommend carrying out the descaling process every 4-weeks. If you notice limescale earlier than 4-weeks, descaling may be required sooner. Living in a hard water area can produce limescale quicker than other areas. You can find out your water quality via your water provider.If descaling after a steam cycle allow the unit to cool down completely before descaling.
- Discard any remaining water from the water tank by tipping the unit sideways over a sink.
- Pour in 250ml of white vinegar.
- Leave for at least 30 minutes, or up to 24-hours depending on the extent of the limescale.
- Pour the white vinegar liquid down the sink. Rinse the water tank with cool water to remove any build-up that came loose as a result of the descaling process and pour the liquid down the sink. You may like to repeat this process to remove any residual build-up or white vinegar.
- Follow instructions under ‘Set up’ to perform a final cleaning cycle.You may need to repeat this process if you find that limescale is still present.
USAGE
For your child’s safety always check food temperature before feeding
This unit can steam and blend vegetables, fruits (peeled and cored/pips removed), meats and fish (with bones removed). All food must be diced into approximately 2-3cm cubes before being placed into the container for cooking. Cooking times can be found in these instructions and for recipes visit tommeetippee.com
- Place unit on dry kitchen work surface. Place container with diced food in unit (B) and lock in place using the locking dial. (C) Steam no more than 200gms in one cycle. Fill water tank with 450ml of cold water and replace the cap. (D)
- Plug unit into mains power supply, the power button LED will be flashing. Press the power button to turn on the unit. The power button LED will continue to flash and the LCD display will illuminate. (E)
3. CYCLE OPTIONS3.1 TO SET AN AUTOMATIC STEAM TO BLEND CYCLE:i. Press the steam button and set the steam time using the +/- buttons. Maximum steam time of 30 minutes. (F)ii. Press the blend button and set the blend time using the +/- buttons. Maximum blend time of 5 minutes. (G)iii. Press the power button to start. The unit will now run the steam and blend cycle automatically.When setting the automatic cycle, the blend time can be set first, but the unit will always start with the steam cycle first. During the automatic steam and blend cycle, the blades will rotate once every 2 minutes to move food around the container. When cooking meat, it is extremely important to pause the unit every 10 minutes and stir food thoroughly. This is to ensure even cooking.The blend time can be set for 2, 4, 6, 8 or 10 seconds to control the texture of the food.3.2 TO SET A STEAM ONLY CYCLE:i. Press the steam button and set the steam time using the +/- buttons. Maximum steam time of 30 minutes. (F)ii. Press the power button to start. The unit will now run a steam cycle.To remove blade, hold the blade tab inside the unit while turning the locking ring on the bottom of the container. (I) This will remove the locking ring and the blade will split into two parts.WARNING! Handle the knife blade carefully as it is extremely sharp. Care shall be taken when handling the sharp cutting blades, emptying the bowl, and during cleaning.3.3 TO SET A BLEND ONLY CYCLE:i. Press the blend button and set the blend time using the +/- buttons. Maximum blend time of 5 minutes. (G)ii. Press the power button to start. The unit will now run a blend cycle.The blend time can be set for 2, 4, 6, 8 or 10 seconds to control the texture of the food.4. When the cycle has finished the unit will beep, the LCD display will turn off and the power button will flash.During steaming, water will collect in the container. In stage 1 weaning, where food consistency should be a smooth puree we recommend that you stir in this nutrient-rich water. In later weaning stages, when thicker textures are required we would recommend removing some/all of this water depending on your baby’s preference. Leave unit to stand for 2mins before unlocking container and decanting food into storage. Take care when removing the container and lid as steam may still be present and the container hot to touch.
5. Turn unit off at the power supply and unplug the unit.Disassemble blade from the container and lid and wash all parts in warm soapy water. To remove blade, hold the blade tab inside the unit while turning the locking ring on the bottom of the container. (I) This will remove the locking ring and the blade will split into two parts. To re-assemble, reverse these steps.WARNING! Handle the knife blade carefully as it is extremely sharp. Care shall be taken when handling the sharp cutting blades, emptying the bowl and during cleaning.6. If preparing another batch of food straight away, make sure that you top up the water tank with more water.
EXTRA FUNCTIONS
PAUSETo pause while mid-cycle, press and hold the steam button and blend buttons simultaneously for three seconds until the unit beeps. The power button will flash. This will pause the cycle indefinitely. The container can be removed during this time. Press the power button to continue the cycle.
CANCELTo stop a cycle while mid cycle, press the power button for three seconds until unit turns off.
TROUBLESHOOTING
1. Do not use the unit for anything other than the intended use. This unit is not suitable for:
- Cooking rice, noodles, and pasta
- Heating liquids, soup, or water
- Chopping hard ingredients such as ice cubes and sugar lumps
- Cooking frozen foods
- Defrosting and reheating food or keeping food warm
- Heating baby food jars
- Heating bottles
2. Do not use before the water tank is filled with water, unless using the blend-only cycle.3. During the automatic steam and blend cycle, the blades will turn to circulate the food. The unit is designed to do this and is a normal part of the cycle.4. Once a steam and blend, steam only or blend the only cycle has been set, if the container has not been assembled correctly and the power button is pressed to start a cycle, a continuous beep will sound.5. The unit will not start operating if the lid is not placed on the container before locking it into place.6. If the container is loosened or removed from the unit during a cycle, it will automatically stop and a beep will sound for 10 seconds. The cycle will be paused and the appliance will return to a standby state until the container is put back and fixed in place, to continue the cycle, press the power button.7. In the unlikely event that the water tank boils dry during steaming, the unit will beep, stop automatically and display ‘E001’ on the LCD display. If this occurs, start a new cycle and replace the food. Unplug the unit, allow the unit to stand for 2 minutes before filling the water tank with 450ml of cold water. Re-set cycle following the instructions in the usage section.8. Quickly set the timer by holding down the + and – buttons.9. If you find that your machine is not working as efficiently as it was, we would recommend carrying out the descaling process as there may be a build-up of limescale.
Model number: 1120. Voltage: 220-240V 50/60Hz 630W. ~Copyright © Jackel International Limited 2015-17.Jackel International Limited trading as Mayborn GroupNorthumberland Business Park WestCramlington NorthumberlandNE23 7RH, UKTOMMEE TIPPEE is a registered trademark of Jackel International Limited. Jackel International Limited retains all intellectual property rights to this product, packaging, and printed or electronic media including all two and three-dimensional designs, graphic images, logos, and text. Jackel International Limited is incorporated in England and Wales under company number 01894022.Any manufacture, publication, copying, hiring, lending, and reproduction of any materials is strictly prohibited and constitutes infringement.International patent applications pending.
 Information on the disposal for Waste Electrical & Electronic Equipment (WEEE) This symbol on the products and accompanying documents means that used electrical and electronic products should not be mixed with general household waste. For proper disposal for treatment, recovery and recycling, please take these products to designated collection points where they will be accepted on a free of charge basis. In some countries you may be able to return your products to your local retailer upon the purchase of a new product. Disposing of this product correctly will help you save valuable resources and prevent any possible effects on human health and the environment, which could otherwise arise from inappropriate waste handling. Please contact your local authority for further details of your nearest collection point for WEEE. Penalties may be applicable for the incorrect disposal of this product in accordance with national legislation. The product is fitted with a BS 1363 mains plug containing a 13A fuse. If it ever becomes necessary to replace the fuse, only use fuses that are marked BS 1362, and rated at 13A. In the unlikely event that this plug is not suitable for the sockets in your home, it should be removed and a suitable plug fitted as follows: The wires of the mains lead are coloured in accordance with the following code:GREEN AND YELLOW – EARTH. BLUE – NEUTRAL. BROWN – LIVE As these colours may not correspond with the coloured markings sometimes used to identify the terminals in the plug, connect as follows. The wire coloured GREEN AND YELLOW must be connected to the terminal marked E or by the earth symbol or coloured GREEN or GREEN AND YELLOW. The wire coloured BLUE must be connected to the terminal marked N or coloured BLACK. The wire coloured BROWN must be connected to the terminal marked L or coloured RED. If you are in any doubt about how to wire a plug or replace a fuse safely, consult a qualified electrician.
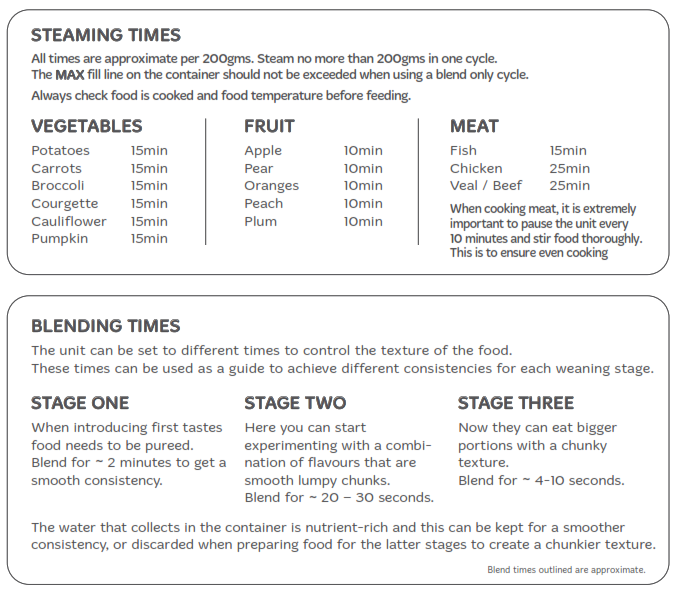
5. STEAMING AND BLENDING TIMES
Every moment you spend with your baby is precious, so hours spent preparing meals and cleaning up may not be high on your list.
To help with your weaning journey more information about the Tommee Tippee Baby Food Steamer Blender, and recipes go to www.tommeetippee.com
Department of health recommends that solid food should not be introduced before 6 months.Although you can start earlier (but not before 4 months) if advised by your health visitor or GP.
Any questions?Visit our website www.tommeetippee.com
Please read and retain this important information for future reference.Leaflet no. 0440055
Tommee Tippee Baby Food Steamer Blender Instruction Manual – Tommee Tippee Baby Food Steamer Blender Instruction Manual –
[xyz-ips snippet=”download-snippet”]