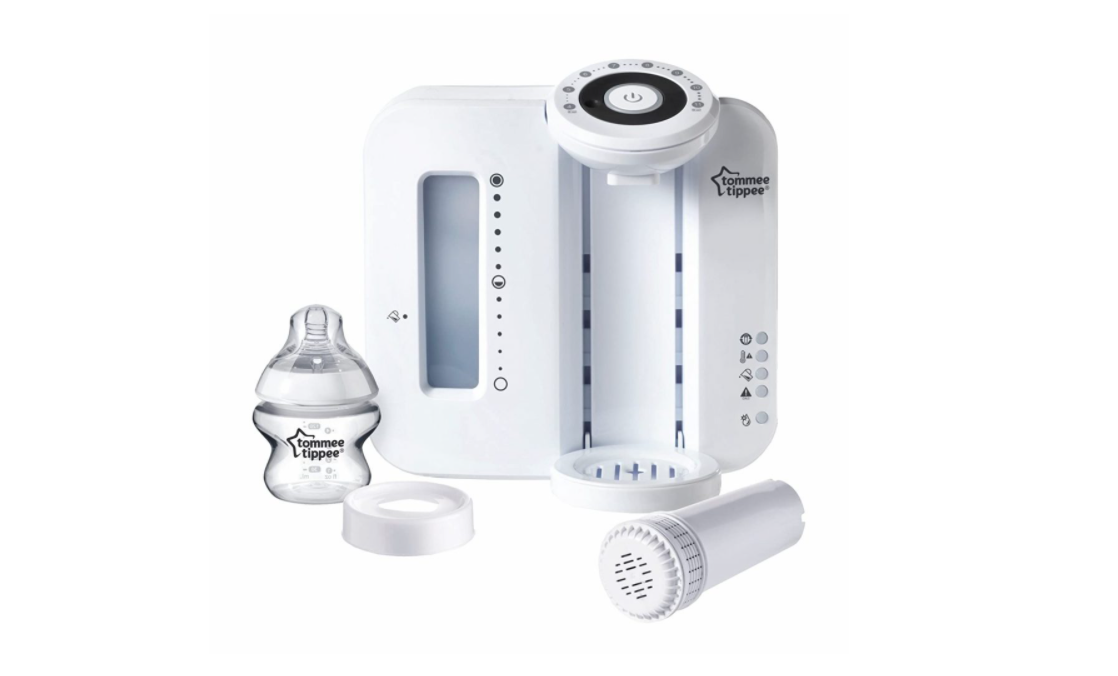
Tommee Tippee Closer to Nature Perfect Prep Machine #0423708
INSTRUCTIONS FOR USE
IMPORTANT WARNINGS – Keep this instruction sheet for future reference as it includes important information.
- Do not immerse in water.
- This appliance can be used by children aged from 8 years and above and persons with reduced physical, sensory or mental capabilities or lack of experience and knowledge if they have been given supervision or instruction concerning use of the appliance in a safe way and understand the hazards involved. Children shall not play with this appliance. Cleaning and user maintenance shall not be made by children without supervision.
- Keep the appliance cord out of reach of children.
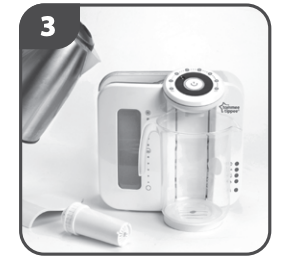
1. SET UP AND CLEANING
Before first use you need to run a cleaning cycle – which should take approximately 10 minutes. You should clean your unit as part of the set up and again whenever you replace your filter. For hygiene and safety reasons you should always clean your unit if it has been unused or in storage for longer than 2 weeks.
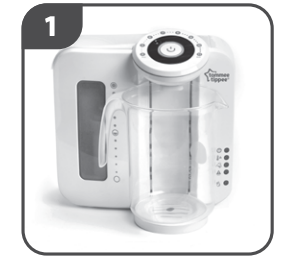
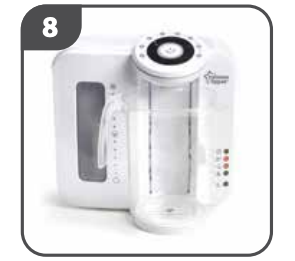
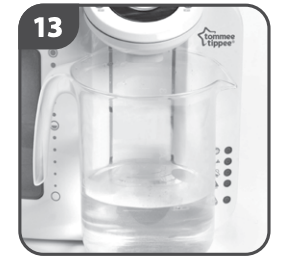
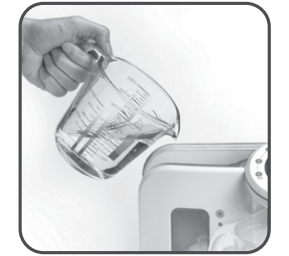
- Place a container under the dispenser outlet to capture the water used to clean the system (at least 1 litre capacity).

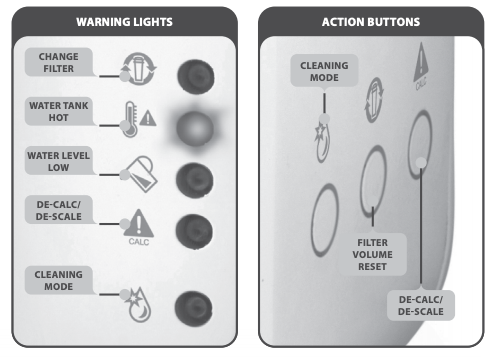
- Plug in the unit, the tank empty warning light will illuminate.
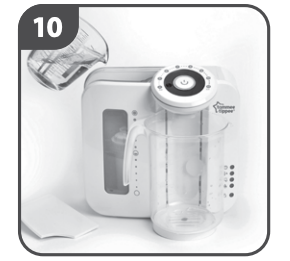
- With the water hopper in place (but not the filter) fill the hopper with 1 litre of freshly boiled water – HOT WATER –
- Wait for the tank empty warning light to go out. The water tank hot light will illuminate.
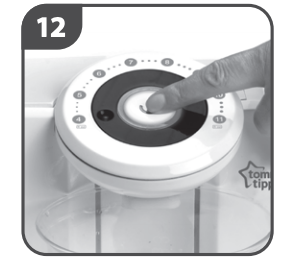
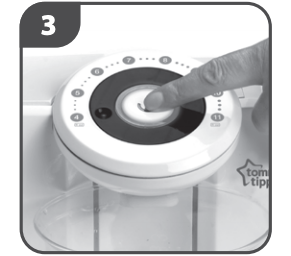
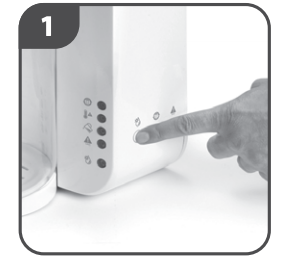
- Press the cleaning mode button and hold for 2 seconds. The cleaning mode light will illuminate.
- Wait whilst the boiled water is emptied from the tank, through the dispenser, into the container that you placed under the outlet in step 1.
- The tank empty warning light will illuminate once the water has flushed through the system.
- Discard the water captured in your container and replace it under the dispenser.
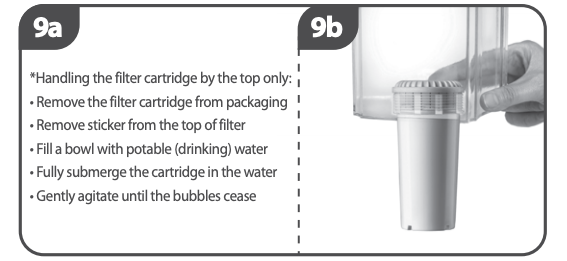
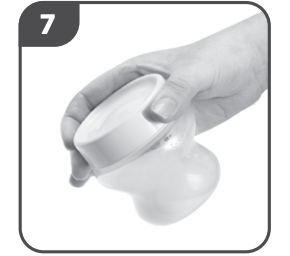
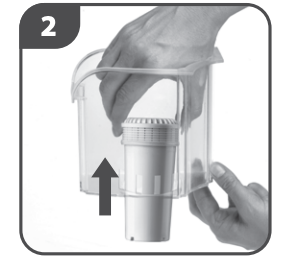
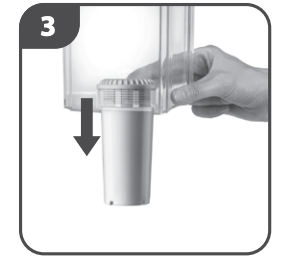
- Remove the water hopper and fit the filter*.Replace in the water tank.
- Fill the hopper with COLD WATER.
- Wait for the tank empty warning light to go out.
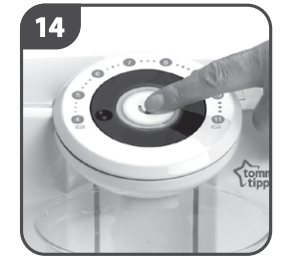
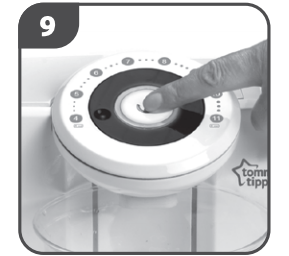
- Press the start/stop button. A red light will flash.
- The appliance will dispense an amount of hot water.
- Press the start/stop button again. A green light will flash and an amount of water will be dispensed to finish the cycle.
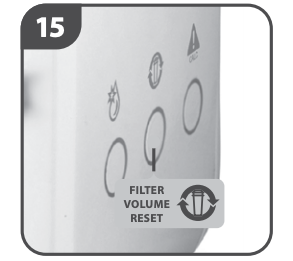
- Press the filter volume reset button for 2 seconds to clear the memory. Discard dispensed water.Your system is now ready to use.

2. USAGE
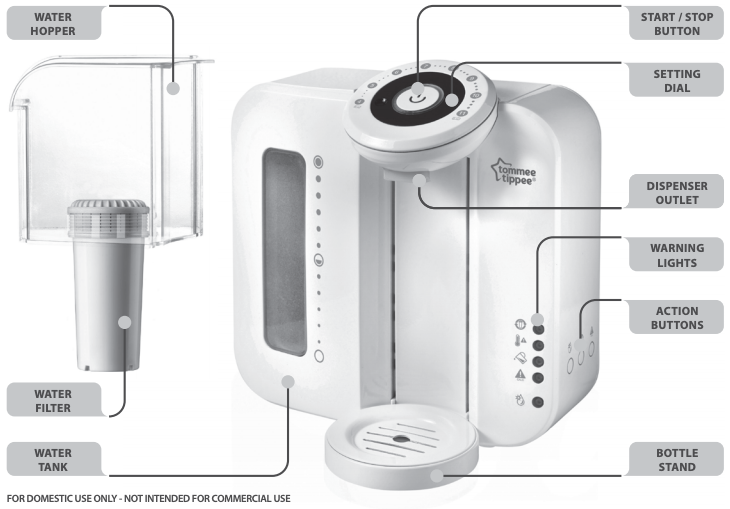
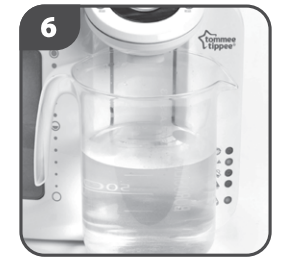
Before each use you must ensure that your water tank is above the minimum fill mark. Water to fill the unit must come from the cold tap.
Check the water level and top up if necessary with COLD WATER. When filling the tank, you must always fill the hopper and as the water passes through the filter you can regularly top it up.
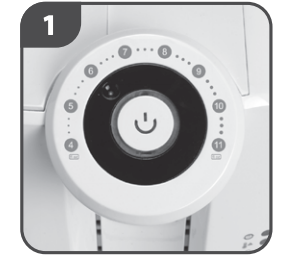
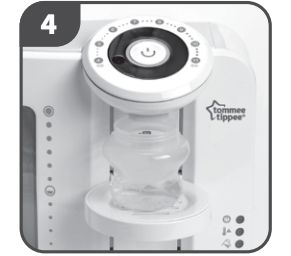
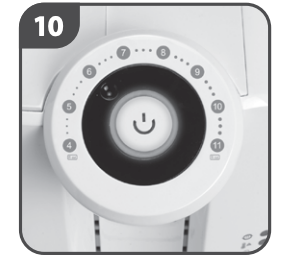
- Turn the dial to select the feed size you require (4fl oz –11fl oz).
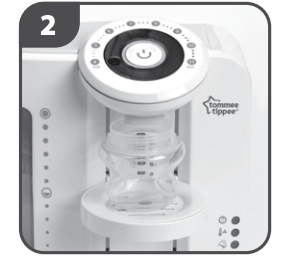
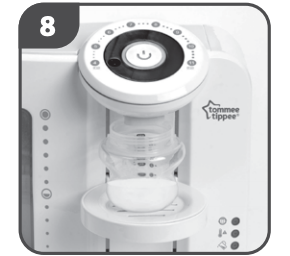
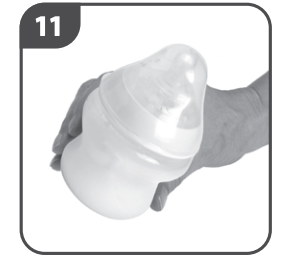
- Position your sterilised bottle under the dispenser. Adjust bottle stand if necessary. (Bottle neck should sit close to the outlet).
- Press the start/stop button. A red light will flash and a volume of HOT WATER is dispensed into your bottle.
- The light will change to solid red and there will be a double beep to indicate the end of the first stage. You will need to make up your feed within 2 minutes.
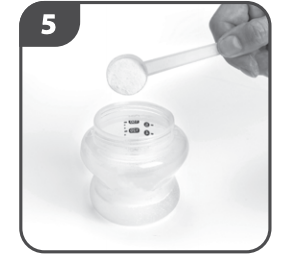
- Carefully remove the bottle from the stand and measure the correct number of formula scoops into the bottle.
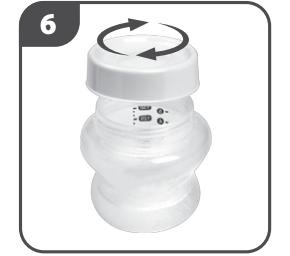
- Screw the sterilised milk storage lid onto the bottle and ensure that the lid is tight. Be careful when handling hot liquid.
- Shake well until the formula powder has dissolved.
- Remove the milk storage lid and replace your bottle onto the bottle stand.
- Press the start/stop button again. The red light will go out and the green light will flash. If this button is not pressed within 2 minutes of the hot water being dispensed a long beep will sound. If the alarm sounds you should discard the feed and repeat the process from step 1.
- Wait whilst the remainder of water is dispensed. Once completed, there will be a double beep and the green light will change to solid.
- Always check that the amount dispensed is consistent with the size of feed you have selected on the dial. Add the sterilised teat, screw ring and hood and shake.
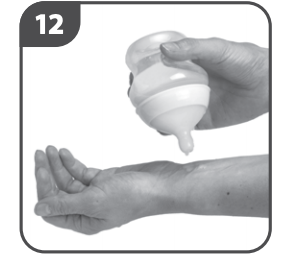
- For your child’s safety always check food temperature before feeding by testing on a sensitive part of your skin.
- Your bottle is now ready to serve. Make sure you discard any unwanted feed as per the formula manufacturers recommendation.
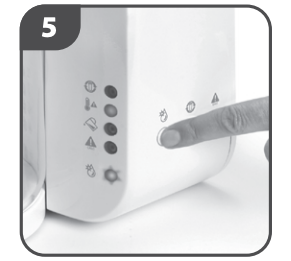
HOW TO STOP THE PERFECT PREP™ MACHINE
If at any point you need to stop the perfect prep™ machine you can do so by pressing the start/stop button. The pump may continue to run for a few seconds and the green light will illuminate to show that the process has ended. It will not be possible to restart the machine for 20 seconds. Should you have to stop the perfect prep™ machine please discard of any feed.
HINTS AND TIPS
For a cool tank keep the unit out of direct sunlight and away from sources of heat. Fill with COLD WATER from the fridge. Regularly top up with COLD/COOLED WATER.
3. MAINTENANCE
Replacing your filter.
Your unit comes with a water filter which lasts 150 litres (approximately 3 months).Replacement filters are available from all closer to nature perfect prep™ machine stockists.
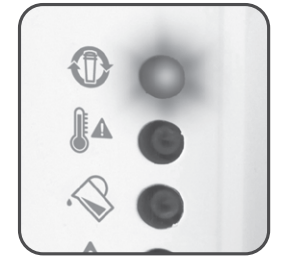
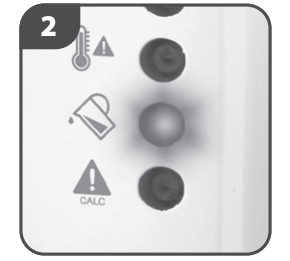
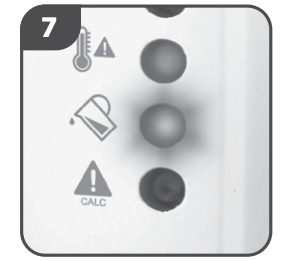
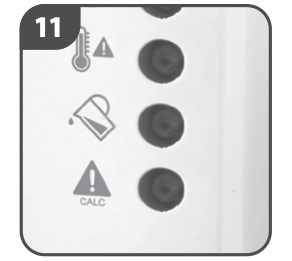
A red change filter warning light will illuminate when the filter needs replacing soon. If this light flashes, the filter must be changed immediately.
- Press the cleaning mode button for 2 seconds to empty the tank (ensure a suitably sized receptacle is under the dispenser outlet to collect the water). Then press the filter volume reset button for 2 seconds to clear the memory.
- Remove the old filter from the hopper and discard. Replace the hopper (without filter).
- Follow the cleaning cycle steps as per SET UP – fitting your new filter at stage 9.
4. DESCALING
The descaling process will remove deposits of calcium and other minerals in the system that may affect its performance.
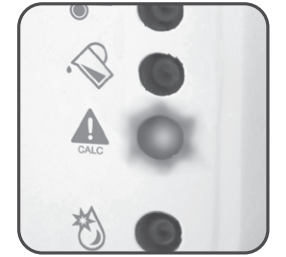
A red warning light will illuminate when the unit requires descaling soon. If the light flashes, you should descale immediately.
- Remove the filter.
- Fill the water tank with 0.5 litres of distilled white vinegar (4 or 5%).
- Place a jug under the dispenser outlet.
- Press the descale button for 2 seconds and the system will run a descale process. During the descale process the red descale light will continue to flash.
- At the end of the descale process an alarm will sound and the descale LED will switch off.
- The red cleaning mode light will flash.
- Fill the tank with 1 litre of freshly boiled water.
- Follow the cleaning cycle steps as per stages 5-15 of the set up and cleaning process.
- Again, fill the tank with 1 litre of freshly boiled water.
- Repeat the cleaning cycle steps as per stages 5-15 of the set up and cleaning process.
- The current filter can be refitted.
KEEP THIS INSTRUCTION SHEET FOR FUTURE REFERENCE AS IT INCLUDES IMPORTANT INFORMATION.
Information on the disposal for Waste Electrical & Electronic Equipment (WEEE)

This symbol on the products and accompanying documents means that used electrical and electronic products should not be mixed with general household waste.
For proper disposal for treatment, recovery and recycling, please take these products to designated collection points where they will be accepted on a free of charge basis. In some countries you may be able to return your products to your local retailer upon the purchase of a new product.
Disposing of this product correctly will help you save valuable resources and prevent any possible effects on human health and the environment, which could otherwise arise from inappropriate waste handling. Please contact your local authority for further details of your nearest collection point for WEEE.
Penalties may be applicable for the incorrect disposal of this product in accordance with national legislation.
The appliance is designed for domestic use only. It should not be used for commercial purpose.
Do not immerse in water
Warning! Children should be supervised to ensure that they do not play with the appliance
If the supply cord is damaged, it must be replaced by the manufacturer, its service agent or similarly qualified persons in order to aviod a hazard.
The product is fitted with a BS 1363 mains plug containing a 13A fuse. If it ever becomes necessary to replace the fuse, only use fuses that are marked BS 1362, and rated at 13A. In the unlikely event that this plug is not suitable for the sockets in your home, it should be removed and a suitable plug fitted as follows:
The wires of the mains lead are coloured in accordance with the following code:
GREEN AND YELLOW – EARTHBLUE – NEUTRALBROWN – LIVE
As these colours may not correspond with the coloured markings sometimes used to identify the terminals in the plug, connect as follows. The wire coloured GREEN AND YELLOW must be connected to the terminal marked E or by the earth symbol or coloured GREEN or GREEN AND YELLOW. The wire coloured BLUE must be connected to the terminal marked N or coloured BLACK. The wire coloured BROWN must be connected to the terminal marked L or coloured RED.
If you are in any doubt about how to wire a plug or replace a fuse safely, consult a qualified electrician.
DO’S & DON’TS
Do’s
✔ Before first use clean the unit following points 1 to 15 in the set up and cleaning section.✔ Always ensure good hygiene by washing your hands and work surfaces before handling the water filter.✔ This product is intended for use with tommee tippee closer to nature water filters which are available from all perfect prep™ machine stockists. Use of any other water filter with this product could put your child’s health at risk.✔ A solid red light will indicate when the filter has enough life to filter 30 litres of water. When the change filter light flashes red, the filter must be changed immediately for your child’s safety and health.✔ Always adjust the height of the bottle stand to ensure that the bottle neck is close to the dispenser outlet to maintain the temperature of the water and avoid any splashes.✔ Dispose of the filter in general household waste.✔ Only use potable water (drinking water).✔ To clean the outside of the unit, wipe with clean damp cloth.✔ For your child’s safety always check food temperature before feeding by testing on a sensitive part of your skin.✔ Be careful when handling boiling water.
Don’ts
✘ Do not allow the water tank to be contaminated. The inside of the unit should only be cleaned by following the cleaning process in steps 1-15 in the set up and cleaning section of this leaflet.✘ Do not clean with solvents or harsh chemicals.✘ This appliance is intended for use in a kitchen and not suitable for use in a nursery.✘ This unit makes very hot water. Keep hands and other body parts away from the dispenser outlet.✘ Use cold water only. Do not use water that is over 25°C other than when cleaning the unit using the set up and cleaning process. If water over 25°C is used, the unit will automatically turn itself off. If this happens allow the unit to cool and restart.✘ Do not overfill past the max mark on the water hopper.✘ Do not pour water down the back of the unit.✘ Do not pour water directly into the water tank. The water must go into the water hopper.
Tommee Tippee Closer to Nature Perfect Prep Machine #0423708 Instruction Manual – Tommee Tippee Closer to Nature Perfect Prep Machine #0423708 Instruction Manual –
[xyz-ips snippet=”download-snippet”]