![]()
Electronic Steam SteriliserIttstructionS fOr USC Before using your Merits, please ensure that you read these instructions thoroughly. Keep this Instruction Sheet for future reference as It Includes important intonation.
 NOTE: The bottle brush included in this kit is not suitable for sterilisation by any method. Simply wash in warm soapy water, rinse and allow to dry.BEFORE FIRST USE – TO ENSURE BEST HYGIENE
- Remove all bottles and accessories from steriliser.
- Pour 80m1 of water into the steriliser.
- Close the lid, connect the lead into the back of the steriliser and plug Into the mains supply. The digital display will show 0.
- Press the steriliser start switch and aacw the steriliser to progress through a cycle until the digital display shows 3.
- Switch off at the mains and unplug the lead. Take care: the unit will be hot. Remove the main body and wipe clean. Pour away any remaining water from the base.
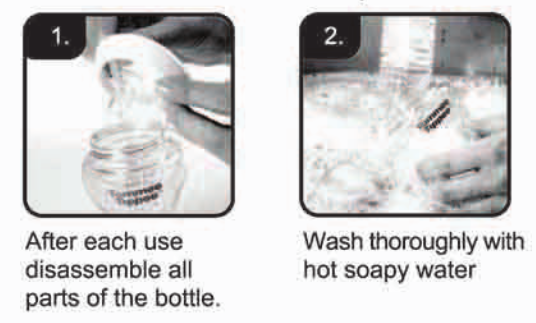
Cleaning and Sterilising your Tonunee Tippce Closer to Nature Bottles:– Always wash bmh bottle and teat immediately after use. do not tum the teat inside out during deaning use a teat brush.
 Take extra care when cleaning the sensitive anti-colic teat valve.In order to ensure optimum venting the teal valve is manufactured using a thinner silicone than the teat itself and therefore care needs to be taken during cleaning to ensure no damage is caused.Performance of the teat maybe affected if the anti-colic valve is not cleaned thoroughly after each use.
 DO NOT USEa teat brush to clean the anti-colic valve as this may split and damage it.Before use. wash all pads thoroughly and sterilise following the steriliser manufacturer’s Instructions. or by baling in water for at least 5 minutes. Keep in a dry. covered container.All methods Of Stenksation are suitable for this system.If you need any help please can our free Caroline on 0500 97 98 99 (UK only) or email: , www.rommeetippee.co.uk
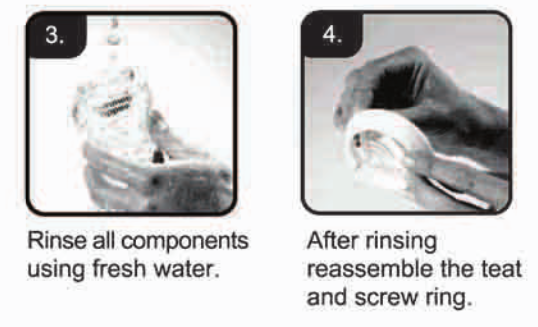
Before placing in steriliser reassemble teat and screw cap:– The New Tommee lippee teat and screw ring have been designed to be placed into the steraser fully assembled. In order to ease bottle assembly after sterilisation.
 Helpful TipsAssembly of your TT teat and screw ring:
 Due the larger size of our new teat and screw ring, care needs to be taken during assembly to ensure the teat Is In the correct position as shown → . The best method of assembly of the teat and screw ring after sterilisation is to carefully pull the teat through the ring in different directions to ensure the siticone lip fully ‘clips’ over the edge of the screw ring. The area where the teal and screw ring meet should be flush. Though you may find assembly difficult at first you will quickly develop a technique and find it as easy as a conventional teat and screw ring.
Sterilising Bottles and Feeding EquipmentThis steriliser is designed for use with all wide neck bottles and feeding accessories (except bottle brush).The steriliser can also be used for any other items which can be sterilised by boiling. If in doubt. please refer to the individual manufacturer’s Instruction regarding sterilisation.
- Before sterilisation. wash ail bottle and feeding accessories to remove any milk residues. Separate all components i.e. teats. bottles, screw caps etc. Warning: if components are washed in a dishwasher with other items which have residues of strong coloured sauces (e.g. tomato). they may discolour over time. Reassemble Close, to Nature teats and screw rings as above.
- Measure exactly 80m1 of water into the steriliser base. Your Closer to Nature bottles have a handy measure mark beneath the Tommee Tippee logo.
- Load the bottles neck downwards into the slots provided in the bottom of the main body.
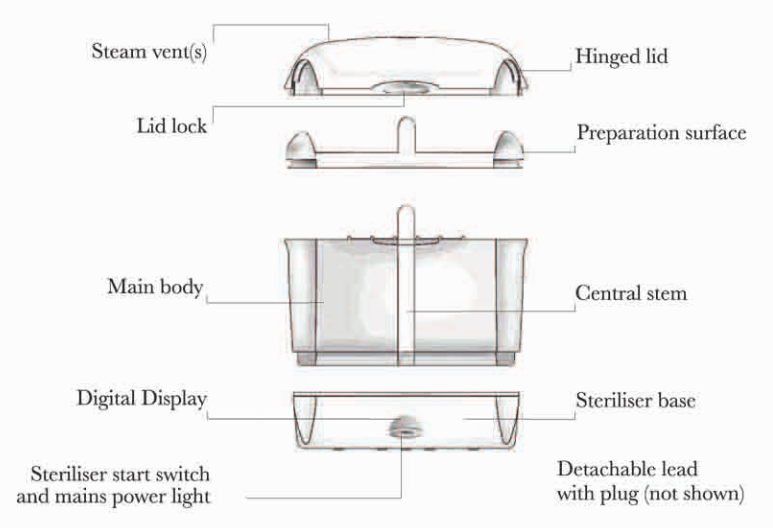
- Place the Screw rings on the central stem.
- Ed the preparation Staten in Paco and pack the assembled teats and other accessories onto it Ensure that all the Items are arranged so that the steam can circulate around all surfaces. and any condensation can drain easily.
- Close and lock the lid.
- Plug the lead into the back of the steriliser. then Into the mains power supply and switch cc. The digital display war Shaw 0.
- Press the power button to start the sterilisation cycle.
- As the steriliser proceeds through the cyde the digital display will indicate the progress

H Heating upS StemsingC Cooling3 Cycle completed If the steriliser is left unopened the contents will remain merge for up to 3 hours.2 Counting down The contents will remain sterile for 2 hours If the steriliser is unopened.1 Counting down The cements will remain sterile for 1 hour more if the sterikser is unopened. When you are ready to remove the contems from the steriliser. switch off and unplug at the mains first. Wash your hands thoroughly before hen:ring sterilised items. Take care – the unit may be hot0 Flashing indicates that the mittens must be mwtenlised. Switch oil at the mains.

Care of your Tommce Tippet Electronic Steam Steriliser
- After each use, pour away any remaining water from the steriliser base.
- You should descale your steriliser every 4 weeks to ensure it continues to work efficlentty. Electric steam steriliser descaling products are widely available. Use according to the manufacturer’s instructions.
- Do not use softened water in the steriliser. The hot plate is easily damaged and most be treated with care. Do not use metal objects or scourers.
- Do not use bleach or chemical sterilising solutions! tablets in your steriliser or on products to be sterilised.
- Do not use abrasive or anti-bacterial materials. or scourers to dean the steriliser.
Tommee Tippet Verding Bottles and Teats – Cleaning and Sterilising
- Immediately before each use, wash the bottles and all components thoroughly inside and out. Wash in warm soapy water and rinse thoroughly, with dean water, or use a dishwasher.
- Take care not to damage the teat – use a teat brush. Do not turn the teat inside out for cleaning. Tommee Tippets recommend that teals are changed every three months as a matter of course for safety and hygiene.
- Ant-bacterial cleaners can damage plastic feeding bottles. Do not use them to dean bottles. or any work surface on which they stand.
- Replace bottles when worn or scratched.
- Dishwasher safe – food colourings may discolour components.
- Suitable for all methods of sterilisation: steam; microwave steam; cold water: boiling in water for 5 minutes.
Making 12p FeedsMake up feeds according to the feed manufacturer’s instructions. Use cooled, freshly boded water (45`C – •C). Do not use hot water.
Tommee Tippet, Easillow Wilde to CupSuitable from 3+ months.The spill proof Easiflow Bottle to Cup with its unique natimal action spout alows children to control the flow of liquid naturally.Continuous and prolonged sucking of fluids will cause tooth decay. Easiflow is designed to help reduce these problems and was the first cup to be endorsed by the British Dental Health Foundation. The BDHF recommends juice should be given only with meals and milk or water at all other times.
For best results and to prevent leakS, each time you fit the lid, squeeze the spout with teat tongs or dean fingers to release trapped air. Easiflow is suitable for all forms of sterilisation and is dishwasher safe (top shelf only). Do not use solvents or abrasives for cleaning as this may cause damage.
To remove the spout unit for cleaning, dose the hygiene cover and unscrew in an antiolodcwise direction.To assemble, ensure hygiene cover is closed and screw the spout dawn firmly clockwise until It Mops. Do not ovenighten.Infants must not be allowed to drink from 8 Cup without adult supervision.Feeding Bottle and Easillow Bottle to CupFor your child’s safety and healthWARNING!Heating Feed – Microwave CautionHeating feed in a microwave is not recommended. However. if heating feed in this way, do not seal bottles.Shake wed before use and always check temperature before offering to baby.
Always use this product with adult supervision.Before first use. clean the product.Never use feeding teats or son spouts as a soother.Continuous and prolonged sucking of fluids vAll cause tooth decay.Always crock food temperature before feeding.Accidents have occurred when babies have been left alone with drinking equipment due to the baby fairing or if the product has disassembled.
Tooth decay in young children can occur even when non.sweetened fluids are used. This can occur it the baby Is slowed to use the bottle/cup for long periods through the day and particularly through the night, when saliva flow is reduced or if it Is used as a soother.
Heating in a microwave oven may produce localised high temperatures. Take extra care when microwave heating. Always stir heated food to ensure even heat distribution and test the temperature before serving.
Do not dean or allow to come into contact with solvents or harsh chemicals. Damage could result.Keep all components not In use Out of reach Of Children.Additional wa g for teatsInspect before each use and pull the feeding teat in all directions. Throw away at the first signs of damage or weakness. Do not leave feeding teat in direct sunlight or heat, or leave in disinfectant (`sterillsing solution’) for longer than recommended. as this may weaken the teal. Before first use place in boiling water for 5 minutes. This is to ensure hygiene. Clean before each use.
Additional warning for spoutsInspect the spout and other components immediately before and after each use and throw away when worn, damaged or punctured. for example by biting. Before use. wash thoroughly and sterilise. Always wash the spout, cup and lid immediately after use. The Easiflow Bottle to Cup Is not suitable for hot or foxy drinks.
Important Safety Information
- Afways use on a Rat. heat resistant surface.
- Always ensure that the correct amount of water is in the stersiser before switching on.
- If you put too little water into the steriliser it will not operate correctly, and the digital display will display C flashing.
- Do not open whilst in use as this product contains boiling water. Beware of escaping steam from vents in the lid.
- Always wall until the digital display shows 3. 2 or 1 before opening the stenliser. This allows time for the items to cool before handling.
- Take care when opening the steriliser lid alter use to avoid risk of scalding.
- Keep all components out of reach of children.
- Never place items on top of the steriliser.
- AtvrayS unplug from the mains when net in use.
- Do not immerse the steraiser base in water.
- To stop the steriliser during the cycle. hold down start scotch for 6 seconds and then wait to cool for 3 minutes before opening.
- The lead supplied is for use with the Tommee Yippee Electronic Steam &eraser only. Do not use any other electrical ‘ead with this product If the supply cord is damaged. it must be replaced by a special cord or assembly available from the manufacturer or it’s service agent.
- The product Is fitted with a EIS 1363 mains plug containing a 5A fuse. If It ever becomes mess. to replace the fuse, only use fuses that are merited BS 1382. and rated at 5k
- In the unlikely event that this plug is not suitable for the sockets n your home, r, should be removed and a suitable plug fated as follows:
The wires of the mains lead are coloured in accordance with the follovAng code:GREEN AND YELLOW – EARTHBLUE – NEUTRALBROWN – LIVE
As these colours may not correspond with the cctoured markings sometimes used to identify the temknals in the plug. connect as follows. The wire coloured GREEN AND YELLOW must be connected to the terminal marked E or by the earth symbol or coloured GREEN or GREEN AND YELLOW. The wire coloured BLUE must be connected to the terminal marked Nor coloured BLACK. The wire coloured BROWN must be connected to the terminal marked L or coloured RED.
If you are in any doubt about how to wire a plug or replace a fuse safely, consult a qualified electrician.
Problem Solving
| Problem | Check |
| Steriser will not work | Check the mains lead is ;rugged into the unit and the mains socket. and the socket is switched on. Cheek the fuse is in the plug. Check the socket by plugging in another appliance. |
| Excessive steam | Parts incorrectly loaded. Switch off, saw to cool and reload. |
| Bottles come out with marks | Unit needs descaling. Refer to care instructions. |
| Cycle take too long to Complete | Too much water. Use exactly 80mIS. |
Flashing C |
Sterilisation has not been effective (likely cause – too RUG water). Do not open until aispiaying flashing E. |
Flashing E |
Error has occurred. It is safe to open unit. Empty residual water. Switch onloff – mains – restart programme. |
GuaranteeJacket International Ltd guarantees that should this product become faulty during twelve months Pan the dale of purchase, it will repair, or at its option. replace the product free of charge during this time.This applies only if:The product has been used according to the 111SINCtiOM in this leaflet and connected to a suitable etectricity supply. The claim must not be as a result of accident, misuse. dirt neglect, or fair wear and tear.The product has nol been modified or repaired by anyone other than Jacket International Ltd or its authorised agents.Please MOM it to the dealer where It was purchased. Please keep your receipt as a proof of purchase. This warranty is in addition to your statutory consumer rights. and does not affect those rights in any way.


Product Rff: 431280Jackel International Ltd. Dudley Lane, Cramlingto, Northumberland. NE23 7RH. UK.
Tommee Tippee Electric Steam Steriliser User Manual – Tommee Tippee Electric Steam Steriliser User Manual –
[xyz-ips snippet=”download-snippet”]