

Mum, you’re one of a kind.Treat yourself like the true wonder you are and let us support you through your unique breastfeeding experience with the Made for Me™ range from Tommee Tippee.Your Made for Me™ electric breast pump has soft, cushioned silicone cups that are gentle on your breasts. And it’s powered by a lightweight, portable power pack so that you can use it wherever you need to.Made especially for you because you’re a one off…Check out the rest of our Made for Me™ range, designed to help you on your breastfeeding journey. www.tommeetippee.com.
Stuff you need to know…
IMPORTANT SAFEGUARDSPlease keep this instruction guide for future reference as it includes important information.You can also find these instructions at tommeetippee.com.
- To protect against fire, electric shock, and injury to persons, do not immerse motor unit, USB cable, and adapter, or air tubes in water or other liquid.
- Do not place the power unit in a microwave oven or steam steriliser.
- DO NOT WASH the air tubes. This will result in bacteria build up and can lead to pump failure. Washing or sterilising the air tubes will invalidate the warranty and will damage the power unit.
- Do not place the air tubes in a microwave or electric steam steriliser or boiling water as they will melt.
- Misuse of the appliance may result in the risk of fire, electric shock, and/or personal injury.
- Do not clean with solvents or harsh chemicals.
- This appliance should not be used or played with by children. Keep the pump, its air tubes, and USB cable out of reach of children under 8 years old.
- The appliance can be used by persons with reduced physical, sensory or mental capabilities or lack of experience and knowledge if they have been given supervision or instruction concerning the use of the appliance in a safe way and understand the hazards involved.
- User maintenance, other than cleaning and sterilizing is not required.
- Do not open the power unit, it contains no user-serviceable parts and will invalidate the warranty.
- Do not operate any appliance with a damaged USB cable or motor casing. If the appliance malfunctions or has been damaged please contact tommeetippee.com.
- If the damage is from new the unit must be returned to manufacturer.
- Do not leave the appliance in direct sunlight.
- Do not store below freezing or above 45°C.
- If damaged within a retail warranty period, this appliance should be exchanged at place of purchase. The manufacturer will then be made aware.
- Do not use any accessories other than those supplied with this appliance.
- The appliance should not be used adjacent or stacked with other equipment as the two appliances may interfere with each other.
- Do not allow appliance to come into contact with oil-based foods (e.g. oil/tomato-based sauces) as staining will occur.
- This appliance is a personal care product and therefore cannot be returned once opened, unless faulty.
- Only use the adaptor and USB cable supplied with this product.
- Do not use whilst in transit.
For domestic use only – not intended for commercial or institutional use.
SAVE THESE INSTRUCTIONSAny questions? Visit our website tommeetippee.com.
Getting Started
Mum, we know you have a lot to think about, but can we suggest that you get to know your breast pump before you need to start using it? It should make for a more relaxed experience, and you’ll soon be an expert at this (as well as many other new things).Get to know your breast pumpYou may be wondering how both of your breast pump handsets fit together.Don’t worry, it will soon become second nature.You can wash these parts:A. Cup – rounded, soft silicone part that fits into the horn to sit comfortably against your breast. Gently massaging to stimulate your milk flow.B. Horn – trumpet-shaped part that supports the cup while you use the pump.C. Body – duck-shaped part that you hold and connects the horn and cup to your bottle.D. Duck-bill valve (purple) – small one-way valve that lets breast milk into your bottle, but doesn’t let it back through as you move around.E. Diaphragm – small, transparent cup-shaped part that keeps the “wet” side and the “dry” side of the breast pump separate. This makes it a closed pump system.F. Diaphragm cap – seals to the diaphragm.G. Lid (purple) – allows you to connect the air tube to the pump, and close the pump handset.Together, these parts form your breast pump handset. You have two of these to form your double-breast pump.
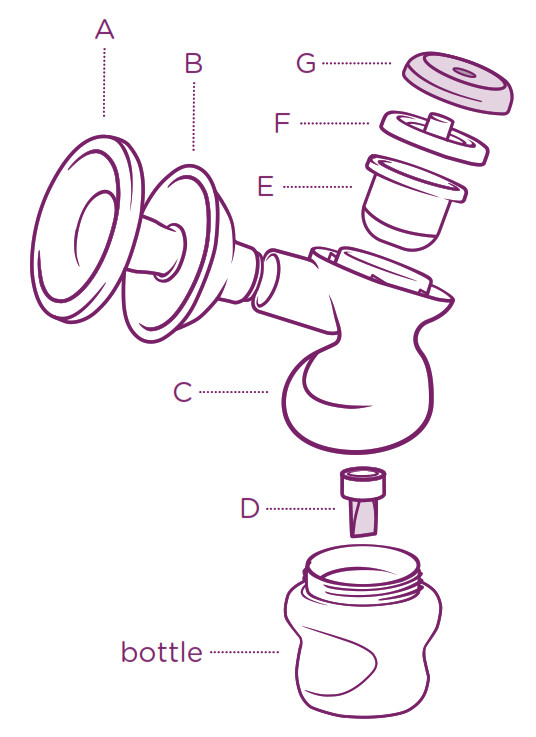
DO NOT wash these parts:Air tubes – two plastic tubes with purple connectors at each end that attach your breast pump to the power unit.Power unit – small, portable motor that powers the massage and expression features of your breast pump.
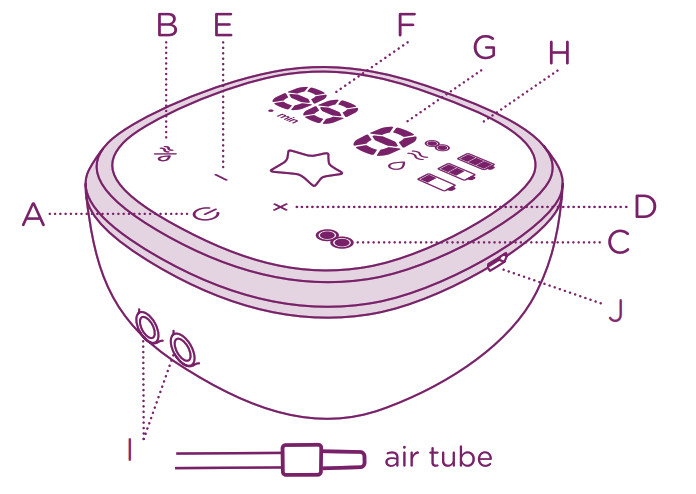
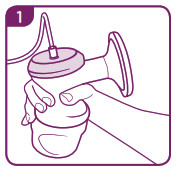
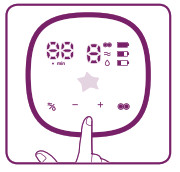
 F. LED display – timer.G. LED display – shows mode level, there are 5 massage levels and 9 expression levels.H. LED display – shows battery charge level.I. Air tube connector – connect your air tubes to the power unit here.J. USB socket – connect this to a USB power source or adapter to recharge.
Dos and Don’ts
DO wash your hands with soap and water and dry thoroughly before handling your breast pump.DO thoroughly clean and sterilise all the parts of your breast pump that come into contact with milk, following the instructions below. Do this before you use it for the first time and after every use.DON’T wash or sterilise the air tubes. This can cause bacteria to build up in the tubes and will damage the power unit.DON’T wash, sterilise or heat the power unit. This is dangerous and will damage your power unit.
How to clean
Separate each part of each pump handset and wash in clean soapy water. Don’t use water that you’ve used for cleaning other products.DO NOT wash the air tubes.Rinse thoroughly with clean water.You can also wash the pump handset parts in the top rack of a dishwasher. Place the purple duck-bill valve in the cutlery rack or dishwasher basket to keep it safe.Sterilise all parts of both pump handsets using either cold water sterilisation, microwave sterilisation, boiling water, or electric steam sterilisation.DO NOT sterilise the air tubes.For best results use Tommee Tippee electric or microwave sterilisers. If you need to clean the power unit, USB cable or air tubes, wipe the outside with a clean damp cloth.DO NOT wash any of these parts.
Putting your pump together
Each time you use your breast pump check all parts of the pump and power unit for any damage. Wash your hands with soap and water and dry thoroughly before handling your breast pump.Make sure that all parts of the pump have been washed, cleaned and sterilised, and are completely dry.
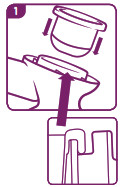
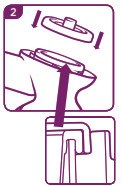
- Place the clear diaphragm in the top of the body and push down gently to get a good seal.

- Place the clear diaphragm cap over the diaphragm and push down gently to seal.
- Place the purple lid over the top of the body and turn it clockwise until it clicks closed.
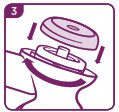
- Push the soft, silicone cup into the widest part of the horn and smooth its lip evenly over the edge. Work your way all around the rim to make sure the cupfits smoothly, evenly, and securely. The two dimples inthe cup should be clear to allow air into the horn.
- Now smooth the lip of the silicone cup around the narrow end of the horn in the same way.Once you’ve fitted and used it, you don’t have to take the silicone cup out of the horn unless milk or dirt becomes trapped inside. Then you can ease the edges of the cup from the horn and gently pull them apart for cleaning.
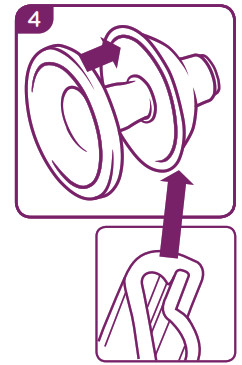
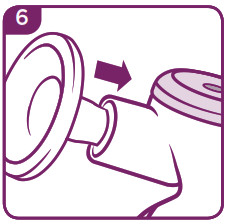
- Push the horn with cup attached onto the body until it’s fully engaged and secure. Turn your pump handset upside down.
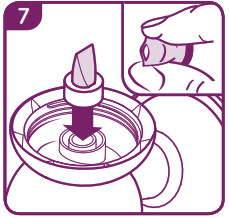
- Insert the purple duck-bill valve. Gently squeeze the sides of the valve to make sure it’s open.
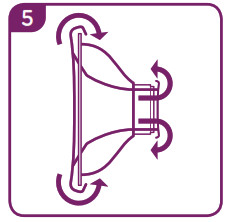
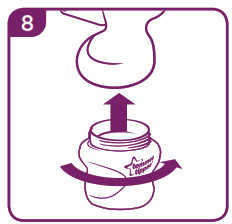
- Screw in a Tommee Tippee Closer to Nature or Advanced Anti-Colic bottle. This breast pump is designed to fit all Tommee Tippee Closer to Nature and Advanced Anti-Colic bottles and Pump & Go milk pouches with adaptor rings (excludes Tommee Tippee Closer to Nature glass bottles).
- Repeat for the other breast pump handset.
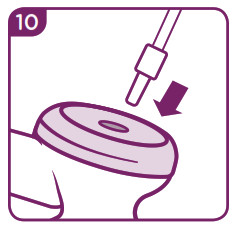
- Place the assembled pumps on a flat surface. Connect one end of each air tube to the purple lid of each pump body and the other to the power unit. The air tubes go into the two holes at the front of the unit.
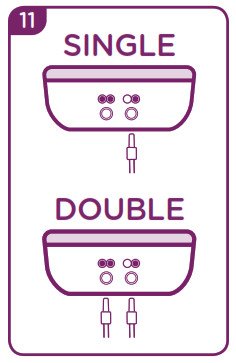
- Insert the other end of the air tubes into both sockets on the front of the power unit. If you want to use the pump in single mode only insert the air tube into the single socket marked .
Charge me up – powering your power unit
The power unit for your breast pump uses a battery similar to the one in your mobile phone. Charge it up so that you can power your breast pump anywhere. You do not need to have your power unit plugged into mains power to use your breast pump. The power unit will come with some charge in it, but you should fully charge it before first use.
To charge the power unit
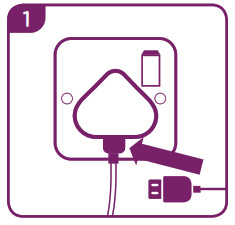
- Connect one end of the USB cable into your power unit and the other end into the supplied adapter.
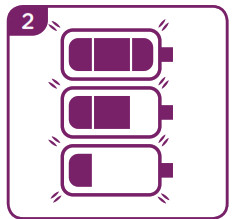
- The LED battery icon will flash to show that your power unit is charging. Charge until all 3 bars are full. Charging time may vary depending on voltage and equipment used, from 3 – 6 hours.
- When it’s fully charged all three of the LED lights will remain on.

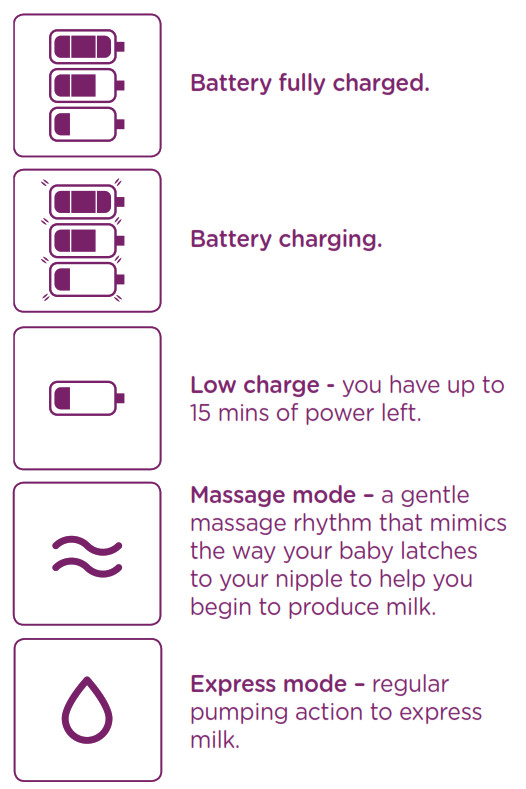
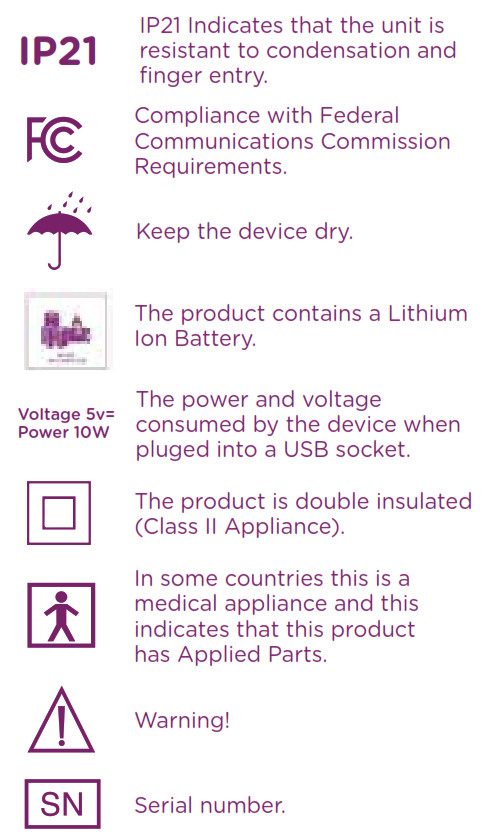
What do the symbols mean?
Using your breast pump
You’ve cleaned and assembled your breast pump, powered up your power unit. You’re prepped and ready to go…The best time to use your breast pump is after the first feed of the day (unless your breastfeeding advisor has told you something different).
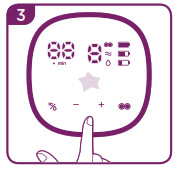
- Hold a pump handset around the narrow neck of the body. Hold it in whichever hand feels most comfortable. As you use it, you may find it’s more comfortable to cup your hand around the bottle. Do not hold it by the air tube.
- Place the soft silicone cup attached to the horn over your breast so that it creates a seal all the way around with your nipple at the centre of the hole, you don’t need to cover the whole of your areola or breast with the horn,so don’t force it. It should sit comfortably. If it doesn’t feel right, relax and reposition.
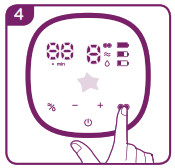
- Once you’re ready, press and hold the power button for a couple of seconds. The pump will start with a gentle massage rhythm that mimics the way your baby latches on to your nipple to help you begin to produce milk. It will give you 10 short pulses and one longer pump.
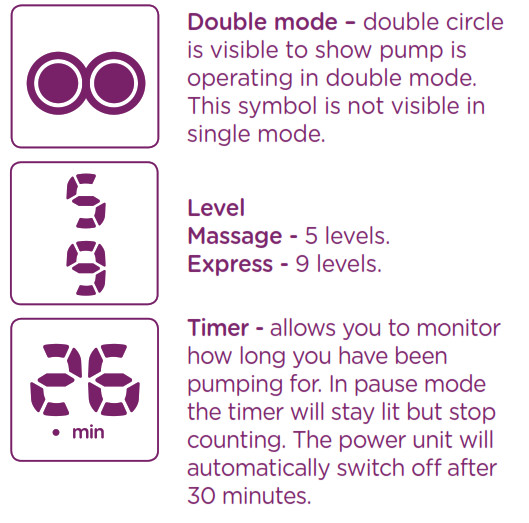
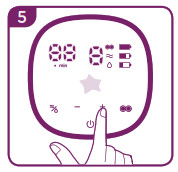
- Choose whether you want to use the pump in single or double mode. Two circles on the LED display show that you’ve selected double mode. If you’re using the double pump mode, place the second pump handset over your other breast as described above, or into your pumping bra.Make sure hands are washed and dried before touching your breast pump, and breast pump parts are washed and sterilised.Get yourself in a comfortable position, sitting, standing or half-lying. You may choose to wear a pumping bra (available separately) to help keep your hands free. The important thing is to keep the pump handsets vertical while you hold them against your breasts. You’ll also need a flat surface nearby to put the pumps and bottles on when you’re done.
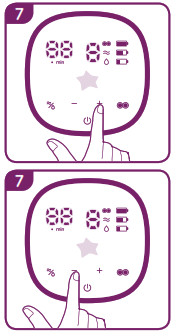
- After about a minute, the pump will automatically move to more powerful massage settings. If you want to move on onto a more powerful setting, touch the “+” button.
- Once you feel or see your milk,you can switch to Express mode. This gives you a more regular and prolonged pumping action to help you express milk. Press the mode selection button once to switch to Express mode.
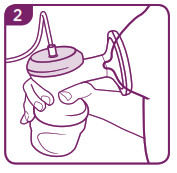
- To move to a more powerful and longer express setting, touch the “+” button. To move to a less powerful and shorter express setting, touch the “-“ button. The power will automatically shut off after 30 minutes of express mode.
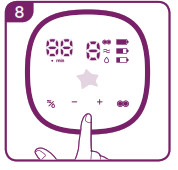
- If you want to pause at any point, briefly touch the power button. This will pause the timer as well. Briefly touch again to resume pumping.

When you want to stop expressing
- When your milk is no longer freely flowing, touch and hold the power button for a couple of seconds to turn off the pump.
- Disconnect the air tubes from the purple lids and gently unscrew your bottles from the pumps.
- You can store your breast milk in this bottle, by adding a clean sterilised lid or nipple and hood (see page 8 for storage advice). Or decant it into another clean, sterilised bottle or pouch to feed it to your baby.
- When you’ve finished using the pump, disassemble all the parts and clean and sterilise as outlined in the cleaning section on page 3. Don’t clean or sterilise the air tubes.
- Plug your power unit into a USB charging point or use the adapter provided to recharge it ready for next time.
- If you want to pause during pumping to change position, or move down to a lower setting that’s absolutely fine. It’s okay to remove the pump from your breast at any time. You can always come back to it later.
- You can use the built-in timer to monitor how long you’re expressing for. The power unit will automatically shut off after 30 minutes ofexpressing.
If using this breast pump is more painful than when you breast feed, stop using it immediately.The soft silicone cup should feel comfortable against your breast.When pumping your nipple should sit comfortably in the center of the silicone cup and will be extended down the tube by gentle suction. The pump creates a seal around your areola and nipple. You do not need to cover the whole of your areola or breast with the horn. Do not force your breast or nipple into the horn.
Don’t tilt the bottle while expressing. Keep it upright to keep your milk flowing into the bottle.
You don’t need strong suction to express milk from just behind your nipple. Use the mode and power setting that feels most comfortable for you. This may be different at different times of day or at different stages of your breastfeeding experience.
The illuminated LEDs and quiet pump unit allow you to use the pump at night without disturbing others when you want to keep the lights low.
Storing breast milk

- When you want to freeze breast milk, allow space at the top of your bottle for it to expand. It’s easiest to freeze breast milk in individual feed quantities of 2-4oz / 60-125ml.
- Your breast milk may separate out into layers when you store it. Give it a shake to remix it thoroughly before feeding your baby.
- Thaw frozen breast milk in the fridge or by standing your bottle in lukewarm water until it has reached body temperature.Or use a Tommee Tippee bottle warmer.
- If you want to take expressed milk out and about with you, make sure it stays cold or frozen until you need to feed your baby.
Remember
DON’T× Don’t use whilst driving or operating machinery.× Don’t use whilst bathing or showering – it is not waterproof× Don’t use whilst sleeping.× Don’t use in temperatures below 10°C.× Don’t use if the USB cable or motor unit is damaged.× Don’t share your breast pump with other mums.× Don’t leave the USB plugged in when the unit is not charging or in use.
Health and Safety
- Don’t place furniture or other obstructions on the USB cable or air tubes, and make sure no one can step on or trip over them. Keep them well out of reach of your baby and any young children.
- Keep the USB cable and air tubes away from hot surfaces such as radiators and central heating pipes.
Advice and FAQs
Get comfortable with your breast pump
- Unless you’ve been told otherwise, the best time to try your breast pump for the first time is after your baby’s first feed of the day.
- Make sure you’re in a comfortable position and try to relax.
- You’re not trying to suck milk out. It comes from just behind your nipple. Start with the mode and power that feels most comfortable and allows you to express your milk.
- Using your breast pump shouldn’t hurt. If it does, try a gentler setting. Then check your breasts. If you have any red or hot areas, stop using the breast pump and get in touch with your breastfeeding advisor as soon as possible.
- Every mum is different. You may only produce a little milk, or flow freely. You may produce more milk at different times of the day (morning or evening) or different volumes from one breast to another. The Tommee Tippee electric breast pump allows you to choose different settings to suit you at different times.
- Don’t continue using the pump once your milk has stopped coming. Give your breasts a break.
FAQsHelp – there’s no or very little suction. What can I do?It’s most likely that there’s some air getting in somewhere, which means the pump won’t work properly.
- Check that the air tubes are connected securely at both ends and there are no kinks in them.
- Make sure that the soft silicone cup is securely attached to the horn at the top and bottom and forms a comfortable seal around your breast. Adjust your position if you need to.
- Check the duck-bill valve is clean and opens easily. Give it a gentle squeeze if it’s stuck.
- Check the diaphragm and diaphragm cap are secure and there are no signs of damage.
Will milk get sucked into the power unit?No. If you have fitted the diaphragm and cap properly, each air tube and pump are separated from your milk and can’t come into contact with the power unit. It’s what’s known as a closed pump.
Help, the pump is making a funny soundCheck if you have selected single or double mode. And that you have the air tube/s connected correctly. If you are using a single pump and have the double mode selected (shown by the double circle lit up on the LED display), or have a single air tube attached to the wrong connector, the pump will run continuously, and make a noise when it’s trying to provide suction to the unattached pump handset. Choose the correct mode and connection for single or double pumping.Why do I have to use a Tommee Tippee bottle?The Tommee Tippee Made for Me™ electric breast pump is designed to be a perfect fit for Tommee Tippee bottles and pouches (excludes Tommee Tippee Closer to Nature glass bottles). You may get leaks and spills if you use other brands of bottles and containers that don’t fit correctly.
Register your breast pump
Why register?
- Get an additional year’s warranty completely free of charge.
- Get support more quickly as we’ll already have information about you.
- You’ll be the first to hear about any product information updates. Visit tommeetippee.com/product-registration to register.It’s quick and easy.
Device Symbols
- This equipment has been tested and found to comply with the limits for medical devices in EN60601-1-2. These limits are designed to provide reasonable protection against harmful interference in a typical medical installation.
- This equipment generates, uses and can radiate radio frequency energy and if not installed and used in a accordance with the instructions, may cause harmful interference to other devices in the vicinity. However, there is no guarantee that interference will not occur in a particular installation.
- If this equipment does cause harmful interference to other devices, which can be determined by turning the equipment off and on, the ser is encouraged to try to correct the interference by one or more of the following measures:
- Reorient or relocate the receiving device.
- Increase the separation between the equipment.
- Connect the equipment into an outlet on a circuit different from that to which the other device(s) are connected.
- Consult the manufacturer or field service technician for help.
Transport and Storage Condition
Temperature: 32°F to 113°FHumidity: 10% – 85%Atmospheric pressure: 850Hpa – 1060Hpa
Working condition
Rated temperature range: 50°F to 104°FRated relative humidity: 10% – 85%Rated atmospheric Pressure: 850Hpa – 1060HpaLong-term storage should be kept in a dry and cool place.
Let us know what you thinkWe’d love to hear what you think of the Made for Me™ range. Share your photos, reviews and tell us about your experiences on our social channels.
tommee tippeehelping you Parent Ontommeetippee.com
Copyright © Mayborn (UK) Limited 2020.Made in China.
Tommee Tippee Made for Me Double Electric Breast Pump #1162 User Manual – Tommee Tippee Made for Me Double Electric Breast Pump #1162 User Manual –
[xyz-ips snippet=”download-snippet”]