
![]()
single bottle steriliserINSTRUCTIONS FOR USE
MICROWAVE STEAM STERILISATION
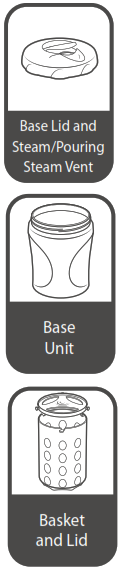
This sterilizer is designed for use with closer to nature bottles. For instructions on cleaning and sterilizing Tommee Tippee closer to nature bottles please refer overleaf.
5 Allow cooling for 3 minutes before removing the sterilizer from the microwave.
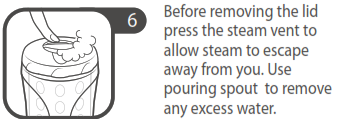
7 Wash your hands thoroughly before handling sterilized items. Take care as the items will be hot.8 Remove the basket (rotate basket lid anti-clockwise to remove) and lift out sterilised items. Makeup feed according to manufacturer’s instructions.9 If the steriliser is left unopened bottle will remain sterile for 3 hours. After this time re-sterilisation is required.
WARNING
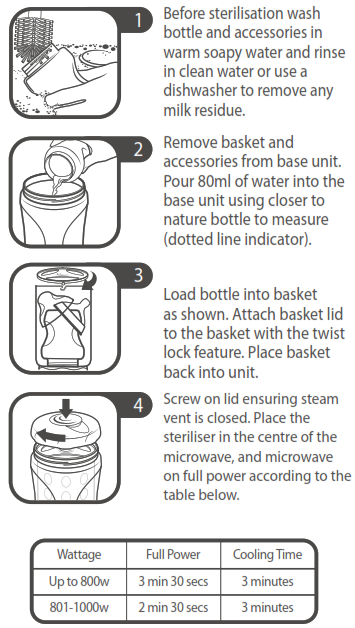
Always add 80ml of water before use. Ensure the unit does not boil dry. Ensure the microwave is set correctly on full power. Always allow 3 minutes of cooling time before removing it from the microwave. When removing the steriliser from the microwave, take care, as the unit will contain hot water and steam. Place on a hard, heat resistant surface. Always release steam using the steam vent before completely removing the lid. Do not use chemical sterilising solutions/tablets in the microwave. If you have a combination oven, ensure the grill is switched off and the oven has cooled before use.Always follow loading instructions to ensure sterilisation. Do not place metallic items in the microwave as damage could result. Make sure the microwave turntable is clean and dry before use. If components are washed in a dishwasher with other items, which have residues of strong coloured sauces (e.g. tomato), they may discolour over time. Keep out of reach of small children.
COLD WATER STERILISATION
- Prepare a sterilising solution as instructed by the sterilising solution manufacturer. You will need approximately 1.5 L.
- Place closer to nature bottle upright inside the basket and place the basket inside the steriliser.
- Ensure the bottle is filled first, then continue to fill the Steriliser until the solution reaches the base of the neck.
- Place hood upside down inside the bottleneck ensuring that it is completely submerged.
- Place assembled screw cap and teat upside down inside the hood ensuring that it is completely submerged.
- Assemble the basket lid to the basket with the twist lock feature ensuring that all the bottle components are fully submerged in the Sterilising solution.
- Assemble the Steriliser lid to the Steriliser ensuring the pouring/steam vent is in the closed position.
THE UNIT IS NOT WATERTIGHT AND THEREFORE MUST REMAIN IN THE UPRIGHT POSITION.
bottle & teatsFOR YOUR CHILD’S SAFETY & HEALTHWARNINGAlways use this product with adult supervision. Before first use clean the product. Never use feeding teats as a soother. Continuous and prolonged sucking of fluids will cause tooth decay.Always check food temperature before feeding. Inspect before each use and pull the feeding teat in all directions. Throw away at the first signs of damage or weakness.Do not leave the feeding teat in direct sunlight or near a source of heat, or leave it in disinfectant (“sterilising solution”) for longer than recommended, as this may weaken the teat. Before first use, place in boiling water for 5 minutes. This is to ensure hygiene. Clean before each use. Always wash the product immediately after use. Accidents have occurred when babies have been left alone with drinking equipment due to the baby falling or if the product has disassembled. Tooth decay in young children can occur even when non-sweetened fluids are used. This can occur if the baby is allowed to use the bottle for long periods through the day & particularly through the night, when saliva flow is reduced or if it is used as a soother.For safety and hygiene reasons it is recommended the teat is replaced at least every 2 months. Keep all components not in use out of reach of children.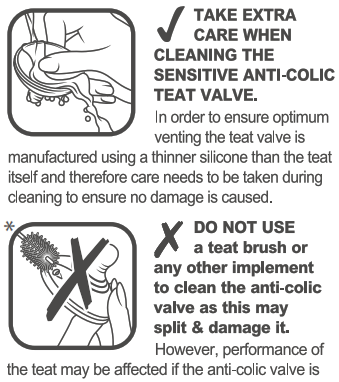 not cleaned thoroughly after each useEnsure the valve is flushed with warm water during cleaning.DO NOT turn the teat inside out for cleaning. Damage could result.Use a teat brush, but not on the anti-colic valve (see above*).DO NOT clean or allow to come into contact with solvents or harsh chemicals. Do not store in direct sunlight or near a source of heat. Damage could result.DO NOT allow the product to come into contact with oil-based foods (e.g. oil/tomato based sauces) as staining will occur.
CLEANING & STERILISING
The new Tommee Tippee teat and screw ring have been designed to be placed into the sterilizer fully assembled, in order to avoid assembly problems after sterilization
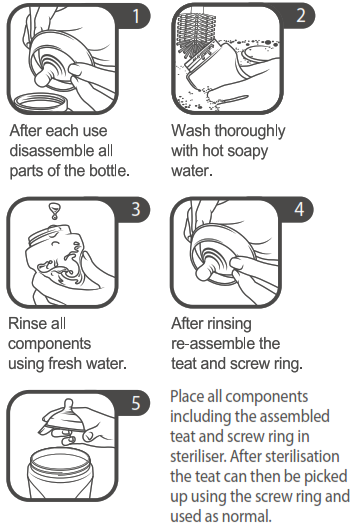
Alternatively, after use, the components can be disassembled, washed, and sterilized as normal. Suitable for all forms of sterilization.
MAKING UP FEEDS
Makeup feeds according to the feed manufacturer’s instructions. Use cooled freshly boiled water. DO NOT use hot water. Heating in a microwave oven may produce localized high temperatures. Take extra care when microwave heating. Always stir heated food to ensure even heat distribution and test the temperature before serving. Do not heat in a microwave with a bottle sealed. Remove teat, locking ring, and dome cap.Not suitable for use in a conventional oven or a combination microwave oven with the grill feature switched on.
Mayborn Baby and ChildNorthumberland Business Park WestCramlington, Northumberland NE23 7RH, UKMayborn Baby and Childis a trading style of Jackel International Limited.Copyright© Jackel International Limited 2008
tommeetippee.com
Tommee Tippee Single Bottle Steriliser Instructions Manual – Tommee Tippee Single Bottle Steriliser Instructions Manual –
[xyz-ips snippet=”download-snippet”]