
![]()
Tommee TipsBottles & Nipples
Cleaning
1. CAN I PUT THE BOTTLE AND NIPPLES IN THE DISHWASHER?
Yes, you can, we advise them to be placed on the top shelf. Try not to put them in with strong colored food as the color can transfer. We also advise that you sterilize the bottles and nipples in a closer to nature® sterilizer.
2. HOW DO I CLEAN AND STERILIZE MILK POWDER DISPENSERS?Milk powder dispensers should be washed and sterilized just like your bottles. You can then leave them to air dry, or use a clean piece of kitchen paper or a clean tea towel. The formula milk powder is not sterile, which is why you are recommended to make up feeds with freshly boiled water that has been allowed to cool for 30 minutes.
BPA Free
3. DO TOMMEE TIPPEE BOTTLES CONTAIN BPA?Our best-selling award-winning closer to nature range is now BPA-free, with all bottles in the range now made in top quality polypropylene. This material is still light to hold, easy to clean and gives great results but contains no bisphenol A.
Nipples
4. CAN I USE EASI-VENT™ NIPPLES ON SENSITIVE TUMMY BOTTLES?No the closer to nature Easy-vent™ nipples have an air valve which will prevent the Sensitive Tummy bottle system from working properly. You should only use Sensitive Tummy nipples with Sensitive Tummy bottles.
5. IS THERE A 6 MONTHS+ SENSITIVE TUMMY NIPPLE?Babies’ digestive systems are well developed by 6 months as they drink their milk and even eat some solid foods. At this age they should not suffer from the symptoms of colic.
6. WHAT NIPPLES CAN I USE WITH THICKER FORMULA?We now have a closer to nature Thick Feed nipple, which has a Y-cut which opens when the baby sucks and allows thicker feeds to flow through. It is suitable for babies from 6 months.
7. WHERE SHOULD THE VALVE BE WHEN FEEDING MY BABY?We recommend the valve to be at the top, near your baby’s nose.
8. WHY IS THE NIPPLE COLLAPSING WHEN MY BABY IS FEEDING?The closer to nature nipples are very sensitive as it is made of specially designed silicone material which can sometimes stick together when not used, this is perfectly natural. To ensure the slit at the tip of the tent-like valve can open before use, flush through with water and gently manipulate the valve between finger and thumb until you see the slit re-open. This allows the air to flow into the bottle and prevents the teat from collapsing.
9. THE SENSITIVE TUMMY NIPPLE KEEPS COLLAPSING, INVERTING, AND IS PROVING DIFFICULT TO DRINK FROM?The round dome valve that fits onto the bottom of the Sensitive Tummy tube is very sensitive as it is made of specially designed silicone material which can sometimes stick together when not used, this is perfectly natural. To ensure the slit in the dome valve is open before use, flush through with water and gently manipulate the valve between finger and thumb until you see the slit re open.
Using & Storing Bottles
10. CAN I USE THE MICROWAVE TO HEAT UP THE BOTTLE?No, we strongly recommend that you do not heat milk in a microwave as this produces localized hot spots. You should also never boil breast milk as this destroys valuable nutrients in the milk.
11. CAN I STORE MILK IN THE BOTTLES?You can store milk in the fridge or freezer. In both cases, be sure to use a sterilized air tight container. You can store breast milk in your closer to nature bottle but it must be stored in the fridge (not in the door) for up to 5 days. You should gently warm the milk through before use. You should never heat the milk in a microwave as it creates localized hot spots.
12. ARE THE CLOSER TO NATURE BOTTLES RECYCLABLE?Yes, the closer to nature bottles can be recycled.
Breastfeeding
1. WHY SHOULD I EXPRESS MY MILK?
The closer to nature range is specially designed to make it easier for you to combine breast and bottle feeding. Many pregnant women and mothers assume that combination feeding means mixing breastmilk and formula milk. But this is not the case – combination feeding can also mean giving breastmilk direct from the breast – or via a bottle.There are many reasons why you may choose to express your milk:
- you may be returning to work
- you may want to leave your baby with someone else
- dad may want to be more involved in the feeding routine
- or perhaps you just want to enjoy a night out
Expressing allows you to continue to give your baby all the nutritional benefits of your breast milk, even when you can’t feed your baby yourself. It is important that you establish your breastfeeding routine before you start to express milk and introduce a bottle.
2. HOW DO I EXPRESS WITH A BREAST PUMP?
- Sterilize all parts of your breast pump before each use.
- Assemble the pump according to the manufacturers’ instructions.
- Get everything ready – breast pump, container and a drink (a photo of your aby may help the milk to flow).
- Wash your hands, find a comfortable position and relax.
- Start to express slowly at first, ensuring that the pump is in the correct position and comfortable.
- Pump for 5 minutes or until the milk flow stops on each breast.
- Repeat the cycle again on both breasts.
- Collect your milk in a sterile container, remembering to label it with the date and time.Remember you are only trying to express milk from just behind the nipple, so strong suction is not necessary. Good breast pumps will aim to mimic your baby’s sucking action and should not cause pain. If it hurts to use the pump, stop and seek advice from your healthcare professional.
3. HOW SHOULD I STORE AND USE MY BREAST MILK?
You can store milk either in the fridge or freezer. In both cases, be sure to use a sterilised airtight container. Always remember to:
- Label the container with the date and time before storing.
- Refrigerate expressed milk immediately. Make sure it is kept in the main part of the fridge and not in the fridge door.
- Store milk in the fridge for up to 5 days or in the freezer for 6 months.
- You will notice that stored milk separates into layers. Shake to remix thoroughly before feeding.
- When freezing milk, allow space at the top of the bottle or storage pot for expansion.
- Thaw frozen milk in the fridge or by standing the container in lukewarm water. Do not microwave it!
- Throw away any leftover milk after a feed.You can use closer to nature milk storage pots which are designed to fit into the neck of closer to nature bottles to collect and protect™ your precious breastmilk.
BPA-Free
WHAT IS BPA?
BPA is one of the 50 most-produced chemicals in the world. It is used in the manufacture of numerous household articles, from plastic water jugs to take-out containers, sports equipment, canned food liners, and baby formula cans. This widespread use of polycarbonate feeding bottles is due to the exceptional combination of properties that the material gives, including safety, toughness, durability, lightweight, glass-like appearance, and its suitability for all common household methods of sterilization.
WHY HAS BPA BECOME SUCH A HOT TOPIC?On Saturday, March 14, BBC News featured an item about BPA in baby feeding bottles. And in recent months many environmental groups have expressed concerns that the BPA contained in baby feeding bottles could ‘leach’ or leak out into a baby’s milk from the plastic when heated under certain conditions, or when bottles were cracked or scratched. This, they claimed, could result in health concerns for babies and children.Bisphenol A has been intensively scrutinized for a long period of time and no credible scientific evidence has yet been found as to whether BPA is damaging to humans. The Department of Health and the Food Standards Agency are among many national and international bodies to publicly state that polycarbonate is safe to use and Tommee Tippee has followed all advice while closely monitoring all available information about the issue.
SO WHY HAVE WE CHANGED TO BPA-FREE MATERIALS?As a leading and responsible manufacturer with 50 years of experience, we decided that we should do whatever we could to minimize the confusion for parents in order to provide the total reassurance they have come to expect from us.
Our best-selling award-winning closer to nature range is now BPA free, with all bottles in the range now made in top quality polypropylene. This material is still light to hold, easy to clean and gives great results but contains no bisphenol A.
Sterilizers
- HOW DO I SET MY ELECTRIC STERILIZER UP FOR THE FIRST TIME?It is important that you set your sterilizer up according to the instructions for use BEFORE connecting your sterilizer to the power.Instructions: Electric Steam SterilizerWhen you then connect your sterilizer to the power for the first time the start switch should come on automatically. If it does not, please press the start switch and the amber light should come on to show sterilizing has begun. It will switch off automatically when the cycle has completed.This amber switch is a start button only. The sterilizer is designed to switch itself off automatically once the cycle is finished.
- WHEN I PLUGGED MY STERILIZER IN FOR THE FIRST TIME, IT AUTOMATICALLY STARTED AND I WAS UNABLE TOSWITCH IT OFF?The amber button on the sterilizer is a start button only (not a stop button). The product is designed this way so that once the sterilizing cycle begins it cannot be switched off mid-cycle.This is a deliberate feature to remove any risk of the sterilizer be accidentally switched off mid-cycle, which could mean that the contents are not yet fully sterilized.The sterilizer will switch off automatically once the cycle has completed.It is important to refer to our instructions for use when setting up your sterilizer for the first time.Instructions: Electric Steam Sterilizer
- HOW DO I DESCALE MY STERILIZER?We recommend that you use a descaler specifically designed for electric sterilizers.We no longer recommend using citric acid for descaling, as it is difficult to find, varies in strengths, and does not come with instructions.
- WHY SHOULD I DESCALE MY STERILIZER?By descaling the sterilizer you remove the build-up of limescale on the electric element within the sterilizer. The long-term build-up of limescale can cause the element to stop working. If you don’t descale the electric sterilizer then this could affect your warranty.
- I HAVE STERILIZED MY BOTTLES, WHY HAVE THEY GOT MARKS ON THEM?The bottles are still required to be washed before sterilizing. Your sterilizer may need descaling, we recommend descaling every 4 weeks.
- I’VE GOT NO INSTRUCTIONS FOR MY STERILIZER?Please click on the links below to download the instructions for the Electric Steam Sterilizer and the Microwave Steam Sterilizer.• Electric Steam Sterilizer• Microwave Steam Sterilizer
- TIPS FOR USING YOUR MICROWAVE STERILIZERMake sure the turntable of your microwave is clean. Food residues can overheat and may cause the base of your sterilizer to melt.If you have a combination microwave, make sure the grill is turned off Otherwise you risk melting the lid of your sterilizer.
- WHY HAS THE ELEMENT IN THE BOTTOM OF MY STERILIZER CHANGED TO A BROWN COLOR?Your sterilizer is due to be descaled, we recommend doing this approximately every 4-6 weeks.
- HOW MUCH WATER SHOULD I USE IN MY STERILIZER?You should use 7fl. oz. in the closer to nature microwave sterilizer and 2.7fl. oz. in the closer to nature electric sterilizer
Electric Sterilizer Quick-Start Guide
BEFORE USING YOUR ELECTRIC STERILIZER FOR THE VERY FIRST TIME YOU NEED TO DO ALL OF THE FOLLOWING BEFORECONNECTING THE POWER.
- Empty the free contents from inside
- Fill the sterilizer base with exactly 2.7 fl. oz. / 80ml water (your closer to nature bottles have a handy measure)
- Assemble the lower tray, central stem and upper tray and place in the sterilizer base
- Add the lid
YOU CAN NOW PLUG THE ELECTRIC CORD INTO YOUR ELECTRIC OUTLET.
- The start switch should come on automatically. If it does not, please press the button and the amber light should come on to show sterilizing has begun.
- It will switch off automatically when the cycle has completed.
- Allow to cool for 3 minutes before unplugging
- Remove lower tray, central stem and upper tray. Pour away any remaining water and wipe dry. Your sterilizer is now ready to use.More detailed instructions (with diagrams) can also be downloaded from our advice centreInstructions: Electric Steam Sterilizer
Pacifiers
1. HOW DO THE NEW CLOSER TO NATURE PACIFIERS DIFFER FROM OTHERS?The new closer to nature pacifers (Pure, C-air, and Soft) were created by a bio-medical engineer and a paediatric dentist. They studied the way that the tongue functions and the way that infants suck, and wanted to develop a soother to be more natural and fit more naturally in the mouth.When a baby sucks on a pacifier, they build up internal pressure in their mouth, the tongue is low and the cheek muscles push inwards on the palate. Our new pacifier is designed to have a natural fit in the mouth and gently expands in an umbrella-like fashion to support the palate and maintain its natural shape.There are a lot of orthodontic-shaped pacifiers on the market today, but what we have developed is a pacifier that provides an orthodontic function.This pacifier promotes safe and healthy oral development because of its natural fit and unique attributes in the design of the teat.
2. HOW DO I CLEAN MY CLOSER TO NATURE PACIFIER?You should wash the pacifier in warm, soapy water. We would then recommend you sterilize the pacifier in your sterilizer.
3. HOW OFTEN SHOULD I CHANGE MY CHILD’S PACIFIER?We recommend that you should change your child’s pacifier every month. We also recommend you follow the age stage guidance shown on the pacifier packaging. The age guide is important as the size and scale of the baglet on the pacifier changes as the child grows and develops.
Explora® Cups
1. ARE THE CUPS AND BEAKERS DISHWASHER SAFE?The whole range except the Insulated cups (Explora Sipper and Straw) are dishwasher safe, top shelf only.
2. WHY IS THE CUP LEAKING?The silicon valve may not have been assembled correctly, ensure the valve is pushed through the white retainer. Please see the attached assembly instructions.
INSTRUCTIONS FOR CLEANING AND ASSEMBLING TO ENSURE YOUR CUP FUNCTION CORRECTLY
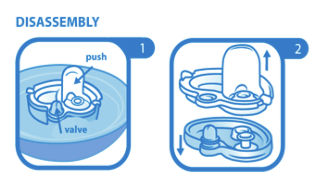
DISASSEMBLY
- Unscrew the lid. Remove valve by pushing on the lever. This will pop the valve out of the lid.
- Separate the 2 parts of the valve (soft & hard).
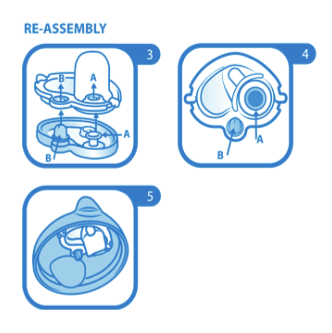
RE-ASSEMBLY3. Align the two parts and press together AS PER ILLUSTRATION
4. IMPORTANT! Ensure parts A and B of the soft side are pushed through the holes of the hard side making sure they snap into place.
Ensure the cut (slit) in dome B opens by squeezing before use.5. Place the valve back in the lid, and push until the sides lock into place. Screw-on lid.
CLEAN ALL PARTS WITH WARM SOAPY WATER AND RINSE THOROUGHLY OR USE A DISHWASHER.
3. WHY HAS THE CUP STAINED AN ORANGE COLOR
The only time we have come across the cups staining is if they have been washed in the dishwasher with other items which have residues of strong colored sauces e.g. tomato or carrot.
4. ARE SPARE SPOUTS AVAILABLE?Unfortunately, we are not supplied with spare spouts for these, however, the spout will last for however long the child should need them unless they are chewing or biting on the silicone.If this is the case we would recommend a different style of cup with a harder more robust spout.
5. WHY IS THE WHITE RETAINER FALLING OFF?The valve may not be assembled correctly, ensure the silicon valve is pushed all the way through the white retainer. Please see the attached assembly instructions.
6. CAN HOT AND CARBONATED DRINKS BE USED IN EXPLORA CUPS?Tommee Tippee Explora cups are suitable for hot or fizzy (carbonated) drinks but Tommee Tippee recommends giving your child milk or water.
7. CAN I DISHWASH THE EXPLORA CUPS?The Explora cups can be used in a dishwasher apart from Truly Spill proof Active Straw and Truly Spill proof Active Sipper bases.
8. CAN I GET ANY SPARE PARTS FOR MY EXPLORA CUP?The only spare parts we have are some spare valves. If you require a spare valve then please contact Consumer Comments,Mayborn USA Inc, PO Box 5003, Westport, CT 06881- 5003
9. CAN MY EXPLORA CUP BE STERILIZED?All explora cups are suitable for sterilization/ sterilization by steam (electric and microwave), boiling (5 minutes) or cold water tablet/ liquid solution.
10. MY EXPLORA® CUP IS MAKING A WHISTLING NOISE?Explora® cups can make a slight noise when in use. This is commonplace and may occur when the fluid flow is extremely slow or low (depending on the child’s drinking action) and this does not affect the functionality of the product in any way.
tommee tippee Tips Manual – tommee tippee Tips Manual –
[xyz-ips snippet=”download-snippet”]