![]()
Instruction Manual
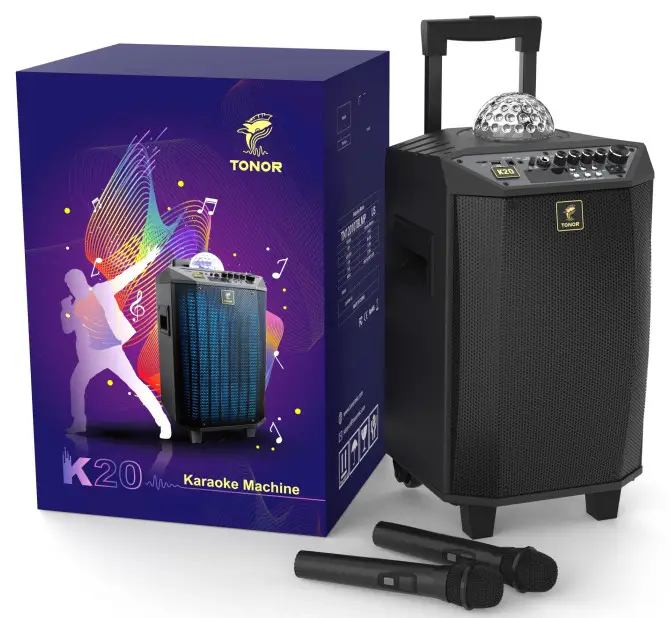
K20Karaoke Machine
ABOUT THIS MANUAL
Thank you for purchasing the TONOR K20 karaoke machine. This manual is intended to help you understand all about this karaoke kit and how to use it. TONOR always strives for the ultimate user experience. All our knowledge and passion for audio technology are incorporated into building microphones and speakers with high performance for you. The TONOR K20 uses enhanced bass diaphragm speakers and cool LED lights to achieve the best user experience.Enjoy your time!TONOR Team
ACCESSORIES
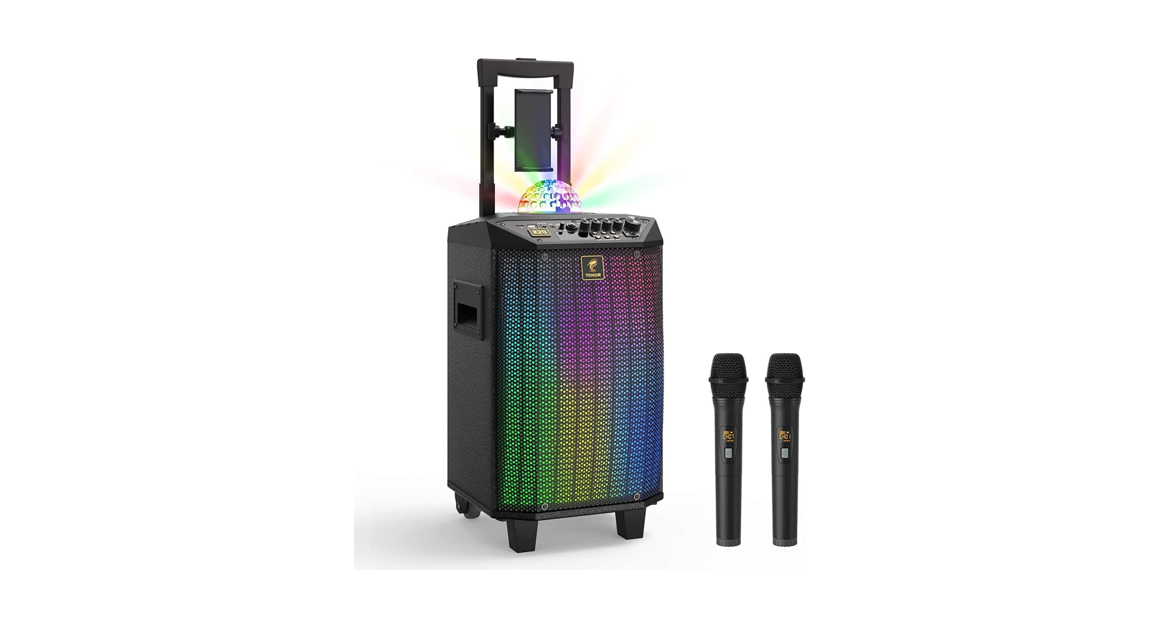
| 1 x Karaoke Machine2 x Wireless Microphone1 x Remote Control1x 3.5mm to RCA Cable1 x 3.5mm Audio Cable4 x Foam Cover | 1 x Tablet Holder1 x Power Adapter1 x Storage Bag1 x Manual1 x After-sales Card |
CHARGING INSTRUCTION
For the first use, please use this product until there is only one grid of power left, then use the included power adapter for charging. When charging, the battery icon on the display will flash. After charging for about 6 to 8 hours, the power indicator icon will indicate full. Please unplug the power adapter.
After the battery is fully charged, it can be used for 8 to 12 hours. When the battery voltage is low (power off), the machine will automatically shut down. Please charge it within 48 hours.If the device doesn’t work for a long time, the battery should maintain a certain amount of power. Long-term lack of power will damage the battery! Correct operation can extend battery life.
SAFETY WARNING
If you do not use the machine for a long time, please unplug the power plug to prevent the machine from being burned by lightning flash.The applicable voltage of this machine’s power adapter requires 100-240V.
The power cord cannot be squeezed, pulled, bent, knotted, hung heavy objects, or trampled to prevent the insulation layer of the power cord from being damaged and causing electric shock.To reduce the risk of fire or electric shock, do not expose the machine to rain or moisture. Do not place objects filled with liquids, such as vases, on the machine.The device is equipped with batteries, so do not expose it to the scorching sun for a long time. Do not install near any heat sources such as radiators, heat registers, stoves, or other apparatus (including amplifiers) that produce heat.Do not block the heat radiation holes, otherwise, it will cause poor heat dissipation of the machine and affect the service life of the machine.
TECHNICAL PARAMETERS
| Speaker:Model No.: K20Peak Power: 250WSensitivity: 550+30mVS/N Ratio: >70dBFrequency Response: 30Hz-20kHzInput Voltage: DC 15VAdapter: 15V/2.4A | Wireless Microphone:Frequency Response: 50Hz-15kHzOperating Distance: 100ftRF Carrier Stability: +0.003%S/N Ratio: 96dBT.H.D.: <0.5%@1kHzMicrophone Input Sensitivity: -52dBRF Sensitivity: -95dBmWorking Temperature: 0°Cto +55°C |
FUNCTION DESCRIPTION
Built-in MP3 function.USB port: Plug and play.SD/TF port: Plug and play.Support MP3, WAV, WMA, FLAC, and other audio formats.Built-in recording function:Connect an external storage device (USB flash disk/TF card) and short press the REC button to start recording. When the external storage is used on this machine for the first time, a folder named RECORD will be created automatically, and the recording files MICOQ001.MP3,MICO002.MP3……will keep in this folder. Press the REC button to start recording, then press the RE.PLAY button to exit the recording and play the recording. Press the RE.PLAY or MODE button again to exit the recording playback mode.
- The default input signal source is AUX mode when power on.
- In “BLUE” mode, you need to make sure that the Bluetooth device(mobile phone, tablet, etc.) is turned on, then scan, search and match this machine’s Bluetooth (the prompt sound “Bluetooth connection” will appear when the connection is successful), (the Bluetooth name of this machine: TONOR K20).Note: if they can’t match, please restart the machine or Bluetooth device to try again.
- After the Bluetooth connection between the mobile phone and this machine is successful, you can start playing music.
- The Bluetooth range of this machine is 35ft (line of sight).
Cautions:During use, please keep away from high temperature, strong magnetic field, and high-frequency interference.If you encounter a crash/froze, please turn o the power and restart or unplug the USB flash disk/TF card and plug it in again to resume normal operation.Format the USB flash disk/TF card in the computer to FAT32 format.When the system reads data, it will first read the file with the earlier creation time.When downloading (copying) files in formats such as MP3, WAV, WMA, and FLAC to the root directory of the USB flash disk/TF card, it is recommended to delete unnecessary files and file directories to make playing songs faster and reduce reading errors.
PANEL FUNCTION INSTRUCTION
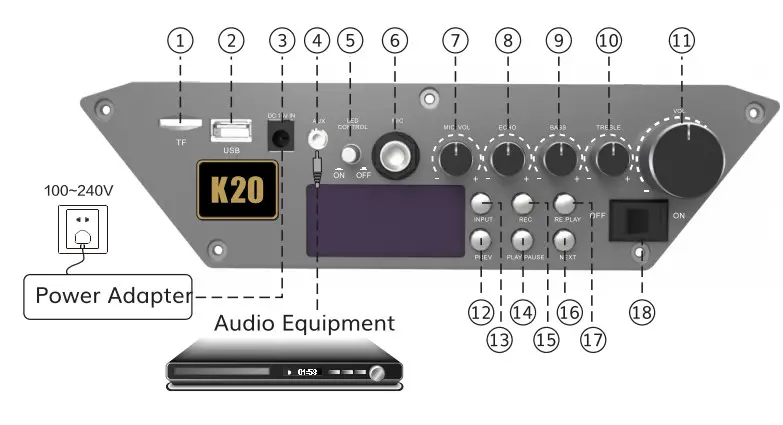
| 1. TF2. USB3. DC 15V IN4. AUX5. LED CONTROL6. MIC | 7. MIC.VOL8. ECHO9. BASS10. TREBLE11. VOL12. PREV | 13. INPUT14. PLAY/PAUSE15. REC16. NEXT17. RE.PLAY18. ON/OFF |
REMOTE CONTROL INSTRUCTION

| 1. Mute2. Numeric Keys 0-93. AUX4. INPUT5. USB6. NEXT7. EQ | 9. VOL-10. RE.PLAY11. PREV12.REC13. VOL +14Loop Playback |
WIRELESS MICROPHONE INSTRUCTION
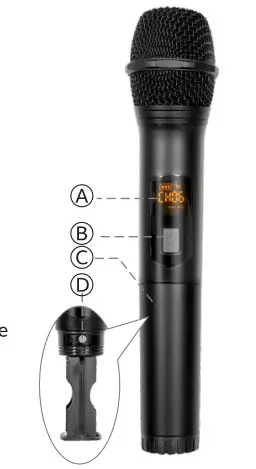
A. Display ScreenB. On/Off SwitchC. Battery CompartmentD. Channel Adjustment Button
Wireless microphone battery installation and on/off:
- Takedown the tail tube(C) of the mic.
- Put two AA batteries into the battery compartment of the microphone according to the positive and negative poles.
- Press the power button (B) to turn on the microphone.
Operating instructions for wireless microphone binding:The 5 frequencies of Mic A: CH01-CH05The 5 frequencies of Mic B: CHO6-CH10
Press the “D” button to switch channels in sequence.
Cautions:The operating distance of the wireless microphone is within 100ft.In order not to affect performance, please do not exceed this range.When the battery power is low or the environmental interference source is too strong, the operating distance will be shortened.Do not use wireless microphones of the same channel simultaneously in a short distance, as this will cause silence or interference.If you have purchased two or more sets of this product and plan to use them together within a short distance, please switch the wireless microphone to a different channel. During use, please do not place the machine near devices with high interference frequencies (such as VCD/CD/DVD), so as to avoid interference between the machine and the VCD /CD/DVD of the same frequency.
WARRANTY
TONOR provides 2 years of after-sales service, free replacement to products that are NOT damaged resulting from accident, alteration, misuse, negligence, or abuse. If exceeding 30 days of the Amazon return policy, you can still contact us through our Shopify TONORMIC. We will serve you with full sincerity!Shopify link: https://www.tonormic.comEmail: [email protected]
TROUBLESHOOTING
During use of this machine, if the following problems are found, please check one by one according to the following troubleshooting guide. If the problem still cannot be solved, you can contact our company for consultation via email or website. The detailed troubleshooting is as follows:
|
Problem |
Possible Cause |
Solution |
|
Cannot findBluetooth device
|
1. The device has beenconnected by another Bluetoothdevice2. The Bluetooth device is setwith function restrictions | 1. Disconnect the Bluetooth of the connected device and return the Bluetooth device to search for pairing.2. Enter the Bluetooth setting terminal of the mobile phone to activate “Allow search by other devices” |
|
One microphonecannot be used.
|
The microphone and speakerare not paired successfully.
|
Wireless Microphone ID Pairing Steps1. Make sure that the speaker and microphone are turned OFF.2. Unscrew the microphone tail tube and install the batteries into the mic’s battery compartment.3. Make sure that the microphone is OFF, press and hold the channel adjustment button and the power button simultaneously, do not release them, until the microphone screen flashes quickly, then release two buttons simultaneously.4. Turn on the speaker’s power button, wait for 5 seconds or so, then press the microphone’s channel adjustment button once, until the microphone screen becomes steady and no longer flashes, indicating that the pairing is successful.5. Turn off the microphone, then tighten the microphone tail tube. Pairing is now completed. |
| No sound when turning on the power | 1. There is no audio source input2. The master volume knob is at the 0 level position | 1. Check the audio source input to make sure there is either aux, mp3 or Bluetooth input.2. Adjust the master volume to a suitable position. |
| Problem | Possible Cause | Solution |
| Sound distortion | 1. The master volume is adjusted too loud is2. The microphone or speaker s damaged | 1 Please turn down the volume appropriately.2. Please contact TONOR -atter-sales service team for help. |
| Karaoke machinehas no sound | The microphone is not turned on or the microphone battery is low or the input volume of the microphone on the speaker is 0 | When the battery power is sufficient, turn on the microphone and then adjust the input volume to an appropriate level. |
| Mp3 playbackis silent | 1. The format of the song is wrong2. The format of the USB flash disk/TF card itself is wrong3. Operation error format. | 1. Convert the song to mp3, WAV, WMA, or FLAG format.2. Format the USB flash disk/TF card on the computer to FAT323. Restart. |
| Sound use timeis short | 1. The power of the speaker is insufficient2. The battery of the speaker is damaged | 1. Fully charged before use, it takes about 6-8 hours to fully charge. Contact TONOR’s after-sales service team for help. |
| Can’t cut the song | Set the single repeat function | Reset the repeat mode. |
| Frequency isdisconnected whenusing the microphone |
— |
1. Check whether the operation distance exceeds 100ft or if there are more signal blockers in the environment.2. Check whether the battery power is sufficient.3. Check whether there is interference around the evice and try to adjust the frequency. |
 report this ad
![]()
[xyz-ips snippet=”download-snippet”]