
![]()
USER MANUAL
|
SPECIFICATION |
|
| Motor | Brushless 2212/1400KV |
| ESC | Brushless 30A |
| Servo | 9-gram servo x 4pcs |
| Battery | 7.4V 1500mAh Li-Ion |
| Propeller | 10-inch folded |
WARNING
The following terms are used throughout the product literature to indicate various levels of potential harm when operating this product.CAUTION: Procedures, which if not be properly followed, is able to create a possibility of physical property damage AND or possibility of injury.
![]() Read the ENTIRE instruction manual to become familiar with the features of the product before operating. Fail to operate the product correctly can result in damage to the product, personal property and cause serious injury.
Read the ENTIRE instruction manual to become familiar with the features of the product before operating. Fail to operate the product correctly can result in damage to the product, personal property and cause serious injury.
![]() This is a sophisticated hobby product and NOT a toy. It must be operated with caution and common sense and requires some basic mechanical ability. Fail to operate this Product in a safe and responsible manner could result in injury or damage to the product or other property. This product is not intended for use by children without direct adult supervision. Do not attempt to disassemble, use with incompatible components or augment product in any way without the approval of VolantexRC Co., Ltd..This manual contains instructions for safety, operation and maintenance. It is essential to read and follow all the instructions and warnings in the manual, prior to assembly, setup or use, in order to operate correctly and avoid damage or serious injury.Age Recommendation: Not for children under 14 years. This is not a toy.
This is a sophisticated hobby product and NOT a toy. It must be operated with caution and common sense and requires some basic mechanical ability. Fail to operate this Product in a safe and responsible manner could result in injury or damage to the product or other property. This product is not intended for use by children without direct adult supervision. Do not attempt to disassemble, use with incompatible components or augment product in any way without the approval of VolantexRC Co., Ltd..This manual contains instructions for safety, operation and maintenance. It is essential to read and follow all the instructions and warnings in the manual, prior to assembly, setup or use, in order to operate correctly and avoid damage or serious injury.Age Recommendation: Not for children under 14 years. This is not a toy.
Safety Precautions
As the user of this product, you are solely responsible for operating in a manner that does not endanger yourself and others or result in damage to the product or the property of others.– Always ensure all batteries have been properly charged before using the vehicle.– Always check all servos and their connections prior to each run.– Never operate your vehicle near spectators, parking areas or any other area that could result in injury to people or damage of property.– Never operate your vehicle during adverse weather conditions. Poor visibility can cause disorientation and loss of control of your vehicle.– Never point the transmitter antenna directly toward the vehicle. The radiation pattern from the tip of the antenna is inherently low.– If at any time during the operation of your vehicle you observe any erratic or abnormal operation, immediately stop operation of your vehicle until the cause of the problem has been ascertained and corrected.
Battery Usage & Charging Warnings
CAUTION: All instructions and warnings must be followed exactly. Mishandling of Li-Po/Li-Ion/Ni-Mh batteries can result in fire, personal injury, and/or property damage.– The battery charger included with your plane(if there be) is designed to safely balance and charge the specific Li-Po/Li-Ion/Ni-Mh battery.– By handling, charging or using the included battery, you shall assume all risks associated with Li-Po/Li-Ion/Ni-Mh battery.– If at any time the battery begins to balloon or swell, discontinue use immediately. If charging or discharging, you should discontinue and disconnect.Continue to use, charge or discharge a battery that is ballooning or swelling can result in fire.– Always store the battery at room temperature in a dry area for best results.– Always transport or temporarily store the battery in a temperature range of 40-120 Fahrenheit degrees (5-49 degrees centigrade). Do not store battery or your plane in a car or direct sunlight. If stored in a hot car, the battery can be damaged or even cause fire.– Always charge a battery away from flammable materials.– Always inspect the battery before charging and never charge damaged batteries.– Always disconnect the battery after charging, and allow the charger cool before next charge.– Always constantly monitor the temperature of the battery pack while charging.– ONLY USE A CHARGER SPECIALLY DESIGNED TO CHARGE SPECIFIC BATTERIES.– Never discharge Li-Po cells till below 3V under load.– Never cover waning lables with hook or loop strips.– Never leave charging batteries unattended.– Never charge batteries outside recommended levels.– Never attempt to dismantle or alter the charger.– Never allow minors to charge battery packs.– Never charge batteries in extremely hot or cold places(recommended between 40-120 Fahrenheit degrees / 5-49 degrees centigrade) or in direct sunlight.
Box Contents

1. Fuselange2. Mainwing3. Horizontal Tail4. Vertical Tail5. Philips Screw Driver6. Joint Bar7. Push Rods8. Propeller9. Extend Wires10. Servo Arms and Screws11. Control Horns12. Screws— Below Parts For RTF Version —13. Transmitter(and Receiver)14. Lithium Battery15. Power Adaptor16. Balance Charger
Charging Instruction(RTF)
- Plug the included balance charger to the power adaptor cable, then plug the power adaptor into a compatible AC outlet(depends on different countries and area) , then connect the power output lead to the receptacle on the side of the balance charger The power adapter and balance charger are powered on when the green color LED indicator is glowing.
- Connect the white connector from battery to the mating connector on the charger. And while the white connectors are ‘keyed’ to minimize the risk of a reverse polarity connection, if you force them it is possible to make connection with the incorrect polarity potentially causing damage to the battery and/or charger. When the connectors are properly aligned for correct polarity, connecting them should require only a moderate amount of pressure to achieve the ‘click’ that indicates a secure connection.
- When the battery is connected to the charger securely and with the proper polarity both the red color and green color LED indicators will glow. The battery will be charging anytime the red LED indicator is glowing.
- It will take approximately 1.5-2.5 hours to fully charge a mostly or fully discharged (not over-discharged) battery. And when the battery is fully charged the red LED indicator will stop glowing entirely. When the red LED indicator is no longer glowing you can disconnect the battery from the charger as it is now fully charged and ready for use.
CAUTION: Do not store the lithium battery fully charged.For improved safety and longevity of the LiPo battery it’s best to store it only partially charged for any length of time. Storing the LiPo battery at approximately 50% charged (which is approximately 3.85V per cell) is typically best, however it will take some careful management of the charge time and the use of a volt meterto achieve this voltage.If you have the equipment and skills to achieve the 50% charge level for storage it is recommended. If not, simply be sure to not store the battery fully charged whenever possible. In fact, as long as the battery will be stored at approximately room temperature and for no more than a few weeks before the next use, it may be best to store the battery in the discharged state after the last flight (as long as the battery was not over-discharged on the last flight).
Setup Instruction
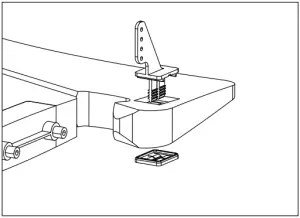
1. Install the control horns to the tail part as shown above. Make sure the horn legs are secured through the plates.
2. Install the horizontal and vertical tails with 2pcs PA2.6*8mm screws.
3. Secure the tail part to fuselage with 4pcs PA2.6*8mm screws.
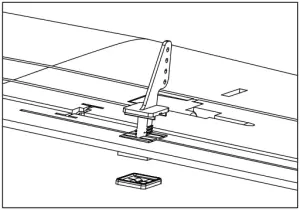
4. Install the servo arms to each servo with a PWA2.3*4mm screw.
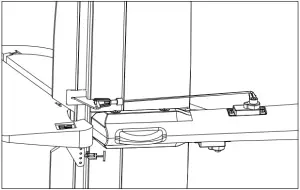
5. Install the pushrod(1.4*135mm) to connect the servo arm and the surface control horn for the horizontal tail. Repeat this step to install the pushrod(1.4*110mm) for the vertical tail.
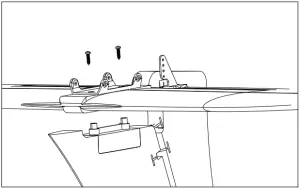
6. Install the pushrod to connect the servo arm and the surface control horn for each part of the main wings.
7. Assemble the main wings with the bar connected. Make sure you hear a click sound to secure the main wings to the fuselage.

8. Place the battery into the fuselage preset position. Completely read the following instructions before you power on the airplane. After all set, cover on the canopy to the fuselage.
Center the Control Surfaces
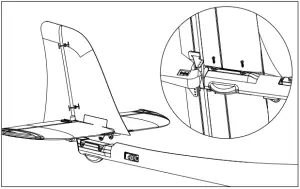
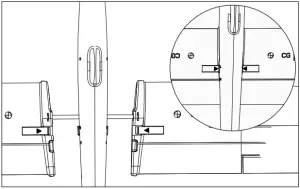
With the transmitter turned on and the Lipo flight battery connected to the ESC(and installed in the battery compartment), it is now possible to connect the pushrods to the control surfaces and to center the surfaces.First, be sure to center the elevator, rudder and aileron trim levers. See the “Digital Trims” section for more information. With the trim levers centered, carefully spread open each clevis so that you can insert the pin in the hole on each control horn. It may be helpful to use a flat blade screwdriver(not included) into the clevis then carefully twist it until it disengages the pin from the hole in the clevis.

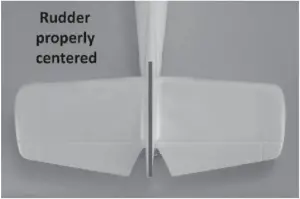
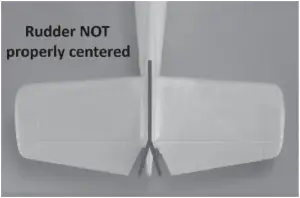
After connecting the clevis to the control horns, observe the rudder to see if it is centered. If it is angled off to the right or left, you can adjust the length/position of the push rod/clevis so that the surface is centered. Repeat the steps on elevator and aileron to ensure the surfaces are center too.
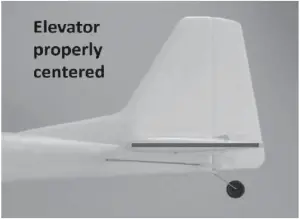
NOTE: You should always rotate the clevis until the pin is vertical with the control horn to ensure the pin is not under any excessive load/pressure when inserted in the hole and during operation. If you can’t properly make the pin vertical with the control horn, slightly adjust the trimmer as needed.
Also, we strongly recommend to install the included clevis keepers to provide extra security.
Propeller Assembly
- Screws
- Nut
- Propeller Base & Blades
- Shaft Adaptor
- Nut
- Washer
- Spinner
Assemble the propeller by the order as shown.WARNING: Do NOT power on the airplane while assembling the propeller, or serious damages may cause!
Center of Gravity
The ideal C.G. position is 70±5mm behind the leading edge measured at where the wing meets the fuselage . The C.G. has a GREAT effect on the way of the model flight.If the C.G. is too far aft ( tail heavy ), the model will be too responsive and difficult to control. If the C.G. is too far forward (nose heavy), the model will be too stable and not responsive enough.In order to obtain the C.G. specified, add weight to the fuselage or move the battery position. Check the C.G. before flying.
Flight Checklist
PLEASE NOTE: This checklist is NOT intended t o replace the content included in this instruction manual. Although it can be used as a quick start guide, we strongly suggest reading through this manual completely before proceeding.
- Always turn the transmitter on first
- Ensure the throttle control stick is on the button position then plug the battery.
- Fly the model (handglaunch or takeoff from a flat/level surface)
- Land the model (land on a flat/level surface)
- Unplug the LiPo flight battery from the ESC
- Always turn the transmitter off last
Find a Flight Field
Based on the size and weight of the plane it’s typically considered to be a ‘park flyer’ class model. As a result it’s best to fly the plane at a local park, schoolyard, flying field or other area that’s large enough and free of people and obstructions. We recommend an area the size of at least one football/soccer field, however, even larger areas are better suited and preferred especially when learning how to fly. DO NOT fly in parking lots, crowded neighborhood areas or in areas that are not free of people and obstructions.
We also suggest flying over grass as it’s a much more forgiving surface that causes less damage in the unfortunate event of a c rash. Short grass is better for takeoffs and landings as grass that is too long can cause the airplane to nose-over /flip and be damaged. An ideal flying area allows for takeoffs and landings on a smoother surface (such as asphalt) and flying over grass.
Fly in spacious ground without obstacles and boskage.
Never fly the plane near Highway, railway, high tension line, crowed people, Flying residential area.
PLEASE NOTE: THE PLANE IS DESIGNED TO BE FLOWN OUTDOORS ONLY
Flying Conditions
It’s typically best to fly on days that are calm with no wind, especially when learning how to fly. We strongly suggest flying only in calm conditions until you’re familiar with the controls and handling of the model. Even light winds can make it much more difficult to learn to fly, and in some cases can even carry the model beyond your line of sight.Also, if you are a first-time or low – time pilot we highly recommend allowing a more experienced pilot to test fly and properly trim the model before attempting your first flight. A proven flyable and properly trimmed model is significantly easier and more enjoyable to fly! Please contact your local hobby shop and/or flying club to find a more experienced pilot near you.After you’ve properly trimmed the airplane in calm conditions and become familiar with its handling / capabilities you’ll be able to fly in light winds, or depending on your experience and comfort level, in winds up to 5-7 mph.DO NOT fly on days when significant moisture, such as rain or snow, is present.
Perform a Range Check
As a precaution, an operational ground range test should be performed before the first flight each time out. performing a range test is a good way to detect problems that could cause loss of control such as low batteries defective or damaged radio components or radio interference. This usually requires an assistant and should be done at actual flying site you will be using.First turn on the transmitter. Then, install the fully charged battery into the fuselage and hold it in place with the hook-and-loop strap. Connect the battery and install the hatch.Remember, carefully not to “bump” the throttle stick. Otherwise, the propeller will rotate, possibly causing damage or injury.
With the antenna on the transmitter collapsed (not extended ), begin walking away from the model operating the controls in a predictable pattern (for example: Up, then down elevator. Right, then left aileron. Right, then left rudder). While moving the control surfaces, also vary motor rpm.Have your assistant alert you if the controls fail to respond or if they move suddenly or erratically. You should be able to maintain control up to a distance of approximately100′ [30m].If the controls respond erratically or if anything else seems wrong, make certain all the servo wires are securely connected to the receiver and that the transmitter and receiver batteries are fully charged. If you cannot find a mechanical problem with the model, it is slightly possible that there is radio interference somewhere in the area. One option would be to try another range check at an alternate flying site.After the range check, fully extend the antenna.Monitor and limit your flight time using a timer such as the one on your wrist watch. When the batteries are getting low you will usually notice a performance drop before the ESC cuts off motor power, so when you notice the plane flying slower you should land. Often (but not always!), power can be briefly restored after the motor cuts off by holding the throttle stick all the way down for a few seconds.To avoid an unexpected dead-stick landing on your first flight set your timer to a conservative 4 minutes. When the alarm sounds you should land your model.When you learn how much flight time you are getting you can adjust your timer accordingly. Always be conservative so the motor won’t quit unexpectedly and you will have enough battery to land under power.
Take off
Until you have become comfortable with flying your plane, do not fly if the wind speed is greater than 10 mph [16 kilometers/hr].One final check before takeoff : always double – check the flight control response to your inputs from the transmitter before every flight. Be certain the ailerons, elevator and rudder respond correctly and that none of the controls have inadvertently become reversed. Don’ t forget to fully extend the transmitter antenna.If the surface is smooth (such as paverment or blacktop) the plane cart take off from the ground. But most grass is probably too tall, so if flying from grass the model will have to be hand launched.
ROG(Rise off Ground) Take off
If taking off from the ground, place the model on your “runway” with the nose pointing into the wind–this will reduce the ground speed that must be reached and automatically provide “heading assist” making steering and takeoff easier. Slowly advance the throttle, adding rudder correction as needed to keep the model rolling straight. When the plane become “light”continue to apply throttle until you are at full power all this will happen in a few seconds. When sufficient liftoff speed has been reached, gradually apply “up” elevator allowing the model to leave the ground. Do not “yank” up on the stick rather, be smooth and allow the plane to establish a gentle climb.Once you have reached a safe flying speed at a comfortable altitude (approximately 50′ [15m]), work the controls as necessary to establish a gentle turn away from the runway.
Hand-Launch
Until you have become efficient at flying your plane, always use an assistant to hand-launch your model.Have your assistant hold the model by the bottom of the fuselage. When both of you have signaled “ready”, advance the throttle to full power. Your assistant should run a few steps with the plane held high above his head, and then give the model a swift, but controlled toss at a level, or slightly nose – up attitude. lnitially, the model will gently ascend, but within a few seconds it will reach enough speed to climb. Gently add “up” elevator to establish the climb.Once you have reached a safe flying speed at a comfortable altitude (approximately 50′ [15m]), work the controls as necessary to establish a gentle turn away from the runway.
Flying
One thing to remember is that, when the plane is flying away from you, moving the aileron stick to the right will make the plane bank to your right.However, when the model is flying toward you, moving the aileron stick to the right will make the plane move to your left. Of course, the plane is still responding the same way, it’s just that your orientation has reversed. This must be kept in mind while learning to fly (and is also a good reason to take flight lessons from an experienced pilot!).To establish a turn, “up” elevator (pulling back on the stick) is usually required along with aileron input to get the model into a bank. To stop the turn, apply a small amount of opposite aileron.Once you get the plane into the air and have climbed to a comfortable altitude, the first “order of business” will be to “trim” the model for straight – and – level flight. The model flies best at approximately 3/4-throttle. Adjust the trims on the transmitter to make minor control surface adjustments as necessary until the plane will fly straight without any control inputs. Often, your assistant can reach over and adjust the trims for you.Remember to keep the model high enough to give yourself time to make corrections, but don’ t let it get too far away. Otherwise, it will be difficult to detect its attitude and which way it is going.One final check before landing: see how the model will react when it’s time to land and you cut the power. To do this, while still at altitude, cut the motor power. The model should establish a gentle, downward glide path. This is how the model will react when it’s actually time to land. Add power and climb back up to your original altitude. Try again, this time adding flaps.To climb, add throttle and immediately take the flaps back out. Practice a few of these “climb and glides” to judge how far out you will need to be when its time to land.
Landing
Make sure that the airplane initiates an ascending glide path. If necessary, add power to extend the glide path to reach control the glide path and altitude.Continue to apply elevator until the mode touches down at which time you should be holding full, or nearly full up elevator. This will cause the airplane to slow and settle to the ground.CAUTION: If, during a rough landing, the propeller becomes jammed and cannot rotate, the battery and speed control will become very hot if you attempt to add power. Immediately move the throttle down to stop the moto.
After Flight
Disconnect the battery and remove it from the airplane. Then, turn off the transmitter. Allow the battery to cool airplane to make sure nothing has become loose or damaged.For improved safety and longevity of the LiPo battery it’s best to store it only partially charged for any length of time. Storing the LiPo battery at approximately 50% charged (which is approximately 3.85V per cell) is typically best, however it will take some careful management of the charge time and the use of a volt meter to achieve this voltage.If you have the equipment and skills to achieve the 50% charge level for storage it is recommended. If not, simply be sure to not store the battery fully charged whenever possible. In fact, as long as the battery will be stored at approximately room temperature and for no more than a few weeks before the next use, it may be best to store the battery in the discharged state after the last flight (as long as the battery was not over-discharged on the last flight).
report this adPRODUCED, DESIGNED AND BACKED BY 
[xyz-ips snippet=”download-snippet”]