Touchstone 50” Recessed Electric Fireplace 86273
WARNING: Read and understand this entire owner’s manual, including all safety information, before plugging in or using this product. Failure to do so could result in fire, electric shock, or serious personal injury.CAUTION: Keep this owner’s manual for future reference. If you sell or give this product away, make sure this manual accompanies this product.
IMPORTANT SAFETY INFORMATION
WARNING!
- THIS FIREPLACE IS HOT WHEN IN OPERATION AND CAN CAUSE SEVERE BURNS
- Do not operate fireplace before reading and understanding operating instructions. Failure to operate fireplace according to operating instructions could cause fire or injury.
- Risk of burns. This fireplace is HOT when in operation and heating element is ON. Power to the fireplace should be turned off and the fireplace allowed to cool before servicing. To disconnect power to the fireplace, turn controls to off, then remove plug from outlet.
- Do not install damaged, incomplete, or substitute components.
- Young children should be carefully supervised when they are in same room with fireplace. Toddlers, young children and others may be susceptible to accidental contact burns. A physical barrier is recommended if there are at risk individuals in the house. To restrict access to the fireplace, install an adjustable safety gate to keep toddlers, young children and other at risk individuals away from the fireplace and hot surfaces. Ensure that you have incorporated adequate safety measures to protect infants/toddlers from touching hot surfaces.
- Clothing and other flammable material should not be placed on or near the fireplace.
- Due to high temperatures, the fireplace should be located out of traffic and away from furniture and draperies.
- It is imperative that that the control compartments, circulating blower, and its passageway is the fireplace is kept clean.
- Under no circumstances should this fireplace be modified.
- Do not use the fireplace if any part has been under water.
- Do not operate the fireplace with the glass panel removed, cracked or broken.
- Keep the packaging material out of the reach of children. As with all plastic bags, these are not toys and should be kept away from children and infants.
- Servicing should only be done while the fireplace is disconnected from the power outlet.
- Unplug fireplace if not being used for an extended period of time.
- Do not operate this fireplace with a damaged cord or plug after the fireplace malfunctions, has been dropped, or damaged in any manner.
- INDOOR USE ONLY! Do not use outdoors.
- Never locate fireplace where it may fall into a bathtub or other water container.
- Do not run the cord under carpeting. Do not cover cord with throw rugs, runners, or the like. Arrange cord away from traffic area and where it will not be tripped over.
- Connect to properly grounded outlets only.
- Do not insert foreign objects into any ventilation or exhaust opening as this may cause and electric shock, fire, or damage to the fireplace.
- To prevent a possible fire, do not block the air intakes or exhaust in any manner. Do not use on soft surfaces, like a carpet, where openings may be blocked.
- Ensure clearances to combustibles are maintained when building a mantel or shelves above the fireplace. Elevated temperatures on the wall or in the air above the fireplace can cause melting, discoloration or damage to the decorations, a TV or other electronic components.
www.touchstonehomeproducts.com
Fireplace Specifications
| Model Number | 86273 |
| Description | Recessed 50” |
| Voltage | 120v AC |
| Watts | Max 1500W |
| Amps | 15 AMP |
| Fireplace Width | 50 3/8” |
| Fireplace Height | 21 ½” |
| Fireplace Depth | 5 ½” |
| Net Weight | 60 lbs |
| Gross Weight | 65 lbs |
ETL Approval Listing InformationThis fireplace has been tested in accordance with the ETL Intertek Standards for fixed and location-dedicated electric room appliances in the United States and Canada. If you need assistance during installation, please contact our technical support department at 800-215-1990 option 2.
Note: This fireplace must be electrically wired and grounded in accordance with local codes or, in the absence of local codes, with National Electric Code ANSI/NFPA 70-latest edition in the United States or the Canadian Electric Code, CSA C22.1 in Canada.
Dimensional Drawing
Unpacking Your Fireplace
Parts and Hardware
Tools Required• Phillips screwdriver• Stud finder• Level• Tape measure• Electric drill• 1/4” wood drill bit
What’s in the Box
Unpacking and Setup
Unpacking Instructions: Remove all parts and hardware from the carton and place them on a clean, soft, dry surface. Check the parts list to make sure no parts are missing. If parts are missing, please contact technical support at 800-215-1990 option 3 for replacement.
NOTE: Dispose of plastic bag, as it may cause choking hazard with young children. Do not let children play with plastic bag.
Wiring
The 86273 series recessed fireplace can either be plugged into a grounded 3-prong outlet or hard wire connection.Testing the Fireplace Prior to Installation
- Before installing the fireplace, test the fireplace to make sure that it operates properly.
- Plug fireplace into approved outlet and power on fireplace. Once fireplace is tested, continue with installation.
- If you have any problems, please contact technical support at 800-215-1990 opt 2.
3-prong Outlet Installation
- Only use this fireplace on a 120V AC, 15-Amp grounded circuit. Never overload the circuit. If this fireplace trips the circuit breaker, unplug all other appliances on the same circuit before the next use. Avoid plugging other appliances into the same circuit as this fireplace.
- Always check the fireplace plug and connections before each use.
- Never plug this fireplace into an outlet that is cracked or has any loose wires or connections. Plugging this fireplace into a faulty outlet could result in the outlet overheating or catching fire.
- Make sure this plug fits securely into the outlet. Faulty wall outlet connections or loose plugs can cause the outlet to overheat. If the outlet or faceplate is hot, discontinue use immediately and have a qualified electrician inspect and/or replace the faulty outlet.
- The power cord supplied with the heater has three prongs: two flat blades (live and neutral) and one round pin (ground). If a 3-slot receptacle is not available, an adapter MUST be used. The adapter MUST be properly grounded to the outlet box (see figure below).
NOTE: Adapter NOT INCLUDED.
Hard Wire Connection
If it is necessary to hard wire this appliance, a qualified electrician must remove the cord connection, and wire the appliance directly to the house hold wiring.This appliance must be electrically connected and grounded in accordance with local codes, if hard wired. In the absence of local codes, use the current ANSI/NFPA 70 NATIONAL ELECTRICAL CODE in the United States or the current CSA C22.1 CANADIAN ELECTRICAL CODE in Canada.
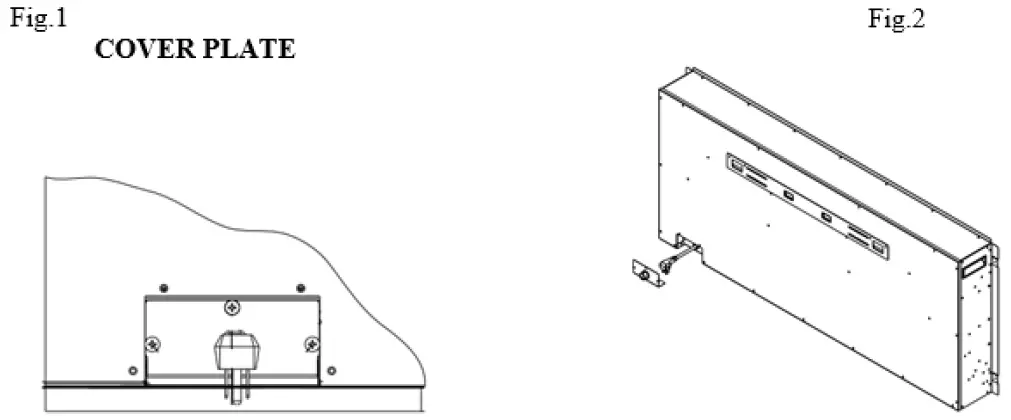
A. Remove the cover plate from the left side bottom of the appliance by removing the three screws, as shown above. Save screws for installation of new cover plate. (figure 1)B. Remove the wire connectors from the power cord. Keep power cord, in case needed in future.C. Take the new cover plate and punch a 7/8”. Thread your wiring through the hole in the cover plate for connecting to the wires in the 86273 fireplace.D. Using the wire connectors, connect the ground green wires (G), the common white wires (N) together, then the hot black wires (L) and then the refer to Figure 3.E. Reinstall the cover plate using the three screws, as shown in Figure 1.

Installation
WARNINGS
- Due to high temperatures, keep the fireplace out of high traffic locations.
- Keep combustible materials, such as furniture, pillows, bedding, papers, clothes, and curtains at least 36” away from the front of the fireplace.
- Never install the fireplace where it may fall into a bathtub or other body of water.
- Wear safety gloves and safety glasses for protection during installation. Broken glass may cause injury or harm.
- Prevent contact with loose insulation. Do not install the fireplace against a vapor barrier or exposed insulation.
- Do not expose the fireplace to the elements (rain, etc).
Choosing Installation Location
Choosing Wall Location
- Measure wall location to ensure that fireplace will fit on desired wall location.
- Minimum clearances (measurements taken from front of glass panel):
- Select a location that is not prone to moisture and is located at least 36” away from combustible materials such as curtains, drapes, furniture, bedding, or other combustible materials.
- See Safety Information on page 3 for warnings about safe placement, safe installation, and proper use of this product.
| Bottom of Fireplace to Floor: 6” |
| Sides of Fireplace: 0” |
| Back of Fireplace: 0” |
| Top of Fireplace: 8” to mantel |
| Top of Fireplace: 8” to TV |
| Top of Fireplace: 8” to ceiling |

Removing The Glass Panel
Prior to installation, it is best to remove the glass panel. Please remove the glass panel as per instructions below:Instructions
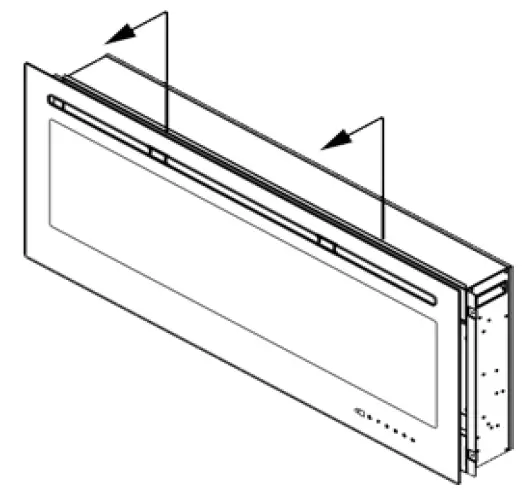
- There are 6 screws securing the glass panel to the fireplace. Remove 2 screws securing the glass panel to the fireplace in the front vents of the fireplace (A). Then remove all 4 screws (2 on the left side and 2 on the right side) on the side of the fireplace (B). These screws are for shipping purposes only and will not be reused after installation.
 Note: For recessed installation, only the front 2 mounting screws will be reinstalled. The side screws do not need to be reinstalled.
 - After removing screws, lift glass panel UP and STRAIGHT OUT toward you to remove from fireplace. Place glass panel in a soft, dry place.
CAUTION: It is recommended that 2 people remove the glass panel to minimize change of breakage.
Recessed Installation
- Due to many different finish materials use on walls, it is highly recommended that you consult your local builder before you install this fireplace in the wall.
- Select a location that is not prone to moisture and is located at least 36” away from combustible materials such as curtains, drapes, furniture, bedding, or other combustible materials.
- In order to avoid the possibility of exposed insulation or vapor barrier coming in contact with the fireplace, it is recommended that the walls of the fireplace enclosure be “finished” (ie. Sheetrock, drywall, etc) as you would finish any other outside wall of your home. This will ensure that clearance to combustibles is maintained within the wall cavity.
- Never install fireplace into load-bearing walls. When recessing fireplace in a wall, recess into non-load bearing walls ONLY!
Instructions:
- Choose a location in the wall to install fireplace.
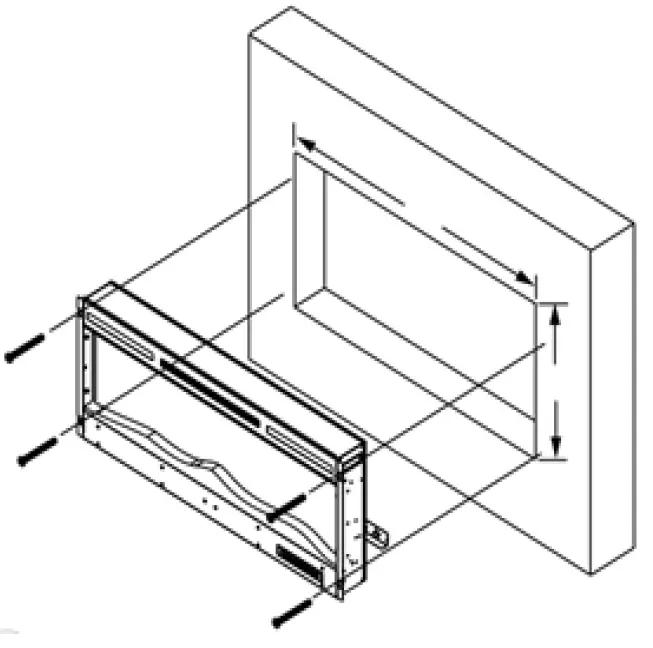
- Create opening in the wall according to the rough opening dimensions listed in the chart below:

- With the help of a second person, insert fireplace into wall opening and secure with mounting screws provided.

- Once the fireplace is installed in the wall, place crystal embers or fire log in the fireplace.
a. Crystal Ember Installation
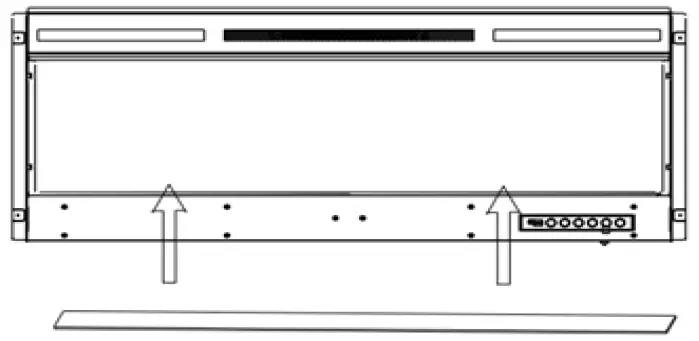
- Place plastic tray strip in fireplace above the LED lights as shown in the diagram to the right.

- Carefully, place crystal embers on plastic strip as illustrated in the picture to the right. Apply an even layer from side to side.
b. Fire log Installation
1. Place fire log in fireplace as illustrated below.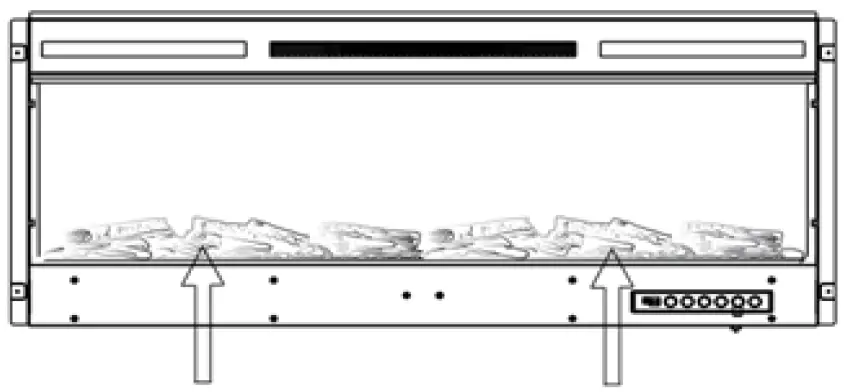 5. Once completed installing crystal embers or fire log, reinstall glass panel. The hooks on the back of the glass panels fit into the slots on the side of the firebox. Once in the slots, the glass panel goes down and locks into place.

Wall Mounted Installation
- Due to many different finish materials use on walls, it is highly recommended that you consult your local builder before you install this fireplace on the wall.
- Select a location that is not prone to moisture and is located at least 36” away from combustible materials such as curtains, drapes, furniture, bedding, or other combustible materials.
Instructions
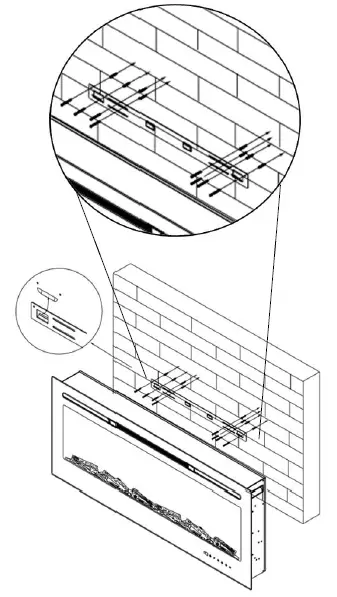
- With glass panel removed (see p.10 for instructions on removing glass panel), have two people hold the fireplace against the wall to determine the final location.
- Place the unit face down on a soft, non-abrasive surface. Remove the bracket from the back of the unit by removing the screws holding the bracket to the back of the fireplace.

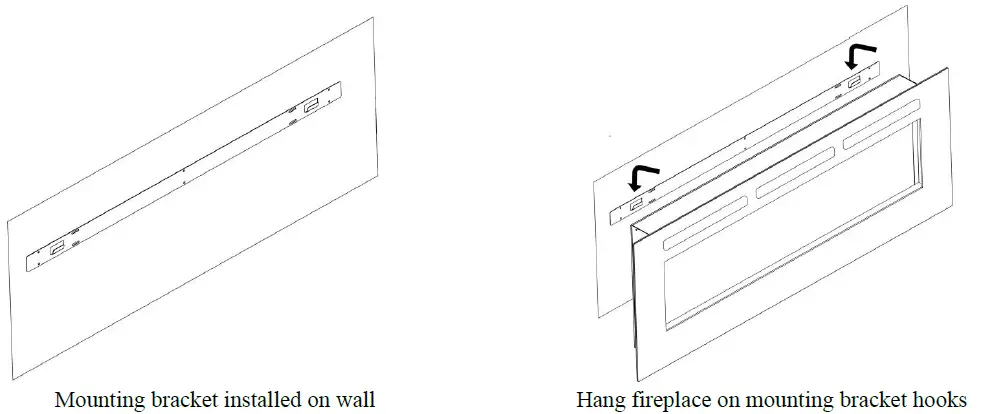
- Mark location of bracket on wall and then mount the bracket to the wall using the supplied screws and dry wall anchors. The hooks in the bracket MUST be pointed away from the wall, upward, and level.Note: Mount bracket to at least 2 studs. If 2 studs cannot be used, ensure that the supplied dry wall anchors are used to affix the bracket to the wall and the bracket is adequately secured before moving to the next step.

- With the wall mounting bracket installed, have 2 people lift the fireplace up and insert the 2 hooks on the bracket into the back of the fireplace. The 2 hooks on the mounting bracket will line up with the 2 holes on the back of the fireplace. Once aligned, the hooks will insert into the holes in the back of the fireplace and lock in the down position.

- Check the fireplace for stability, ensuring that the bracket will not pull free from the wall. Once satisfied, install crystal embers/fire log and reinstall glass panel. See instructions on 12-13 for installing the crystal embers/fire log and front glass panel.
Operating Fireplace
Once the fireplace has been plugged into a grounded outlet, the fireplace is now ready for operation. Ensure that the house circuit breakers for the power supply are turned on.
PowerPlug the power cable into a 110v 15 amp grounded outlet. Make sure the outlet is in good condition and that the plug is not loose. NEVER exceed the maximum amperage for the circuit. DO NOT plug other appliances into the same circuit.
Methods of OperationThis electric fireplace can be operated by the TOUCH PANEL, located on the BOTTOM right side glass panel of the fireplace, or by the battery-powered REMOTE CONTROL. The operation and functions of the two methods are the same.

Remote Control Operation
- This remote control uses one CR2025 battery (included)
- Instructions for battery installation are located in the remote control battery compartment.
- To improve operation of the remote control, aim the remote control at the front of the fireplace. DO NOT PRESS the buttons too quickly. Give the unit time to respond to each command.
- NOTICE: NEVER dispose of batteries in fire. Failure to observe this precaution may result in an explosion. Dispose of batteries at your local hazardous material processing center.
Remote Control and Touch Panel Functions
| BUTTON | FUNCTION | ACTION & INDICATION |
 |
ON: Enables control panel functions and remote control. Turns on the flame effect.
OFF: Disables control panel functions and remove control. Turns off the flame effect. |
1. Press once. Indicator light turns on. Power turns on. All functions enabled.
2. Press again. Flame effect turns off. Unit goes to standby. All functions turn off. |
 |
TIMER button: Control time settings to turn off fireplace at selected time.
Settings range from 1 hour to 8 hours. |
1. Press once. Increases the timer shut off time by 1 hour.
2. Press again until desired setting is reached. Setting range from 1 to 8 hours. |
 |
FLAME button: Makes flame effects dimmer or brighter.
NOTE: Flame effect stays on until power button is turned off. Flame effect must be on for heater to turn on. |
1. Press once to change the flame brightness.
2. Press again until desired setting is reached. |
 |
COLOR button: Changes the color of the flame. | 1. Press once to change the color of the flame.
2. Press again until desired flame color setting is reached. |
 |
HEATER button: Turns heater on and off.
NOTE: The heater only works when the flame effect is on. NOTE: To prevent overheating, the heater fan will blow cool air for 8-10 seconds before the heater turns on, and after the heater turns off. |
1. Press once. Indicator lights up. Fan blows cool air for 10 seconds and 750W heater turns on and blows warm air.
2. Press again: Indicator lights up. 1500W heater turns on and blows hot air. 3. Press again. Heater turns off. |
 |
TEMPERATURE button: Control temperature settings to choose temperature as desired.
Setting ranges from 62F to 82F. |
1. Press once. LED display is turned on and temperature is set to 62F by default.
2. Press again unit desired setting is reached. Note: Heater will turn off when temperature reaches desired setting. |
Troubleshooting
| Problem | Possible Cause | Solution |
| 1. Fireplace turns off and will not turn on. | 1. Fireplace has overheated and safety devise has caused thermal switch to disconnector home circuit breaker has opened. | 1. Reset switch by turning main power off and waiting turning it back on or breaker circuit breaker. |
| 2. Flame is not moving. | 1. Loose wiring.
2. Flame motor defective 3. Flame rod out of place |
1. Inspect wiring for loose connections.
2. Call a qualified service technician to replace flame motor. 3. “Flame Rod” out of place due to rough transit/handing of the product. This issue can be corrected as simple as removing the glass, flipping the fireplace upside and down, removing a set of screws that are holding the bottom frame plate and placing the flame rod back into place. |
| 3 Flame is not visible. | 1. Wiring is loose | 1. Disconnect from power source and inspect wiring for loose connections and repair or replace if necessary.
2. Push the flame button to high |
| 4 Log set and /or is not glowing. | 1. Wiring is loose
2. Ember is off mode |
1. Disconnect from power source and inspect wiring for loose connections and
repair or replace if necessary. |
| 5 Remote control does not work. | 1. Low batteries.
2. Not aiming control correctly. 3. Defective remote control and /or sensor |
1. Replace batteries in remote control.
2. Aim control at sensor located directly behind glass screen in center of unit just above logs. 3. Replace remote control and/or sensor. |
Temperature Limiting Control
This heater is equipped with a Temperature Limiting Control. Should the heater reach an unsafe temperature, the heater will automatically TURN OFF. To reset, please do the following:
- Unplug the power cord from the outlet.
- Turn ON/OFF switch on the CONTROL PANEL to OFF. Wait 5 minutes for fireplace to cool down.
- Inspect the fireplace to make sure no vents are blocked or clogged with dust or lint. If they are, use a vacuum to clean the vent areas.
- With the POWER switch in the OFF position, plug the power cord back into the outlet.
- If the problem continues, have your outlet and wiring inspected by a professional. If the outlet is OK, please contact our customer support department at 800-215-1990.
Care and Maintenance
Cleaning
- ALWAYS turn the heater OFF and unplug the power cord from the outlet before cleaning, performing maintenance, or moving the fireplace. Failure to do so could result in electric shock, fire, or personal injury.
- NEVER immerse in water or spray with water. Doing so could result in electric shock, fire, or personal injury.
Metal:
- Buff using a soft cloth, slightly dampened with citrus oil-based product.
- DO NOT use brass polish or household cleaners, as these products will damage the metal trim.
Glass:
- Use a good quality glass cleaner sprayed onto a cloth or towel. Dry thoroughly with a paper towel or lint-free cloth.
- NEVER use abrasive cleansers, liquid sprays, or any cleaner that could scratch the surface.
Vents: Use a vacuum or duster to remove dust and dirt from the heater and vent areas.
Plastic:
- Wipe gently with a slightly damp cloth and a mild solution of dish soap and warm water.
- NEVER use abrasive cleansers, liquid sprays, or any cleaner that could scratch the surface.
Maintenance
- RISK OF ELECTRIC SHOCK! DO NOT OPEN any panels. No user-serviceable parts inside!
- ALWAYS turn the heater OFF and unplug the power cord from the outlet before cleaning, performing maintenance, or moving the fireplace. Failure to do so could result in electric shock, fire, or personal injury.
Electrical and Moving Parts:
- The fan motors are lubricated at the factory and will not require lubrication.
- Electrical components are integrated in the fireplace and are not serviceable by the customer.
Storage: Store fireplace in a clean, dry place when not in use.
Warranty
Touchstone Home Products®, Inc warrants our electric fireplaces to be free of defects in material and workmanship for one year from date of purchase. Touchstone will repair or replace any fireplace or fireplace part that is deemed defective or becomes defective during normal use within one year after the date of purchase.
Electrical components, such as fan motor, heater motor, control board, remote control, and control panel are covered under warranty for one year from date of purchase. Touchstone Home Products® will provide replacement parts free of charge during the first year of the warranty.
Replacement parts and fireplace units are covered under a 90-day warranty or the remainder of the original one year manufacturer’s warranty from original date of purchase, whichever is greater.
Touchstone Home Products®, Inc does not warrant its products against damage caused by third parties.Touchstone Home Products®, Inc does not cover damages caused by misuse, alterations, accident, lack of maintenance, abuse or neglect. Parts installed from other manufacturers will void this warranty.
The warranty does not cover paint scratches, cosmetic blemishes, dents, corrosion, or other normal wear and tear associated with the fireplace. Damage to fireplace or other components due to water, weather damage, long periods of dampness, condensation, damaging chemicals or cleaners are not covered under warranty.This warranty does not cover breakage of fireplace glass panel.
Touchstone Home Products® will not be responsible for installation, labor, or any other expenses related to the reinstallation of a warranted part, and such expenses are not covered under warranty.Extended warranty coverage for the fireplace is available by contacting Touchstone Home Products® directly at 1-800-215-1990.
www.touchstonehomeproducts.com
References
[xyz-ips snippet=”download-snippet”]

 Note: For recessed installation, only the front 2 mounting screws will be reinstalled. The side screws do not need to be reinstalled.