
TP-Link10 Gigabit PCI Express Network AdapterInstallation Guide
1. Hardware Connection
a. Turn off your computer, unplug the power cable and remove the case panel
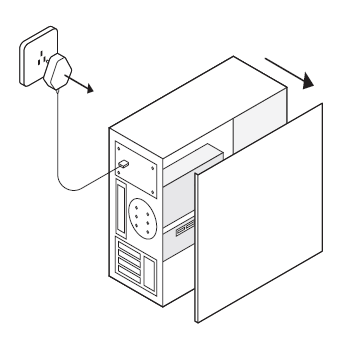
b. Locate an available PCI-E slot and carefully insert the adapter.
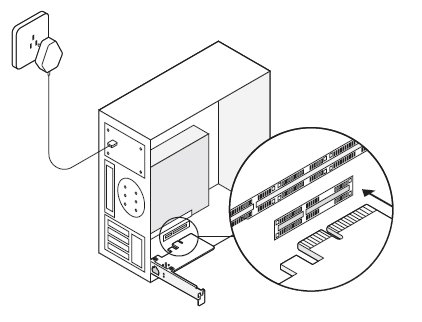
Note:If the bracket is not suitable for your computer, detach it from the adapter’s board and replace it with the low-profile bracket.
c. Replace the case panel, plug in the power cable and turn on your computer.Then connect the Ethernet cable to the adapter.

2. Driver Installation
a. Insert the CD and run the Autorun.exe.
Note:
- You can also download the driver or check the new release athttps://www.tp-link.com/download-center
- To install driver on Linux, refer tohttps://www.tp-link.com/faq-2868.html
b. Select your adapter and follow the instructions to complete the installation.
Note:If you can’t install the driver successfully, disable the antivirus software and firewall, then try again.

LED Indicator

Note:If neither LED flashes, check whether the adapter is detected by the computer or the driver is successfully installed.
Troubleshooting
Q1: How can I find the driver if the CD is lost or broken?
- You can find and download the driver athttps://www.tp-link.com/download-center
Q2: How can I find the hardware version of the adapter?
- The hardware version (Ver:X.Y) is printed on the product label on the package or the adapter. The number X is the hardware version of the adapter.
- For more detailed instructions, please visithttps://www.tp-link.com/faq-46.html
Q3: What should I do if my computer cannot find the new hardware?
- Restart your computer and try again.
- Power off the computer, then reinsert the adapter or try another PCI-E slot.
- If the problem persists, contact our Technical Support.
Support
For technical support, replacement services, user guides, and other information, please visit https://www.tp-link.com/support, or simply scan the QR code.
- Do not attempt to disassemble, repair, or modify the device. If you need service, please contact us.
- Keep the device away from water, fire, humidity or hot environments.
©2020 TP-Link 7106508928 REV1.0.1
References
[xyz-ips snippet=”download-snippet”]