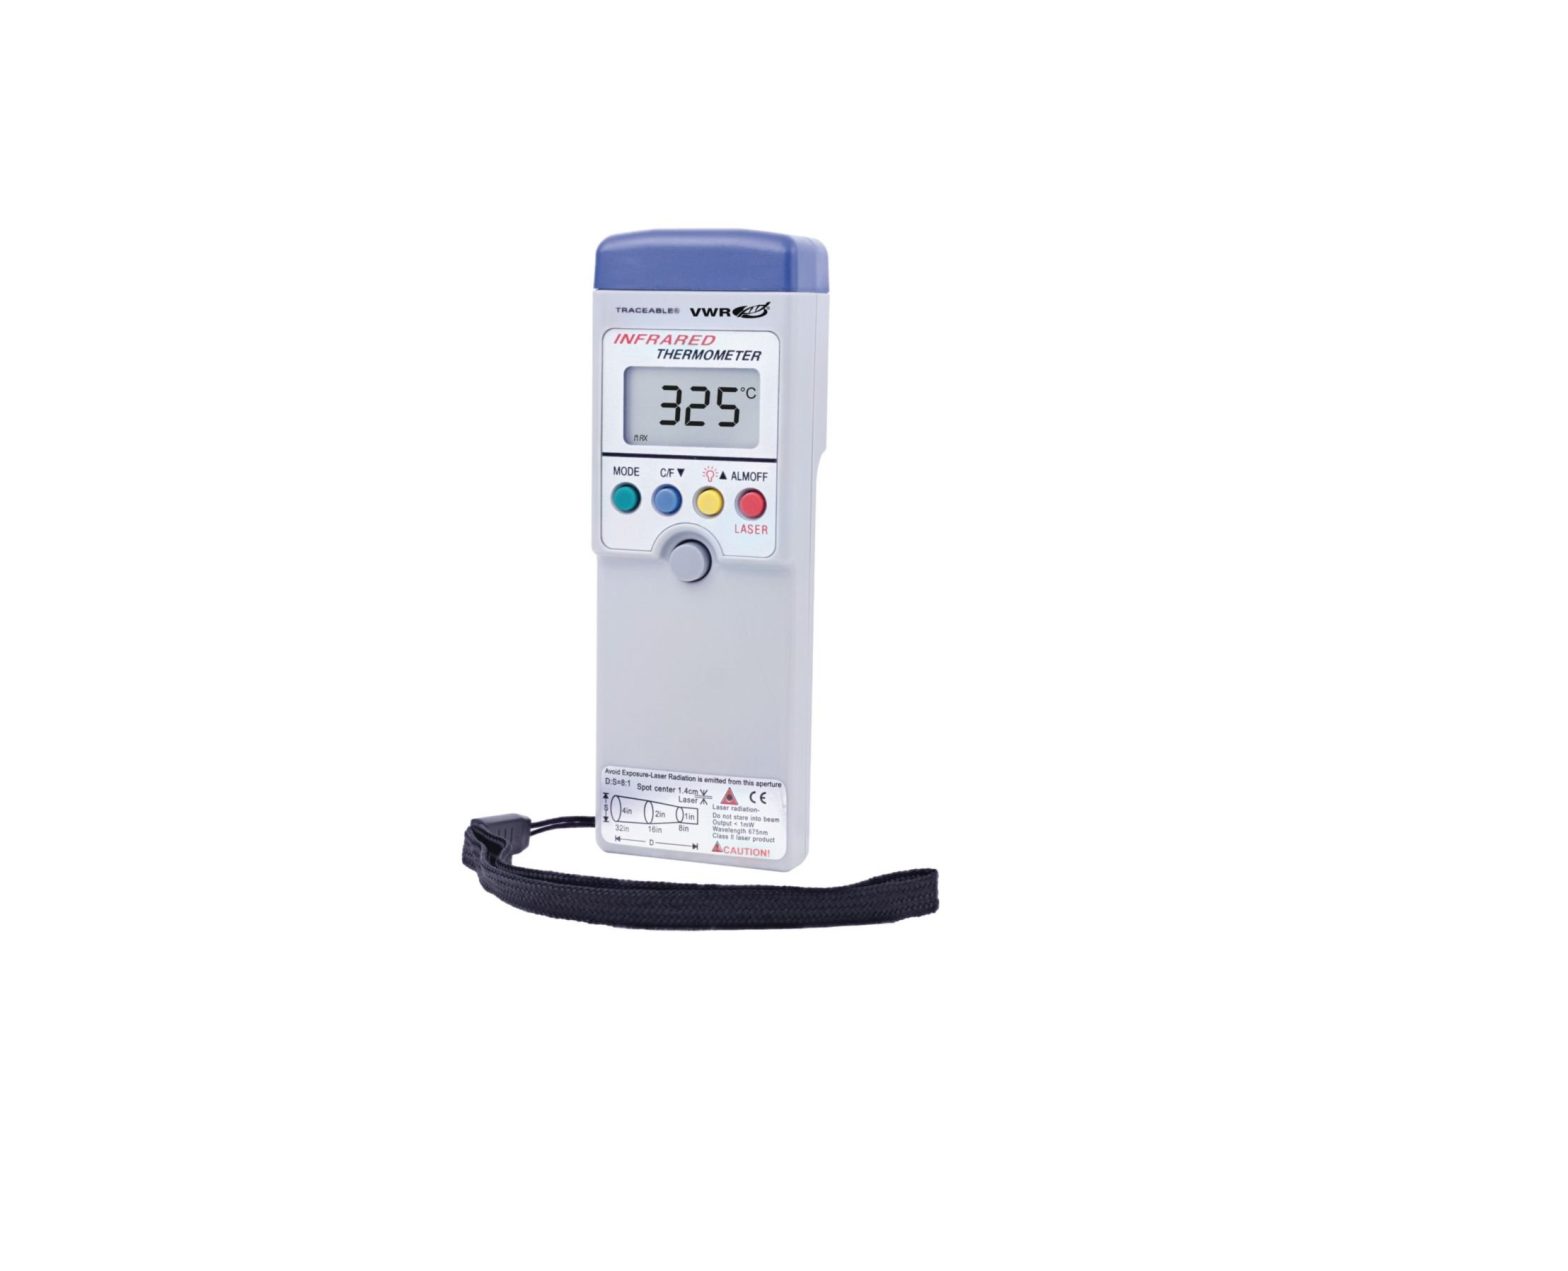
TRACEABLE 4559274 Infrared Thermometer with Memories-Alarm

SPECIFICATIONS
| Range | –4 to 788°F / –20 to 420°C |
| Resolution | 1° |
| Accuracy | ±2° C, ±2% |
| Alarm | Audio |
| Emissivity | 0.3 to 1.0 |
| Sampling Rate | 0.5 second |
| Features | Backlight, 9 Point Memory, Laser Targeting, Programmable Alarm |
| Included | Lanyard and carrying case |
| Battery | 9-Volt |
CONTROLS AND INDICATORS
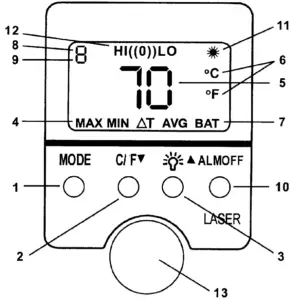
- MODE key. Temperature display mode select, memory recall and programming select button.
- C/F ▼ key. Fahrenheit/Celsius select button and mode down/decrease button.
 /▲ key. Backlight button and up/increase selector.
- MAX/MIN/▲T/AVG. Temperature display mode indicator.
- Temperature measurement reading.
- C/F. Fahrenheit/Celsius scale indicator.
- BAT. Low battery annunciator.
- . Memory location annunciator.
- Emissivity annunciator.
- ALMOFF key. Alarm mode indicator button and laser on/off.
- . Laser-on annunciator
- HI((0))LO. Alarm mode indicators.
- POWER/HOLD key. Turns unit off/on and holds reading.
DISTANCE / SPOT RATIO
To take temperature measurements, point the meter at the surface to be measured and press the power button.There are other factors that may effect measurement accuracy – the target must completely fill the spot diameter seen by the infrared senor, otherwise readings will be influenced by the surface surrounding the target.The ratio of the distance to the size of the spot being measured is 8:1. For example, an object’s diameter of 100mm can be measured from 800mm away.
Power Key
With each press of the power key, five values are recorded:
- MAX – Highest temperature measured
- MIN – Lowest temperature measured.
- Difference between MAX and MIN
- Time-weighted average temperature.
- The value last displayed before releasing the button.
Selecting °F or °C
Pressing the blue “C/F ” button will toggle the temperature in °F or °C.
Backlight Operation
The yellow ” /” button will toggle the backlight off and on. Once the backlight has been turned on, it will come on each time the power key is pressed until it is toggled off.
Measurement Modes
Press and hold down the power button. While holding down the power button, press the mode button. Each press of the MODE button will select one of the 5 temperature modes. You can cycle through the modes in this order:
- Real-time temperature – the value is updated once every 1/2 second (no words or symbols appear on lower line).
- “MAX” (Maximum temperature) – press the MODE button repeatedly until you see the word MAX displayed on the LCD. In the MAX mode the highest temperature measurement taken is displayed on the LCD and will update each time a higher temperature is measured.
- “MIN” (Minimum temperature) – Press the MODE key repeatedly until you see the word MIN displayed on the LCD. In MIN mode, the lowest temperature measurement taken is displayed on the LCD and will update each time a new lower temperature is measured.
- ▲T “(Temperature differential between MAX and MIN) – Press and release the mode button repeatedly until “▲T” is displayed on the LCD.
- “AVG” (Calculated (time weighted) average temperature)- Press and release the MODE button repeatedly until AVG is displayed on the LCD. Actual surface temperature is not dis-played while taking measurement in this mode.The term “time” in reference to the averaging mode, means all temperature measurements are averaged together from the first press of the power key. If you were to walk along a wall for one minute taking readings that were generally 72 degrees, then walk by a spot for 1/2 second that was 20 degrees, no significant change in average temperature would be displayed.
NOTE: The last mode selected will remain selected the next time the meter is turned on.
Recalling memory points
With each press of the power key, values are recorded in memory:
- MAX – Highest temperature measured
- MIN – Lowest temperature measured.
- Difference between MAX and MIN
- Time-weighted average temperature.
- The value last displayed before releasing nthe button.
A total of 9 memory sets of four values (MAX, MIN, ▲T, AVG) are achieved by pressing the power key nine times. All nine are available for recall.To review recorded values, start with the power off then press and release the MODE button. The number “1” will appear on the display indicating the last of the 9 sets of values recorded in memory. Press the yellow button to view 2nd value, and press it again to view the next reading. To view the previous value press the blue button.You may now either cycle through each of the values recorded during the last power key presses, or go to one of the values, then select the number of the power key presses you wish to review.For more examples, to select the maximum temperature measured three power key presses ago, you may either:
- Press the MODE button once. The number “1” and a value appear.
- Press the (/▲) button twice. The number “3” and a value appear.
- Press the MODE button once again. The word MAX appears in the lower left of the LCD, along with the highest temperature recorded three prior power key presses.
OR
- Press the MODE button once. The number “1” and a value appears.
- Press the MODE button once again. The word MAX appears in the lower left of the LCD, along with the highest temperature recorded during the power key press.
- Press the (/▲) button twice. The number “3” and the value of the maximum temperature recorded from three power key presses ago appears. To maneuver up and down through recorded values, press the appropriate (C/F ▼) or ( /▲) button to view the different readings on the LCD.
Temperature Alarm
NOTE: Operate every step in 4 seconds, otherwise the meter will turn off automatically to conserve battery life.An audible alarm will sound at both an upper and a lower temperature limit. To adjust the alarm temperatures:
- Turn the power off.
- Press and hold the MODE button until “HI” or “LO” are displayed. (Do not press the power key). Select the high alarm by pressing the “C/F ” and press the ” /” button to select the low temperature alarm.
- When desired alarm is selected press the MODE button again to view a value.
To decrease the temperature alarm setting press the “C/F ▼”. Press the “![]() /▲” button to increase the temperature alarm setting. Pressing the MODE button will lock in the alarm temperature value. “E”, “0.95” (pre-set emissivity) are shown on the top left of the screen, press MODE again and the display turns off.When taking temperatures with the power button pressed down, an alarm will sound when the temperature is above or below preset alarm values.
/▲” button to increase the temperature alarm setting. Pressing the MODE button will lock in the alarm temperature value. “E”, “0.95” (pre-set emissivity) are shown on the top left of the screen, press MODE again and the display turns off.When taking temperatures with the power button pressed down, an alarm will sound when the temperature is above or below preset alarm values.
Emissivity Adjustment
Emissivity adjustments are used to provide a truer temperature reading. Different materials radiate infrared energy at slightly different temperatures. The emissivity adjustment is used to compensate for different types of materials.The factory set emissivity of 0.95 will cover 90% of typical applications. The following instructions indicate how to change the emissivity setting. The following table provides a guide of different emissivity values for different materials.When the emissivity of an object is unknown use a non-infrared thermometer, such as a probe type thermometer to measure the object’s surface. Then adjust the emissivity until the temperature of the Infrared Thermometer matches the temperature of the probe type thermometer. Use this emissivity value to measure similar materials.To set emissivity you must pass through the alarm setting function. Press and hold the MODE button and the LCD displays the alarm adjustment function. Go through the key presses for the alarm setting function. Press the MODE button again to display the current emissivity value (preset to 0.95). The emissivity range is 0.3 to 1.0. Press the “C/F ▼” button to decrease and the “![]() /▲” button to increase the emissivity setting. Pressing the MODE button will lock in the value. This value will become the unit’s default value until reset.
/▲” button to increase the emissivity setting. Pressing the MODE button will lock in the value. This value will become the unit’s default value until reset.
Typical Emissivity Values - METALS
SURFACE EMISSIVITY
Iron and SteelCast iron (polished) …………………………………….0.2Cast iron (tumed at 100oC) …………………………0.45Cast iron (tumed at 1000oC) ………………. 0.6 to 0.7Steel (ground sheet)……………………………………0.6Mild steel …………………………………………. 0.3 to 0.5Steel plate (oxidized) …………………………………..0.9Iron plate (rusted) …………………………… 0.7 to 0.85Cast iron (rough) rusted……………………………..0.95Rough ingot iron …………………………………………0.9Molten cast iron…………………………………………..0.3Molten mild steel………………………………. 0.3 to 0.4Stainless steel (polished)……………………………..0.1Stainless steel (various)…………………….. 0.2 to 0.6AluminumPolished aluminum ……………………………………0.1*Aluminum (heavily oxidized)……………………….0.25Aluminum oxide at 260oC …………………………….0.6Aluminum oxide at 800oC …………………………….0.3Aluminum Alloys, various…………………. 0.1 to 0.25BrassBrass (polished)………………………………………..0.1*Brass (roughened surface)…………………………..0.2Brass (oxide)………………………………………………0.6CopperCopper (polished)……………………………………0.05*Copper (oxide)……………………………………………0.8Molten copper…………………………………………..0.15LeadLeadr (polished)………………………………………..0.1*Leadr (oxide at 25oC)…………………………………..0.3Leadr (oxide)………………………………………………0.6Nickel and Its AlloysNickel (pure)……………………………………………..0.1*Nickel plate (oxide) …………………………… 0.4 to 0.5Nichrome……………………………………………………0.7Nichrome (oxide) ………………………………………0.95Zinc (oxidized)…………………………………………..0.1*Galvanized iron …………………………………………..0.3Tin-plated steel………………………………………….0.1*Gold (polished) …………………………………………0.1*Silver (polished)………………………………………..0.1*Chromium (polished)…………………………………0.1*
Typical Emissivity Values - NON-METALS
SURFACE EMISSIVITY
Refractory & Building MaterialsRed brick (rough)……………………………. 0.75 to 0.9Fire clay……………………………………………………0.75Asbestos ………………………………………………….0.95Concrete…………………………………………………….0.7Marble ……………………………………………………….0.9Carborundum……………………………………………0.85Plaster ……………………………………………………….0.9Alumina (fine grain)……………………………………0.25Alumina (coarse grain)……………………………….0.45Silica (fine grain) …………………………………………0.4Silica (coarse grain)…………………………………..0.55Zirconium silicate up to 500oC…………………….0.85Zirconium silicate at 850oC …………………………..0.6Quartz (rough)…………………………………………….0.9Carbon (graphite) ……………………………………..0.75Carbon (soot)……………………………………………0.95Timber (various)……………………………….. 0.8 to 0.9MiscellaneousEnamel (any color)………………………………………0.9Oil paint (any color) …………………………………..0.95Lacquer ……………………………………………………..0.9Matte black paint…………………………… 0.95 to 0.98Aluminum lacquer……………………………………….0.5Water……………………………………………………….0.98Rubber (smooth)…………………………………………0.9Rubber (rough) …………………………………………0.98Plastics (various, solid)……………………. 0.8 to 0.95Plastic films (0.05 mm thick)…………….. 0.5 to 0.95Polythene film (0.03 mm thick) …………… 0.2 to 0.3Rubber (smooth)…………………………………………0.9Rubber (rough) …………………………………………0.98Plastics (various, solid)……………………. 0.8 to 0.95Plastic films (0.05 mm thick)…………….. 0.5 to 0.95Polythene film (0.03 mm thick) …………… 0.2 to 0.3Paper and cardboard…………………………………..0.9Silicone polish…………………………………………….0.7*Emissivity varies with purity
Laser Targeting
CAUTION: Eye damage may result from direct exposure to laser light . To toggle the laser targeting feature on or off, depress the LASER button. The laser can be engaged from any measurement mode.
ALL OPERATIONAL DIFFICULTIES
If this thermometer does not function properly for any reason, please replace the battery with a new high-quality battery (see “Battery Replacement” section). Low battery power can occasionally cause any number of “apparent” operational difficulties. Replacing the battery with a new fresh battery will solve most difficulties.
BATTERY REPLACEMENT
Erratic readings, a faint display, no display, or BAT appearing on the display are all indicators that the battery must be replaced. Slide the panel on the back of the unit in the direction of the arrow. Unplug the old 9-volt battery and replace with a new 9-volt alkaline battery. Slide the battery compartment cover back into place. Replacement battery Cat. No. 1112.
WARRANTY, SERVICE, OR RECALIBRATION
 report this ad
For warranty, service, or recalibration, contact:
![]() 12554 Old Galveston Rd. Suite B230 Webster, Texas 77598 USAPh. 281 482-1714|Fax 281 482-9448E-mail [email protected] | www.traceable.comTraceable® Products is ISO 9001:2018 Quality Certified by DNV and ISO/IEC 17025:2017accredited as a Calibration Laboratory by A2LA.©2020 Traceable® Products. 92-4472-00 Rev. 5 032420
12554 Old Galveston Rd. Suite B230 Webster, Texas 77598 USAPh. 281 482-1714|Fax 281 482-9448E-mail [email protected] | www.traceable.comTraceable® Products is ISO 9001:2018 Quality Certified by DNV and ISO/IEC 17025:2017accredited as a Calibration Laboratory by A2LA.©2020 Traceable® Products. 92-4472-00 Rev. 5 032420
References
[xyz-ips snippet=”download-snippet”]