TRADIM Smart Led (Filament) Foot Dimmer
USER MANUAL SMART LED (FILAMENT) FOOT DIMMER 6430X
This smart led (filament) foot dimmer (3-100W/VA) is suitable for dimming the following light sources:
- Dimmable (filament) led lamps (230V, max 50W/VA)
- Low voltage led lamps combined with a dimmable led driver (DC) (80W max)
- Incandescent and halogen lamps (230V, max 80W)
- 12V halogen lamps combined with a dimmable electronic transformer (AC) (80W max)
CHARACTERISTICS OF THIS SMART LED (FILAMENT) FOOT DIMMER
- Trailing edge dimmer (‘R,C’), 230V/50Hz, max. load 100W/VA
- The dimmer adapts itself, depending on the connected load
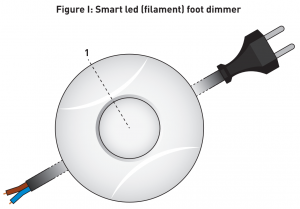
- With the (push) button (1) this dimmer can be fully switched off (u)
- This dimmer comes standard with connection cables and power plug (see figure I)

OPERATION OF THE DIMMER
After safe connection of the dimmer with the light fixture, put the power plug in the wall socket. Switch on the lamp by pressing the push button (1). The lamp will show the last applied dimming value. The storage of the last applied dimming value will take place after the lamp is at least 3 seconds in that light intensity. Keep the push button (1) pressed to change the desired light intensity of the connected lamp. The dimmer runs through a dimming curve from minimum to maximum light intensity and back to minimum. If the desired light intensity is reached, release the push button (1). Switch off the lamp by shortly pressing the push button (1).
INSTALLATION
- Switch off the power before installation (remove power plug from the wall socket)
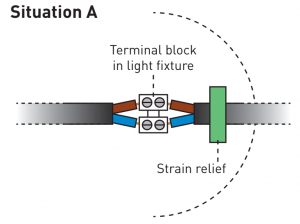
- Connect the cable wires (blue (N) and brown (L) wires) of the output side of the dimmer to:– Situation A: directly to the connector (terminal block) of the light fixture (blue (N) and brown (L) wire) instead of the original connection cable (with switch or dimmer).Don’t forget to mount and fix the cable with the strain relief of the light fixture.– Situation B: mount a female (extension) socket on the blue (N) and brown (L) wire of the dimmer so the original cable (and flat power plug) of the light fixture fits in it. In that case make sure that the eventual cord switch is permanently on.
- With the push button (1) you determine the desired dimming level of the (led) lamp (see ‘Operation of the dimmer’).TOOLS:
- Small flat screwdriver
 – Situation B: mount a female (extension) socket on the blue (N) and brown (L) wire of the dimmer so the original cable (and flat power plug) of the light fixture fits in it. In that case make sure that the eventual cord switch is permanently on.
The manufacturer is not responsible for damage, caused by misuse or improper installation of the dimmer. The warranty period is 2 years from the date of purchase, to be demonstrated to your specialist dealer by means of your purchase receipt.
Save this user manual carefully for (re)installation!
TRADIM Aalsbergen 9, 6942 SE Didam NL www.tradim.nl

References
[xyz-ips snippet=”download-snippet”]