![]()
jx seriesOPERATING MANUALMOVE FORWRRD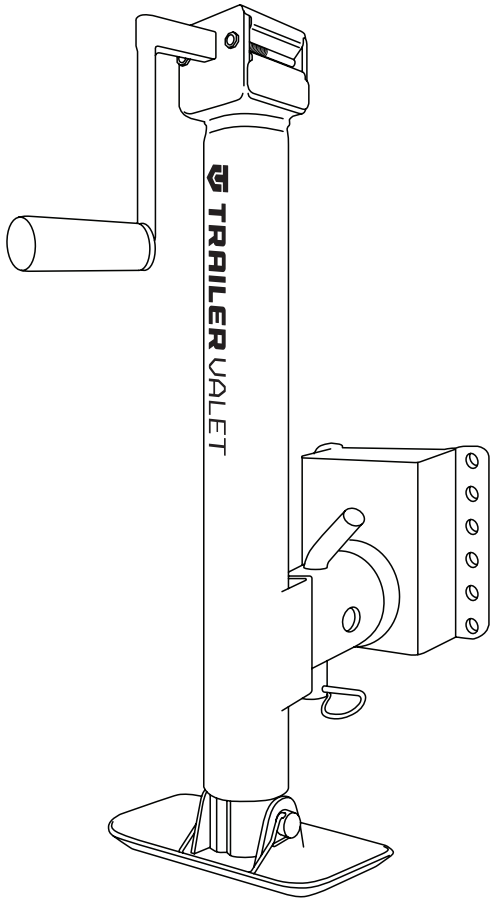
![]() OPERATING MANUAL
OPERATING MANUAL
WARNINGCarefully read and understand all the instructions before connecting your new JX.Failure to follow these guidelines may result in serious injury to persons and property for which Trailer Valet will not be held liable. Do not allow persons to operate or assemble this unit until they have read this manual and have developed a thorough understanding of how the unit works.
THANK YOU FOR YOUR PURCHASE
Congratulations on your purchase of the Trailer Valet JX. For your future reference please complete the owner’s record below:Purchase Date: ______________________Order No.:______________________Retailer:_____________________________Be sure to save your receipt and owner’s manual with warranty information in a safe place.
 IMPORTANT SAFETY INFORMATION
Failure to heed these markings may result in personal injury and/or property damage:
- DO NOT leave your trailer freestanding without the use of wheel chocks.
- DO NOT submerge the jack in water (salt or fresh) or leave it in water for prolonged periods, since this can damage the gears and erode lubricants.
- Carefully read all instructions. The operator of the jack must exercise common sense, caution, and full judgment when assessing situations not covered or cautioned in this manual.
- The Trailer Valet JX is designed for specific applications only. Trailer Valet will not be responsible for issues arising from modifications made onto the device. Do not modify the device or use the device for any application other than its intended purpose. Do not exceed the designated weight limits.
- As with all devices with moving parts, do not wear excessively loose clothing as it may become caught, resulting in injury. Tie back and secure long hair.
- This product must be installed and used in strict accordance with these instructions.
- Always read and understand your drill/driver operator’s manual and instructions.
- Before each use of the Trailer Valet JX, check for damaged parts. Carefully inspect the device for any part that appears to be damaged to determine if the device will operate properly. Check for alignment and secure mounting of all moving parts. If the device is neither aligned, secured or both: DO NOT use the device.
- When servicing, use only factory replacement parts.
- Have wheel chocks in place before/after use and ready in case of emergency.
- Never exceed the maximum rated capacity. Refer to the specifications section of this operating manual or decals on the product to obtain rated capacity. If uncertain, contact Customer Support at (844) 846-9344 or email:
- The Trailer Valet JX is designed for vertical loading. Excessive side forces may cause failure and must be avoided.
- The use of gloves is recommended while attaching the device to the trailer.
Phone: (844) 846-9344Email: [email protected]Website: www.trailervalet.com
SAVE THESE INSTRUCTIONS
Specifications
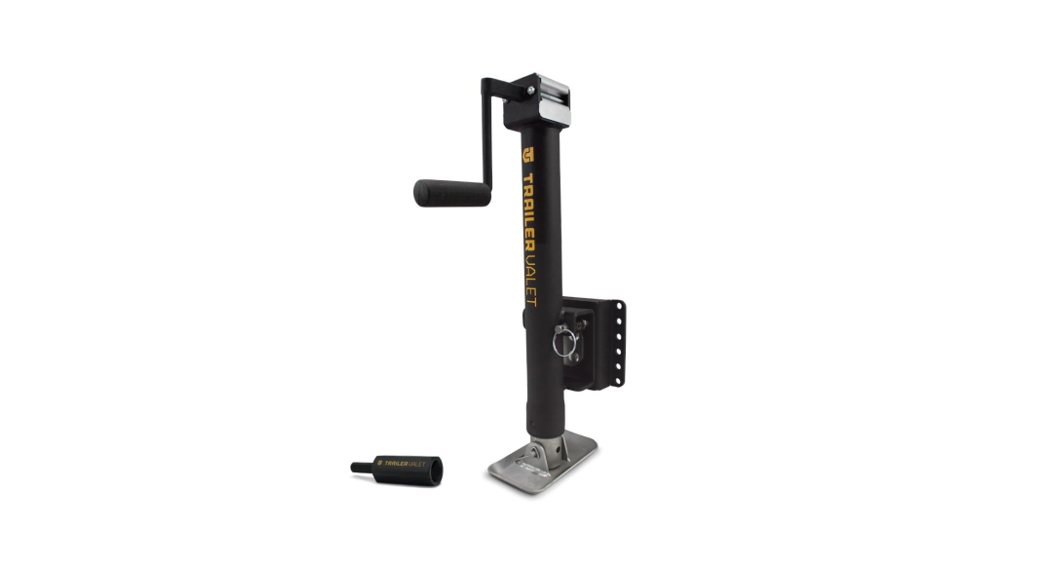
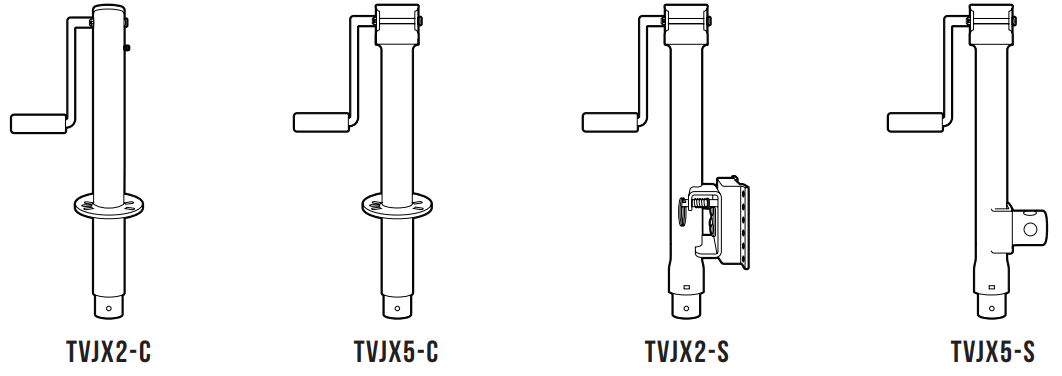
The Trailer Valet JX Series is a line of manual hand-crank trailer jacks that have the versatility to be powered using any standard 18-24V drill and a Trailer Valet Drill Attachment. Designed for consumers to make hitching and adjusting quick and easy in comparison to standard hand-crank jacks, the line comes in two weight capacities with either side or center mount options. Each product comes standard with a hand crank, drill attachment, and static footplate.Accessories such as the JX Wheel option are sold separately.
| PART #
TVJX2-C |
CAPACITY | GEAR RATIO | MOUNT TYPE |
| 2,000Ibs lift, 2,000Ibs static | 1:1 | Center, Bolted | |
| TVJX5-C | 3,000lbs lift, 5,000lbs static | 3:4 | Center, Bolted |
| TVJX2-S | 2,000lbs lift, 2,000lbs static | 3:4 | Pull-Pin Swivel |
| TVJX5-S | 3,000lbs lift, 5,000lbs static | 3:4 | Pipe Mount with Bracket |
Upon removing items from packaging, it is very important to thoroughly inspect all parts of the system before using the device. Any part that is missing or damaged must be immediately replaced.Contact Trailer Valet Customer Service at 1-844-846-9344 or [email protected]
 |
 |
Jack Range from 23 to 37 inchesWeight: 13-25 lbs.Items Sold Separately:– Standard Cordless Drill/Driver– Drop Leg Attachment– Center Jack Bolts
TVJXMW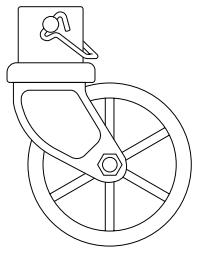
WheelAttachment
Assembly
Prior to installation, raise the trailer tongue until you have adequate space to attach the jack. The unit must be attached while the weight of the trailer is supported by existing support or tow vehicle. Having wheel chocks in place during connection will insure a safe install.
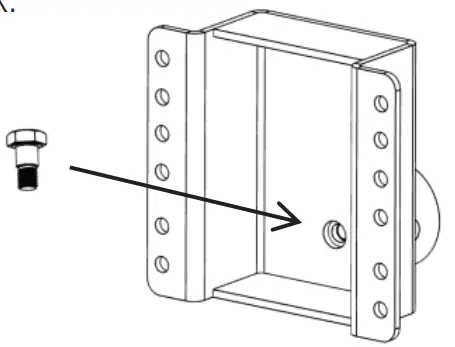
SIDE JACK INSTALLATIONPlace the mounting bracket onto an 8-inch clearing on your frame where the jack can freely rotate from its vertical position to its horizontal stow position. Secure with the four included bolts at the desired height.
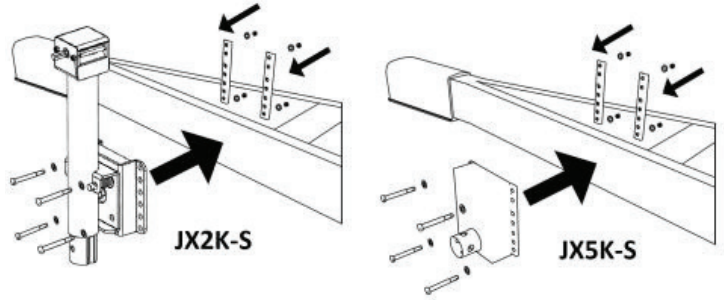
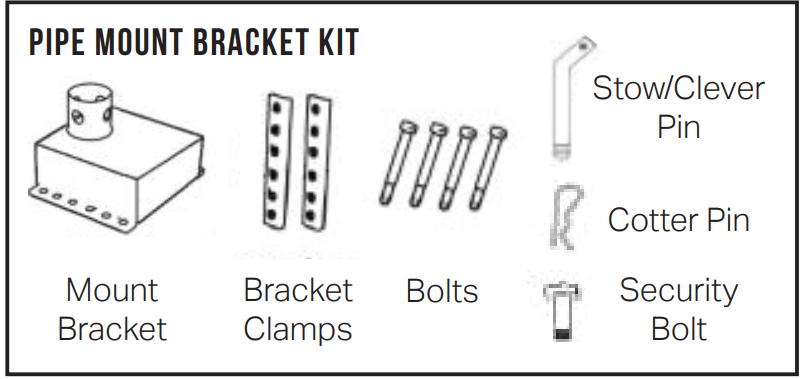
WARNING The Mount Bracket is only to be installed on trailer frames that are rectangular in profile. Cylindrical frames are not compatible with the Mount Bracket.NOTE: While it is recommended that the bracket is installed with the attachment point in the low position for stability, the bracket can be flipped prior to install if needed.If installing the 5k model, you will now need to place the connection point of the Jack tube into the Mount bracket.
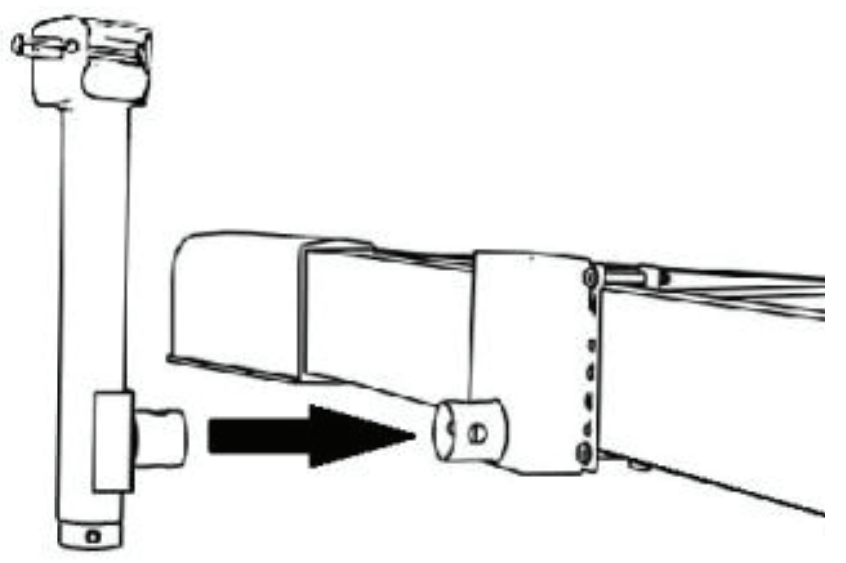
Fasten with the included Stow/Clevis pin.Then, set the cotter pin through the Stow/Clevis pin. These pins are to be removed when either detaching or stowing the jack.
The JX5K-S mount bracket comes with a security bolt that is an option to secure the device. If you choose to use it, the bolt slots through the back of the mounting bracket and threads into the attachment point of the jack.
CENTER JACK INSTALLATIONWith the footplate detached, drop the jack into the hole located in the trailer’s coupler.Note that the support plate on the jack has one point that is flattened. This corner should face forward, toward the front of the coupler.
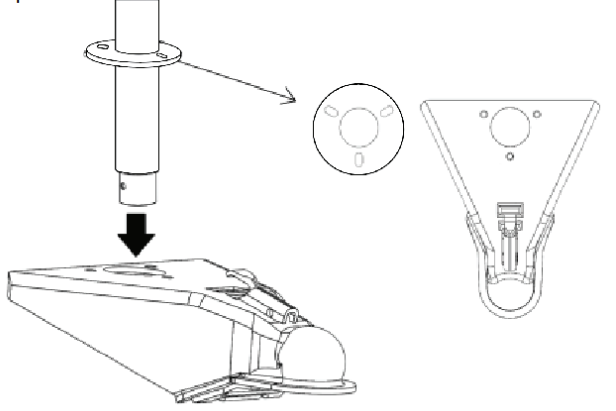
You can now fit the jack to the coupler. Bolt sizes are specific to your coupler and are not included with your JX purchase.Alternatively, the center jack can also be welded for a more permanent attachment to the trailer.
operating instructions
ATTACHING DRIVEROption 1: Manual OperationAttach the Drive Handle to the Driveshaft located at the top of the unit. Turning the handle clockwise will extend the jack. Turning the handle counter-clockwise will retract the Jack.Option 2: Drill AdapterThe Drill Adapter can be used with any standard 18 to 24 volt, ½ inch chuck, consumer drill. Corded drills and impact drills are not recommended. Slot the Drill Adapter in your Drill chuck and secure it tightly to avoid the adapter slipping. Align and insert the Drill Adapter to the driveshaft.
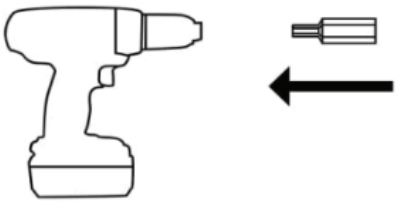 NOTE: If you are using a power drill, be sure yourbattery pack is fully charged before use. Follow your drill/driver manufacturer’s recommendation.
When using an electric drill, it will have high initial torque if the drill trigger is pulled rather than squeezed. For proper use, hold the drill firmly and begin to squeeze the trigger slowly, increasing the power up to an appropriate speed.
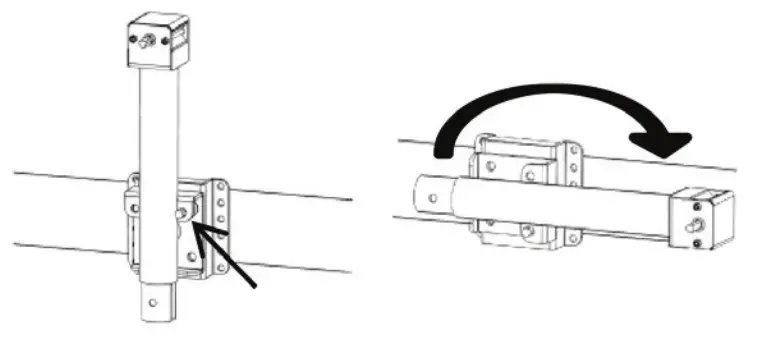
STORING THE DEVICEAfter use, lower your jack until your trailer frame sits level and remove the drill/drive handle.If storing, ensure that the trailer frame is jacked to level height. Alternatively, the jack’s stow position will allow it to remain attached to the trailer while being towed. To stow the unit, secure the trailer to a tow vehicle then crank the jack handle until the inner jack tube is fully withdrawn and choose between the following two options:
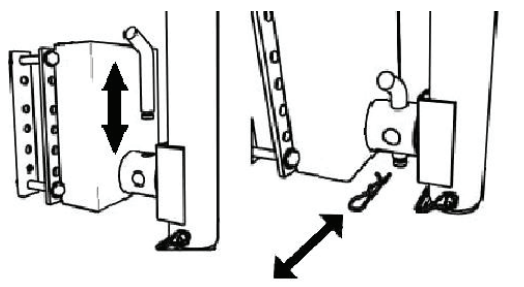
Stowing the JX5K-SRemove the cotter and clevis/stow pin and rotate the unit 90 degrees. Restore the clevis and stow pins while the unit remains attached to the mounting bracket.

Stowing the JX2K-SPull the set pin by the ring away from your trailer frame and rotate the unit 90 degrees.Release the pin and the Jack will lock into place.
WARNING Failure to lock in the pins and bolt prior to trailering with the unit in the stowed position may result in the unit becoming dislodged during movement.
Visit our website to see a video on how to stow your Trailer Valet Jack.
LIMITED MANUFACTURER’S WARRANTY
Supertech S Corp warrants for one year from the purchase date that the product will be in working condition and will be free from manufacturing defects, provided that installation and use of the product are in accordance with product instructions. This warranty is only made to the original consumer purchaser and is non-transferable.
ALL OTHER WARRANTIES IMPLIED OR EXPRESSED ARE HEREBY DISCLAIMED. THIS WARRANTY DOES NOT COVER:
- Normal wear and tear or normal aging of the product;
- Consumable parts designed to diminish over time unless failure occurred due to a manufacturing defect;
- Cosmetic damage, including but not limited to scratches and dents;
- Damage through accident, abuse, neglect, misuse, natural events, or other external causes;
- Damage through misapplication, overloading, or improper installation;
- Damage due to improper maintenance and repair; and/or
- Product alterations.
LIMITATION OF LIABILITY:EXCEPT AS PROVIDED IN THIS WARRANTY AND TO THE MAXIMUM EXTENT PERMITTED BY LAW, SUPERTECH IS NOT RESPONSIBLE FOR ANY DIRECT, INCIDENTAL, CONSEQUENTIAL DAMAGES, OR INJURIES RESULTING FROM ANY BREACH OF WARRANTY OR CONDITION; INCLUDING, BUT NOT LIMITED TO, LOSS OF USE, LOSS OF REVENUE, LOSS OF ACTUAL OR ANTICIPATED PROFITS, LOSS OF BUSINESS, LOSS OF OPPORTUNITY, LOSS OF GOOD WILL, LOSS OF REPUTATION, OR ANY DIRECT, INDIRECT, OR CONSEQUENTIAL LOSS OR DAMAGE WHATSOEVER CAUSED, INCLUDING THE REPLACEMENT OF EQUIPMENT AND PROPERTY.
CUSTOMER RESPONSIBILITIES:Customers may be required to provide proof of purchase date, respond to questions designed to assist with diagnosing potential issues, and follow Trailer Valet’s directions to make a claim on your warranty.TO MAKE A WARRANTY CLAIM:Contact us either through:PHONE: (844) 846-9344EMAIL: [email protected]WEBSITE: www.trailervalet.comTRAILER VALET SHALL HAVE THE EXCLUSIVE RIGHT TO DETERMINE IF A UNIT IS COVERED UNDER ITS LIMITED MANUFACTURER’S WARRANTY.SEVERABILITY:The invalidity, illegality, or unenforceability of any provision of this warranty shall not render the other provisions invalid, illegal, or unenforceable.GOVERNING LAW AND JURISDICTIONThis warranty shall be governed by the laws of the State of California. The courts of California shall have the exclusive right to adjudicate any disputes arising under or in connection to this warranty.
![]()
For further information or if you have any questions, please contact:SUPERTECH S. CORP.Customer Service: (844) 846-9344Email: [email protected]WWW.TRAILERVALET.COM
Copyright 2021 by Supertech S. Corporation. All rights reserved.No portion of this manual or any artwork contained herein may be reproduced in any shape orform without the express written consent of Supertech S. Corporation.
References
[xyz-ips snippet=”download-snippet”]