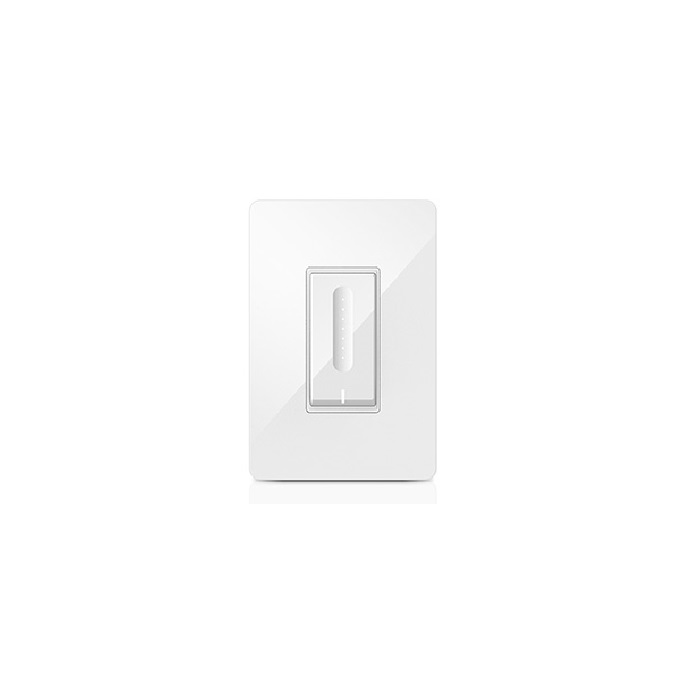
TREATLIFE Smart Dimmer

Thank YouIf you have any questions, please feel free to contact us first. We are always here for you.
ATTENTION
- The smart dimmer switch is designed for single-pole (one location) wiring. (Not compatible with 3-way/multi -way switch wiring).
- Supported Bulb Types: Dimmable LED/ CFL – 150W Max;Incandescent – 400W Max. Not compatible with non dimmable light bulbs.
- Neutral wire is required to install the smart switch. If your house was built or remodeled before mid-80’s, you may not have a neutral. Please try another location or call an electrician for help.
- Inst all your Treat life switch where there is a strong Wi-Fi signal.
- Keep your mobile device close to the Treat life light switch until setup is complete.
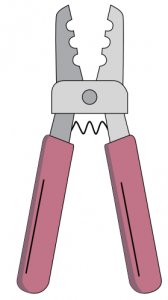
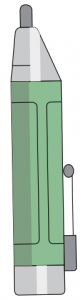
The Tools You’ll Need
- Screwdriver

- Pliers
- Electrical Tester

1. Turn Off PowerLocate your circuit breaker panel and t urn off the power to each switch you are replacing
![]() Caution:Risk of shock.Make sure the power to every switch you are replacing has been turned off before installation.Please call a professional electrician if you are not familiar with electrical work.
Caution:Risk of shock.Make sure the power to every switch you are replacing has been turned off before installation.Please call a professional electrician if you are not familiar with electrical work.
Verify Power is Off
Press each light switch at the location you’re doing the installation to confirm the power is off.If a light turns on, return the panel to turn off the correct circuit. We recommend you to remove the faceplate from the old switch and use electrical t ester to test all wires connected to the switch to ensure there is no voltage in the circuit.You may need to turn off more than one circuit breaker.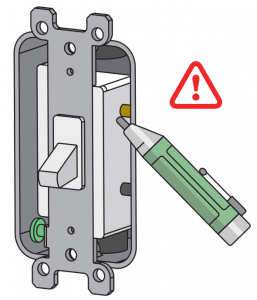
Pull Out Old Switch
Unscrew the old switch and pull it out of the wall. Do not remove any wires.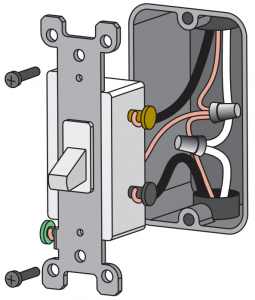
Find the NEUTRAL Wires
A neutral is required to install the smart light switch.Make sure there are NEUTRAL wires (most likely a bundle of one or more white wires) in the wall. Unless you are replacing an existing smart switch, it’s probably not connected to your old switch.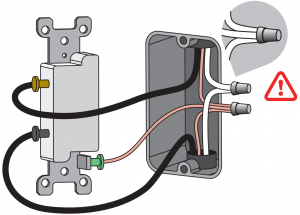
Note: If there is no neutral, please try another location or call an electrician for help.
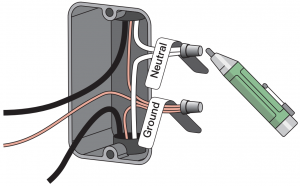
Test NEUTRAL and GROUND Wires
Make sure there is no power on the neutral wires from a neighboring circuit. If necessary, shut off the additional circuits until no voltage is found.
- Label the NEUTRAL and GROUND wire In the wall with the stickers in the package.GROUND wires are usually BARE COPPER or GREEN.
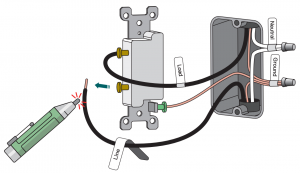
Identify Line and Load Wire
Label the LINE wire in the wall with the “Line” sticker.Label the LOAD wire in the wall with the “Load” sticker.
How to identify Line and Load?
- Turn on the power and make sure that the switch is off.If not, please turn off the switch and turn off the light. (Be careful not to touch any wires)
- Use an electrical tester to measure the two wires (usually black) connected to the old switch, the Line and Load can be identified according to the measurement method of the electrical tester. (The tester will flash or chirp when it comes close to a Line wire)
Note: If the Line and Load wires are reversely connected, the switch will not work.
Take Pictures of the Wiring
Take one or two pictures of the old switch and where each wire is connected to it, in case you need guidance to repeat the installation.Note: Make sure all of the text on the labels in the pictures is clearly displayed.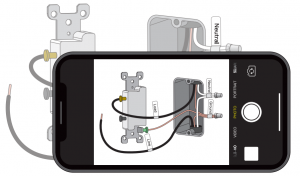
Remove Existing Switch
Loosen the screw terminals and remove the old switch.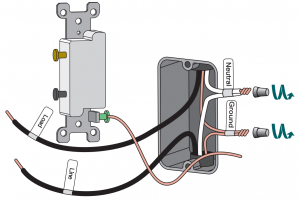
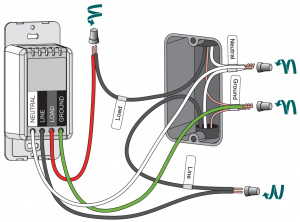
Wire the Smart Switch
Remove the sticker securing the wires on the new switch.
- Connect NEUTRAL/GROUND WiresUse wire nuts to connect the neutral and ground wires on the Treat life Light Switch to the labeled wires coming from the wall in order.
- Connect LINE/ LOAD WiresUse wire nuts to connect the line and load wires on the Treatlife Light Switch to the labeled wires coming from the wall in order.
Install Light Switch Into the Wall
Hold the wire nuts and gently pull each wire to make sure the wire nuts are secure. Carefully push the wires deep into the switch box. Attach the Light Switch to the switch box with the screws provided. Finally, snap on the faceplate.Note: Do not over tighten the screws, as it could restrict the operation of the switch.
Turn on Power
Turn the power back on at the circuit breaker.
- Press the on/off button to confirm whether the switch is powered on/ off normally. If the light fixture can not be turned off/on, the wiring may be incorrect or the nuts are loose. (In t his case, the most likely problem is that the line and load wires are reversely connected.) Please refer to the instructions in the manual or call an electrician for help.If you encounter any problems, please contact us via email: [email protected](Please be sure to attach the wiring pictures of the old switch In step 7 )
ADD DEVICES
- Download the Treatlife APPPlease scan the QR code or search “Treatlife” on the Apple APP Store / Google Play to download the APP.
- Registration or Log In• Tap “Register” to create an account. Enter your email address to get a verification code and create a password. Or, choose “Log in” if you already have a Treat life account .
- Configure the APP to the Switch• Preparation: Ensure the switch is connected to power; Ensure your phone is connected to your WiFi router and is able to connect to the internet.Note: This switch only supports 2.4Ghz networks. If you connected to a 5Ghz network before, please switch to the 2.4Ghz Network• Tap the icon “+” on the top right corner to Select Device Type; Tap “All” and choose “Dimmer Switch(WiFi)”.3.1 Default Configuration Mode• Press and hold the mechanical on/ off button for 5 seconds until the red indicator light blinks rapidly.• Tap “Confirm indicator rapidly blink”; Enter your WiFi Password; Wait for t he switch to complete.• Repeat steps to add any additional smart switches.3.2 AP Mode• If you can not configure the switch successfully with the default mode, please try to connect with AP Mode.• Tap “AP Mode” on the top right corner.• Press and hold the mechanical on/ off button f or 5 seconds, until the red indicator light blinks rapidly. Then press and hold for 5 seconds again until the indicator light blinks slowly.Tap “Confirm indicator slowly blink”.• Enter your Wi- Fi Password.• Open WLAN settings; The Wi- Fi settings on your phone and connect to the “Treatlife- xxx” network.• Go back to the APP and continue to add the to add the device then wait for the connect ion to complete.
 Please scan the QR code or search “Treatlife” on the Apple APP Store / Google Play to download the APP.
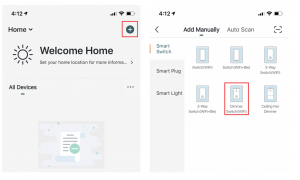 3.1 Default Configuration Mode• Press and hold the mechanical on/ off button for 5 seconds until the red indicator light blinks rapidly.• Tap “Confirm indicator rapidly blink”; Enter your WiFi Password; Wait for t he switch to complete.• Repeat steps to add any additional smart switches.3.2 AP Mode• If you can not configure the switch successfully with the default mode, please try to connect with AP Mode.• Tap “AP Mode” on the top right corner.• Press and hold the mechanical on/ off button f or 5 seconds, until the red indicator light blinks rapidly. Then press and hold for 5 seconds again until the indicator light blinks slowly.Tap “Confirm indicator slowly blink”.
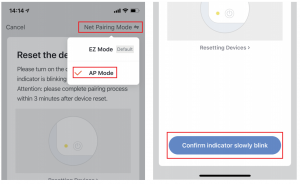 • Enter your Wi- Fi Password.• Open WLAN settings; The Wi- Fi settings on your phone and connect to the “Treatlife- xxx” network.• Go back to the APP and continue to add the to add the device then wait for the connect ion to complete.
Link TreatLife to Alexa/ Google Assistant
Go to Treatlife>![]() >More for instruct ions to link Alexa/Google Assistant.Note: Please log In with your Treatlife account.
>More for instruct ions to link Alexa/Google Assistant.Note: Please log In with your Treatlife account.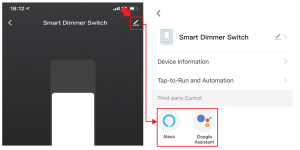
Key Steps to Link the Alexa Skill
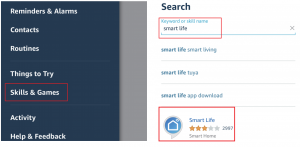
- Sign in with Amazon, tap on “Skills & Games” in the Alexa menu;
- Search for the “Smart Life”, and tap “Enable” to enable the Skill.
- Enter the “Treatlife” APP Account and Password, then tap “Link Now” to enable the Skill.
PRODUCT APPEARANCE

Indicator Light Status
| Light Color | Light Status | Switch Status |
| Whit | ON | Power OFF |
| Red
|
OFF | Power ON |
| Steady on | Energy-saving mode | |
| Blinking rapidly (twice/1s) | Ready for default configuration mode | |
| Blinking slowly (Once every 3s) | Ready for AP (Access Point) configuration mode | |
| Turn on for 10s and then turn off | Configured successfully but the network disconnects suddenly |
TROUBLESHOOTING
Can’t connect to the APP.
- Please make sure the red indicator light is blinking when you are attempting to connect to the APP.Default Mode Paring: Red Indicator Blinking rapidly.AP mode Paring: Red Indicator Blinking slowly.
- Please finish the pairing within 3 minutes when thered indicator starts blinking. (Refer to “Me- FAQ& Feedback” in the APP)
- If your router is 2.4Ghz & 5Ghz dual-band, the 2.4Ghz band may not be turned on. Please enter the router settings to turn on the 2.4Ghz band. You can check the router’s manual or contact the router’s official support for help.
- Make sure you entered the correct WiFi password.The smart switch shows wrong status on the APP.
- The network may be delayed or the network signal is weak. Try to move the router closer to the switch or power off the router and then power it on. If it still doesn’t work, try to replace the light bulb with a different model or brand bulb.Can’t connect to Alexa.
- Check whether the Alexa APP is correctly configured with the account of Treatlife APP. Refer to the manual instruction or “Me–FAQ & Feedback–AII-Third- party control issues” in APP to reconnect to Alexa.The Timing function doesn’t work properly.
- Remove the switch from APP, and repair the switch to APP again; You can also check Me- > FAQ & Feedback information in the APP. If it st ill doesn’t work, please provide the Virtual ID in the APP to us.Can’t dim lights manually
- Check if they are dimmable light bulbs, if not, change to another non- smart dimmable light bulb.There is a noise with the light lighting switch or light bulb
- Change to another different model of non- smart dimmable light bulb.Lights are too bright even on minimum level
- Go to Treatlife > dimmer setting to decrease the dimming range.Lights are too dark or not light up even on minimum level
- Go to Treatlife > dimmer setting to increase the dimming range.The lights will flicker
- If they are dimmable light bulbs, go to Treatlife > dimmer setting to switch the mode or adjust the dimming range;If they are not dimmable light bulbs, change to non- smart dimmable light bulbs.After turning off the light, the light bulb flickers or is not completely turned off.
- Replace the light bulb with a different make/model.After using the switch for a period of time, manual operation doesn’t work properly.
- Turn off the power at your circuit breaker panel for a few minutes and then power it on again.One of several Treatlife light switches doesn’t work properly.
- Replace this switch with one of the known good ones to ensure everything is wired properly. If it st ill doesn’t work, please contact our support.
FCC Caution:
This device complies with part 15 of the FCC Rules.Operation is subject to the following two conditions: (1)This device may not cause harmful interference, and (2) this device must accept any interference received, including interference that may cause undesired operation.
Any Changes or modifications not expressly approved by the party responsible for compliance could void the user’s authority to operate the equipment.
Note: This equipment has been tested and found to comply with the limits for a Class B digital device, pursuant to part 15 of the FCC Rules. These limits are designed to provide reasonable protection against harmful interference in a residential installation. This equipment generates uses and can radiate radio frequency energy and, if not installed and used in accordance with the instructions, may cause harmful interference to radio communications. However, there is no guarantee that interference will not occur in a particular installation. If this equipment does cause harmful interference to radio or television reception, which can be determined by turning the equipment off and on, the user is encouraged to try to correct the interference by one or more of the following measures:
– Reorient or relocate the receiving antenna.-Increase the separation between the equipment and receiver.– Connect the equipment into an outlet on a circuit different from that to which the receiver is connected.-Consult the dealer or an experienced radio/1V technician for help.
RSS (Category I Equipment):
This device complies with Innovation, Science, and Economic Development Canada’s licence- exempt RSS standard(s). Operation is subject to the following two conditions:( 1) this device may not cause interference, and(2) this device must accept any interference, including interference that may cause undesired operation of the device.

[xyz-ips snippet=”download-snippet”]