TRENDNET WiFi Outdoor Directional Installation Guide

Before You Start
Package Contents
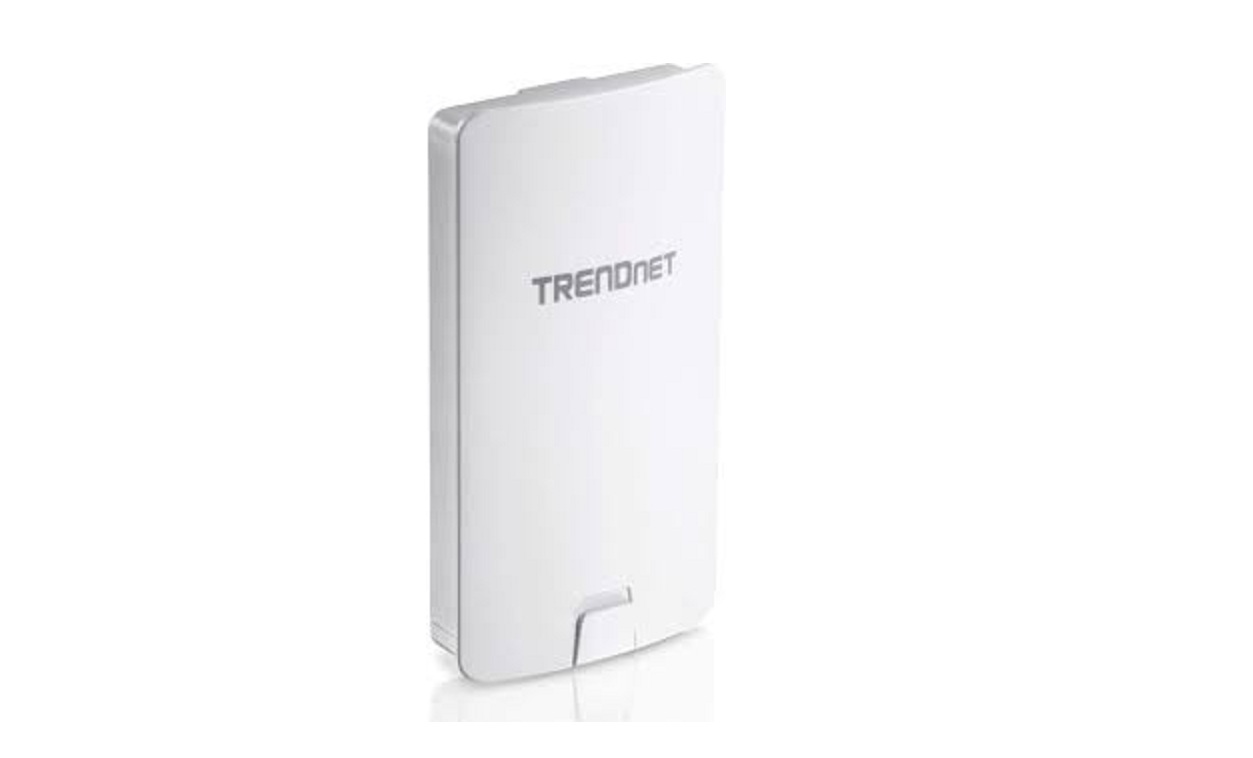
- TEW-840AP60
- Quick Installation Guide
- Proprietary/ Passive PoE injector (24V DC. 0.6A)
- Mounting Hardware
Minimum Requirements
- Computer wkli a network port and web browser
- A network switch or router with an available network IAN port
- Additional TEW-8400280 HAY: vl wireless AC867 directional access point
- 4 x RJ-45 network cables
Note:The TEW.840APB0 does not support IEEE 802.3at/af PoE standards. You must use the propnetanfipassive power over Ethernet injector that is supplied with the TEW-840AP8O. This installation guide will walk you through the installation and configuration of two TEW-840AP80 access points to establish a wireless point to point bridge using WDS (wireless distribution system). The RJ-45 Ethernet cable between the passive PoE injector and access point can have a maximum length of up to 60 m (197 ft.).
Hardware Setup and Configuration
Note:
- The default IP address of the TEW-840AP80 is 192.168.10.100. To configure the TEW.840APBO. your network adapter must have an IP address within the 192.168.10.x subnet (e.g. 192.168.10.10). Please refer to the Appendix in the Users Guide for more Information.
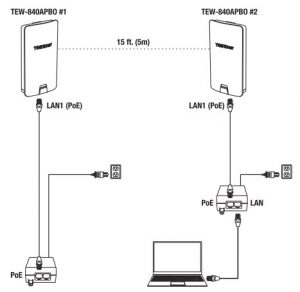
- The initial configuration should be completed in a testing environment with two TEW-840APB0 access points approximately 15 ft. (5 m) apart from one another with the front of the access points directly facing each other.
- Configure and corned the access points before mounting.
- The configuration example in this guide will use the default/standard TEW-840APB0 channel access mode CSMA. More details can be found in the users guide about TOMA channel access mode which is also supported by the TEW-840AP80 wireless AP.
Phase 1: OverviewIn this installation guide, we will assume the following:
Router Settings:Router/Default Gateway IP address: 192.168.10.1Subnet Mask: 255.255.255.0
The TEW-840APBO access points will be configured with the following settings:
|
TEW-840AP80 #1 |
TEW/-840AP80 #2 |
|
IP Address: 192.168.10.50 |
IP Address: 192.168.10.51 |
|
Netmask (Subnet Mask): 255.255.255.0 |
Netmask (Subnet Mask): 255.255.255.0 |
|
IP Gateway (Default Gateway): 192.168.10.1 |
IP Gateway (Default Gateway): 192.168.10.1 |
|
Primary DNS: 192.168.10.1 |
Primary DNS: 192.168.10.1 |
|
Wireless Channel Default 48 |
Wireless Charnel Default: 48 |
|
Y/DS Access Point Mode (CSMA) |
WDS Station Mode ICSMA) |
|
WPA2-PSK Encryption |
WPA2-PSK Encryption |
Phase 2: TEW-840APBO Unit el Hardware Setup and Configuration
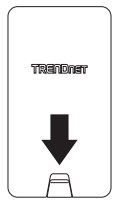
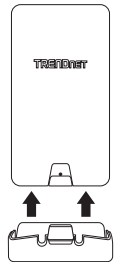
- Remove the cover of the access point by pulling and holding the bottom tab in the vertical direction down (based on the access point orientation below) and sliding the cover below away from the access point.
 Pull and hold tab
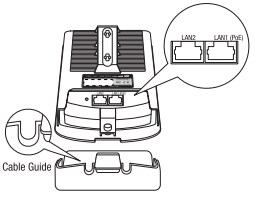
 - Write clown the SSID and WPA2 Key of the TEY/-840APBO Kt access point. The SSID and WPA2 Key can be found on the inside of the device cover where the Ethernet LAN ports are located (shown below).
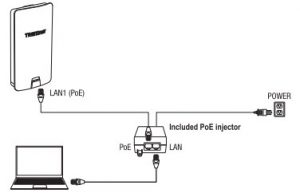
- Using a network cable, connect one end of the cable to the LAN1(poE) port.
- Connect the other end of the network cable to the PoE port on the included PoE injector.
- Using another network cable, connect one end to the LAN port on the included PoE injector.
- Connect the other end of the network cable to your computers Ethernet port.
- Attach the power cord to the PoE injector and plug tre connected power cord into a power outlet.
- Confirm the device is powered on through the LEO indicators.
- Assign a static IP address to your computers network adapter in the subnet of 192.168.10.x (e.g. 192.168.10.10) and subnet mask of 255.255.255.0.
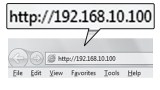
- Open your web browser and type the IP address of the access point In the address bar, then Pre% Enter. The default IP address is 192.168.10.100.
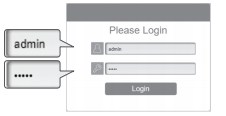
- When prompted, login to the browser configuration page using the default user name and password settings.User Name: adminPassword: adminNote: Me User Name and Password are case sensitive
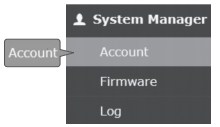
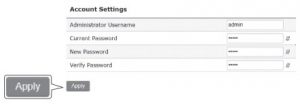
- In the left hand menu under System Manager click on Account
- Under Account Settings. change the default administrator password by typing in the current password admin and your new password in the fields provided. Then click the Apply button the save the new password settings. You will prompted to log back in with the new password settings.
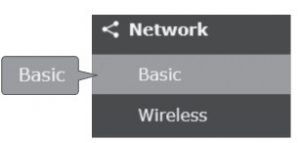
- After setting a new administrator password, in the left hand menu under Network, click on Basic
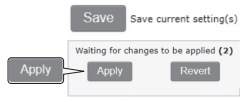
- In the 113y4 Settings section, enter the IP Address 192.168.10.50 and Subnet Mask 255.255.255.0, then click Save at the bottom of the page. When prompted to apply settings at the bottom right of the page, click Apply to commit the changes.
 Pull and hold tab
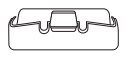

Note: When configuring TEW-840APBO #2, enter the IP address settings 192.168.10.51 and Netmask 255.255.255.0.
| IPv4 Setting | |
| IP Network Setting | |
| IP Address | 192. 168. 10. 50 |
| Subnet Mask | 255. 255. 255. 0 |

Phase 3: TEW-840APBO Unit 82 Hardware Setu and Configuration
When configuring the TEW-840APBO #2, repeat 1-14 of the steps in Phase 2 setup and configuration.
- In Step 15, under IPv4 Settings, enter the IP Address 192.168.10.51 and Subnet Mask 255.255.255.0, then click Save at the bottom of the page. When prompted to apply settings at the bottom right of the page, click Apply to commit the changes.
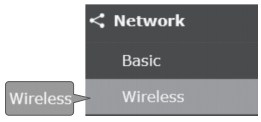
IPv4 Setting IP Network Setting DHCP Static IP IP Address 192. 168. 10. 50 Subnet Mask 255. 255. 255. 0 - In the left hand menu under Network, click Wireless.
- Under 5GHz-802.11 AC/N, click the operation Mode drop-down list and select WDS Station.
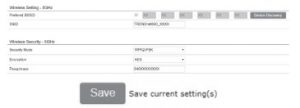
- Under Wireless Setting – 5GHz, click Edit.
- Under Wireless Setting – 5GHz, next to preferred BSSID ,click Device Discovery. The device will scan for wireless network.
- In the Site Survey list select the SSID of the TEW-840APB0 #1.Note:This is the SSID of TEW-840APB0 #1 from Phase 2 step 2.
- Under Wireless Security – 5GHz, in the PASSPHRASE field, enter the WPA2 key of TEW-840APB0 #1 and click Save
- After you are brought back to the main wireless settings page, click Save at the bottom of the page. When prompted to apply settings at the bottom right of the page. click Apply to commit the changes.


Phase 4: Confirm Connectivity
- Leave your computer connected to TEW-840APB0 112 and keep the web management interface open. In the left hand menu under Overview, click Connections and the Connection Status should display Associated.
- Make sure both TEW-840APBO 41 and TEW-840APB0 42 access points are powered on approximately 15 ft. (5 m) apart from one another with front of access points directly facing each other.
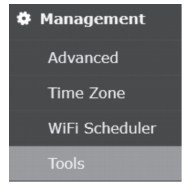
- To further verify connectivity, in the TEW-840ABP #2 web management interface under Management, click on Tools.
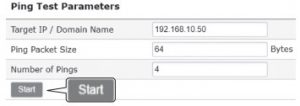
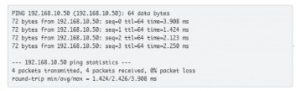
- Under Ping in the Target IP / Domain Name field, enter the IP address of TEW-840APB0 #1, 192.168.10.50 then click Start.
- Ping replies and 0% packet loss will indicate as successful point to point bridge connection between the TEW-840APB0 #1 and #2.
- Ping replies and 0% packet loss will indicate as successful point to point bridge connection between the TEW-840APB0 #1 and #2.
Note: If the connectivity test fails, wait for about a minute and try again. Make sure there are no obstacles between the two access points when running the connectivity test and make sure the two access points are not too close together.
Hardware Installation
- Reinstall the cover by lining up the guide into the notch as shown and push until the cover clips into place and is secured. The cover includes cable openings to route the connected Ethernet cable(s) when installing.
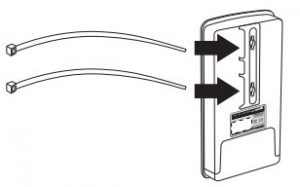
- Insert the included fasteners through the holes located at the back of the access point
- Wrap the fasteners around the pole where the access points will be installed. On the fasteners, insert the open end into the locking mechanism and pull tight until the access point is secured.Note: When set to WDS station mode, the TEW-840APBO features WiFi signal strength connectivity LEN located on the back of the access point to assist in determining the optimal mounting position.(Red = Good, Orange = Better, Green = Best)
- After the access points are properly mounted, you can connect the RJ-45 cables fro, each access points to your network.

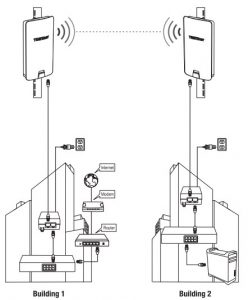
Completed Installation Reference
CertificationsThis device complies with Pan 15 of me FCC Rules. Operation is subxcl to the following two conditions:
- This device may not C3US* harmful interference
- This device must accept any interference received including interference Mat may cause undesired operation.
![]() Waste electrical an electronic products must not be disposed of with household waste. Please recycle where facilities exist. Check with your Local Authority or Retailer for recycling advice.
Waste electrical an electronic products must not be disposed of with household waste. Please recycle where facilities exist. Check with your Local Authority or Retailer for recycling advice.
Applies to PoE Products Only: This product is to be connected only to PoE networks without routing to the outside plantNote: The Manufacturer is not responsible for any radio or TV interference caused by unauthorized modifications to this equipment. Such modifications could void the user’s authority to operate the equipment.
Technical Supportit you have any questions regarding the product installation, please contact our Technical Support.Toll tree US/Canada: 1-855-373-4741Regional phone numbers availableat www.trendnet.com/support
TRENDnet20675 Manhattan PlaceTorrance, CA 90501USA
Product Warranty RegistrationPlease take a moment to register your product online. Go to TRENDnet’s website at: www.trendnet.com/register
[xyz-ips snippet=”download-snippet”]