
![]()
User ManualTMP50 Type K/J Thermometer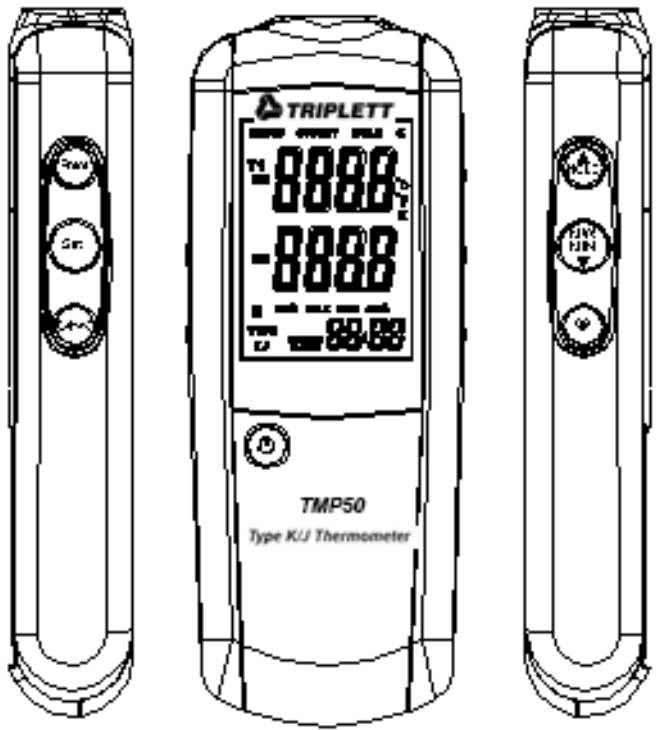
Introduction
Congratulations on your purchase of the Triplett TMP50 Type K/J Thermometer This meter. This single input contact thermometer offers fast response and laboratory accuracy and works with K-type or J-type thermocouples as temperature sensors and offers a 0.1 0C/0.1 0 F resolution.
Safety
Do not operate the meter in environments where the following are present: explosive gases (or materials), combustible gases (or materials), steam, or dust.Please replace the battery immediately when the low battery symbol appears on the LCD.Do not touch the meter’s circuit board for any reason; static electricity or contamination could damage the sensitive components.This instrument was designed for pollution degree 2. Operation Altitude: Up to 2000m (7000′).
Description
1. Type K Thermocouple Input2. LCD Display3. Function Buttons4. Power: ON/OFF Button
Display
| 1. Entering/Exiting Setup Icon2. Offset Option Icon3. HOLD Icon4. APO Status Icon5. Primary Display: T1 Reading6. Units Icon | 7. Secondary Display MAX/MIN/AVG/OFFSET8. MIN/MAX/AVG Icon9. Time Display10. Min: Sec or Hour: minDisplay11. Thermocouple Type Icon12. Low Battery Indicator Icon |
Operation
Connecting thermocouples
- This meter accepts a K/J-type thermocouple with spade lugs (the subminiature type with one spade wider than the other).
- Plug the thermocouple into the meter’s thermocouple input jack.
Measuring
- Press the
 button to switch ON the thermometer. After 1 second the thermometer will display the first temperature reading (upper display).
 - Press the C-F-K button to select the desired temperature unit of measure. A display icon will reflect the selection.
- Touch the object to be measured with the probe. Read the measured temperature on the display. Note: If the display indicates “OL” the temperature is outside the measurement range. The display shows “- – – -“ when a thermocouple is not connected.
MAX/MIN/AVG modePress MAX/MIN to capture and step through the maximum (MAX), minimum (MIN), and average (AVG) temperature values. These values will be shown in the lower display with an elapsed time reference below (hrs: mins, mins: secs).
- Press MAX/MIN to enter this mode.
- Press MAX/MIN to step through maximum, minimum and average readings.
- Press and hold MAX/MIN for 3 seconds to return to normal mode.
Data HoldPress the HOLD button to freeze the reading in the display. HOLD will appear at the top right of the display. Press the HOLD button again to return to the normal operation mode.BacklightPress the SETUP button to switch the backlight OFF/ON.Setup optionThe setup option is used to select the thermocouple type that matches the type that will be connected to the meter, to switch the sleep mode OFF/ON, and to adjust the thermocouple offset.Note: In the setup mode, the upper display shows the menu items and the lower display shows the selection for a given menu item.
Press and hold the SET button for 3 seconds to enter or exit the Setup mode. When the thermometer is in Setup mode, the display shows the SETUP display icon.Set Type J or K thermocouple
- Press or scroll to the “TYPE” setting (shown on the bottom left of the display).
- Press ENTER to choose the option.
- Press to toggle between J and K.
- Press and hold the SET button for 3 seconds to save the setting and return to normal mode.
Set Sleep/non-sleep modeThe thermometer enters sleep mode by default. The meter will automatically shut off after 20 minutes of inactivity (no buttons pressed). When the thermometer is in Setup mode, the display shows the SETUP display icon.
- Press or scroll to the SLP setting.
- Press ENTER to choose the option; On or OFF will appear in the display.
- Use the arrow key to select ON or OFF.
- Press ENTER to store the new setting.
- Press and hold the SET button for 3 seconds to return to normal mode.
Set OffsetUse the offset option in Setup (T1 menu item) to adjust the thermometer’s readings to compensate for known temperature offset at a specific temperature. The adjustment range is ± 5.0°C or ± 9.0 °F.
- Plug the thermocouple into the input connector.
- Place the thermocouple into the known, stable temperature environment (such as an ice bath or dry good calibrator). Allow the reading to stabilize.
- Use the arrow keys to scroll to the “T1” option and then press ENTER.
- Change the offset temperature reading (upper display) by pressing until the desired temperature is reached.
- Press and hold the SET button for 3 seconds to return to normal mode.
Replacing the Batteries
- Switch OFF the thermometer.
- Loosen the battery compartment screw and remove the compartment door.
- Replace the AAA batteries.
- Replace the battery door and tighten the screw.
![]() Never dispose of used batteries or rechargeable batteries in household waste. As consumers, users are legally required to take used batteries to appropriate collection sites, the retail store where the batteries were purchased, or wherever batteries are sold.
Never dispose of used batteries or rechargeable batteries in household waste. As consumers, users are legally required to take used batteries to appropriate collection sites, the retail store where the batteries were purchased, or wherever batteries are sold.
Disposal: Do not dispose of this instrument in household waste. The user is obligated to take end-of-life devices to a designated collection point for the disposal of electrical and electronic equipment.Other Battery Safety Reminders
- Never dispose of batteries in a fire. Batteries may explode or leak.
- Never mix battery types. Always install new batteries of the same type.
Specifications
Temperature Range:
| K type thermocouplesJ type thermocouples | 200°C to 1372°C (-328°F to 2501°F)210°C to 1100°C (-346°F to 2012°F) |
Note that thermocouple wire may be insulated with materials that cannot withstand temperatures in the ranges listed above. Check that the thermocouples used are rated for the temperature measurements to be made.Temperature accuracy:
| T1 Above – 100 °C-148 °F)T1 Below – 100 °C (-148 °F)Display Resolution:Power supply:Operating Temperature:Storage Temperature:Dimensions:Weight: | ± [0.15%rgd+1°C (1.8°F)]± [0.5%rgd+2°C (3.6°F)]0.1°C /°F /°K <1000, 1°C /°F /°K >1000Three (3) AAA 1.5V batteries0°C to 50°C (40°F to 122°F)10°C to 50°C (14°F to 122°F)220 x 63 x 28mm (8.7 x 2.5 x 1.1”)200g (7oz) |
Warranty Information
Triplett / Jewell Instruments extends the following warranty to the original purchaser of these goods for use. Triplett warrants to the original purchaser for use that the products sold by it will be free from defects in workmanship and material for a period of (1) one year from the date of purchase. This warranty does not apply to any of our products that have been repaired or altered by unauthorized persons in any way or purchased from unauthorized distributors so as, in our sole judgment, to injure their stability or reliability, or which have been subject to misuse, abuse, misapplication, negligence, accident or which have had the serial numbers altered, defaced, or removed. Accessories, including batteries, are not covered by this warrantyCopyright © 2020 Triplett
[xyz-ips snippet=”download-snippet”]