TRIPP-LITE AG-03F7 External Battery Pack for Select SmartOnline UPS Systems

Introduction
Tripp Lite’s BP192V12RT3US External Battery Pack is designed for use with the following UPS systems:UPS Models with Built-In Receptacles: SU5KRT3UHV, SU5KRT3UX, SU5KRT3UG, SU5KRT3UHW, SU5KRT3UTF, SU6KRT3UHV, SU6KRT3UTF, SU6KRT3UX, SU6KRT3UG, SU6KRT3UHWUPS Models with a Detachable Bypass Power Distribution Module: SU5KRT3UHVMB, SU5KRT3UTFMB, SU5KRT3UGMB, SU5KRT3UHWMB, SU6KRT3UHVMB, SU6KRT3UTFMB, SU6KRT3UGMB, SU6KRT3UHWMB, SU6KRT3UXMB
Important Safety Instructions
SAVE THESE INSTRUCTIONSWARNING! The mounting shelves are not intended to support more than one battery pack. Do not stack multiple battery packs on a single set of mounting shelves. Failure to follow this warning may lead to product damage and/or risk of personal bodily harm.
- Use caution when lifting battery packs. Because of the considerable weight of all battery packs, at least two people should assist in lifting and installing them.
- Make certain the battery packs and UPS use the same DC voltage before connecting them.
- Use of this equipment in life support applications where failure of this equipment can reasonably be expected to cause the failure of the life support equipment or to significantly affect its safety or effectiveness is not recommended.
- Suggested mounting procedures are for common rack types and may not be appropriate for all rack configurations. User must determine the fitness of rack and wall-mount hardware and procedures before mounting.
- Install the battery pack at a height not exceeding 1 m (3.3 ft.).
- Your battery pack provides a means of equipotential protective bonding for safety purposes. Using the included battery cable, be sure to connect the grounding wire between the metal enclosure of the battery pack and the metal enclosure of the UPS.
- Use only Tripp Lite battery packs with overcurrent protection. Contact Tripp Lite customer support at tripplite.com/support for appropriate models.
- CAUTION: Only qualified professional electrical service personnel should perform installation.
- When connecting multiple battery packs to a single UPS, the battery packs should be approximately the same age.
- It is normal for sparks to occur when connecting external batteries.
- Do not unplug external batteries from the UPS while the UPS is operating on battery power, due to the possibility of dangerous arcing.
- Batteries can present a risk of electrical shock and burn from high short-circuit current. Observe proper precautions. Do not dispose of the batteries in a fire. Do not open the UPS or batteries. Do not short or bridge the battery terminals with any object. Unplug and turn off the UPS before performing battery replacement. Use tools with insulated handles. There are no user-serviceable parts inside the UPS. Battery replacement should be performed only by authorized service personnel using the same number and type of batteries (Sealed Lead-Acid). The batteries are recyclable. Refer to your local codes for disposal requirements or visit tripplite.com/support/recycling-program for recycling information. Tripp Lite offers a complete line of UPS System Replacement Battery Cartridges (R.B.C.). Visit Tripp Lite on the Web at tripplite.com/products/battery-finder/ to locate the specific replacement battery for your UPS.
Removing Internal Battery
Before mounting the battery pack to a 4-post or 2-post rack, first remove the battery trays and set them aside. To remove the batteries from the battery pack, follow the instructions below.
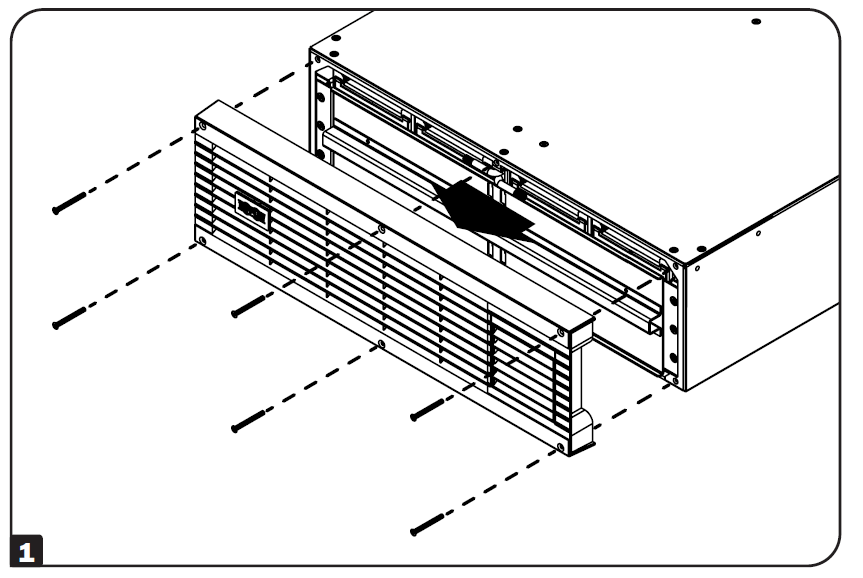
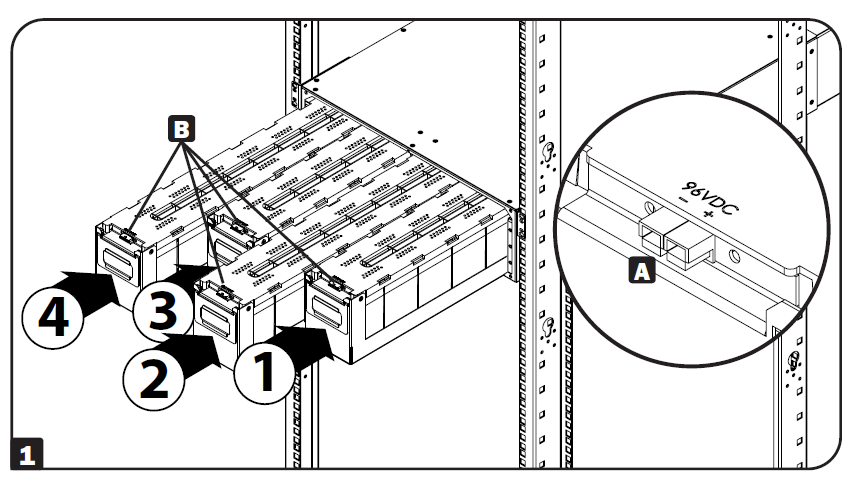
- Remove the six front screws from the front bezel and remove the bezel from the battery pack frame.

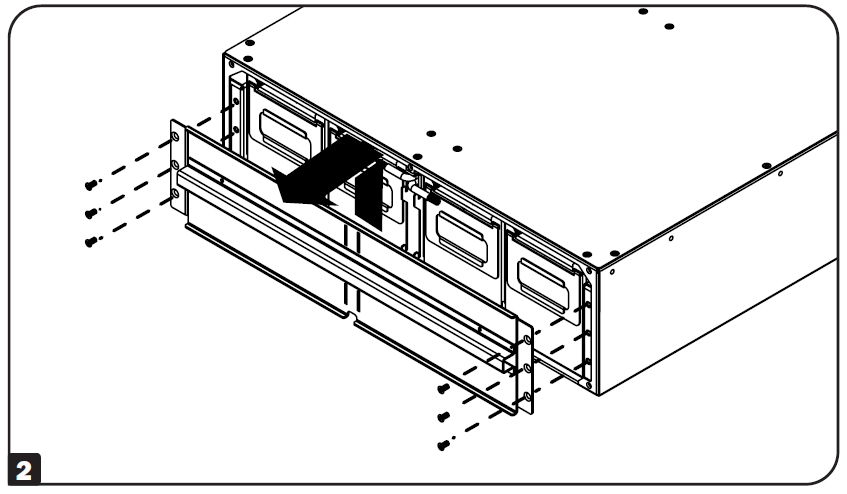
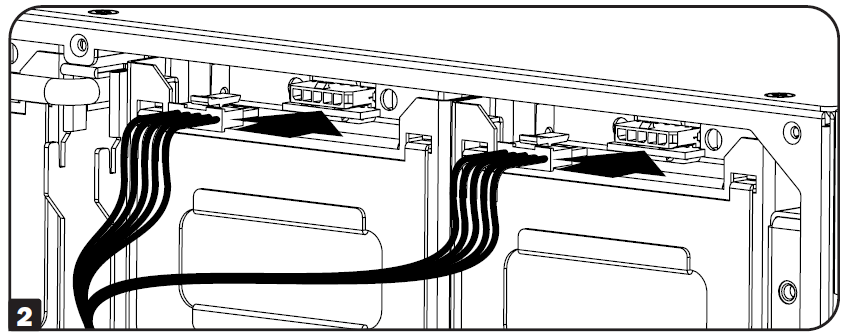
- Remove the six screws from the battery bracket and remove the battery bracket from the battery pack frame. Disconnect the communications cable from each battery tray.
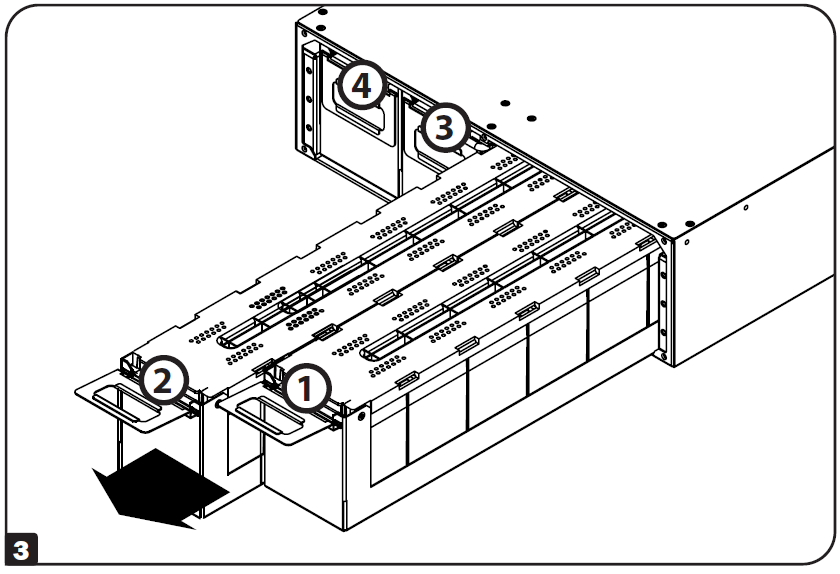
- Use the handles attached to each battery pack tray to remove the battery pack trays in the order shown.Note: Make sure to move the communication cables out of the way of the battery trays accordingly.
Mounting (4-Post Rack)
Mount your battery pack in a 4-post or 2-post rack or rack enclosure, or in an upright tower position. The user must determine the fitness of hardware and procedures before mounting. If hardware and procedures are not suitable for your application, contact the manufacturer of your rack or rack enclosure. The procedures described in this manual are for common rack and rack enclosure types and may not be appropriate for all applications.
4-Post Mounting
Most external battery packs include the hardware required for 4-post mounting. If this hardware did not come with your unit, an Adjustable 4-Post Rack-Mount Shelf Kit (models: 4POSTRAILKIT or 4POSTRAILKITHD) may be ordered separately.Install at a height not exceeding 1 m (3.3 ft.).
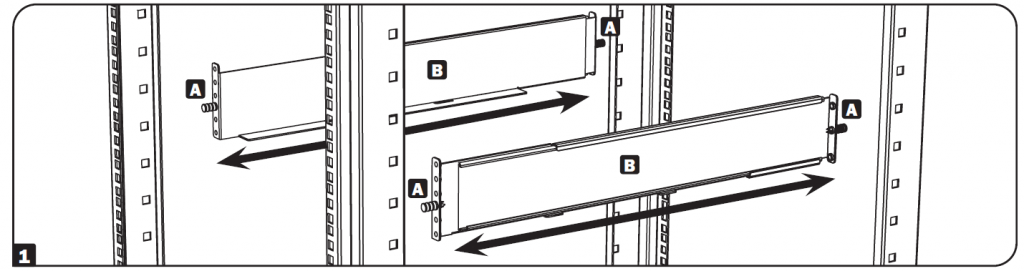
- The included plastic pegs A will temporarily support the empty rack-mount shelves B while you install the permanent mounting hardware. Insert a peg near the center of the front and rear bracket of each shelf as shown. (Each front bracket has six holes and each rear bracket has three holes.) The pegs will snap into place.After installing the pegs, expand each shelf to match the depth of your rack rails. The pegs will fit through the square holes in the rack rails to support the shelves. Refer to the rack unit labels to confirm the shelves are level in all directions.Note: The support ledge of each shelf must face inward.
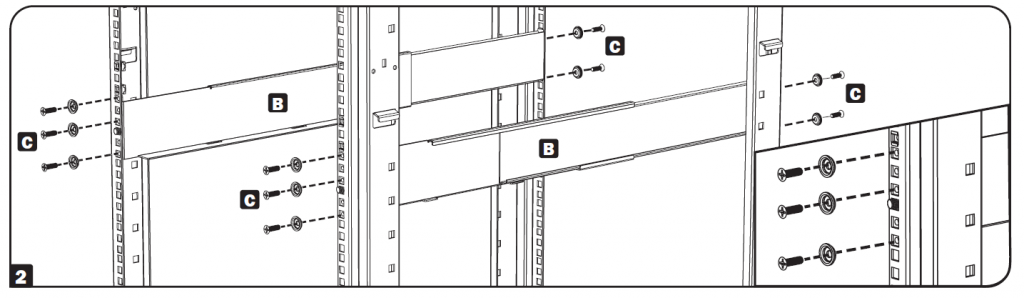
- Secure the shelves B to the mounting rails permanently using the included screws (six screws in the front and four screws in the rear) and cup washers C as shown. Tighten all screws before proceeding.Warning: Do not attempt to install equipment until you have inserted and tightened the required screws. The plastic pegs will not support the weight of your equipment.
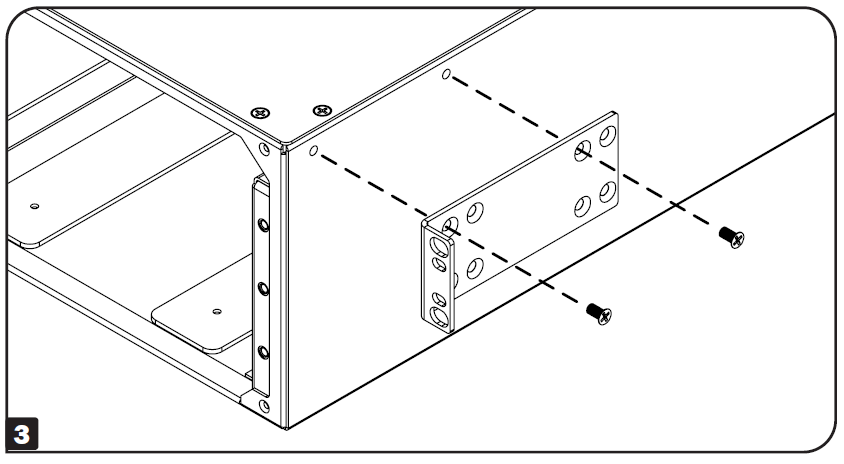
- Using the included hardware, attach the mounting brackets to the forward mounting holes of the cabinet. The mounting bracket “ears” should face forward. (Some equipment may have pre-installed or integrated mounting brackets.)
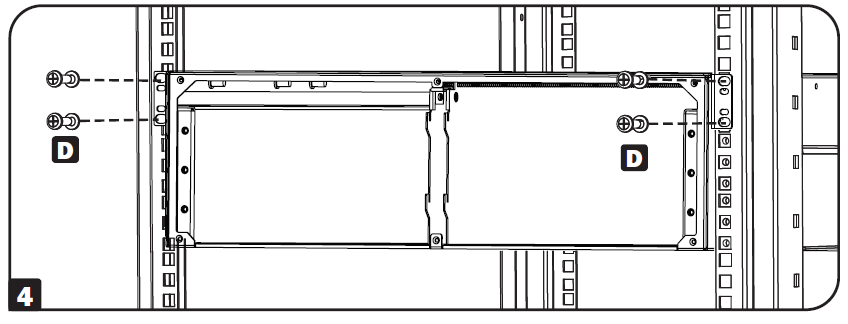
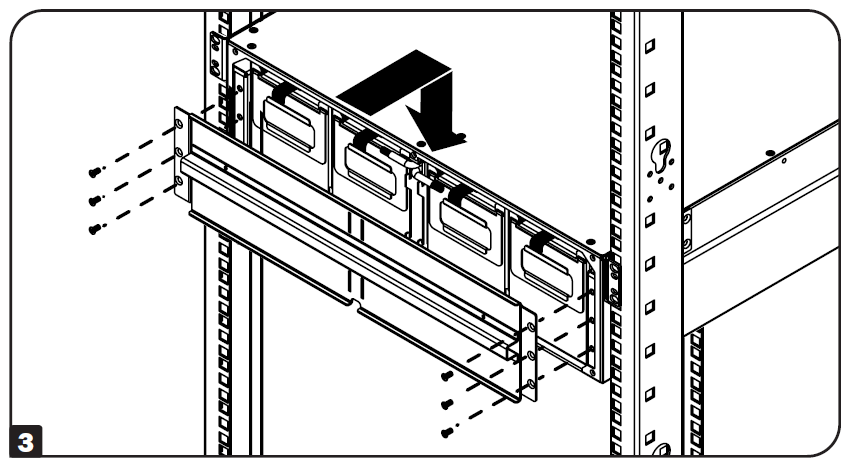
- With the aid of an assistant (if necessary), lift the battery pack chassis and slide it into the shelves. Attach the equipment mounting brackets to the forward mounting rails with user-supplied screws and washers D . Tighten all screws securely.
Mounting (2-Post Rack or Tower)
2-Post (Telecom) MountingA 2-Post Rack-Mount Installation Kit (Model 2POSTRMKITWM or 2POSTRMKITHD) may be ordered separately. Refer to the illustrations for installation instructions.
Tower MountingThe BP192V12RT3US External Battery Pack supports tower mounting. For increased stability, Tripp Lite recommends the use of the 2-9USTAND (sold separately). Follow the instructions included with the 2-9USTAND to complete the installation.

Connection
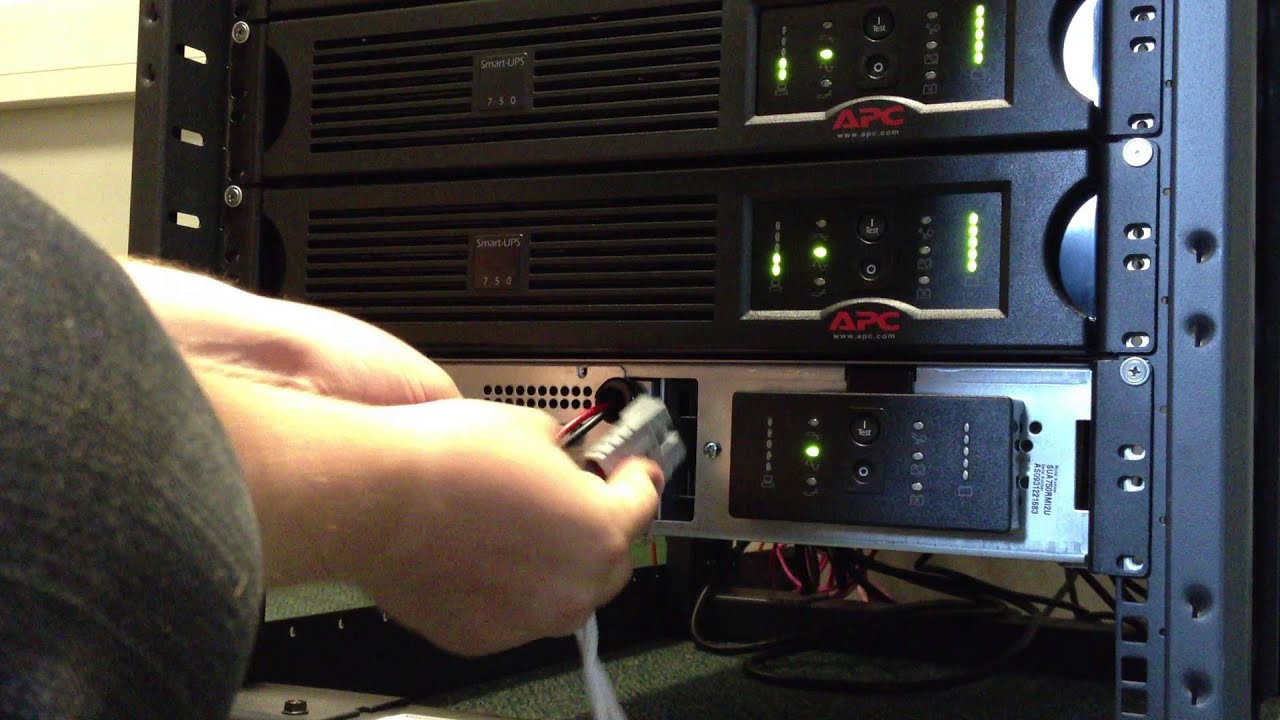
Connecting a Battery Pack to the UPS
The battery pack includes a detached, 3-conductor DC cable. Two conductors contain a polarized plug at each end for a DC power connection from the battery pack to the UPS. The third conductor is for ground connection between the battery pack and the UPS.

UPS models without Power Distribution Module: To connect the battery pack cable to the UPS, first remove the DC connector plate cover 1 . Then, connect the battery cable’s ground wire to the UPS system’s battery pack ground screw location 2 and connect to the ground connection on the battery pack. Plug in the polarized DC connector to the UPS, followed by the battery pack’s incoming DC connector 3 .UPS models with Power Distribution Module: For UPS systems with the power distribution module (PDM), connect the battery cable ground wire to the ground screw connection located on the underside of the PDM. Connect and secure the other end of ground wire to the ground connection on the battery pack.
Always connect the ground first.
Note: The incoming DC connector is always located on top and the outgoing DC connector is always located on the bottom.
Daisy-Chaining Multiple Battery Packs
For longer runtime, one or more BP192V12RT3US battery packs may be used with daisy-chain capability.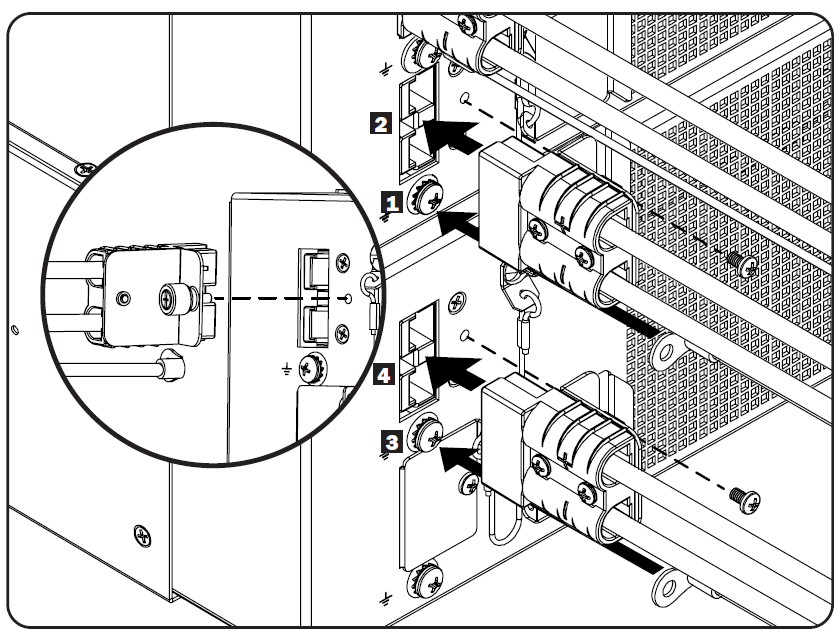
To daisy-chain multiple battery packs to a single UPS, first connect the battery pack to the UPS (refer to Connecting a Battery Pack to the UPS). Using a second cable harness, connect to the first battery pack unit’s outgoing ground 1 , and plug the cable harness into the first battery pack’s outgoing DC connector 2 . Then connect to the second battery pack’s incoming ground 3 and plug the cable harness into the second battery pack’s incoming DC connector 4 . Repeat procedure for each additional battery pack.
Always connect the ground first.
Notes:
- Only one battery pack will have a direct connection to the UPS.
- Multiple battery pack configurations will provide longer runtimes, but will also require longer recharge times.
Connection
Connecting Battery Detection PortsEach BP192V12RT3US battery pack contains a set of battery detection ports on the rear panel. The UPS will automatically detect the external battery pack(s) upon connection with the battery communication cable(s).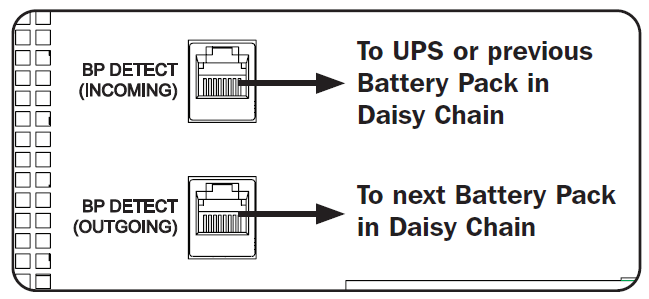 Notes:
- The incoming battery detection port is always located on top and the outgoing battery detection port is always located on the bottom.
- It may take up to 5 minutes for the UPS to detect the connection of the attached battery pack.
Maintenance
UPS Internal Batteries and External Battery packs require minimal maintenance. UPS Internal Batteries and External Battery packs should be kept dry at all times. Avoid installation in locations with high heat and/or humidity. The UPS system’s internal batteries and external battery packs should be kept fully charged by being connected to an active compatible UPS system, not left in a depleted condition. Batteries left in a discharged state will suffer a permanent loss of capacity.
TroubleshootingThere are fuse arrays inside the UPS internal battery system and external battery packs. If a heavy overload or short circuit is encountered, a fuse will open (blow). An internal battery system or external battery pack with blown fuses will deliver no output voltage at any load. A qualified technician must replace the fuses. Contact Tripp Lite Customer Support for additional information.
StorageUPS System: First, turn off your UPS by pressing the “OFF” switch to enter Bypass or Standby mode. Disconnect the power cord from the wall outlet or shut off UPS mains circuit breaker. Then, disconnect all equipment to avoid battery drain. If you plan on storing your UPS for an extended period of time, fully recharge the UPS batteries once every three months by plugging the UPS into a live AC circuit or outlet and letting the UPS charge for 4-6 hours. If you leave your UPS batteries discharged for an extended period, they may suffer permanent loss of capacity.External Battery Pack: Disconnect your battery pack’s power cable before storing. If you plan to store your battery pack for an extended period, fully recharge its batteries every three months by connecting it to a UPS that is connected to AC input for at least 12 hours.
ServiceYour Tripp Lite product is covered by the warranty described in this manual. A variety of Extended Warranty and On-Site Service Programs are also available from Tripp Lite. For more information on service, visit tripplite.com/support. Before returning your product for service, follow these steps:
- Review the installation and operation procedures in this manual to insure that the service problem does not originate from a misreading of the instructions.
- If the problem continues, do not contact or return the product to the dealer. Instead, visit tripplite.com/support.
- If the problem requires service, visit tripplite.com/support and click the Product Returns link. From here you can request a Returned Material Authorization (RMA) number, which is required for service. This simple on-line form will ask for your unit’s model and serial numbers, along with other general purchaser information. The RMA number, along with shipping instructions will be emailed to you. Any damages (direct, indirect, special or consequential) to the product incurred during shipment to Tripp Lite or an authorized Tripp Lite service center are not covered under warranty. Products shipped to Tripp Lite, or an authorized Tripp Lite service center must have transportation charges prepaid. Mark the RMA number on the outside of the package. If the product is within its warranty period, enclose a copy of your sales receipt. Return the product for service using an insured carrier to the address given to you when you request the RMA.
Internal Battery Replacement
Under normal conditions, the batteries in your battery pack will last several years. However, if batteries need to be replaced, the battery sleeves are hot-swappable. Batteries should be replaced only by qualified service personnel. If you require a replacement battery set, you can find it at tripplite.com/support/battery/index.cfm. The replacement battery part number is: RBC58-3US.Tripp Lite offers an exchange program for North American customers, wherein they may exchange worn-out battery packs for new ones at a price comparable to the cost of individual battery replacement. For more details, visit tripplite.com/support
Warranty and Product Registration
2-Year Limited WarrantySeller warrants this product, if used in accordance with all applicable instructions, to be free from original defects in material and workmanship for a period of 2 years from the date of initial purchase. If the product should prove defective in material or workmanship within that period, Seller will repair or replace the product, at its sole discretion.THIS WARRANTY DOES NOT APPLY TO NORMAL WEAR OR TO DAMAGE RESULTING FROM ACCIDENT, MISUSE, ABUSE OR NEGLECT. SELLER MAKES NO EXPRESS WARRANTIES OTHER THAN THE WARRANTY EXPRESSLY SET FORTH HEREIN. EXCEPT TO THE EXTENT PROHIBITED BY APPLICABLE LAW, ALL IMPLIED WARRANTIES, INCLUDING ALL WARRANTIES OF MERCHANTABILITY OR FITNESS, ARE LIMITED IN DURATION TO THE WARRANTY PERIOD SET FORTH ABOVE; AND THIS WARRANTY EXPRESSLY EXCLUDES ALL INCIDENTAL AND CONSEQUENTIAL DAMAGES. (Some states do not allow limitations on how long an implied warranty lasts, and some states do not allow the exclusion or limitation of incidental or consequential damages, so the above limitations or exclusions may not apply to you. This warranty gives you specific legal rights, and you may have other rights which vary from jurisdiction to jurisdiction).WARNING: The individual user should take care to determine prior to use whether this device is suitable, adequate or safe for the use intended. Since individual applications are subject to great variation, the manufacturer makes no representation or warranty as to the suitability or fitness of these devices for any specific application.
Product RegistrationVisit tripplite.com/warranty today to register your new Tripp Lite product. You’ll be automatically entered into a drawing for a chance to win a FREE Tripp Lite product!** No purchase necessary. Void where prohibited. Some restrictions apply. See website for details.Tripp Lite has a policy of continuous improvement. Specifications are subject to change without notice. Photos and illustrations may differ slightly from actual products.
![]()
References
[xyz-ips snippet=”download-snippet”]