![]()
Quick Start GuideHDMI KVM over IPRemote UserConsole StationModel: B064-000-STNCe guide est disponible en français sur le site Web de Tripp Lite : tripplite.com/support
WARRANTY REGISTRATION
Register your product today and be automatically entered to win an ISOBAR surge protector in our monthly drawing! tripplite.com/warranty

http://www.tripplite.com/warranty
 Manufacturing Excellence.1111 W. 35th Street, Chicago, IL 60609 USA• tripplite.com/support Copyright © 2020 Tripp Lite.All rights reserved.
Product Features
- Standalone HDMI user console station provides remote access to your B064-IPG KVM over IP switches from one centralized location.
- Enterprise-level Java-free console station replaces a C, laptop, or notebook computer.
- With no operating system, the console station eliminates the need for system or software updates and provides security against virus threats and data protection.
- Monitors the video output of up to 64 servers on the primary display using panel array mode.
- Virtual media lets you remotely connect storage media to a target server anywhere n the network.
- HDMI port supports HD resolutions up to 1920 x 1200 @ 60 Hz.
- Included mounting plate enables wall mounting or space-saving 0U rack mounting.
Package Contents
- B064-000-STN Console Station
- Rubber Feet (x4)
- Mounting Plate
- External Power Supply (100V-240V) with C13 to NEMA 5-15P Power Cord
Optional Accessories
- P569-Series High-Speed HDMI Cables
System Requirements
- Tripp Lite’s B064-IPG-Series KVM over IP Switch(es)*
- USB Mouse/Keyboard & HDMI monitor*B064-IPG KVM over IP Switches require firmware version V1.1.102 or above to support the B064-000-STN.
Introduction
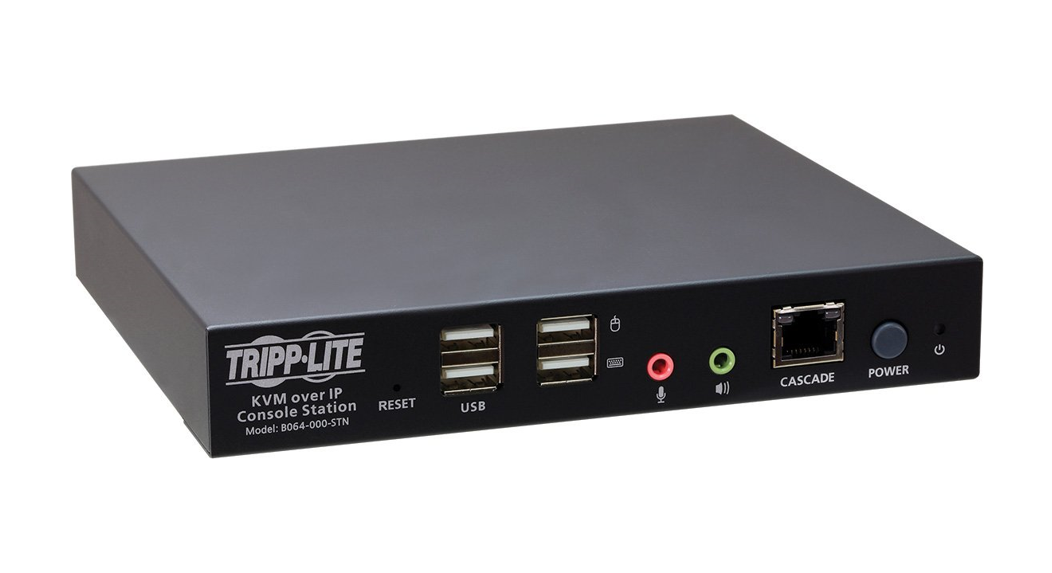
Front Panel:
|
5 Cascade Port6 Power Button (Press once to enter Standby Mode, press again to power on the unit) 7 Power LED (Power ON: Blue; Standby: Orange) |
Rear Panel: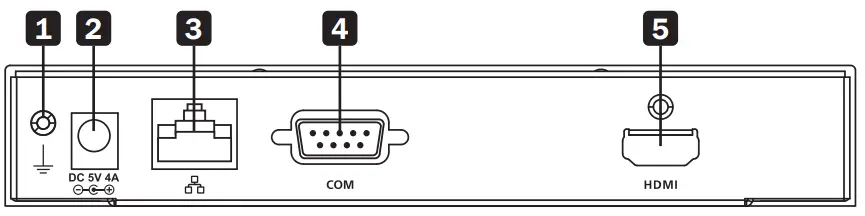
|
4 COM (RS-232) Port5 HDMI Port |
Mounting Instructions
The B064-000-STN can be rack-mounted or wall-mounted. The following section will guide you through the proper steps.
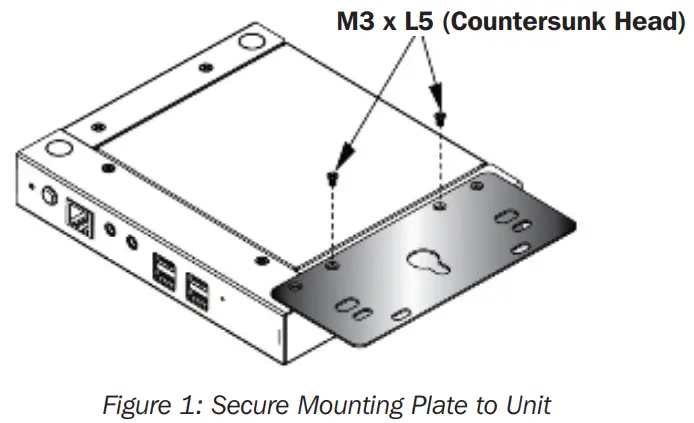
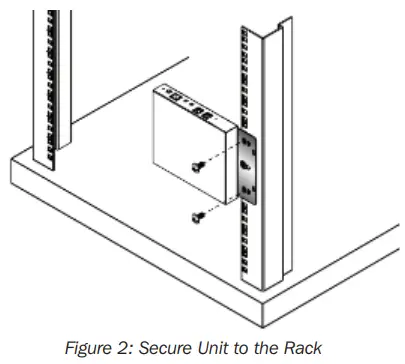
Rack MountingThe KVM over IP Console Station is designed to be mounted at the rear of a rack, where it occupies 0U to save space.
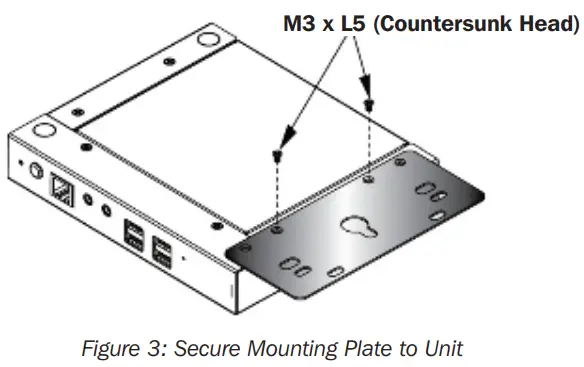
- Remove two bottom screws on the unit. Use the screws to secure the mounting plate to the bottom of the unit as shown in Figure 1.

- Screw the mounting plate to any convenient location in the rear of the rack.Note: These screws are user-supplied. M5 x 12 Phillips type I cross screws are recommended.
Mounting Instructions
 Mounting Instructions
Wall Mounting
- Remove two bottom screws on the unit. Use the screws to secure the mounting plate to the bottom of the unit.
- With a user-supplied screw, use the mounting plate’s center screw hole to mount the unit to a wall.

Installation
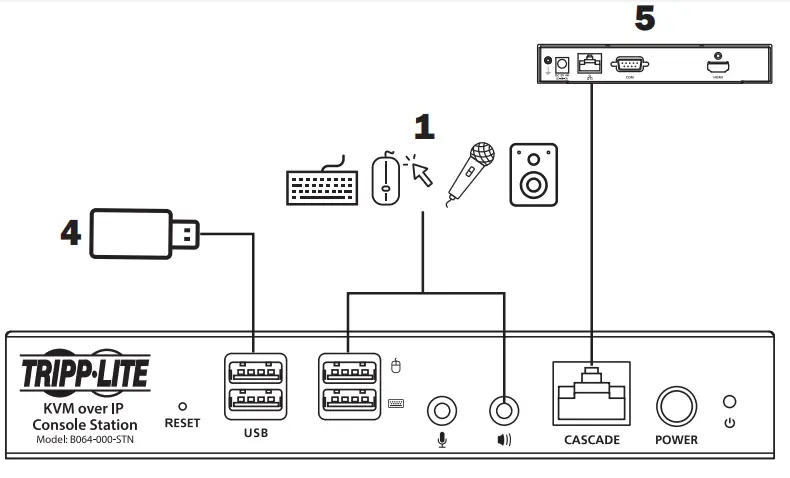
The B064-000-STN HDMI KVM over IP Remote User Console Station supports hot-plugging, which allows you to connect, disconnect, add or remove components without having to shut down the unit. If it becomes necessary to power off the Remote User Console Station, disconnect the power adapter and wait 30 seconds before reconnecting it. Use the Remote User Console Station’s shutdown function. Note: The numbers shown in Figure 5 correspond to the installation steps below.
- Connect your USB keyboard and USB mouse, as well as any speakers or microphone. 2
- With a user-supplied HDMI cable, connect an HDMI display to the HDMI port on the unit.
- Plug an Ethernet cable from the network into the LAN port.
- (Optional) Plug USB flash drives or devices into the peripheral USB ports on the front of the unit. 5
- (Optional) To cascade, an additional B064-000-STN unit, plug one end of a user-supplied Cat5e/6 Ethernet cable into the port labeled Cascade on the first stage unit, then plug the other end of the Ethernet cable into the LAN port of a second stage B064-000-STN unit. The added unit will gain the first stage unit’s internet connection but the configuration and control of each unit is separate.Note: DO NOT connect the cascade port to a network switch or it will cause a switching loop.
- (Optional) The unit can be grounded by attaching a grounding wire to the Grounding Terminal, then to a suitable, earth-grounded object. Note: Grounding wire is not included.
- Connect the included external power supply to the power jack on the unit.

Operation
Logging InThe B064-000-STN is a central control station used to monitor several or all of the B064-IPG-Series KVM switches in your network. A valid user name and password are required to log in (Figure 6). The default username and password are administrator and password, respectively. If invalid credentials are entered, an Invalid User Name or Password, or a Login Failed message will appear. Log n again with the correct user name and password.Note: If the number of invalid login attempts is exceeded, a timeout period is invoked. You must wait until the timeout period expires before attempting to log in again. The 064-000-STN supports two different modes:
- Console Station Mode: Log into the console station (My device)
- KVM Device Mode: Log into a KVM directly 1.
- a. To log into the console station (My Device), select y Device from the Address dropdown menu.b. To log into a KVM device directly, specify the device’s P address and its port.Note: To find the addresses of other KVM devices on the same local area network, lick the magnifying glass symbol or look in the Address dropdown menu for a device history list (the device history can be cleared using a terminal command).Operation
- Enter a user name and password (by default, user name and password are administrator and password, respectively), then click “Login” to log in.Note: For security purposes, the user name and password should be changed by the administrator to unique values.
- At the bottom right-hand corner, a language option is available (English is the default). Click to change the language.
Warranty and Product Registration
3-Year Limited WarrantyTRIPP LITE warrants its products to be free from defects in materials and workmanship for a period of three 3) years from the date of initial purchase. TRIPP LITE’s obligation under this warranty is limited to repairing or replacing (at its sole option) any such defective products. To obtain service under this warranty, you must obtain a Returned Material Authorization (RMA) number from TRIPP LITE or an authorized TRIPP ITE service center. Products must be returned to TRIPP LITE or an authorized TRIPP LITE service enter with transportation charges prepaid and must be accompanied by a brief description of the problem encountered and proof of date and place of purchase. This warranty does not apply to equipment that has been damaged by accident, negligence, or misapplication, or has been altered or modified in any way.
EXCEPT S PROVIDED HEREIN, TRIPP LITE MAKES NO WARRANTIES, EXPRESS OR IMPLIED, INCLUDING WARRANTIES OF MERCHANTABILITY AND FITNESS FOR A PARTICULAR PURPOSE. Some states do not permit limitation or exclusion of implied warranties; therefore, the aforesaid limitation(s) or exclusion(s) may not apply to the purchaser.
EXCEPT AS PROVIDED ABOVE, IN NO VENT WILL TRIPP LITE BE LIABLE FOR DIRECT, INDIRECT, SPECIAL, INCIDENTAL, OR CONSEQUENTIAL DAMAGES ARISING OUT OF THE USE OF THIS PRODUCT, EVEN IF ADVISED OF THE POSSIBILITY OF SUCH DAMAGE. Specifically, TRIPP LITE is not liable for any costs, such as lost profits or revenue, loss of equipment, loss of use of equipment, loss of software, loss of data, costs of substitutes, claims by third parties, orotherwise.
 report this ad
Warranty and Product RegistrationPRODUCT REGISTRATIONVisit tripplite.com/warranty today to register your new Tripp Lite product. You’ll be automatically entered into a drawing for a chance to win a FREE Tripp Lite product!** No purchase necessary. Void where prohibited. Some restrictions apply. See website for details.
FCC Notice, Class BThis device complies with part 15 of the FCC Rules. Operation is subject to the following two conditions: (1) This device may not cause harmful interference, and (2) this device must accept any interference received, including interference that may cause undesired operation.Note: This equipment has been tested and found to comply with the limits for a Class B digital device, pursuant to part 15 of the FCC Rules. These limits are designed to provide reasonable protection against harmful interference in a residential installation. This equipment generates, uses, and can radiate radio frequency energy and, if not installed and used in accordance with the instructions, may cause harmful interference to radio communications. However, there is no guarantee that interference will not occur in a particular installation. If this equipment does cause harmful interference to radio or television reception, which can be determined by turning the equipment off and on, the user is encouraged to try to correct the interference by one or more of the following measures:
- Reorient or relocate the receiving antenna.
- Increase the separation between the equipment and receiver.
- Connect the equipment into an outlet on a circuit different from that to which the receiver is connected.
- Consult the dealer or an experienced radio/TV technician for help.Any changes or modifications to this equipment not expressly approved by Tripp Lite could void the user’s authority to operate this equipment.Tripp Lite has a policy of continuous improvement. Specifications are subject to change without notice.
20-03-261 93-3C63_RevA
References
[xyz-ips snippet=”download-snippet”]