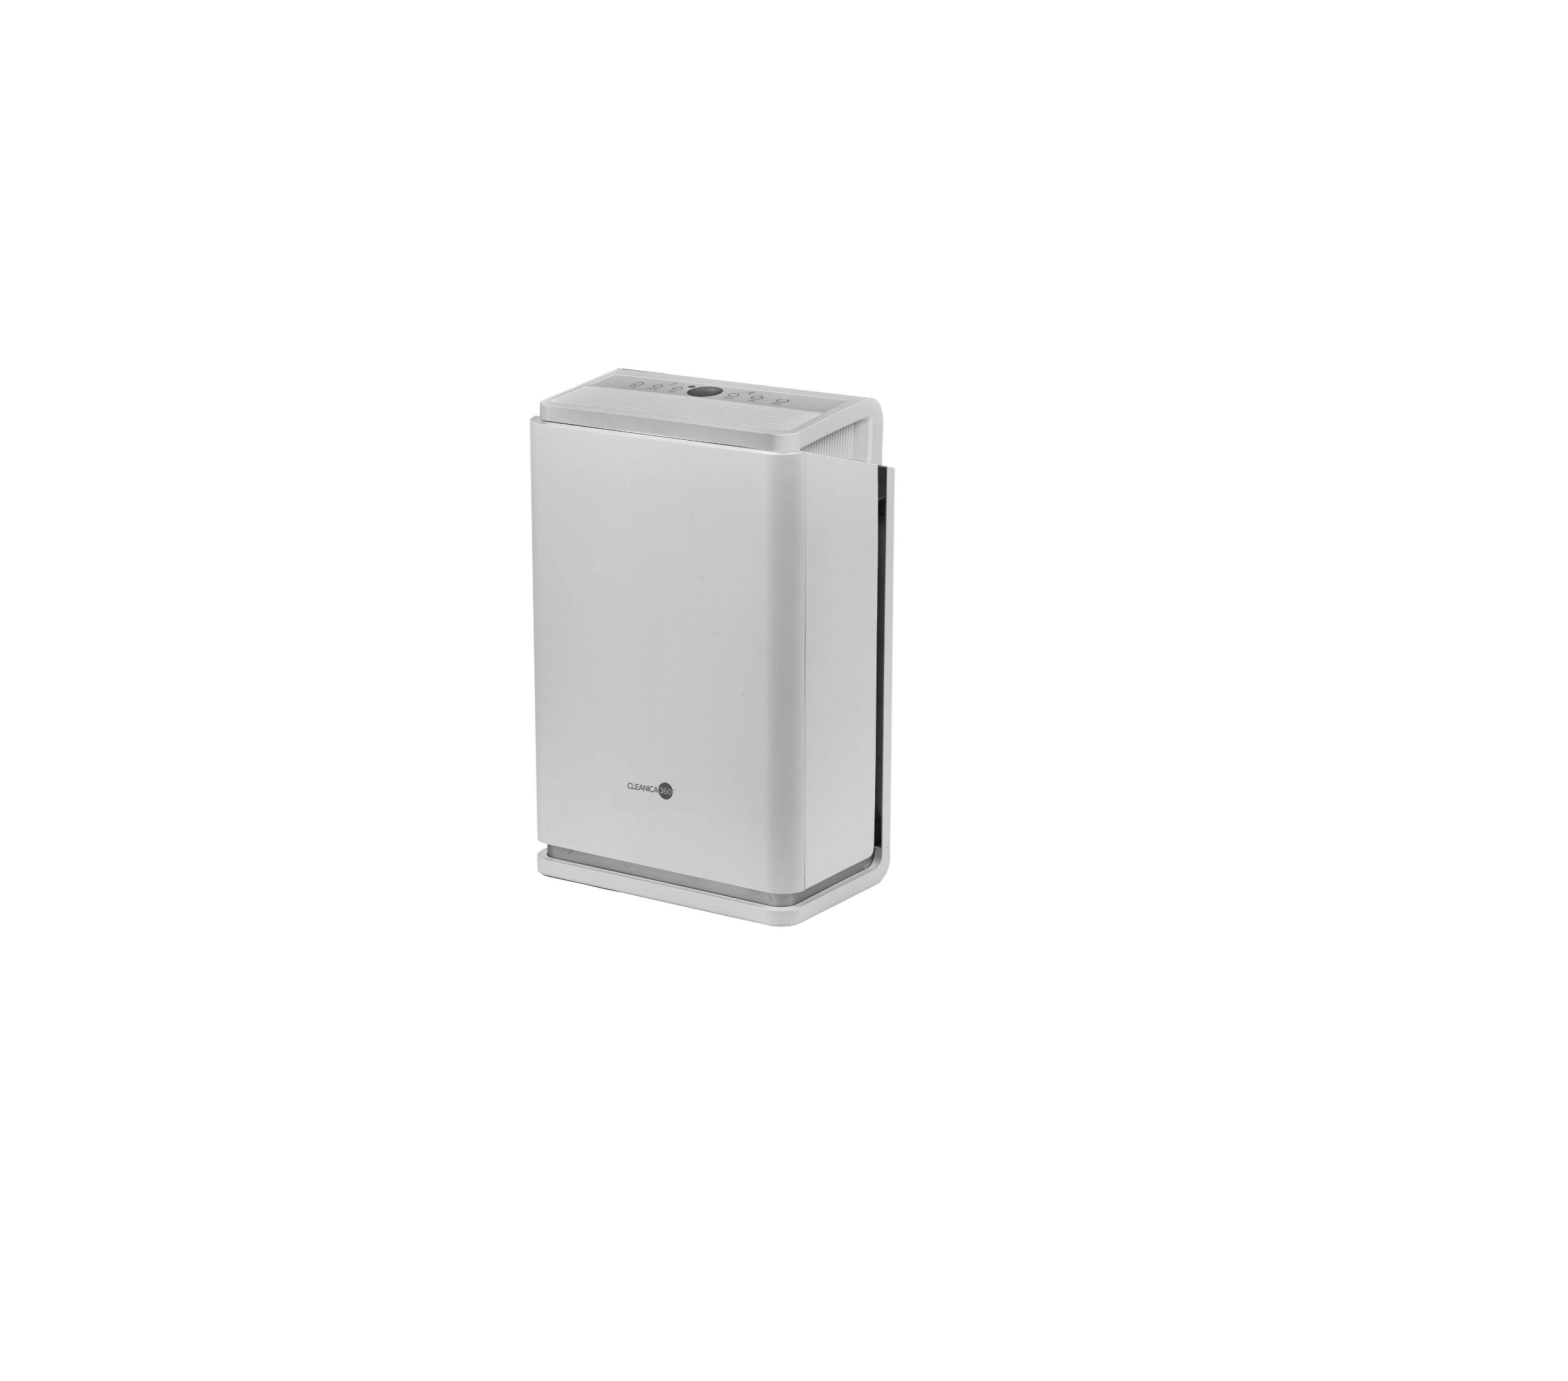
TRiSTAR Cleanica 360 Air Purifier
IMPORTANT SAFEGUARDS
READ AND SAVE THESE SAFETY INSTRUCTIONS BEFORE USING THIS PRODUCT.When using electrical appliances, basic precautions should always be followed to reduce the risk of fire, electric shock, and injury, including the following:
- Read all instructions before operating the appliance.
- Always turn the appliance controls to the OFF position and unplug from the wall outlet when not in use.
- Do not use the appliance outdoors. Only use the device indoors with good air circulation.
- Never use the appliance unless it is fully assembled.
- Do not use the appliance where combustible gases or vapors are present.
- For dry locations ONLY. Do not use outdoors or on wet surfaces and do not expose to water, rain, or damp locations.
- Do not allow foreign objects to enter the ventilation or exhaust opening because this may cause electric shock or damage to the appliance. Do not block the air outlets or intakes.
- Do not use an extension cord.
- This appliance has a polarized plug (one blade is wider than the other). To reduce the risk of electric shock, this plug is intended to fit in a polarized outlet only one way. If the plug does not fit fully in the outlet, reverse the plug. If it still does not fit, contact a qualified electrician to install the proper outlet. DO NOT attempt to modify this plug or defeat this safety feature in any way.
- A loose fit between the AC outlet (receptacle) and plug may cause overheating and a distortion of the plug. Contact a qualified electrician to replace a loose or worn outlet.
- Disconnect the power supply before servicing the replacement filter.
- This product complies with the maximum allowable concentration of ozone of 0.001 parts per million by volume (ppmv) in a 24-hour period.The Health Canada Guideline 2010 recommends that the maximum exposure limit, based on an averaging time of 8 hours, is 0.020 ppmv or less when tested in a sealed, controlled room approximately 30 m3.
- This appliance is not intended for use by people with reduced physical, sensory, or mental capabilities or lack of experience and knowledge unless they are under the supervision of a responsible person or have been given proper instruction in using the appliance.
- Close supervision is necessary when any appliance is used near children. This appliance is not intended for use by children.
- Never attempt to clean the air inlets or outlets with sharp objects.
- Never operate the device near heat sources, such as heaters, open fires, or direct sunlight.
- This appliance does not serve as a fan replacement. This considerably shortens the service life of the filter.
- The device must not be used in an environment containing high levels of dust or chlorine.
- Do not place heavy objects on the unit, and keep it out of the reach of children.
- The device must not be used in closed and narrow rooms that restrict the device’s air flow.
- If the power cord is damaged, stop operation immediately. Contact Customer Service.
- If the unit is not working properly, turn off the main power button and unplug the unit.
- Ensure a minimum distance of at least 10 cm between the unit and the nearest wall.
- Only use this appliance indoors in a location with good air circulation.
- Keep sufficient distance from curtains, drapes, or other easily movable objects.
- Do not place the unit on an uneven, sloping, or moving surface to prevent it from tipping over or falling to the ground.
- CAUTION: High voltage. This equipment should be inspected and collector cells (filters) should be cleaned in accordance with manufacturer’s instructions on a regular basis to prevent excessive accumulation of dust particles that can result in flashover or risk of fire.
NOTE: This equipment has been tested and found to comply with the limits for a Class B digital device, pursuant to Part 15 of the FCC Rules. These limits are designed to provide reasonable protection against harmful interference in a residential installation. This equipment generates, uses, and can radiate radio frequency energy and, if not installed and used in accordance with the instructions, may cause harmful interference to radio communications. However, there is no guarantee that interference will not occur in a particular installation. If this equipment does cause harmful interference to radio or television reception, which can be determined by turning the equipment off and on, the user is encouraged to try to correct the interference by one or more of the following measures:
- Reorient or relocate the receiving antenna.
- Increase the separation between the equipment and receiver.
- Connect the equipment into an outlet on a circuit different from that to which the receiver is connected.
- Consult the dealer or an experienced radio/TV technician for help.
This device complies with part 15 of the FCC Rules. Operation is subject to the following two conditions:(1) This device may not cause harmful interference, and(2) this device must accept any interference received, including interference that may cause undesired operation.This device complies with FCC radiation exposure limits set forth for general population. This transmitter must not be co-located or operating in conjunction with any other antenna or transmitter.
Technical Specifications
| Model Number | KJ260G-E601 |
| Wi-Fi | No |
| Tension | 120V / 60 Hz |
| Rated Power | 70W |
| Air Flow Rate | 260m³/h |
| Timer (hours) | 1-8 |
| Weight | 14.33 lb |
| Dimensions (W*H*T) | 13.78 x 9.06 x 22.05 inches |
| Room Size | 30–35m² |
| Noise Emission | ≤45dB(A) |
| Model Number | KJ260G-E601 W |
| Wi-Fi | Yes |
| Tension | 120V / 60 Hz |
| Rated Power | 70W |
| Air Flow Rate | 260m³/h |
| Timer (hours) | 1-8 |
| Weight | 14.33 lb |
| Dimensions (W*H*T) | 13.78 x 9.06 x 22.05 inches |
| Room Size | max. 55m² |
| Noise Emission | ≤45dB(A |
SAVE THESE INSTRUCTIONS FOR HOUSEHOLD USE ONLY
Parts & Accessories
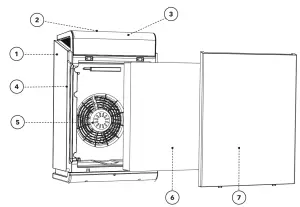
- MAIN UNIT
- CONTROL PANEL
- AIR OUTLET
- AIR INLET (ON BOTH SIDES)
- FAN
- FILTER SYSTEM
- BACK COVER
NOTE: Unpack all listed contents from the packaging. Contents vary by model. Please remove any clear or blue protective film on the components before use.
IMPORTANT: Please make sure that your Cleanica 360 Air Purifier has been shipped with the components that you ordered (some accessories may be sold separately). Check everything carefully before use. If any part is missing or damaged, do not use this product. Contact the shipper using the customer service number located on the back of this manual.
Parts & Accessories

A. WASHABLE PRE-FILTERB. PRE-FILTERC. HEPA FILTERD. ACTIVATED CARBON FILTERE. COLD CATALYST FILTERF. UV LIGHT G. IONIZER
Multi-Step Filtration System
A. Washable Pre-Filter: To clean, rinse the Washable Pre-Filter with tap water. Pat dry with a clean towel. DO NOT machine wash or clean in a dishwasher.B. Pre-Filter: This pre-filter is a coarse particle filter that collects the larger particles from the air flowing through it. This process additionally protects the HEPA filter element from these particles and thus increases the service life of the filter elements.C. HEPA Filter: In order to remove even the smallest particles, air flows through a HEPA filter in the third step of the cleaning process, which absorbs particulates, like pollen, fine dust, and spores.D. Activated Carbon Filter: In the next step, the air, now free of solids, is processed by an activated carbon filter. In this working process, odors and toxins are absorbed. Granulated activated carbon is used in this filter as it has a high degree of efficiency and a large total surface area.E. Cold Catalyst Filter: With the help of the cold catalyst filter, organic compounds, such as bacteria, are broken down by the photocatalytic effect produced through irradiation with UV light.F. Ultraviolet Light: The ultraviolet radiation has a disinfecting effect that kills bacteria and viruses.G. Ionizer: In the last step, the air flowing out of the appliance is mixed with a small quantity of negatively charged ions. These ions attach themselves to the smallest particles in the air and charge them statically. The particles charged in this way tend to accumulate with other charged particles and form larger clusters, which can then be more easily absorbed by the filter.
Parts & Accessories
Control Panel
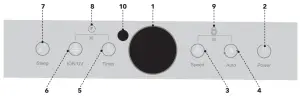
- Display: Displays the information shown in the Display Indicators chart, the current fan speed, and, when the appliance is in auto mode, the current air quality (see the Air Quality Indicator chart).
- Power Button: Press to turn the appliance on and off.
- Fan Speed Button: Press to adjust the fan speed (low, medium, or high) when the appliance is in manual mode.
- Auto Button: Press to switch the appliance between manual mode and automatic mode. When the appliance is in manual mode, the fan speed can be adjusted by pressing the Fan Speed Button. When the appliance is in automatic mode, the fan is controlled by the appliance’s air quality sensor.
- Timer Button: Press to set the amount of time that the appliance will run before shutting off (18 hours).
- Ion/UV Button: Press to turn the appliance’s ion/UV function on or off.
- Sleep Button: Press to set the appliance to sleep mode. In sleep mode, the appliance uses the lowest fan setting for minimal noise and all lights except the Sleep Button are darkened. To exit sleep mode, press the Sleep Button or the Fan Speed Button.
- Reset Function: Press the Timer Button or the Ion/UV Button to display the total time the appliance has been running. Press and hold the Timer Button or the Ion/UV Button for 3 seconds to reset the appliance’s total runtime tracker.
- Child/Safety Lock Function: Press and hold the Speed Button and Auto Button simultaneously for 3 seconds to lock and unlock the appliance. When the appliance is locked, the settings cannot be changed.
- Remote Control Sensor: Point the Remote Control at the Remote Control Sensor for best results.WiFi Function (optional):Press and hold the Sleep Button and Timer Button simultaneously for 3 seconds to activate the appliance’s WiFi connection. Press and Hold both buttons again for another 3 seconds to stop the WiFi connection.
Control Panel Display Indicators
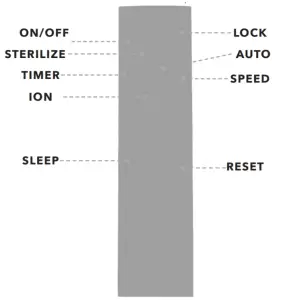
Using the Remote Control
Be sure to point the Remote Control at the appliance’s Remote Control Sensor (see the “Control Panel” section).On/Off: Press to turn the appliance on and off.Sterilize: Press to turn the appliance’s UV function on and off.Timer: Press to set the amount of time that the appliance will run before shutting off (18 hours).Ion: Press to turn the appliance’s Ion function on and off.Sleep: Press to set the appliance to sleep mode. In sleep mode, the appliance uses the lowest fan setting for minimal noise and all lights except the Sleep Button are darkened. To exit sleep mode, press the Sleep Button or the Fan Speed Button.Lock: Press to lock and unlock the appliance. When the appliance is locked, the settings cannot be changed.Auto: Press to switch the appliance between manual mode and automatic mode. When the appliance is in manual mode, the fan speed can be adjusted by pressing the Fan Speed Button (or the Speed Button on the Remote Control). When the appliance is in automatic mode, the fan is controlled by the appliance’s air quality sensor.Speed: Press to adjust the fan speed (low, medium, or high) when the appliance is manual mode.Reset: Press to reset the appliance’s total runtime tracker.
Requires 2 AAA Batteries (Not Included)
Do not mix old and new batteries. Do not mix alkaline, standard, or rechargeable batteries.
- Non-rechargeable batteries are not to be recharged.
- Rechargeable batteries are only to be charged under adult supervision.
- Rechargeable batteries are to be removed from the toy before being charged.
- Different types of batteries or new and used batteries are not to be mixed.
- Batteries are to be inserted with the correct polarity. · Exhausted batteries are to be removed from the toy. · The supply terminals are not to be short-circuited.
Instructions for Use
Before First Use
- Remove the filter elements from the appliance. Remove the foils and plastic packaging and reinsert them into the appliance. Follow the steps in the “Changing the Filter” section.
- The order of the filters is indicated in the “Parts & Accessories” section of this instruction book. The filters should be inserted in alphabetical order (A, B, C, D, and E).
- When the appliance is plugged in and ready for use, a tone will sound.
Using the Smartphone App*
- Scan the QR code below to download the SmartLife app to your smartphone.
- Register an account in the SmartLife app.
- Press and hold the Sleep Button and Timer Button simultaneously for 3 seconds to activate the appliance’s WiFi connection. The WiFi connection icon will appear on the Control Panel’s Display.
- Press the “+” icon located at the top right of the SmartLife app. Then, connect the air purifier to the app either manually or automatically.


MANUAL CONNECTION
- In the SmartLife app, press “Add Manually,” then “Small Home Appliances,” and then “Air Purifier.”
- Ensure the appliance is turned on and the WiFi function is enabled. Then, press “Confirm Indicator Rapidly Blink.”
- Fill out the ID and password of the wireless network to which your smartphone is connected.
- Wait for the appliance to connect successfully to the network. Then, press “Done.”
AUTOMATIC CONNECTION
- In the SmartLife app, press “Auto Scan.”
- Select your appliance from the list of “Available Devices Found.” Then, press “Next.”
- You can now control your air purifier using the SmartLife app on your smartphone.NOTE: Your smartphone must be connected to the internet in order to use the SmartLife app.
Changing the Filter
The appliance`s entire filter should be replaced every 12 months (based on using the appliance for 12 hours per day).
Removing the Filter
- Ensure the appliance is powered off and unplugged before removing the filter.
- Hold the appliance in place and remove the back panel cover (see Fig. A). The back panel cover is held in place with a magnetic fastener.
- Carefully pull the middle strap outward to remove the filter.
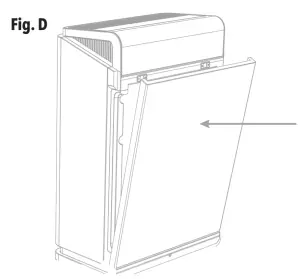
Replacing the Filter
- The order of the filters is indicated in the “Parts & Accessories” section of this instruction book. The filters should be inserted in alphabetical order (A, B, C, D, and E).
- Insert the top part of the filter first (see Fig. C). Then, push the bottom part of the filter slightly to set the filter in place.
- Reattach the back panel cover (see Fig. D). Lightly press the back panel cover into the appliance so that it snaps into place.
- Ensure that the back panel cover is closed tightly.
Cleaning & Maintenance
- Ensure the appliance is powered off and unplugged before cleaning.
- Wipe the outer surfaces of the appliance with a damp, clean cloth.
Purifying Air Containing Cigarette Smoke
Cigarette smoke consists of numerous complex chemical compounds. For air purifiers, purifying air containing cigarette smoke is essentially divided into solid components of smoke and gaseous components of smoke. The solid smoke particles are filtered out by the HEPA filter. The gaseous components are partly absorbed by the activated carbon filter and partly degraded by the photocatalytic filter.
The appliance should be placed as close as possible to the smoke source.
- The appliance should not be placed on the floor (placing the appliance on a table is recommended for cigarette smokers). For best results, place on a table near the smoke source
- Filtering a large amount of cigarette smoke will shorten the lifespan of the .appliance’s filters and new filters will be required more often.
Purifying Air Containing Pollen
Air purifiers are able to filter all common pollens from the air. The pollen remains in the HEPA filter. While an air purifier can remove pollen from the air, it cannot remove pollen that is already deposited on surfaces, such as beds, walls, and furniture. In order for the air purifier to remain fully effective against pollen and reduce the pollen concentration in the air significantly, steps should be taken to reduce the pollen on surfaces in the room:
- Carry out a basic cleaning of the room before using the appliance.
- Do not use dust cloths for cleaning. Instead, use a damp cloth to clean surfaces at least once a week.
- Vacuum upholstered furniture at least once a week. Use a vacuum cleaner suitable for allergy sufferers.
- During the day, leave the appliance running at the lowest fan speed level.
- Place the appliance on a table instead of on the floor.
- Turn the appliance off when you sleep.
- The suggested time to ventilate a room is between 6:00 and 8:00 am in cities and around 7:00 pm in rural areas. When ventilating the room, set the appliance’s fan speed to the highest level.
Purifying Air Containing Dust
Air purifiers can remove dust only from the air. In order for the air purifier to remain fully effective against dust and reduce the dust concentration in the air significantly, steps should be taken to reduce the dust on surfaces in the room:
- Place the appliance on the floor where it can easily ventilate the room.
- Cover mattresses, pillows, and duvets with allergen-proof coverings.
- Wash pillows and duvets frequently.
- Replace older mattresses.
- Use vacuum cleaners with a fine filter.
- Vacuum mattresses monthly.
- Avoid dust traps in the bedroom.
- Do not place indoor plants in the bedroom.
Troubleshooting
Use the troubleshooting guide as a first step to resolve any issues you may be experiencing. Contact customer service using the contact information on theback of this manual.
WARNING: To reduce risk of personal injury, unplug the appliance before troubleshooting.
| Problem | Possible Cause | Possible Solution |
| The appliance will not turn on | Front cover not completely closed | Close cover so it is shut correctly |
| Blown fuse or breaker | Contact your electrician | |
| Power cord not plugged in | Plug the power cord into a working power outlet | |
| The air flow at the outlet opening is restricted | Dirty or clogged filters | Change the filter (see the “Changing the Filter” section) |
| Filter bag unpacked | Change the filter (see the “Changing the Filter” section) | |
| The appliance is unusually loud | Appliance is placed on an uneven surface | Place the appliance on an even surface |
| Unpacked filter | Change the filter (see the “Changing the Filter” section) | |
| Dirty or clogged filter | Change the filter (see the “Changing the Filter” section) | |
| Remote control does not work | Battery used up | Replace the battery |
| Smoke and odors are filtered very poorly |
Filters are placed in the wrong order |
Ensure the filters are placed in the correct order (see the “Replacing the Filter” section). |
| Filters unpacked | Change the filter (see the “Changing the Filter” section) | |
| Dirty or clogged filters | Change the filter (see the “Changing the Filter” section) | |
| Display shows “E1” | Sensor fault | Reboot the appliance |
90-Day Money-Back Guarantee
The Cleanica 360 Air Purifier is covered by a 90-day money-back guarantee. If you are not 100% satisfied with your product, return the product and request a replacement product or refund. Proof of purchase is required.Refunds will include the purchase price, less processing and handling. Follow the instructions in the Return Policy below to request a replacement or refund.
Replacement Guarantee PolicyOur products, when purchased from an authorized retailer, include a 1-year replacement guarantee if your product or component part does not perform as expected, the guarantee extends only to the original purchaser and is not transferable. If you experience an issue with one of our products within 1 year of purchase, return the product or the component part for replacement with a functionally equivalent new product or part. The original proof of purchase is required, and you are responsible to pay to return the appliance to us. In the event a replacement appliance is issued, the guarantee coverage ends six (6) months following the receipt date of the replacement appliance or the remainder of the existing guarantee, whichever is later. Tristar reserves the right to replace the appliance with one of equal or greater value.
Return PolicyIf, for any reason, you would like to replace or return the product under the money-back guarantee, your order number can be used as the return merchandise authorization number (RMA). If the product was purchased in a retail store, return the product to the store or use “RETAIL” as the RMA. Return your product to the address provided below for a replacement, which will incur no additional processing and handling fees, or for the refund of your purchase price, less processing and handling. You are responsible for the cost of returning the product.You can locate your order number at www.customerstatus.com. You can call customer service at 973-287-5124 or email [email protected] for any additional questions. Pack the product carefully and include in the package a note with (1) your name, (2) mailing address, (3) phone number, (4) email address, (5) reason for return, and (6) proof of purchase or order number, and (7) specify on the note whether you are requesting a refund or replacement. Write the RMA on the outside of the package. Send the product to the following return address:
Cleanica 360 Tristar Products 500 Returns Road Wallingford, CT 06495
If the replacement or refund request has not been acknowledged after two weeks, please contact Customer Service at 973-287-5124.
RefundRefunds requested within the money-back guarantee timeframe will be issued to the payment method used at purchase if the item was purchased directly from Tristar. If the item was purchased from an authorized retailer, proof of purchase is required, and a check will be issued for the item and sales tax amount. Processing and handling fees are non-refundable.
We are very proud of the design and quality of our Cleanica 360 Air Purifier.
This product has been manufactured to the highest standards. Should you have any questions, our friendly customer service staff is here to help you.
Visit us at www.TristarCares.com, email us at [email protected], or call us at 973-287-5124
 Distributed by:
  Tristar Products, Inc.Fairfield, NJ 07004© 2021 Tristar Products, Inc.Made in ChinaCL360-AP_IB_TP_ENG_V5_210323
 report this ad
References
[xyz-ips snippet=”download-snippet”]