
Tristar Espresso Machine Instruction Manual
SAFETY
- By ignoring the safety instructions the manufacturer can not be hold responsible for the damage.
- If the supply cord is damaged, it must be replaced by the manufacturer, its service agent or similarly qualified persons in order to avoid a hazard.
- Never move the appliance by pulling the cord and make sure the cord can not become entangled.
- The appliance must be placed on a stable, level surface.
- The user must not leave the device unattended while it is connected to the supply.
- This appliance is only to be used for household purposes and only for the purpose it is made for.
- This appliance shall not be used by children aged less than 8 years. This appliance can be used by children aged from 8 years and above and persons with reduced physical, sensory or mental capabilities or lack of experience and knowledge if they have been given supervision or instruction concerning use of the appliance in a safe way and understand the hazards involved. Children shall not play with the appliance. Keep the appliance and its cord out of reach of children aged less than 8 years. Cleaning and user maintenance shall not be made by children unless older than 8 and supervised.
- Surface are liable to get hot during use.
- To protect yourself against an electric shock, do not immerse the cord, plug or appliance in the water or any other liquid.
- This appliance is intended to be used in household and similar applications such as:– Staff kitchen areas in shops, offices and other working environments.– By clients in hotels, motels and other residential type environments.– Bed and breakfast type environments.– Farm houses.
- Children shall not play with the appliance.
- This appliance shall not be used by children. Keep the appliance and its cord out of reach of children.
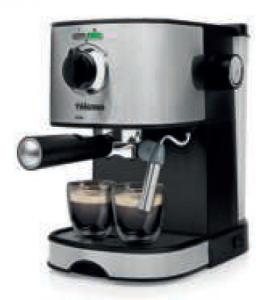
PARTS DESCRIPTION
| 1. On/off switch | 9. Green indicator led |
| 2. Tank lid | 10. Steam control knob |
| 3. Water tank | 11. Steam/hot water nozzle |
| 4. Control knob | 12. Froth device |
| 5. Coffee/hot water position | 13. Drip tray |
| 6. Heating up position | 14. Measuring spoon with tamper |
| 7. Steam function position | 15. Funnel/Filter |
| 8. Red indicator led | 16. Press bar on funnel handle |
BEFORE THE FIRST USE
- Take the appliance and accessories out the box. Remove the stickers, protective foil or plastic from the device.
- Place the device on a flat stable surface and ensure a minimum of 10 cm. free space around the device. This device is not suitable for installation in a cabinet or for outside use.
- Flush the machine through with clean water in the following steps:– Make sure the all buttons are in the off position and that the steam water knob is closed by turning clockwise.– Lift out the tank, draw up the lid and fill with cold water up to the MAX level marked. Alternatively draw up the lid and fill the tank whilst in position on the espresso machine. We recommend using filtered water as it produces better coffee and reduces limescale, never use fizzy water.– Refit the tank, make sure that it is correctly located and apply light pressure if necessary to ensure the valve at the bottom of the tank connects with the water inlet of the machine. It is normal for water to remain in the compartment under the tank, this can be done using a sponge.– Set filter into the funnel (no coffee powder in filter).– Place a jug. Make sure the steam control knob is on the “0” position.– Connect to power source, turn the on/off switch to the “1” position. The red lamp will be illuminated.– Turn the control knob to the coffee/hot water position, the pump will pump water. When there is water flowing out, turn the control knob tothe heating up position and waiting for a moment, the appliance begins to be pre-heated until the green lamp is illuminated, it shows the pre-heating is finish. Then turn the control knob to the coffee/hot water position again, and water will flow out to clean the coffee maker.– Swing out the steam/hot water nozzle by turning it to the right. Place a suitable container underneath the steam/hot water nozzle.– Plug in the mains supply, Press down the on/off switch to the “1” position. Turn the control knob to the steam function position, wait until the green indicator is illuminated. Turn the steam control knob slowly in anti-clockwise, steam will come out from the frothing device.– Turn the control knob to the heating up position and the on/off switch to “0” position to cut the power source off.
Important:
You can not brew espresso if you have not flushed the machine at first, the flushing cycle causes the boiler to fill with water. If you have not used the machine for a few days, you have to flush it with fresh water before you use it again.
- Note: When the appliance pumps the water for the first time, a sound may be heard, this is normal, it is the removal of air in the appliance. The sound will disappear after about 20 seconds.
Making espresso
- Select the desired filter and fit into the filter holder. Use the smaller filter for making one cup of coffee and the larger filter for 2 cups.
- Add the coffee using the measuring spoon provided one full spoon per cup, level the surface then lightly press with the tamper of the measuring spoon, wipe off any coffee around the rim. When buying ground coffee make sure it is suitable for espresso machines. Never press the coffee too firmly as the coffee will come out slowly and the cream will be of a dark colour, however, if it is pressed too lightly ,the coffee will come out too fast and the cream will be a light colour.
- Attach the filter holder into the appliance, turn it to the right to lock into position. Put one or two cups underneath, if making one cup of coffee, centre your cup in the middle. Ensure the on/off switch is on, the green lamp will be illuminated. Then turn the control knob to the coffee/hot water position, and there will be coffee flowing out.
- When you’ve enough coffee, not too much otherwise it will be too weak (optimum dosage is 30ml per cup) manually turn the function knob to the heating up position. If you are not making any more coffee, press the on/ off switch to turn off the appliance.
- Remove the filter holder by turning to the left. There will be water on the filter when you remove it, this is normal.
- To remove the used coffee from the filter holder, please lift the plastic pressing block to press the edge of filter, then tip the filter holder upside down and tap out the grounds.Note: During operation, if the green indicator is extinguished, you need to turn the control knob to the heating up position to pre-heat the appliance again. After a few seconds, if the green lamp is illuminated again, you can make espresso coffee continued by turning the control knob to the coffee/ hot water position, the green lamp is cycle on and off to maintain the water temperature is hot enough.Important: Do not leave the coffee maker unattended during brewing, it sometimes requires manual operation.
Frothing milk for cappuccino
- Prepare the espresso as previously described.
- Make sure there is water in the tank.
- Turn the control knob to the steam function position, wait until the green indicator is illuminated, this indicates that the boiler has reached the correct temperature.
- Partly fill a jug with milk – the milk may increase up to three times in volume so select a suitably sized jug. Cold semi skimmed milk gives the best results.
- Position the jug under the steam nozzle.
- Place the nozzle into the milk about 20mm deep and turn the steam function knob in an anti clockwise direction, the milk will begin to increase in volume and appear frothy. When the volume of the milk has doubled, fully immerse the nozzle and continue heating the milk. Once the desired temperature is reached(60℃ is optimum), stop the steam by turning the steam function knob clockwise.
- Turn the control knob to the heating up position and the on/off switch to the “0” position to cut the power source off.
Note: Never turn the steam control button rapidly, as the steam will accumulate rapidly in short time which may increase the potential of therisk of explosion.Important: Never operate the steam nozzle for longer than 2 minutes at one time.Important: Never allow the milk to boil as this will spoil the flavour of the coffee.Important: To prepare more than one cup of cappuccino, first make all the espresso coffees, then at the end prepare the frothed milk for all the cappuccinosImportant: Clean
- the steam outlet with a wet sponge immediately after steaming stops, but be careful because the part may still be very hot.
Making hot water
- Push the on/off switch to the “1” position and the steam control knob to the “0” position. Turn the control knob to the heating up position. The redlamp will be illuminated, after a short while the red light will be off and the green lamp will be illuminated to show that the device reached the righttemperature.
- Then turn the steam control knob from “0” to “+” position in anticlockwise. (Turn the knob with at least 135 degrees) Then turn thecontrol knob to the coffee/hot water position, and hot water will flow out from the steam/hot water nozzle.
- Important: In the beginning, the hot water can be sprayed from the steam pipe. Therefore, keep the steam nozzle close to the inside of the coffee cup and make sure that this water does not touch the skin as it may cause burns.
Producing steam to heat liquids.
The steam/hot water nozzle (without the frothing device) can be used to make hot beverages like drinking chocolate, water or tea.
- Open the tank cover, remove the detachable tank and fill it with desired water, the water level should not exceed the “MAX” mark in the tank.Then place the tank into the appliance properly.
- Press the on/off switch to the “1” position, the red lamp is illuminated.
- Turn the steam control knob to “0” position, the control knob the heating up position, the appliance begins to pre-heat until the green lamp is illuminated, the device reached the right temperature.
- Dip the steam/hot water nozzle into the liquid to be heated. Turn the steam control knob in anti-clockwise slowly to start making steam.
- Turn the steam control knob to “0” position when the required temperature is reached.
- Press the on/off switch to the “0” position to cut the power source off.
CLEANING AND MAINTENANCE
- Never immerse the cord, plug, or appliance itself in water or other liquids.
- Always unplug the machine and make sure cool down before you clean it.
- All the non-electrical parts can be washed in warm soapy water. Dry thoroughly before reusing. These parts are not dishwasher safe. Never use abrasive detergents.
Steam/hot water nozzle
- Pull out the rubber tube downwards, then wash thoroughly. Check that the hole in the nozzle is not blocked, if necessary unblock them with a pin.
Descaling
- The appliance has to be descaled every month, otherwise the coffee taste will become bad and the scale deposited inside in the machine may cause permanent and irreparable damage to the machine.
- In case of using solid descaler, make sure the descaler dissolves into cold water fully before pouring into the water tank. Never use a descaler based on mineral acids such as sulphuric acid, hydrochloric acid, sulphamic acid and acetic acid(e.g. vinegar).These descalers may damage your machine.
- Mix adequate descaling agent with cold water in a measuring jug as per its instructions. Fill the water tank up to the Max level with the prepared descaling solution, then put the water tank back into the machine.
- Insert the funnel in the appliance.
- Place a cup under the steam/hot water nozzle.
- Connect to power source, turn the on/off switch to “1” position. Steam control knob anticlockwise to the “+” position. Control knob to the coffee/hot water position and water will flow out. Repeat this step until there is half the of water is left in the water tank. Then turn the control knob to the warming-up position to stop the appliance, leave the descaling agent in the appliance for at least 15 minutes.
- Leave the machine to rest for 15 minutes, then press the on/off knob for coffee and function button until the water tank is empty, then rinse it thoroughly.
- Restart the unit and repeat previous step until no descaling agent is left.
- Then start brewing coffee with no coffee powder. Fill with tap water to the Max level. Turn the on/off switch to the “1” position. Steam control knob anticlockwise to the “+” position. Control knob to the coffee/hot water position and water will flow out. Keep brewing until no water is left in the tank.
- Repeat step 6 at least 3 times to ensure that the pipes are clean.
ENVIRONMENT
 ENVIRONMENT
This appliance should not be put into the domestic garbage at the end of its durability, but must be offered at a central point for the recycling of electric and electronic domestic appliances. This symbol on the appliance, instruction manual and packaging puts your attention to this important issue. The materials used in this appliance can be recycled. Byrecycling of used domestic appliances you contribute an important push to the protection of our environment. Ask your local authorities for information regarding the point of recollection.
Support
You can find all available information and spare parts at www.tristar.eu!
Read More About This Manual & Download PDF:
References
[xyz-ips snippet=”download-snippet”]