![]()
![]()
User Manual
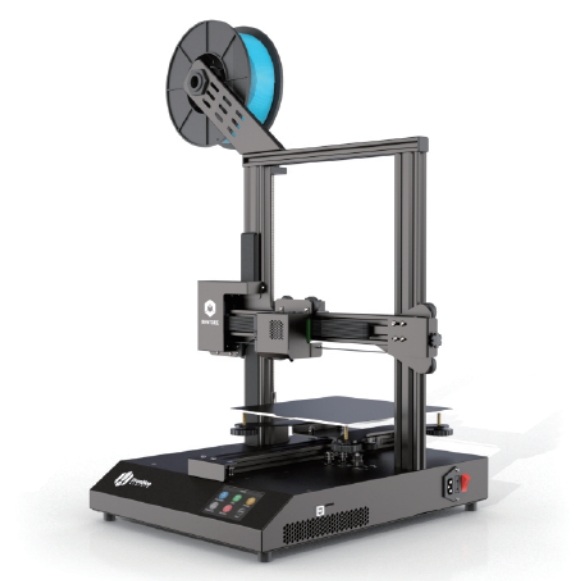
Thank you for choosing TronHoo 3D printer. Read this User Manual Carefully and thoroughly before operating the printer for the first time.
Take good care of this User Manual.

Setup Manual
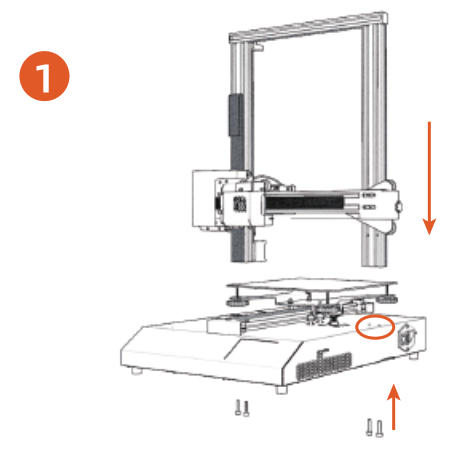
The base and frame are fixed by four MS* 20 screws.
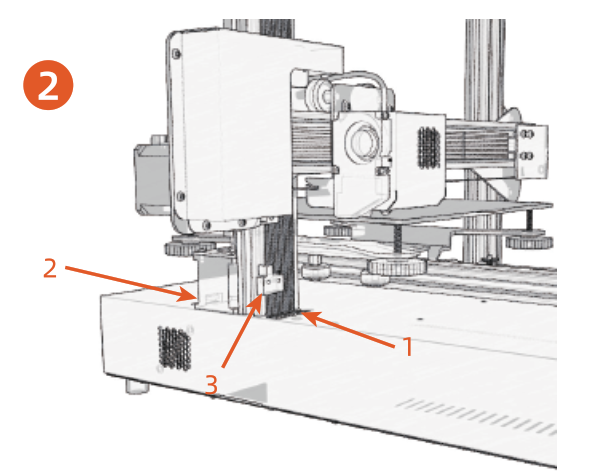
Plug in (1) z-axis FFC, (2) z-axis motor cable, (3) Z-axis limit switch cable.
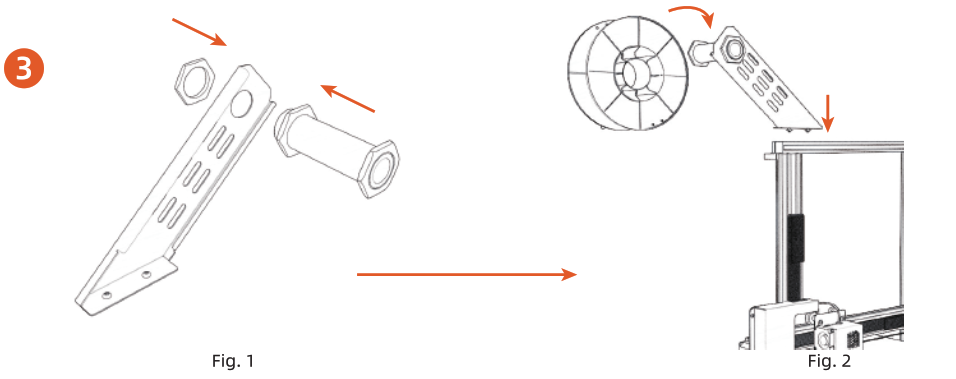
(1) The spool hanging tube is fixed to the spool holder with two M30 screw nuts (Fig. 1).(2) The spool holder is fixed onto the frame by the T-shaped nut (Fig.2).(3) The Spool of Filament is hung on the spool holder.
Home
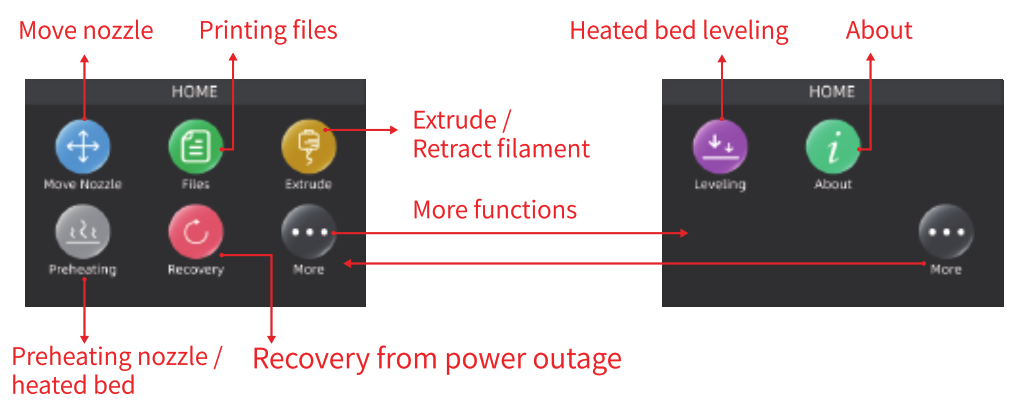
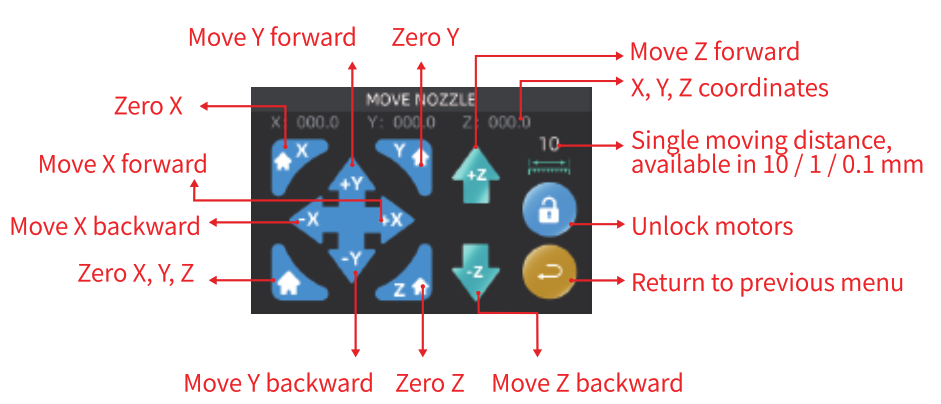
Move Head
Files
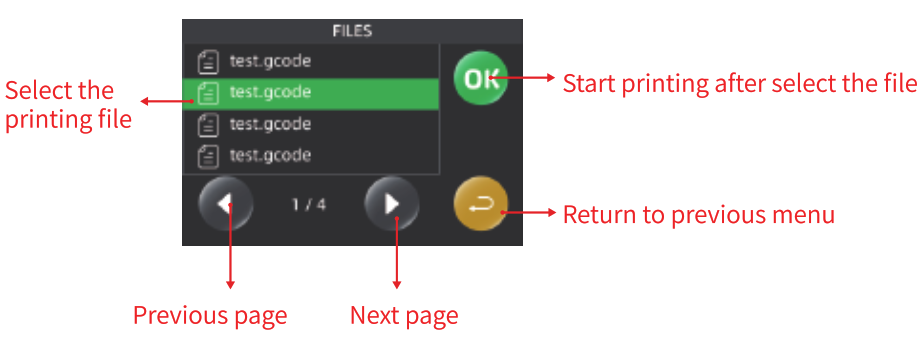
If you cannot find any files on the screen after inserting the SD card, restart the printer and try again. if the problem persists, check the SD card for damage.
Extrude

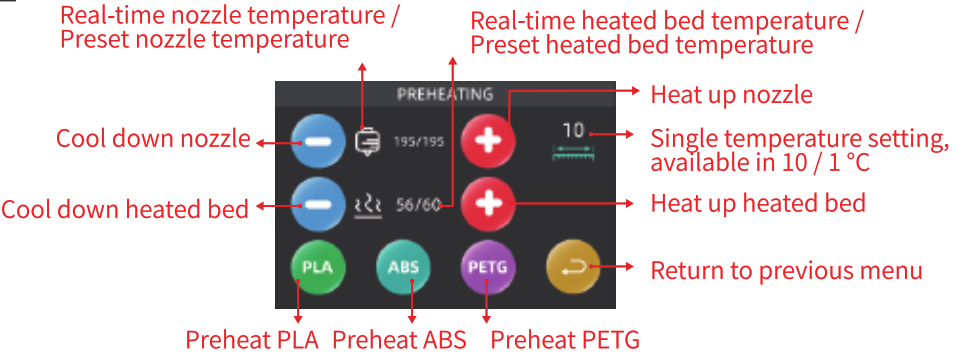
Preheating
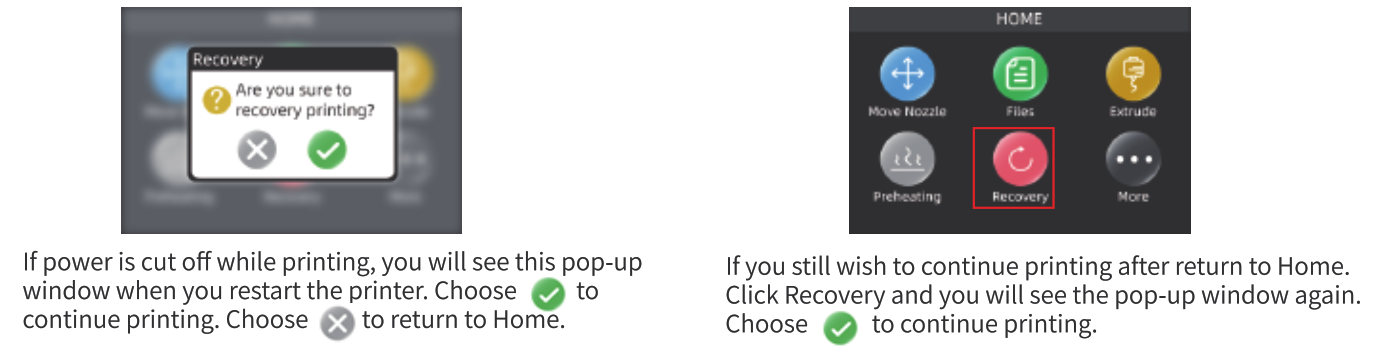
Recovery
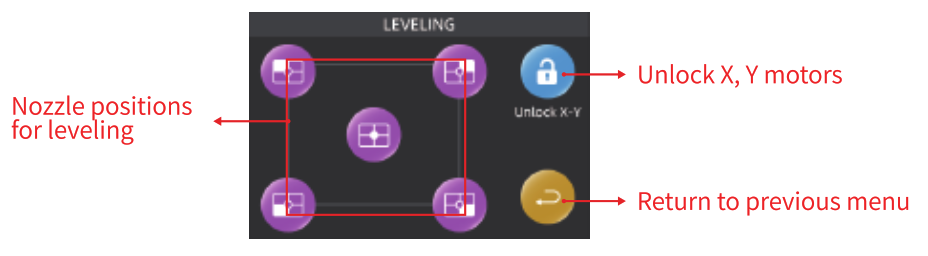
Leveling
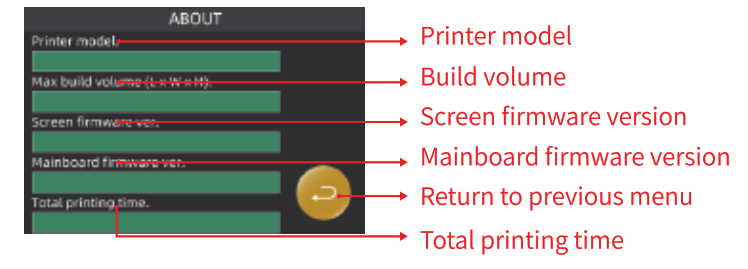
About
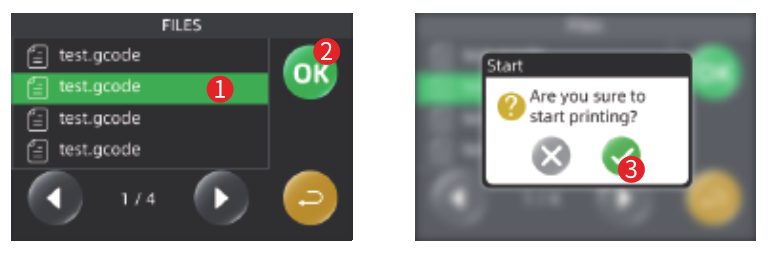
Printing Introduction
Select the printing file and click OK. A pop-up window prompts you to confirm printing. Click![]() to start printing.
to start printing.
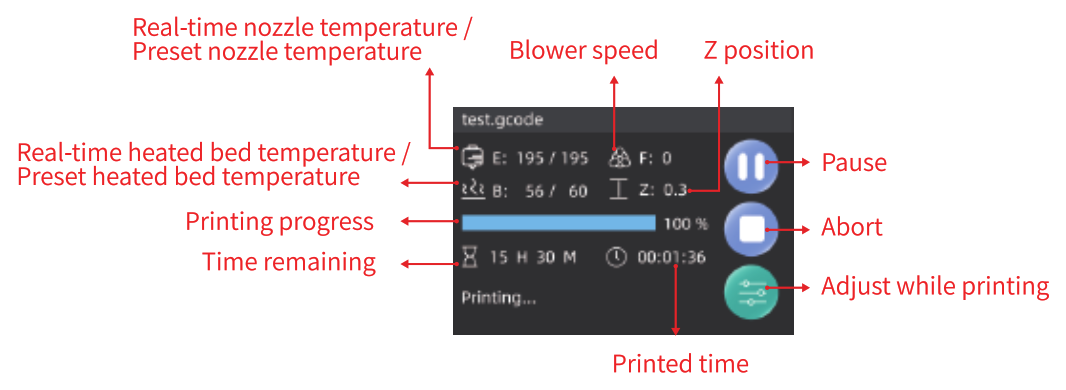
Pause
After clicking ![]() , the nozzle will continue printing for a while, then return to zero of X, Y.
, the nozzle will continue printing for a while, then return to zero of X, Y.
When passing, you can change filament by clicking ![]() to retract or extrude filament in the Extrusion menu.
to retract or extrude filament in the Extrusion menu.
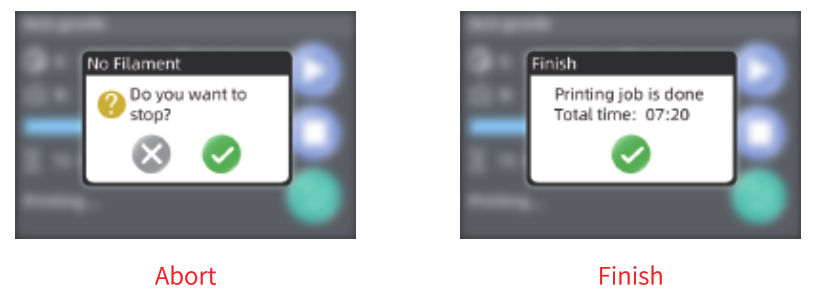
About, Finish
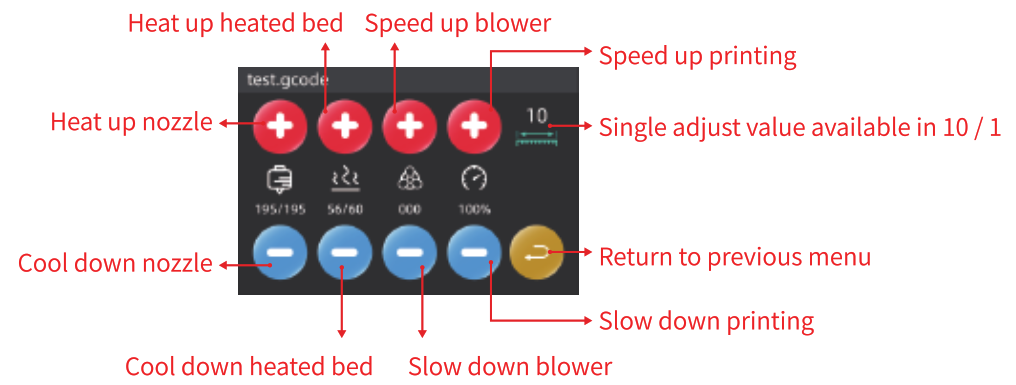
Adust while Printing
Printing Operation
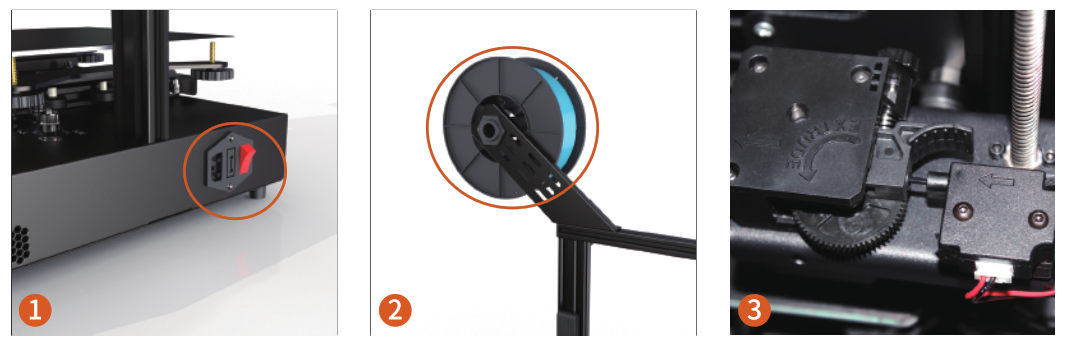
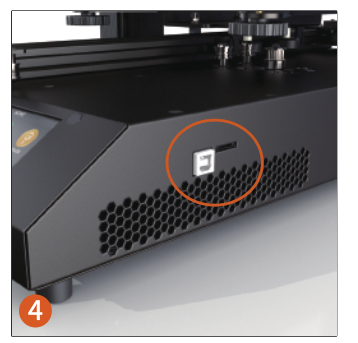
Process for first print1) Setup the printer.2) Check power supply, connect the power cord and turn on the printer. (Fig. 1)3) Reset the nozzle.4) Leveling.5) Loading filament. (Fig. 2 and 3)6) Insert TF card with printing files. (Fig. 4, face up the pins)7) Start printing and wait until it is finished.8) Remove the print.9) Turn off the printer.
General printing process1) Connect power and turn on the printer. (Fig. 1)2) Loading filament. (Fig. 2 and 3)3) Insert TF card with printing files. (Fig. 4, face up the pins)4) Start printing and wait until it is finished.5) Remove the print6) Turn off the printer.
Reset the nozzle and Leveling1. Spin the thumb nuts under the heated bed until the springs are tight.2. Reset the nozzle. Click Move head and then click ![]() the nozzle returns to zero of X, Y, Z.3. Return to Home. Click More and then click Leveling.4. Click one point on one corner of the five leveling points, for example
the nozzle returns to zero of X, Y, Z.3. Return to Home. Click More and then click Leveling.4. Click one point on one corner of the five leveling points, for example ![]() Wait until the nozzle moves to that corner of the heated bed.5. Check if the distance between the nozzle and the heated bed is 0.1 mm. A printing paper can help to check the distance. If the paper can be moved between the nozzle and the heated bed but with slight resistance and the nozzle moves without scratching the heated bed, then the distance is good.6. If the distance is too large or too small, spin the thumb nuts to calibrate.7. Similarly, clockwise or counterclockwise calibrate the distances between the nozzle and the rest three corners to 0.1 mm.8. Besides, you can click
Wait until the nozzle moves to that corner of the heated bed.5. Check if the distance between the nozzle and the heated bed is 0.1 mm. A printing paper can help to check the distance. If the paper can be moved between the nozzle and the heated bed but with slight resistance and the nozzle moves without scratching the heated bed, then the distance is good.6. If the distance is too large or too small, spin the thumb nuts to calibrate.7. Similarly, clockwise or counterclockwise calibrate the distances between the nozzle and the rest three corners to 0.1 mm.8. Besides, you can click ![]() to unlock the motors and move the nozzle and heated bed to any X, Y positions to check the leveling.
to unlock the motors and move the nozzle and heated bed to any X, Y positions to check the leveling.
Loading filament1. Hang a spool of filament with 1.75 mm diameter, PLA is recommended, on the spool holder. (Fig. 2)2. Click Extrude and wait until the nozzle temperature rise to 190 °C.
3. Press the damper of the extruder and feed the filament through the filament detector and the extruder. Release the damper and make sure the driving gear grabs on the filament. (Fig. 3) 4. Click +E to feed the filament to the nozzle.5. Click Stop when the filament comes out from the nozzle. Then the filament is loaded and ready to print.
Printing1. After leveling and loading filament, insert the TF card with the printing file (Fig. 4). Restart the printer.2. Click Files. Select the printing file and click OK to start printing.3. Click ![]() to pause while printing. Click
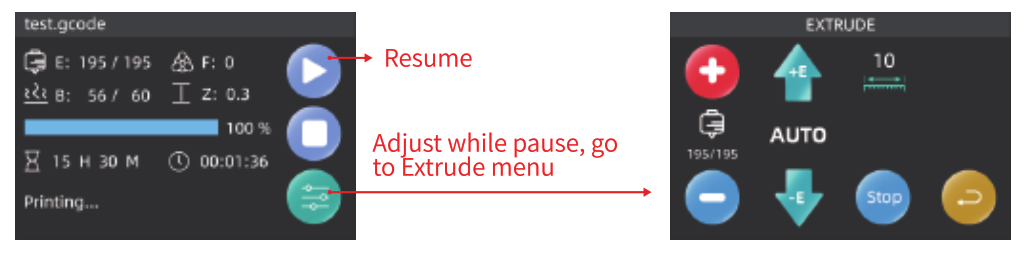
to pause while printing. Click ![]() to resume.
to resume.
Changing filament in mid-print1. Click ![]() to pause while printing. The nozzle will continue printing for a while, then return to zero of X, Y.2. Click
to pause while printing. The nozzle will continue printing for a while, then return to zero of X, Y.2. Click ![]() to go to the Extrude menu.3. Click -E to retract the filament.4. Load new filament Click +E to feed and Click Stop when the filament comes out from the nozzle.5. Return to Printing menu. Click
to go to the Extrude menu.3. Click -E to retract the filament.4. Load new filament Click +E to feed and Click Stop when the filament comes out from the nozzle.5. Return to Printing menu. Click ![]() to resume printing.
to resume printing.
Remove the print1. Cool down the heated bed.2. Detach the magnetic build plate with the print on it.3. Remove the print from the magnetic build plate by bending the build plate.
Use Instruction
-
-
- The printer is a DIY series product, some parts need to be assembled by customers. Take good care of every connection parts. Fixing every connection by glues is recommended.•
- Do NOT attempt to use the machine in any way not mentioned in the manual, misuse may cause serious injuries and property damages.
- Keep the printer away from flammable and explosive materials and heat sources. Place the printer in a ventilated, cool and dust free environment.
- Do NOT place the printer on unstable surfaces, the vibration of the machine will affect the printing quality.
- Use only the original power cord supplied with the printer. Check if the power supply matches the input requirements of the printer. Power must be connected to a three-hole socket with earth wire to avoid damages to components or accidents such as fire or electric shock.
- Do NOT touch the nozzle or the heated bed while the printer is operating. Or it may cause burns or injuries.
- Do NOT wear gloves or bracelets when operating the machine, to avoid being caught by the moving parts which may cause crushing and cutting injuries.
- Clean the residues in the nozzle in time after printing. Do not touch the nozzle while cleaning. Or it may cause burns.
- Maintain the machine regularly. Cut off the power before maintaining the machine. Clean the machine body, heated bed, guide rails, robs, etc. with a dry cloth. Apply lubricant to sliding parts, screws and bearing parts.
- Children under 14 or people over 60 should NOT use this printer without assistance and guidance. Or it may cause injuries.
- Disassembly or modification by yourself may cause damage to the machine or abnormal perfor-mance, which will prevent you from enjoying the right to warranty or after-sales service.
- Cut off the power supply after use.
- The recommended filament for this printer is 1.75mm PLA. We recommend to use TronHoo official filament.
- Get more information from the flash disk in the package. Visit our website: www.tronhoo3d.com regularly to learn more about the latest news and updates.
-
Notice
-
-
- For continue product improvement, all the contents in this manual is subject to change without notice.
- All the contents in user manual are provided for reference only. Actual product features and specifications (including but not limited to appearance, color and size), as well as actual display contents (including but not limited to backgrounds, UI and screen snaps) may vary, and should be subject to actual product.
- All data in this manual are theoretical values obtained by TronHoo internal laboratories through tests carried out under laboratory conditions. Actual performance may vary owing to differences in individual products, software versions, application conditions and environmental factors. All data is subject to actual usage.
- If any misunderstanding occurs due to print failure or misunderstanding of the content, we reserve the right of final explanation.
-


Shenzhen Tronhoo Intelligent Technology Co., Ltd.Room 516, Block BHangcheng iSecurity Industrial Park, Bao’an Dist.Shenzhen, Guangdong, P.R.China.(+86)755-2790-8975 Ext 846
TronHoo T2205 3D Printer User Manual – TronHoo T2205 3D Printer User Manual –
[xyz-ips snippet=”download-snippet”]