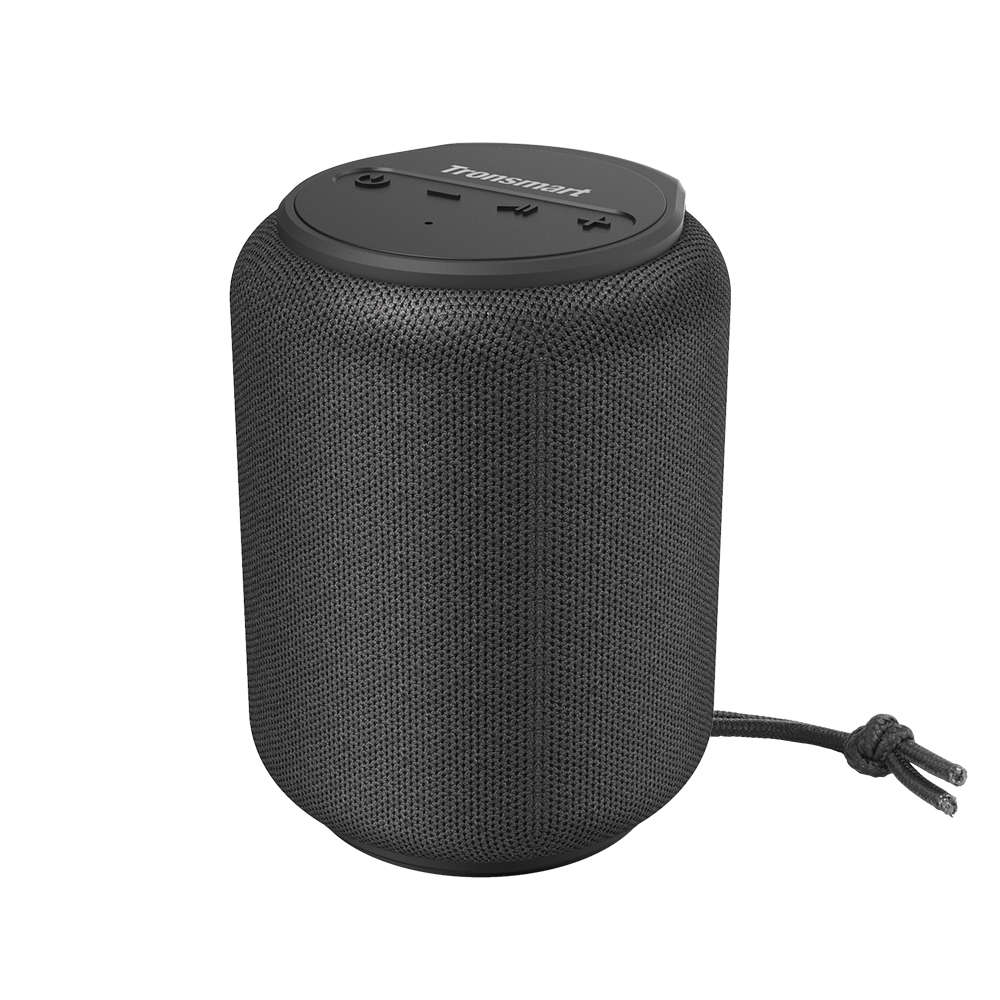
Tronsmart Element T6 Mini Wireless Speaker
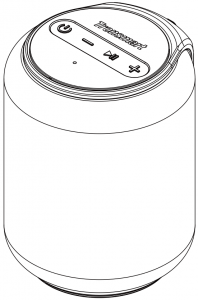
Thank you for purchasing the Tronsmart Element T6 Mini Wireless Speaker. Please read the user manual before use and keep it handy for future reference. If you have trouble understanding or following the instructions in this manual, please contact our customer support team directly at: [email protected]
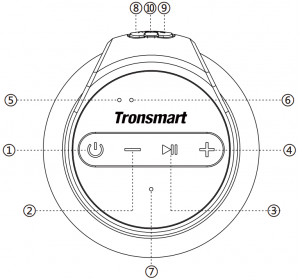
Overview
- Power On/Off TWS pairing Reset
- Volume: Previous track
- Play/Paused: Hand-free phone callBluetooth disconnect: Voice Assistant
- Volume+ Next track
- Bluetooth indicator
- TWS/Charging indicator
- Microphone
- USB-C charge
- TF/Micro SD card slot
- AUX-IN port

Package Content
1 x Element T6 Mini wireless speaker1 x USB charging cable1 x 3.5mm audio cable1 x Detachable strap1 x Warranty card1 x User manual
 |
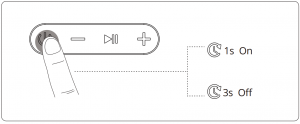
Power On: Hold for 1 second. |
| Power Off: Hold for 3 seconds. | |
| TWS pairing: Detailed operation refers to the following ‘TWS’ section. | |
| Hold for 8 seconds to power off forcedly if the speaker malfunctions. | |

|
Play/Pause: Tap to play or pause the music. |
| Answer/End a phone call: During an incoming call, tap to answer and hang up a phone call. | |
| Reject a phone call: During an incoming call, hold for 3 seconds to reject a phone call. | |
| Redial: During Bluetooth connected mode, double tap to redial the last dialed-out number. | |
| Bluetooth disconnect: Hold for about 8 seconds to disconnect Bluetooth. | |
| Voice Assistant: During Bluetooth connected mode, hold for about 5 seconds to access your personal assistant from your mobile device. | |
| Volume -: Tap to decrease the volume. | |
| Previous track: Hold to choose previous track. | |
 |
Volume +: Tap to increase the volume. |
| Next track: Hold to choose next track. |
How to Use
Turn ON/Off
Bluetooth Connection
Turn on the speaker, then turn on your device’s Bluetooth setting, search for ‘Tronsmart Element T6 Mini’ and tap to connect.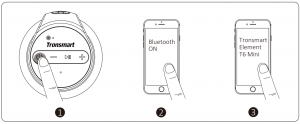
| Flashing blue | Bluetooth pairing mode | |
| Steady blue | Connected to device successfully |
True Wireless Stereo – Pair Two T6 Mini
a) Turn on the two speakers and confirm that both are disconnected from any Bluetooth devices.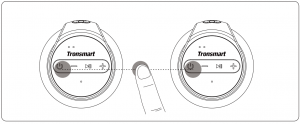

b) Double-tap the Power On/Off button of either speaker quickly, then the two speakers will enter pairing mode. After the two speakers have paired with each other successfully, you will hear a sound prompt and the TWS indicator of both speakers are steady yellow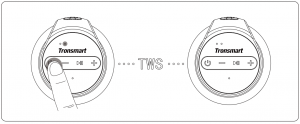

| Flashing yellow | True Wireless Stereo pairing mode | |
| Steady yellow | Connected to True Wireless Stereo mode |
c) Pair the speaker with your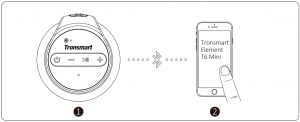

| Steady blue | Connected to your device |
Disconnect Two T6 Mini
Double tap the Power On/Off button of either speaker to disconnect two T6 Mini’s from each other. The TWS indicator will go off after disconnecting successfully.
Activate Voice Assistant
During Bluetooth connected mode, hold the Play/Pause button for about 5 seconds to activate your personal assistant from your mobile device.
TF/Micro SD Card Mode
The speaker will play audio from your TF/Micro SD card when the card is plugged into the slot. The memory capacity should be no more than 64 GB.
AUC-IN Mode
Simply connect the speaker with your non-Bluetooth device and the 3.5mm audio jack cable.
Note: Plugging in an audio cable will automatically switch to AUX mode. When using AUX mode, control audio playback via the connected device.
Auto-power Off
The speaker will power off automatically after 10 minutes if it does not pair with any device via Bluetooth or does not play any sound after turning on. When in low battery, the speaker will power off automatically as well.
Charging
Use the included USB cable to charge your T6 Mini and make sure it is fully charged before its first use.
| Charging indicator – Stable red | Charging | |
|
〇 |
Charging indicator – Off | Fully charged |
Reset to Factory Setting
Hold for 8 seconds to power off forcedly if the speaker malfunctions.
Specification
| Model | Element T6 Mini |
| Bluetooth | 5.0 |
| Bluetooth compatibility | A2DP / AVRCP / HFP |
| Output (watt) | 15W max. |
| Transmission distance | Up to 30m/100ft (open area) |
| Frequency range | 20Hz – 16000Hz |
| Waterproof | PX6 |
| Playtime | Up to 24 hours (50% volume level) |
| Talk time | Up to 20 hours (50% volume level) |
| Standby | 24 months |
| Battery | 2500 mAh |
| Charge input | DC 5V/2.1A |
| Charging time | About 3 hours |
| Dimension | 92 x 92 x 120 mm / 3.62 x 3.62 x 4.72 inches |
| Weight | 560 ± 5 g / 19.8 ± 0.2 oz |
Care & Maintenance
Do not use any form of detergents or cleaning material to clean the product as any type of chemical may make this device unusable. Do not disassemble this product. It contains no user serviceable parts. Do not drop or jump on it and treat it with care for the best performance. Keep the product in a dry location.Dust, dirt & moisture from humidity can accumulate on the body of the product if kept at an unfriendly place. Do not dispose this product in fire or batteries may explode or leak.
Warranty Information
Your ‘Tronsmart Element T6 Mini’, is warranted to the original owner for 12 months from the date of purchase against defects in material and workmanship under normal use and service.Tronsmart is not responsible for the accidental use of this product and its liability will not exceed the purchase price of the product. f you have any problems while using the product, please do not hesitate to contact our customer support team at: [email protected]
FCC STATEMENT
This device complies with Part 15 of the FCC rules. Operation is subject to the following two conditions: 1) this device may not cause harmful interference, and 2) this device must accept any interference received, including interference that may cause undesired operation.Note: This equipment has been tested and found to comply with the limits for a Class B digital device, pursuant to part 15 of the FCC Rules. These limits are designed to provide reasonable protection against harmful interference in a residential installation.This equipment generates uses and can radiate radio frequency energy and, if not installed and used in accordance with the instructions, may cause harmful interference to radio communications. However, there is no guarantee that interference will not occur in particular installation. If this equipment does cause harmful interference to radio or television reception, which can be determined by turning the equipment off and on, the user is encouraged to try to correct the interference by one or more of the following measures:
- Reorient or relocate the receiving antenna.
- Increase the separation between the equipment and receiver.
- Connect the equipment into an outlet on a circuit different from that to which the receiver is connected.
- Consult the dealer or an experienced radio/TV technician for help.
Changes or modifications not expressly approved by the party responsible for compliance could void the user’s authority to operate the equipment.
FCC Radiation Exposure StatementThis device complies with FCC RF radiation exposure limits set forth for an uncontrolled environment. This transmitter must not be co-located or operating in conjunction with any other antenna or transmitter


SHENZHEN GEEKBUY E-COMMERCE CO., LTD.19th Floor, Galaxy World Tower B, #1 YaBao Rd., LongGang District, Shenzhen, ChinaEmail: [email protected]800-270-1082 (USA & Canada)+86-755-23603740 (Global)

[xyz-ips snippet=”download-snippet”]

