![]()
PACK CONTENTS
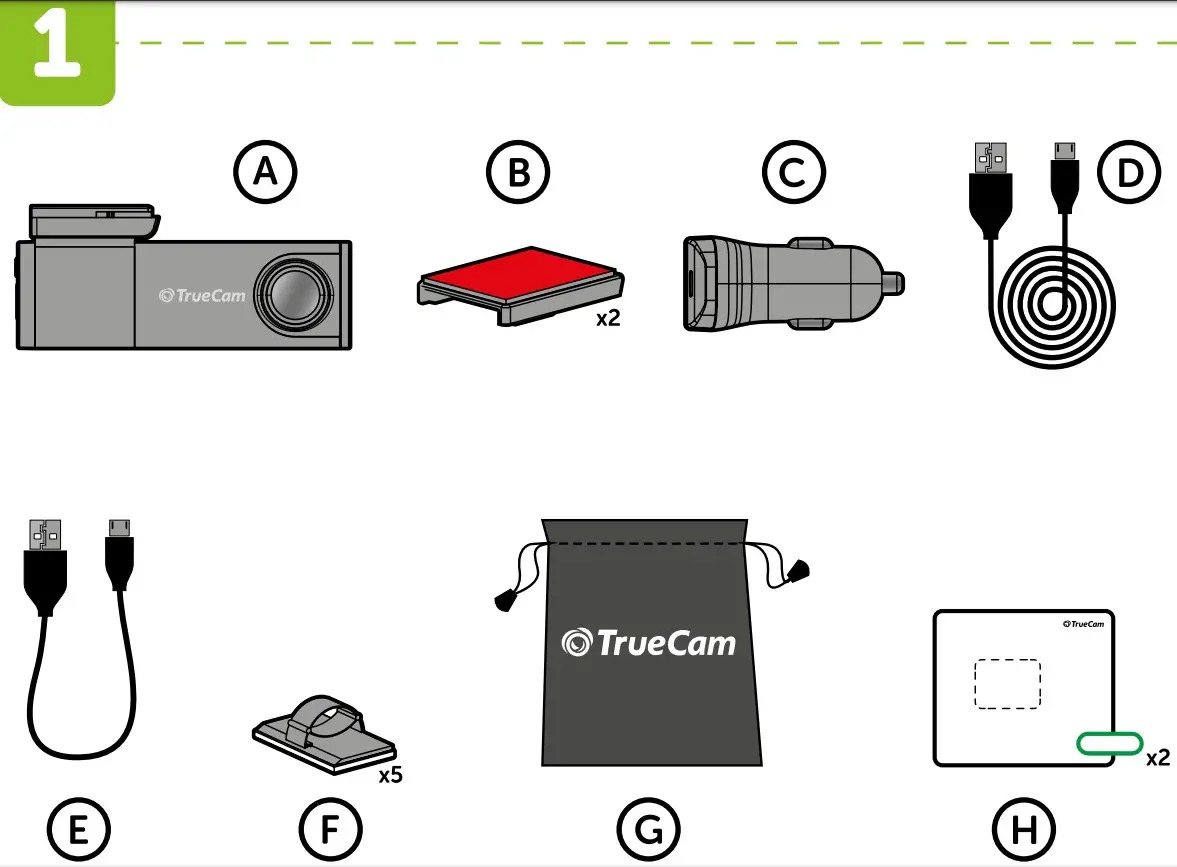
| (A) TrueCam H7 Dashcam(B) 3M windscreen mount (2x)(C) Cigarette lighter adapter with two USB outputs(D)3-metre micro USB charging cable | (E) Micro USB data cable for PC(F) 3M adhesive power cable clips (5x)(G) Protective carry bag(H) Electrostatic glass sticker (2x) |
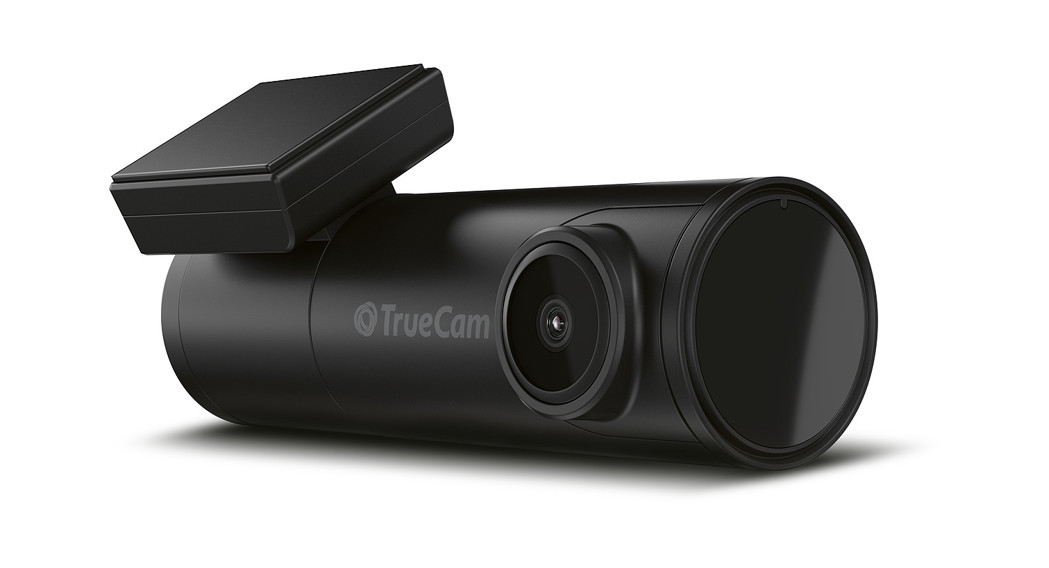
GETTING TO KNOW THE CAMERA / CONTROLS
| (A) Wide-angle lens(B) WIFI button(C) Rear camera input(D) Memory card slot | (E) Power input(F) Status LED (lit = camera on, blinking = recording)(G) GPS LED (green)(H) RESET button |
CONTROLS:
| BUTTON | FUNCTION |
INSTRUCTIONS |
|
WIFI |
PROTECT VIDEO | Press the button to protect the current video |
| TURN WIFI ON | Press and hold the button for 3 seconds to turn wifi on / off | |
| FORMAT TF CARD | Press and hold the button for 10 seconds to format the card | |
| 2.4 GHz OR 5 GHz WIFI SETTINGS | Double-tap to switch between 2.4 GHz and 5 GHz wifi | |
|
RESET |
RESET CAMERA | Press with staple for 5 seconds to reset the camera |
BASIC SETTINGS AND FUNCTIONS
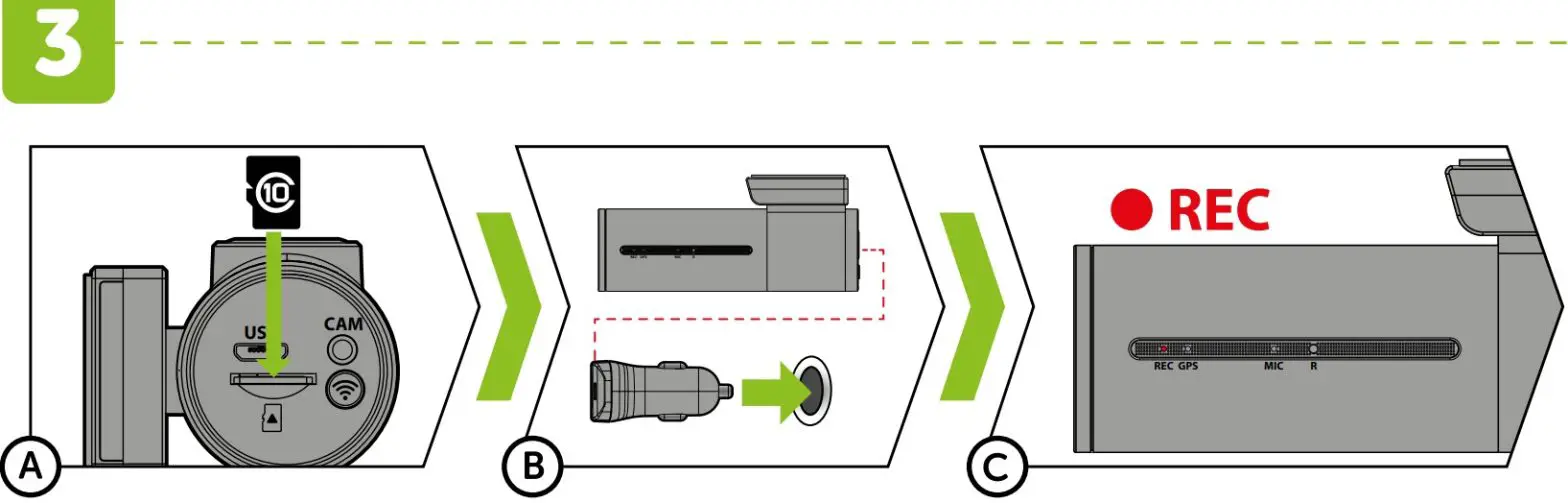
(A) Insert the microSD card as shown into the camera.
- Use Class 10 and higher branded cards up to 128 GB.
- Only remove the card, when the camera is turned off.
- Format the card when using it for the first time directly in the camera by holding down the WiFi button (10s) or using the mobile app.Repeat the formatting at least once a month to ensure the camera works properly.
(B) Insert the adapter into the car cigarette lighter and connect it to the camera using the USB cable.
- The camera is designed to operate only when connected to a power supply.
- Instead of a battery, the camera contains a supercapacitor that provides power which has several times the lifespan of a conventional battery.
(C) The camera turns on automatically and begins recording.
- For some vehicles, the ignition key must be turned first.
BASIC FUNCTIONS:Loop Recording
- The camera automatically splits the video into shorter files and overwrites the oldest unprotected files when the SD card is full.
- This means you don‘t have to worry about free space on the card.
File Protection
- To protect the file from being overwritten, press WiFi while recording or select Protect from the playback mode menu.
G-sensor
- If the G-Sensor detects an impact, it automatically protects the video currently being captured against being overwritten.
- Attention, when the settings are set to high sensitivity and you are driving over uneven surfaces this can cause files to be automatically protectedand the filling up of the SD card.
Timelapse
- Allows you to create a video using 0.2s, 0.5s, and 1s frames.
- With a permanent power supply, it enables long-term monitoring of events around a parked car.
PLACEMENT ON GLASS / SAFETY PRECAUTIONS
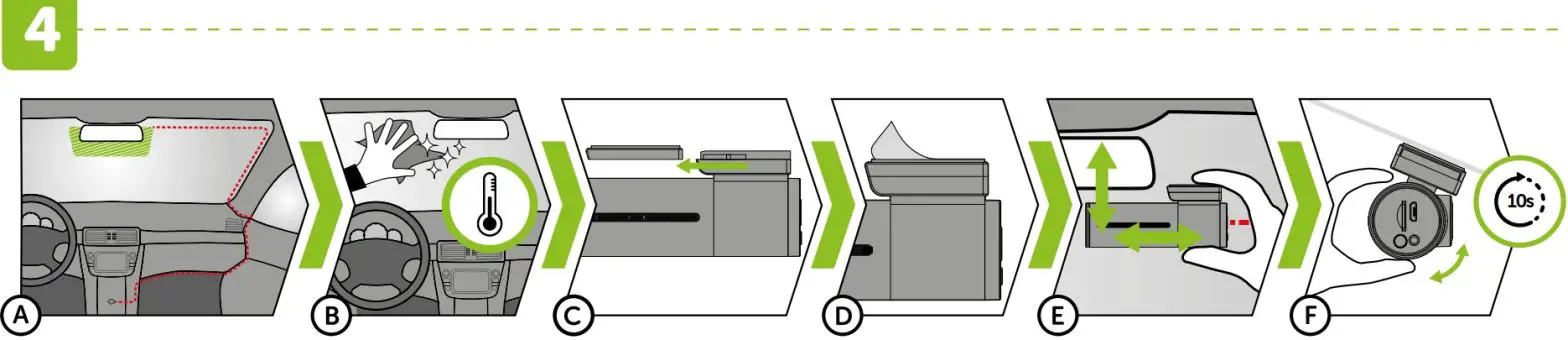
(A) The ideal place to mount your camera is the space between the windscreen and the rear-view mirror so as not to obstruct the driver‘s view.(B) Make sure that the glass is clean and dry at the attachment point.
- The ideal bonding temperature is 20°C – 40°C.
(C) Slide the camera into the mount.(D) Remove the film from the 3M adhesive pad on the camera holder.(E) Before attaching it to the glass, point the camera to capture the best view.(F) Press the 3M adhesive pad onto the glass and hold it for a while.
- You can attach the electrostatic sticker between the 3M sticker and the windshield for easier removal of the holder.
WIFI APPLICATION
(A) Scan the QR code or search for KaCam on the App Store/GooglePlay.(B) Install the app on your smartphone or tablet.(C) Turn on WiFi on the camera by holding the WiFi button (3s) on the camera -> the camera will sound when the WiFi turns on.(D) On your phone/tablet, connect to the WiFi network with the camera‘s name, enter the password (factory default is 12345678), launch the application, and connect to the camera.
| KACAM APP CONTROLS – WITHOUT CONNECTION | KACAM APP CONTROLS – WITH CONNECTION |
| (E) Connect the camera(F) Files dragged to your phone(G) Information(H) Version Update | (I) Camera settings(J) Start/stop recording(K) Files in the camera(L) Take photo(M) Front / rear camera preview |
MORE INFORMATION
You’ll find the complete manual and firmware updates at http://truecam.eu/downloads

 trucam.eu/downloadshttp://www.truecam.eu/firmware/#truecam-h7
References
[xyz-ips snippet=”download-snippet”]