 YBARPC LaptopRGB

TRUST GXT 922 Gaming Mouse – USER’S MANUAL
| a | – Mouse Button 1 (Default = Left Mouse Button) |
| b | – Mouse Button 2 (Default = Right Mouse Button) |
| c | – Mouse Button 3 (Default = Mid click) |
| d | – Mouse Button 4 (Default = Forward) |
| e | – Mouse Button 5 (Default = Backward) |
| f | – Mouse Button 6 (Default = DPI) |
Installation
a- Open the internet browser and go to www.trust.com/24309/driver.b- Click the “Download EXE” Mouse Button to download the software.c- Click on the “24309_X.exe” and follow the installation wizard.d- Click on the “TRUST GXT 922 Gaming Mouse” shortcut to start the software.e- You can now start to configure the mouse. The manual will be referred to as ‘Save’ to update the mouse.![]() Updating the mouse can take up to 20 seconds depending on your system.
Updating the mouse can take up to 20 seconds depending on your system.
3. Assign a functiona- Click on the Button you want to re-assignb- Click on the function you want to assign.– Click on ‘Save’, the mouse is being updated.![]() At least one Mouse Button has to be assigned as “Left Click”.
At least one Mouse Button has to be assigned as “Left Click”.
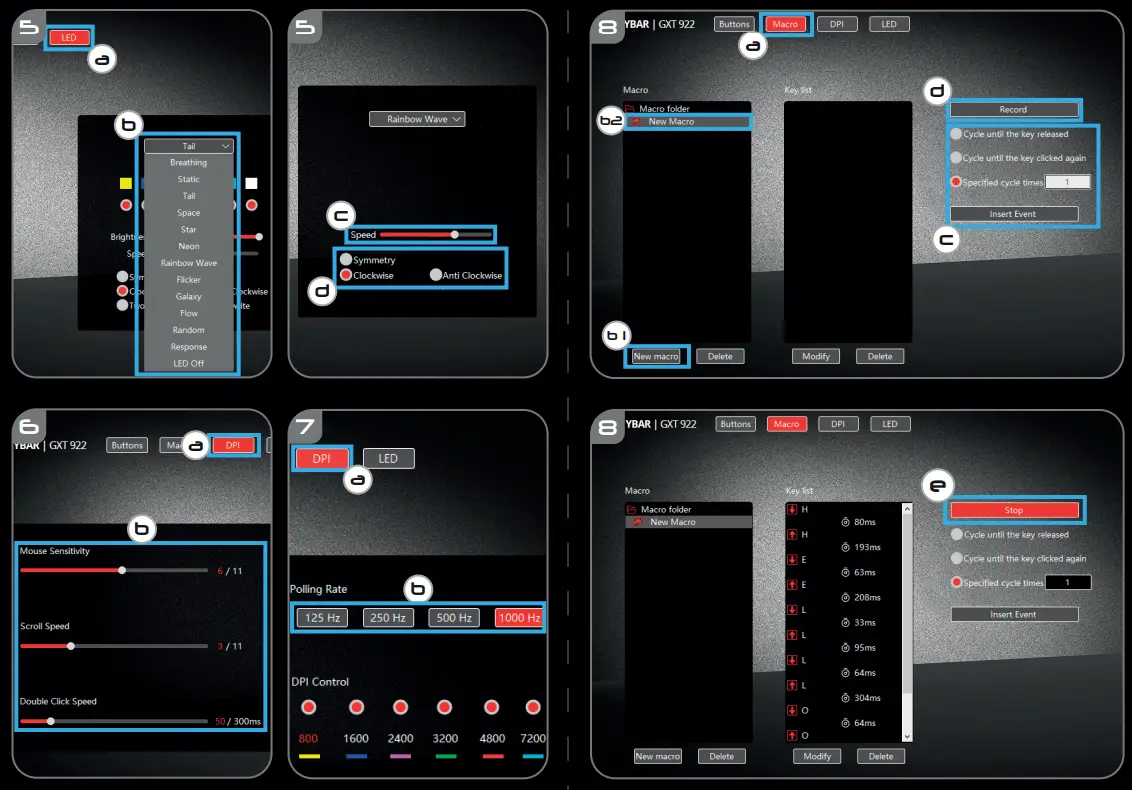
Report rate & DPI settings4. DPI settinga- Click on the ‘DPI’ tab.b- Click on the checkbox next to the DPI number to enable or disable this DPI level.c- Choose a LED color for each DPI setting.d- Click on the ‘DPI’ button.e- Change the DPI level by dragging the respective bar.– Click on ‘Save’, the mouse is being updated.
Light Settings
5. Change the Lightinga- Click on the ‘LED’ tab.b- Change the light mode.c- Change the animation speed.d- Change the direction.– Click on ‘Save’, the mouse is being updated.
Other settings
6. Mouse Parametera- Click on the ‘DPI’ tab.b- Change the Windows acceleration, Windows pointer speed, Windows scroll speed, or Windows double-click speed by dragging the respective cursor.– Click on ‘Save’, the mouse is being updated.7. Polling Ratea- Click on the ‘DPI’’ tab.b- Change the Polling rate by clicking on the respective frequency.– Click on ‘Save’, the mouse is being updated.
Macro Settings
8. Create a Macro (Store a sequence of keys in the software)a- Click on the ‘Macro Editor’ button.b- Click on ‘New macro’ to create a new macro.c- Set the delay time between each action and/or the loop/repeat setting.d- Click ‘Record’ to Record the macro. Now enter your preferred macro sequence.e- Click ‘Stop’ to Stoping the macro. (max. 112 actions)– The created macro is now available under the ‘Macro’ function.![]() To assign a macro to follow step 3 of this manual.
To assign a macro to follow step 3 of this manual.
Profile Settings9. Select, Save or Load a profilea- Select one of the 4 profiles by clicking on the preferred profile.b- Click on ‘Export’ to save a setup, Click on ‘Import’ to load a setup.c- Enter a name for the mouse setup you want to save or choose the preferred profile to load.d- Click on ‘Save’ to save the setup, click on ‘Open’ to load the setup.– Click on ‘Save’ → Your mouse setup is now saved or updated to your mouse.10. Reset default settingsa- Click on ‘RESET’ to reset the current profile to factory default.b- Click on ‘Save’ to reset the current profile to factory default.
Troubleshooting
| Problem | Solution |
| The software is not starting. | – Make sure the TRUST GXT 922 mouse is connected and try to start the software again. |
If your problem is not solved, please contact the help desk at www.trust.com/24309/faq
References
[xyz-ips snippet=”download-snippet”]