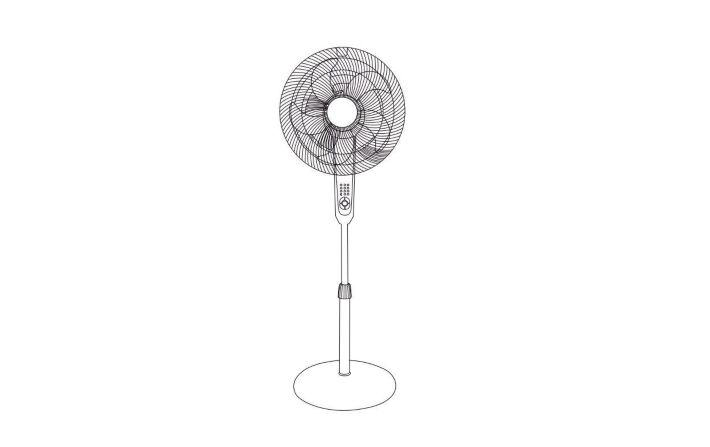
 16” CONVERTIBLE FAN WITH REMOTE CONTROLMODEL: LDS33-40PE-RCOWNER’S MANUALNOTE: FOR HOUSEHOLD USE ONLY. NOT INTENDED FOR COMMERCIAL USE.
Thank you for choosing Trustech fan!This user manual will provide you with information for the proper care and maintenance of our product. Please take a few moments to read it thoroughly and start enjoying your cool summer!
Always here to help youFor any questions or help, please email us: [email protected]
IMPORTANT INSTRUCIONS
RULES FOR SAFE OPERATIONPlease read and understand all instructions before using this fan.When using electrical appliances, basic precautions should always be followed to reduce the risk of fire, electrical shock, and injury to a person or property, including
- Never insert objects such as fingers, pencils, etc., through the grille when the fan is running.
- Disconnect fan from the electrical outlet when moving it between distance, or when removing its grilles or cleaning it.
- Be sure the fan is on a stable and even surface when operating to avoid overturning.
- DO NOT use the fan in a window. Rain may cause an electrical hazard. Do not leave the fan operating near a watery area to avoid the potential of electrical hazards. Do not immerse the unit, plug or cord in water or expose in liquids.
- This appliance has a polarized plug (one blade is wider than the other). To reduce the risk of electrical shock, this plug is intended to fit in a polarized outlet only one way. If the plug does not fit fully in the outlet, reverse the plug. If it still does not fit, contact a qualified electrician. Do not attempt to defeat this safety feature.
- Do not leave the appliance running or operable in a place where young children or animals could have access to it without supervision. Do not allow the cord to hang down from tables or counter.
- Do not operate any appliance with a damaged cord or plug, after the appliance malfunctions or has been dropped or damaged in any manner, contact a qualified electrician should this happen. NOTE: Repairs made by unqualified electricians will void this product’s warranty.
- Do not operate in the presence of explosive and/or flammable fumes.
- Do not place a fan or any parts near an open flame, cooking, or other heating appliance.
- Do not use this fan outdoors or where there are bodies of water such as the bathroom or laundry room.
- Do not use a fan without its base. The fan must operate standing upright.
- Do not use a fan near curtains, plants, window treatments, or where other objects can become caught in the blades.
- To disconnect, grip plug and pull from the wall outlet. Never yank on the cord.
- Do not run cord under carpeting. Do not cover cord with throw rugs, runners, or the like. Arrange cord away from traffic area where it will not be tripped over.
- Use this fan only as it is described in this manual.NOTE: There are no serviceable parts in this unit. Do not attempt to dissemble.WARNING: To reduce the risk of fire or electrical shock, do not use this fan with any solid-state speed control devices.
READ & SAVE THESE INSTRUCTIONS
| 1 | Front grille | 12 | . Power cord |
| 2 | Metal nut | 13 | . Adjustable column (for pedestal fan) |
| 3 | Fan blade | 14 | . Height adjustment locking nut (for pedestal fan) |
| 4 | Plastic nut | 15 | . Lower column (for pedestal fan) |
| 5 | Rear grille with handle | 16 | . Adapter |
| 6 | motor shaft | 17 | Base |
| 7 | Motor housing | 18 | Remote control |
| 8 | Upper column | 19 | Adapter (For table/floor use) |
| 9 | Remote holder | 20 | Snapping lock pin |
| 10 | . Control panel | 21 | Lock screw |
| 11 | . Upper column knob | 22 | Fused plug |
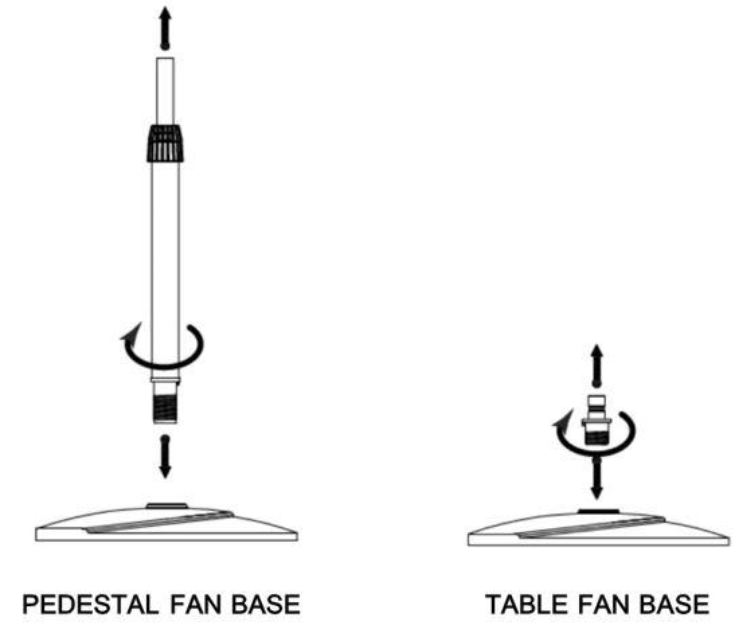
ASSEMBLY OF BASEParts #8.#11.#13-17
For Pedestal Fan
- Remove parts from packaging. Set the fan base (#17) on the floor. Insert the lower column with the adaptor (#16) into the base and secure them by turning the lower column clockwise.
- Loosen the height adjustment locking nut (#14) and pull up the adjustable column (#13); to the desired height and re-tighten the height adjustment locking nut (#14).
- Place the upper column (#8) on top of the adjustable column (#13). Tighten the upper column knob (#11).
For Table Fan
- Set the fan base (#17) on the table, insert the connecting adapter (#19) into the base and secure them by turning the connecting adapter (#19) clockwise.
- Place the upper column (#8) on top of the connecting adapter (#19). Tighten the upper column knob (#11).
ASSEMBLY OF BLADE AND GRILLESFig.2 #1-7.#19.#20
- Remove and discard the plastic sleeve on the motor shaft (#6). Position the rear grille (#5) against the front of the motor housing through the motor shaft (#6). Ensure the handle at the back of grille (#5) is facing up and that all guiding pegs on the motor housing are lined up with cutouts on the rear grille (#5).
- Secure the rear grille (#5) with the plastic nut (#4). Fasten the plastic nut (#4) in a CLOCKWISE direction, firmly placing the rear grille (#5) on the motor housing (#7).
- Install the fan blade (#3) onto the motor shaft (#6) with the cutouts fitted, and then place spinner (#2) on the motor shaft (#6) too. Fasten into place by tightening the metal knob (#2) in a COUNTER-CLOCKWISE direction.
- Fit front grille (#1) against rear grille (#5) by aligning the alignment mark on the top of the grilles, closing them together by the hooks on the front grille and slots on the rear grille, twisting the front grille clockwise to the lock position (see Fig. 3), the snapping lock pin (#19) should pop in.Note: to disassemble the front grille, gently pull the snapping lock pin outwards while twisting the front grille in a counterclockwise direction.
- Tighten the lock screw (#21) to secure the snapping lock pin (#20).
OPERATING INSTRUCTIONSPlug fan into a 120V/60Hz outlet and follow the operating instructions:
USING THE CONTROL PANEL AND REMOTE CONTROLThis fan is designed with 4 speeds, 3 breeze modes, timing, and remote control function. For your convenience, the buttons on the control panel of the fan operate the same functions as the remote control.
| BUTTON | FUNCTION | SOLUTION |
 TIMER TIMER |
Pressing this button sets the timer in increments of 0.5 hours to a maximum of 7.5 hours. After the timer runs out, the fan will automatically shut off. | 4 indicators (0.5H, 1H, 2H, 4H) on the panel will light up when you press the timer button. Total hours on the illuminated indicators are the total time that the timer will work before it shuts off. Example 1: When 0.5H illuminates, the timer will shut off in 30minutes. Example 2: When 0.5H and 2H illuminate at the same time, the timer will shut off in 2.5 hours Example 3: When 0.5H, 1H, 2H and 4H illuminates at the same time, the timer will shut off in 7.5 hours. |
 MODE MODE |
Pressing this button to choose different patterns of breeze. |  When this icon lit, the fan is simulating a NATURAL breeze mode. When this icon lit, the fan is simulating a NATURAL breeze mode.         |
  |
Pressing this button chooses fan speeds from 4 modes (High/Medium/Low/Ec o). This button can be used with any MODE. |   |
  |
To activate the oscillation function for widespread breeze distribution, press this oscillation button once. | The oscillation icon lights up when the oscillation function is activated. Press button again to tum off the oscillation function. Oscillation can be controlled while the fan is operating. |
  |
Pressing this button turns the fan ON orOFF. | Use this button to turn the fan ON and OFF. |
USING THE REMOTE CONTROL
OPERATION IS SUBJECT TO THE FOLLOWING CONDITIONS: (1) THIS DEVICE MAY NOT CAUSE INTERFERENCE, AND (2) THIS DEVICE MUST ACCEPT ANY INTERFERENCE, INCLUDING INTERFERENCE THAT MAY CAUSE UNDESIRED OPERATION OF THE DEVICE.
For your convenience, the remote control features the same buttons as the fan control panel. Follow the operations in”USING THE CONTROL PANEL”.Guidelines for using the remote control (one CR2025 battery included):Note: Remove the plastic insulation film located underneath the battery before using the remote.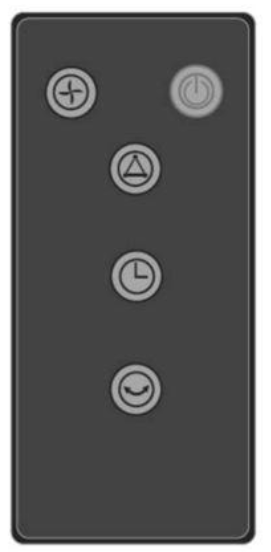

- The remote control must be pointed towards directly the receiver on the fan when using.
- The working range for the remote control is 5 meters. If the remote control is not pointed directly towards the receiver, the range will be decreased.
- The remote control may not operate in a room where heavy machinery is operating.
- Do not block the line of sight between the remote control and the receive.
- Handle the remote control with care. Do not drop the remote control on the floor or bang it against hard objects.
Guidelines for use of batteries
- If the remote control will not be used for a long period of time, remove the batteries from the battery compartment.
- The remote control uses one CR2025 battery. · Clean battery contacts and those of the device prior to battery installation.
- Ensure the batteries are installed correctly with regard to polarity, matching +/- sides of the battery to corresponding indications on the remote control.
- Remove used and dead/discharged batteries promptly.
Dispose of the batteryThe battery must be brought to a household hazardous waste collection site for proper handling.
SETUP OPTIONS FOR IMPROVED AIR CIRCULATIONThis fan has 3 functions that will allow you to better customize your preferred air comfort as well as improve air circulation in the room.
A. OSCILLATION:To activate the oscillation function for widespread breeze distribution, press the ![]()
![]()
![]()
![]()
B. TILT:To tilt the fan head so that the breeze is targeted at an angle, turn the fan off and steady the motor housing of the fan with one hand and grip the fan grille with another. Carefully tilt the head of the fan as depicted in until it reaches the desired angle. Be careful as to not tilt the head back further than it is intended to go, doing so will damage the unit. The maximum tilt is almost to the horizontal position.NOTE: The fan must be turned off when performing this adjustment.
C. HEIGHT ADJUSTMENT FOR FLOOR CONVERSION:To adjust the height of the fan, turn the fan off, grip between the upper column (#8) / adjustable column (#13), and loosen the height adjustment locking nut (#14). Extend or lower the adjustable column to increase or decrease the height of the fan. Once the fan is at a comfortable height, tighten the height adjustment locking nut (#14).
To convert your fan to a floor fan, please see assembly instructions. NOTE: The fan must be turned off when performing this adjustment.
SPECIFICATION
| MODEL/SKU | LDS33-40PE-RC |
| VOLTAGE(V) | 110-120V, 60Hz |
| WATTAGE(W) | 65W |
CAUTION: TO PREVENT ELECTRICAL SHOCK, MATCH WIDE BLADE OF PLUG TO WIDE SLOT, FULLY INSERT.
CLEANING AND MAINTENANCE
- Always disconnect the plug from the electrical outlet when cleaning your fan.
- Light accumulated dust at the back grille of the fan may be removed with a soft cloth.
- Wipe the exterior surfaces of the fan occasionally with a damp cloth (not dripping wet) and dry thoroughly with a soft dry cloth before operating the fan.
- Do not use harsh cleaners or materials to clean this unit, doing so will cause damages to it.CAUTION: DO NOT ALLOW WATER TO RUN INTO THE INTERIOR OF THE FAN AS THIS COULD CREATE A FIRE OR ELECTRIC SHOCK HAZARD. THE FAN MOTOR IS FACTORY LUBRICATED FOR LIFE AND WILL REQUIRE NO FURTHER LUBRICATION. NO OTHER USER MAINTENANCE IS REQUIRED OR RECOMMENDED.
STORAGE
- Follow cleaning instructions 1 to 4 above. Make sure to disassemble and clean fan before storing.
- Retain the original packaging to store your fan.
- Always store in a dry place.
- Never store while still plugged in.
- Never wrap cord tightly around the fan or put any stress on the cord where it enters the fan as it could cause the cord to fray or break.
TROUBLESHOOTING
If your fan fails to operate, please follow these procedures prior to contacting customer service:
|
PROBLEM |
PROBABLE CAUSE |
SOLUTION |
| Fan is not turning on. | The fan is not plugged into 120V AC, 60Hz polarized outlet/receptacle. | Plug-in unit and attempt to turn on again. |
| The breaker has tripped or the fuse has been blown. | Please check your electrical box to confirm the breaker has not been tripped and the fuse has not been blown.Plugin the unit and attempt to turn it on again.Attempt to plug the unit in another receptacle in the house. | |
| Fuse in the power plug has been blown. | Follow the instructions on the power plug tag to replace the fuse. | |
| The fan was working but suddenly tuned off. | The timer setting has counted down to automatic shut off. | Ensure all the timer lights on the control panel 0.5H, 1H, 2H, 4H are off. If any of them are lit, continue to press the timer button |
| Oscillation function is
not working. |
The oscillation function has not been activated. | Ensure the |
| Fan is on but the air coming out of it is not strong enough. | There is dust built up at the back of the fan. | Turn fan OFF and unplug. Using a soft, dry cloth, wipe the back of the grille to remove any dust build-up. Plug-in unit and turn fan back ON to resume normal operation. |
| The remote control is
not working. |
The batteries are weak. | Refer to OPERATING INSTRUCTIONS regarding the remote control on page 6. Guidelines for using the remote control (one CR2025 battery included) and Guidelines for use of batteries. |
| The remote control is too far from the main fan. | ||
| The remote control is not sending a signal to the main fan. |
PLEASE DO NOT ATTEMPT TO OPEN OR REPAIR THE FAN YOURSELF. DOING So COULD VOID THE WARRANTY AND CAUSE DAMAGE OR PERSONAL INJURY.
WARRANTY
TRUSTECH warrants this product against defects in materials and/or workmanship under normal use for a period of ONE (1) YEAR from the date of purchase by the original purchaser (“Warranty Period”). If a defect arises and a valid claim is received within the Warranty Period, at its option, TRUSTECH will either 1) repair the defect at no charge, using new or refurbished replacement parts, or 2) replace the product with a new product that is at least functionally equivalent to the original product, or provide a store credit in the amount of the purchase price of the original product. A replacement product or part, including a user-installable part installed in accordance with instructions provided by TRUSTECH, assumes the remaining warranty of the original product. When a product or part is exchanged, any replacement item becomes your property and the replaced item becomes TRUSTECH’s s property. When a store credit is given, the original product must be returned to TRUSTECH and becomes TRUSTECH’s s property. To obtain warranty service, e-mail TRUSTECH Limited Warranty Service at [email protected]. Please be prepared to describe the product that needs service and the nature of the problem.
This warranty does not apply to:a) damage caused by failure to follow instructions relating to product’ use or the installation of components; b) damage caused by accident, abuse, misuse, fire, floods, earthquake or other external causes; c) damage caused by service performed by anyone who is not a representative of TRUSTECH; d) accessories used in conjunction with a covered product; e) a product or part that has been modified to alter functionality or capability; f) items intended to be periodically replaced by the purchaser during the normal life of the product including, without limitation, batteries or light bulbs; g) any product sold “as is” including, without limitation, floor demonstration models and refurbished items; or h) a product that is used commercially or for a commercial purpose.
CONTACT US
Thank you for choosing the Trustech product. For any questions about your product or honor your warranty, Please scan the QR code below to get our [24-hour online VIP service ]or write to [[email protected]] Our customer service time will respond ASAP within 24 hours!


https://trustech.afterservice.vip?utm_source=card&utm_medium=qrcode


[xyz-ips snippet=”download-snippet”]

