TRUXEDO LO PRO Selling Roll-Up Tonneau
PARTS
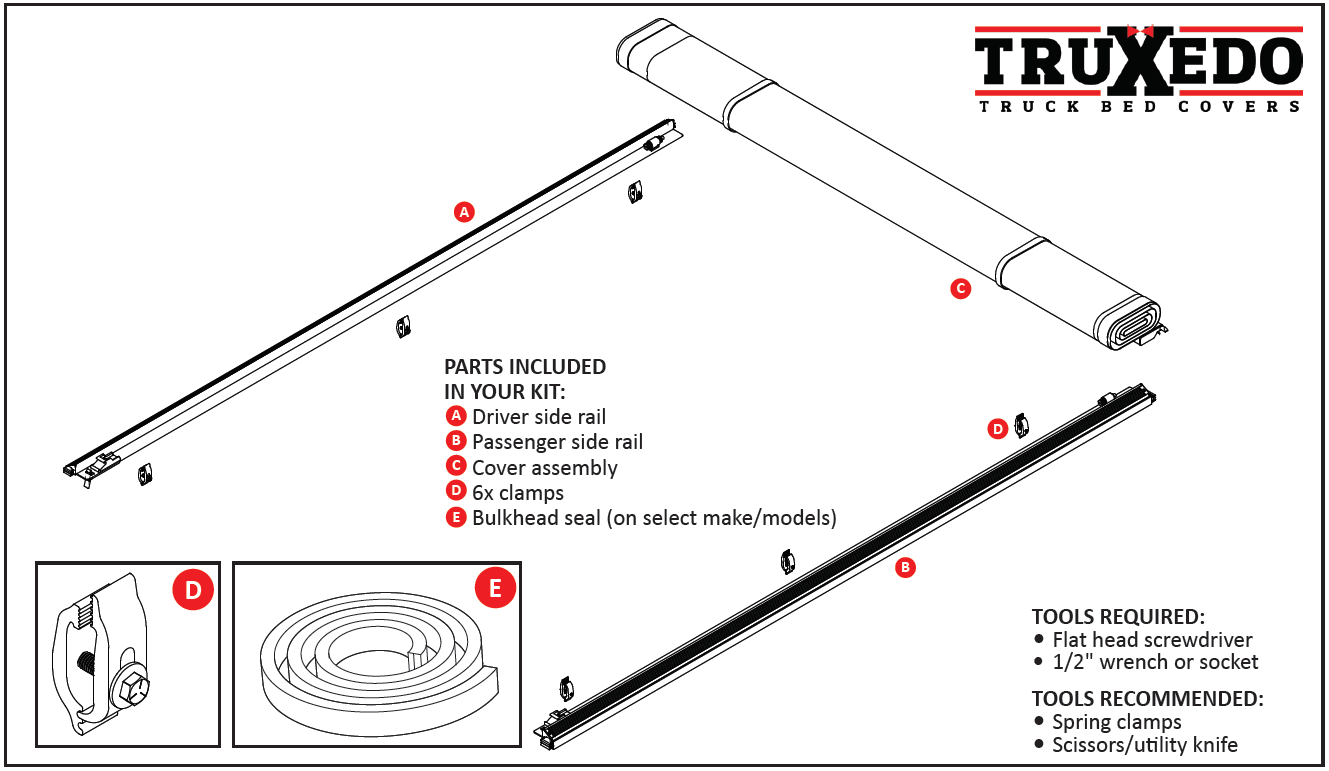
The serial number for the cover is located here.

It is important that all areas where the bed cover mounts are clean and free of debris prior to installing.

Seal Position the driver side rail (A) against the truck bed rail. With the tailgate closed, slide the rail back until the rear seal is slightly compressed against the tailgate. Adjust the rail vertically so that the seal is flush with the truck bed caps.
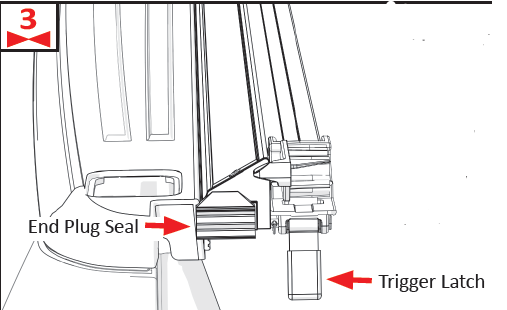
NOTE: The trigger latch is included on the driver side rail only.
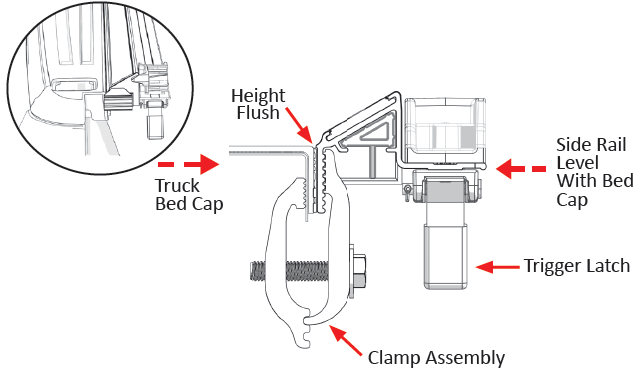
Attach clamps (D) starting in the middle. Evenly space 3 clamps along the driver side rail (A), leaving approximately 8″ on each end. Finger tighten to make sure the teeth of the clamp engage with the grooves of the side rail. Then tighten all clamps with a 1/2” socket or wrench. Repeat steps 4 & 5 on the passenger side rail (B).

NOTE: The use of spring clamps to hold the side rail in place can assist during the installation process.
For optimal latching performance and cover fit, the side rails (A & B) should be level with the truck bed caps and not tilted up or down. To fine-tune side rail tilt, you can reposition the clamps. To adjust the rail tilt upwards, move the clamp as high as you can. To adjust the rail tilt lower, slide the clamp downwards toward the bottom of the rail. Tighten all clamps with a 1/2” wrench or socket.
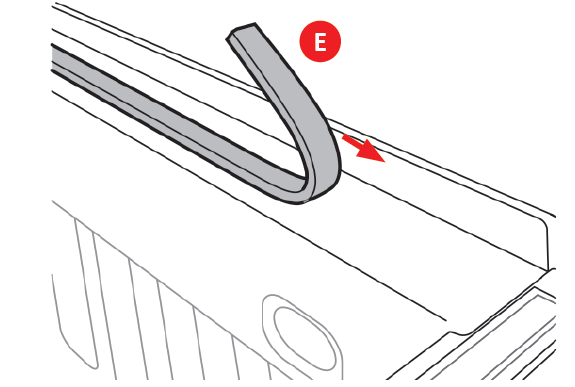
If a bulkhead seal (E) is included with the cover, clean the top of the bulkhead to install the seal. Peel the backing and adhere the seal from one bedrail edge to the other. Remove any excess with scissors or a utility knife. If the truck has a drop-in bedliner, no seal will be needed.
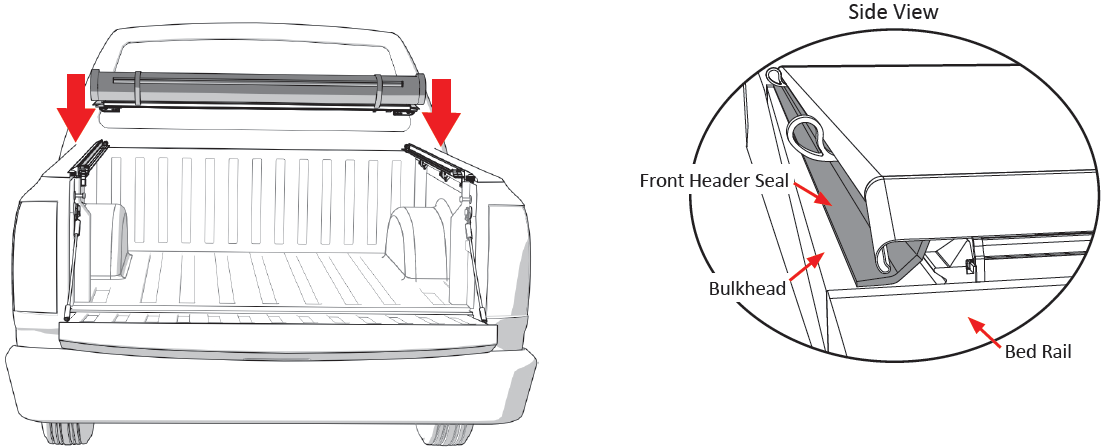
Place the cover (C) on the side rails towards the front of the truck bed (near the cab). The front header seal is designed to help shed water and should be sitting on top of the bulkhead.
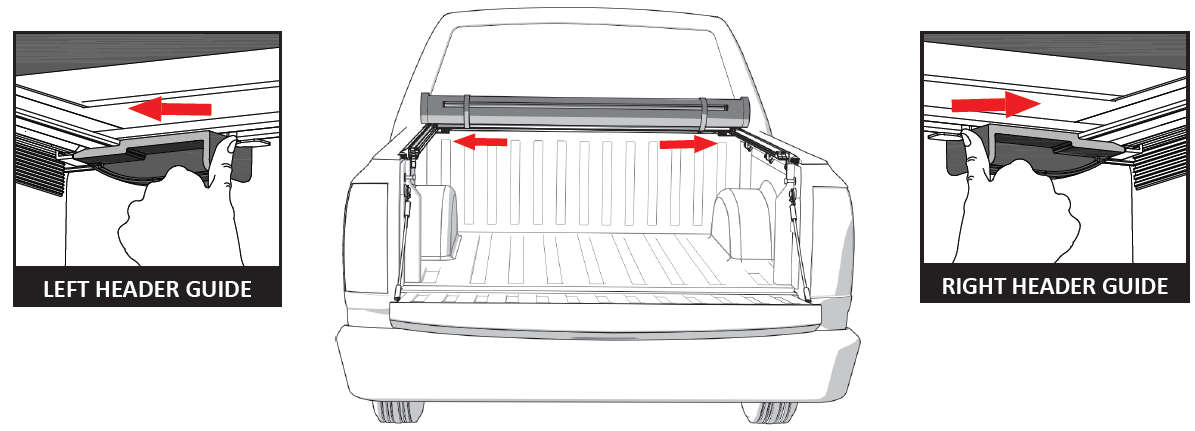
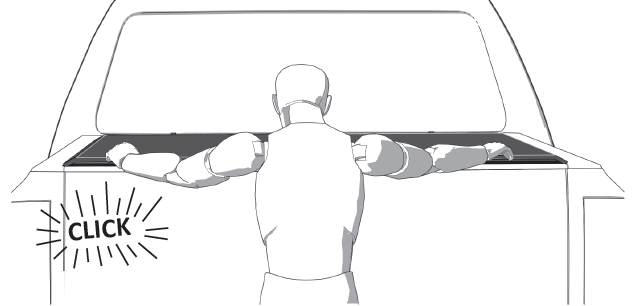
To connect the cover assembly (C) to the side rails (A & B), slide the right and left header guides into the locked position. A clicking sound will indicate a secure attachment.
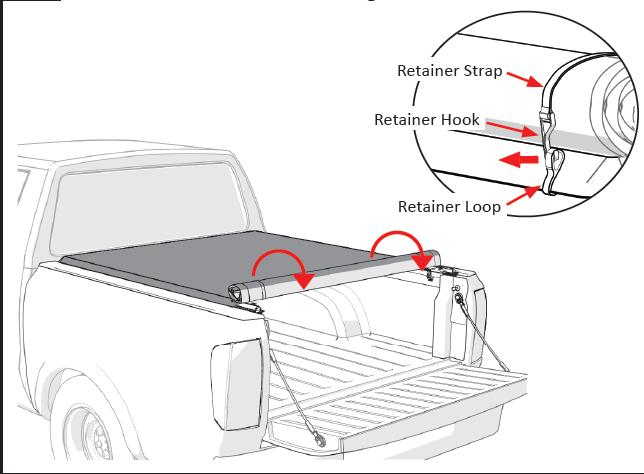
Disengage the retainer hooks from the retainer loops and unroll the cover towards the tailgate.
Place the rear header into the header stops which are located on both side rails. Rotate the rear header downwards until you feel the cover latch in place.

NOTE: We recommend closing the tailgate first and then closing the cover.
A clicking sound will indicate a correctly installed cover. Next secure the hook and loop fastener along the entire length of both side rails before driving the vehicle. Simply run your hands down both sides of the cover to achieve this. This will prevent wind from lifting the cover and causing possible damage. You are ready to drive with the cover in the closed position.NOTE: If the tailgate has a key lock, the cover is secured until the tailgate is unlocked and opened.
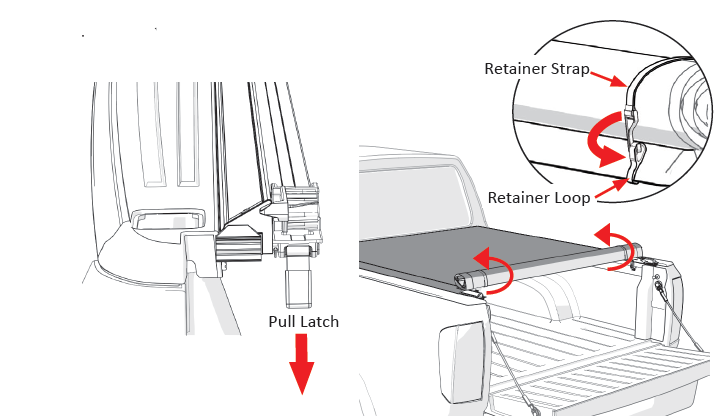
To drive with the cover in the open position, pull the latch towards you to release the cover (located on driver side rail). Roll the cover toward the cab of the truck, making sure that both sides roll evenly. Secure the cover by placing both retainer hooks into the retainer loops. You are ready to drive with the cover in the open position.
REMOVING THE COVER
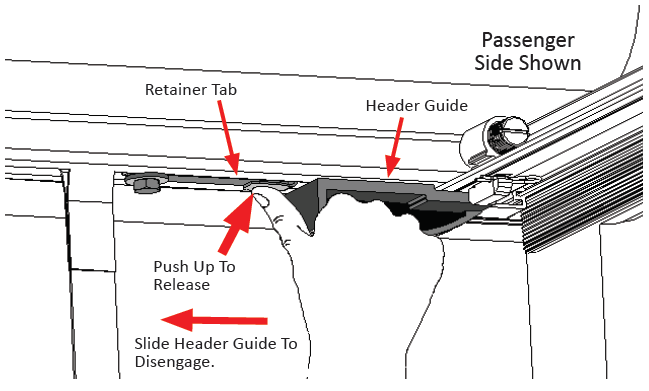
To remove the cover from the side rails, push up on the retainer tab and then slide the header guide away from the side rail. Do this on both the driver and passenger side. Carefully lift the cover off the side rails.
AUTOMATIC TENSION CONTROL ADJUSTMENT
Lo Pro is equipped with Automatic Tension Control. This helps compensate for material expansion and contraction caused by extreme temperature changes. Proper tension allows the cover to look and perform at its best. While preset at the factory, you can check cover tension after installation as well as seasonally.
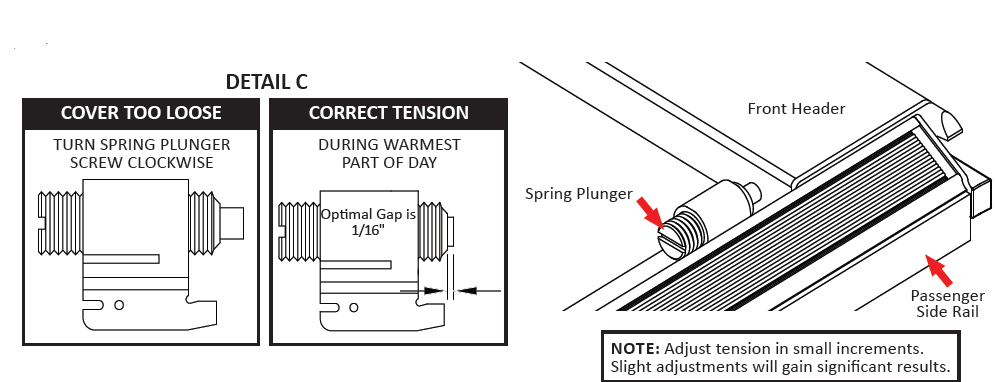
If the cover feels too tight or too loose when opening or closing it, adjust the tension during the warmest part of the day. With the cover closed, release the hook and loop fastener from both side rails near the cab. Check compression of both spring plungers against the front header per Detail C. Roll the cover open and with a flat head screwdriver make adjustments. Repeat until satisfactory tension has been achieved.
WARRANTY DURATION
TruXedo®, Inc. (“TruXedo”) offers a LIFETIME warranty on Lo Pro, Deuce and Pro X15. Warranty is limited to original purchaser of truck bed cover and is nontransferable. The warranty registration must be on file and/or proof of original purchase (detailed and dated receipt) required for warranty service.
WARRANTY CONDITIONS
This warranty is against defective materials or workmanship. The warranty is void if the product has been damaged by accident, unreasonable use, neglect, improper service/installation/removal, modifications, normal wear and tear or other causes not arising out of defective materials or workmanship. Consequential and incidental damages are not covered under this warranty. TruXedo’s obligation under this warranty is limited to repairing or at its option, replacing any part that is returned, transportation prepaid, to Yankton, South Dakota, if the product is, in our judgement, defective. All materials must be accompanied by an RMA (Return Material Authorization) number requested by and authorized in advance of returning the materials. TruXedo shall not be liable or responsible to supply or pay labor to replace any part found defective, nor shall it be liable for any damages of any kind or nature to person, product, or property.
- Please register the warranty online at truxedo.com
- Direct all warranty claims to TruXedo at 877-878-9336
- For available installation videos, visit the TruXedo YouTube channel
The Following Conditions will Void Warranty:
- Wind Whip Damage – The cover must be secured at all points when the vehicle is in motion. An unsecured cover will flap, resulting in damage to the vinyl fabric
- Improper Cleaning – It is recommended to use the tested and approved TruXedo Pro-Tex or clean with soap and water only. Do not use vinyl conditioners (e.g. Armor All®) because they will shrink the vinyl
- Overloading of Cargo – Cargo should not contact the tarp at any point. Protrusions in the tarp will stress the vinyl fabric. Cargo may also shift while traveling causing it to press against the vinyl fabric and damage it.
OWNER/USER RESPONSIBILITIES
It is the responsibility of the owner/user to read this manual and comply with the operating procedures. The owner/user is also responsible for inspecting the TruXedo cover and for having parts repaired or replaced when worn or damaged. Failure to follow safety instructions and warning labels could result in failure of your cover system and/or personal injury.
IMPORTANT OPERATING TIPS
- DO NOT roll cover into rear cab window. DO NOT stow against cab.
- After closing the cover, the operator must secure the hook and loop by running their hand down the driver and passenger side rails,pushing down on the cover material.
- If the side rails are tipping, adjust the clamps in order to level the side rails and ensure a proper fit.
- The tonneau cover must be free of foreign material including snow and ice before rolling open or closed.
SAFETY INSTRUCTIONS
- DO NOT place objects on or against the cover or framework
- DO NOT tie cargo to truck bed cover framework
- DO NOT attempt to drive with the cover in the partially open position
- DO NOT operate the vehicle with objects on top of the cover
- NEVER allow children or pets to occupy the pickup box while the cover is closed.
- Cover is not airtight. Special care is required to keep cargo clean and dry.
- Tonneau covers won’t prevent theft of contents inside the truck box
- The cover assembly (tarp) must be rolled fully open and secured with retainer straps when towing the vehicle backwards.
- If the cover is going to be rolled open for an extended amount of time, periodically re-roll the cover and secure the retainer straps to ensure the cover doesn’t rest against the cab of the truck.
- A fully rolled cover in the open position must always be secured with retainer straps.
TROUBLESHOOTING TIPS
- WRINKLES ON THE VINYL FABRIC AFTER ROLLING COVER CLOSED
- Pull the vinyl fabric taut from each side. For best results, the help of a second person pulling on the opposite side is preferable.
- SAGGING VINYL FABRIC BETWEEN THE CROSS BOWS
- Adjustment to Automatic Tension Control may be required.
- WIND LIFTS UP THE EDGE OF THE VINYL FABRIC
- Make sure to engage the hook and loop on the driver and passenger side rails after closing the cover. This may need to be done periodically when taking long trips.
- VINYL FABRIC FLUTTERS EXCESSIVELY WHEN DRIVING
- Check cover tension, refer to Automatic Tension Control section.
- Make sure hook and loop fasteners are set. See Step 11
- SNOW AND ICE ACCUMULATION ON THE VINYL FABRIC
- Use broom or brush to remove loose snow and ice. DO NOT use sharp or pointed tools to remove snow and ice.
- Direct sunlight will help melt snow and ice off the vinyl fabric.
- TONNEAU COVER WILL NOT LATCH
- Check side rails to make sure they are level. See Step 5.
- Make sure the header seal is not caught between side rails & header.
- Check the position of side rails on the pickup box. They may be positioned too low. See Step 5.
- Make sure the cover has proper tension. See Automatic Tension Control section.
- VINYL FABRIC IS TOO TIGHT OR TOO LOOSE
- See Automatic Tension Control to adjust the tension.
- VINYL FABRIC HAS SHIFTED TOO FAR TO ONE SIDE
- Unlatch the cover at the tailgate, release the hook and loop along both sides, go to the shorter side of the tarp and tug. The vinyl fabric will slide in the aluminum headers. Pull on the shorter side until the tarp appears centered on the whole system. Latch the cover and secure the hook and loop down both sides. Repeat if more adjustment is needed.
COVER CARE AND MAINTENANCE
- It is recommended to use the tested and approved TruXedo Pro-Tex or clean with soap and water only.Do not use vinyl conditioners (e.g. Armor All®) because they will shrink the vinyl.
- It is recommended that you periodically check that the cover is securely attached to your truck bed. Inspect the clamps and front header guide slides to ensure they were properly installed and have not come loose during operation.
- It is recommended that you periodically inspect and service the rear latch closure. Clean away any excess dirt or grime.
- Covers that are used frequently or are subject to vibrations and impacts from rough roadways may require adjustment.
FAQ
WHY IS THERE A HOLE PUNCHED AT THE REAR OF THE PASSENGER SIDE RAIL OF THE TRUXEDO LO PRO, DEUCE AND PRO X15 BUTNO LATCH?All side rails are punched identically to keep them uniform, to ensure manufacturing efficiency and to reduce tooling costs. By doingthis, TruXedo can build and ship more covers while maintaining competitively priced products of the highest quality.
WHY IS MY COVER HOLDING WATER AFTER IT RAINS?Water pooling on the cover is normal because our cross bows are not arched. Since they are designed to sit flat some water mayaccumulate on the top of the cover. Once you drive your truck, the water will shed from the cover. Make sure to retighten the hookand loop fasteners along the length of the bed.
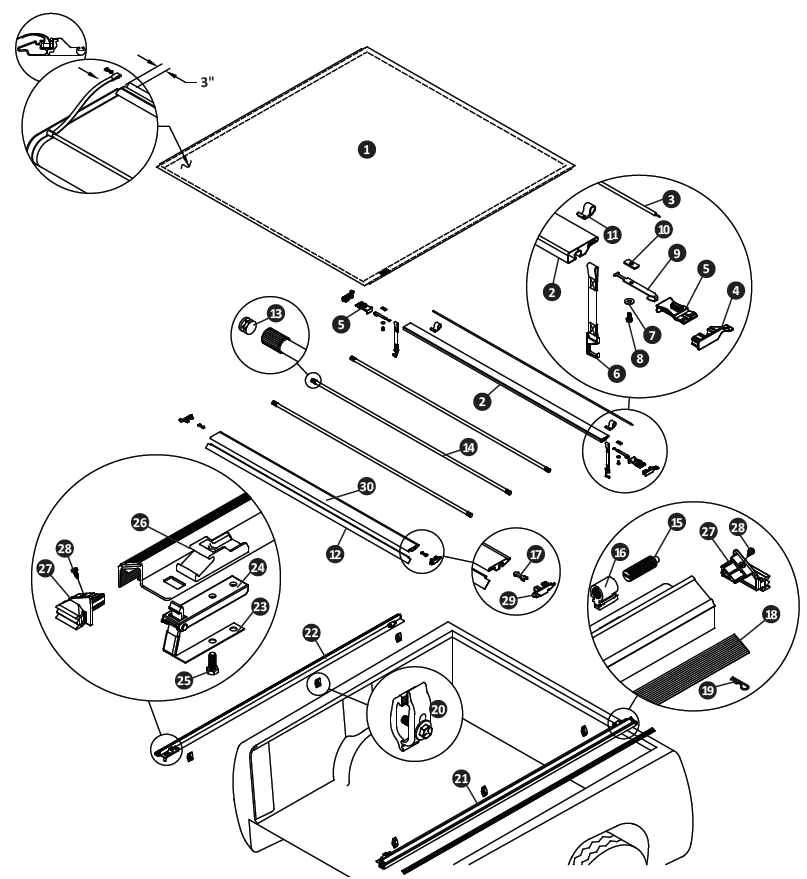
TRUXEDO LO PRO REPLACEMENT PARTS
- ___*___ TruXedo Lo Pro Replacement Cover
- ___*___ Black Front Header
- ___*___ Header Seal Front
- 1117540 Front Header 08 End Plugs (Set of Two)
- 1704707 Header Guide
- ___*___ Retainer Strap
- 1700428 Washer Flat 5/16″
- 1704606 Cap Screw, 5/16-18 x 5/8″
- 1117591 Header Guide Retainer
- 1704194 Weld Nut 5/16-18 ZP
- ___*___ Extruded Retainer Loop
- ___*___ Header Seal Rear
- 1705052 End Plug, 1″ OD
- ___*___ Black Bow
- 1702992 Spring Plunger, 5/8″ x 2.15″
- 1703260 Tension Control Bracket
- 1115354 Header Insert Retainer Clip
- ___*___ Hook and Loop Fasteners
- 1703332 Hitch Pin, 1/16″ x 1 5/16″
- 1705392 Aluminum Clamp Assy
- ___*___ Side Rail, Passenger’s Side
- ___*___ Side Rail, Driver’s Side
- 1114773 Flat Spring, 5/8″ x 3 7/8″
- 1704213 Latch Assembled
- 1702926 Cap Screw, 5/16″ x 7/8″
- 1704187 Header Stop
- 1118094 Side Rail End Plugs w/Seal (Set of Two)
- 1705629 Square Head Screw (#1 Drive)
- 1117467 Rear Header 08 End Plugs (Set of Two)
- ___*___ Black Rear Header

References
[xyz-ips snippet=”download-snippet”]

