
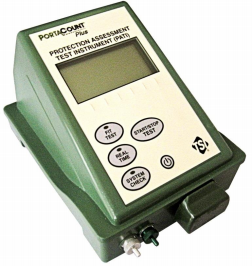
Portacount Plus Protection Assessment Test Instrument
PORTACOUNT® PLUS PROTECTION ASSESSMENT TESTINSTRUMENT (PATI) MODEL 8020MOPERATOR’S MANUALP/N 1980132, REVISION P MAY 2019
Copyright©TSI Incorporated / 19972019 / All rights reserved.Part Number1980132 / Revision P / May 2019AddressTSI Incorporated / 500 Cardigan Road / Shoreview, MN 55126 / USAFax No.(651) 490-3824
LIMITATION OF WARRANTY AND LIABILITY
(effective February 2015)(For country-specific terms and conditions outside of the USA, please visit www.tsi.com.) Seller warrants the goods, excluding software, sold hereunder, under normal use and service as described in the operator’s manual, to be free from defects in workmanship and material for 12 months, or if less, the length of time specified in the operator’s manual, from the date of shipment to the customer. This warranty period is inclusive of any statutory warranty. This limited warranty is subject to the following exclusions and exceptions:a. Hot-wire or hot-film sensors used with research anemometers, and certain other components when indicated in specifications, are warranted for 90 days from the date of shipment;b. Pumps are warranted for hours of operation as set forth in product or operator’s manuals;c. Parts repaired or replaced as a result of repair services are warranted to be free from defects in workmanship and material, under normal use, for 90 days from the date of shipment;d. Seller does not provide any warranty on finished goods manufactured by others or on any fuses, batteries or other consumable materials. Only the original manufacturer’s warranty applies;e. This warranty does not cover calibration requirements, and seller warrants only that the instrument or product is properly calibrated at the time of its manufacture. Instruments returned for calibration are not covered by this warranty;f. This warranty is VOID if the instrument is opened by anyone other than a factory authorized service center with the one exception where requirements set forth in the manual allow an operator to replace consumables or perform recommended cleaning;g. This warranty is VOID if the product has been misused, neglected, subjected to accidental or intentional damage, or is not properly installed, maintained, or cleaned according to the requirements of the manual. Unless specifically authorized in a separate writing by Seller, Seller makes no warranty with respect to, and shall have no liability in connection with, goods which are incorporated into other products or equipment, or which are modified by any person other than Seller.
The foregoing is IN LIEU OF all other warranties and is subject to the LIMITATIONS stated herein. NO OTHER EXPRESS OR IMPLIED WARRANTY OF FITNESS FOR PARTICULAR PURPOSE OR MERCHANTABILITY IS MADE. WITH RESPECT TO SELLER’S BREACH OF THE IMPLIED WARRANTY AGAINST INFRINGEMENT, SAID WARRANTY IS LIMITED TO CLAIMS OF DIRECT INFRINGEMENT AND EXCLUDES CLAIMS OF CONTRIBUTORY OR INDUCED INFRINGEMENTS. BUYER’S EXCLUSIVE REMEDY SHALL BE THE RETURN OF THE PURCHASE PRICE DISCOUNTED FOR REASONABLE WEAR AND TEAR OR AT SELLER’S OPTION REPLACEMENT OF THE GOODS WITH NON-INFRINGING GOODS.
TO THE EXTENT PERMITTED BY LAW, THE EXCLUSIVE REMEDY OF THE USER OR BUYER, AND THE LIMIT OF SELLER’S LIABILITY FOR ANY AND ALL LOSSES, INJURIES, OR DAMAGES CONCERNING THE GOODS (INCLUDING CLAIMS BASED ON CONTRACT, NEGLIGENCE, TORT, STRICT LIABILITY OR OTHERWISE) SHALL BE THE RETURN OF GOODS TO SELLER AND THE REFUND OF THE PURCHASE PRICE, OR, AT THE OPTION OF SELLER, THE REPAIR OR REPLACEMENT OF THE GOODS. IN THE CASE OF SOFTWARE, SELLER WILL REPAIR OR REPLACE DEFECTIVE SOFTWARE OR IF UNABLE TO DO SO, WILL REFUND THE PURCHASE PRICE OF THE SOFTWARE. IN NO EVENT SHALL SELLER BE LIABLE FOR LOST PROFITS, BUSINESS INTERRUPTION, OR ANY SPECIAL, INDIRECT, CONSEQUENTIAL OR INCIDENTAL DAMAGES. SELLER SHALL NOT BE RESPONSIBLE FOR INSTALLATION, DISMANTLING OR REINSTALLATION COSTS OR CHARGES. No Action, regardless of form, may be brought against Seller more than 12 months after a cause of action has accrued. The goods returned under warranty to Seller’s factory shall be at Buyer’s risk of loss, and will be returned, if at all, at Seller’s risk of loss.
Buyer and all users are deemed to have accepted this LIMITATION OF WARRANTY AND LIABILITY, which contains the complete and exclusive limited warranty of Seller. This LIMITATION OF WARRANTY AND LIABILITY may not be amended, modified or its terms waived, except by writing signed by an Officer of Seller. Disclaimer: The measurement provided by the PORTACOUNT® Plus (Protection Assessment TestInstrument) is an assessment of respirator fit during a fit test only. Respirator fit at other times will vary. The fit factor value is not intended for use in calculating an individual’s actual exposure to hazardous substances.Service PolicyKnowing that inoperative or defective instruments are as detrimental to TSI as they are to our customers, our service policy is designed to give prompt attention to any problems. If any malfunction is discovered, please contact your nearest sales office or representative, or call TSI’s Customer Service department at (800) 680-1220 (USA) or (001 651) 490-2860 (International) or visit www.tsi.com.TrademarksTSI, TSI logo, and PortaCount are registered trademarks of TSI Incorporated.
Safety
This section provides instructions to ensure safe and proper handling of the 8020M.
![]() WARNINGThe instrument must be used in the manner described in this manual. Failure to follow all of the procedures described in this manual can result in serious injury to you or can cause irrevocable damage to the instrument. There are no user-serviceable parts inside the instrument. Refer all repair to a qualified factory-authorized technician.
WARNINGThe instrument must be used in the manner described in this manual. Failure to follow all of the procedures described in this manual can result in serious injury to you or can cause irrevocable damage to the instrument. There are no user-serviceable parts inside the instrument. Refer all repair to a qualified factory-authorized technician.
Chemical Safety
Isopropyl alcohol is hazardous material. DO NOT allow alcohol to get into your eyes. Avoid contact with the skin. DO NOT swallow or ingest in any way. Alcohol is extremely flammable. DO NOT expose to open flame or sources of ignition. Consuming the alcohol will result in severe illness or death. See Appendix A in this manual for instructions. The alcohol used with this system is 99.5% pure or greater purity reagent grade isopropyl alcohol. It must be stored, cared for and disposed of properly. See Appendix A in this manual for instructions. The use of other grades/types of alcohol will damage the instrument. Use the 8020M in a clean area. Do not use in areas with corrosive or acidic atmospheres.
Laser Safety
The Model 8020M is a Class 1 laser-based instrument. During normal operation, you will not be exposed to laser radiation. However, you must take certain precautions or you may expose yourself to hazardous radiation in the form of intense, focused visible light. Exposure to this light can cause blindness. Take these precautions:DO NOT remove parts from the instrument unless you are specifically told to do so in this manual.DO NOT remove the instrument housings or covers while power is supplied to the instrument.
![]() WARNINGThe use of controls, adjustments, or procedures other than those specified in this manual may result in exposure to hazardous optical radiation.
WARNINGThe use of controls, adjustments, or procedures other than those specified in this manual may result in exposure to hazardous optical radiation.
Battery Safety and Disposal
The PATI (Protection Assessment Test Instrument) can be powered using Military UltraLife P/N’s BA5347/U, 6135-01-090-5364, 6135-01-455-7946; 6-Volts 11100mAh (11.10Ah) Lithium Manganese Dioxide (Li-MNO2) batteries, or the optional TSI P/N 803100 8-D Cell Alkaline battery pack instead of the AC power supply. These batteries are not included. Follow the battery manufacturer’s instructions for disposal of batteries.
![]() WARNINGDO NOT charge, short circuit, incinerate or mutilate Li-MnO2 batteries. The battery MUST NOT be abused in any way which may cause the battery to rupture. DO NOT use equipment if battery becomes hot. IMMEDIATELY turn off the equipment if battery becomes hot to the touch. DO NOT use any battery which shows signs of damage, such as bulging, swelling, a swollen plastic wrap, liquid in the plastic wrap, etc.
WARNINGDO NOT charge, short circuit, incinerate or mutilate Li-MnO2 batteries. The battery MUST NOT be abused in any way which may cause the battery to rupture. DO NOT use equipment if battery becomes hot. IMMEDIATELY turn off the equipment if battery becomes hot to the touch. DO NOT use any battery which shows signs of damage, such as bulging, swelling, a swollen plastic wrap, liquid in the plastic wrap, etc.
Description of Labels and Markings
This section acquaints you with the advisory and identification labels on the instrument and used in this manual to reinforce the safety features built into the design of the instrument. It also identifies instrument markings.
Caution
![]()
C a u t i o n |
|
Caution means be careful. It means if you do not follow the procedures prescribed in this manual you may do something that might result in equipment damage, or you might have to take something apart and start over again. It also indicates that important information about the operation and maintenance of this instrument is included. |
Warning

W A R N I N G |
|
Warning means that unsafe use of the instrument could result in serious injury to you or cause irrevocable damage to the instrument. Follow the procedures prescribed in this manual to use the instrument safely. |
|
Serial Number Label (displayed on the bottom) |
|
|
WEEE marking (displayed on the bottom) indicates item is non disposable and must be recycled. |
|
INTRODUCTION
PortaCount® Plus Model 8020M Respirator Fit Tester is the manufacturer’s name for the equipment discussed in this publication. The term Model 8020M refers to the whole system or kit. When referring to the instrument itself, the nomenclature used is Protection Assessment Test Instrument (PATI)
The measurement provided by this instrument is an assessment of mask fit during a fit test only. Mask fit at other times will vary. The fit factor value is not intended for use in calculating an individual’s actual exposure to hazardous substances.
Read this manual carefully before attempting to fit test a mask.
Should any problem arise, consult the Troubleshooting chapter of this manual. Do not attempt to service the PATI without consulting the troubleshooting section of this manual. If the problem cannot be remedied consulting the troubleshooting section, contact the manufacturer at (800) 874-2811 for further troubleshooting.
MODEL 8020M COMPONENT LIST AND PHYSICAL DESCRIPTION
Use the component list below to be sure no items are missing. Next, identify the various parts in the marked photographs. Then follow the setup instructions in Chapter 2 to prepare the instrument for operation.
Model 8020M Basic Issue
The following items are included with the Model 8020M:
Qty |
Item |
|
1 |
PATI (PORTACOUNT® Plus Model 8020M) |
|
1 |
Carrying case |
|
2 |
HEPA filters |
|
2 |
Twin tube assemblies |
|
2 |
Alcohol fill capsule |
|
2 |
Alcohol cartridge (with wick) |
|
1 |
Storage cap |
|
1 |
115/230 AC adapter |
|
1 |
North American line cord for AC adapter |
|
1 |
European line cord for AC adapter |
|
4 |
Alcohol wick kits |
|
1 |
Data port plug |
|
1 |
USB connector plug |
|
1 |
Model 8020M Operator’s Manual (this manual, P/N 1980132) |
|
1 |
Mask sampling kit |
|
1 |
USB Cable |
|
1 |
Li battery adapter cable |
|
1 |
FitPro+ Software Installation CD |
Mask sampling kit (1040098) consists of:
Qty |
Item |
|
4 |
Drink tube sampling adapters (M50/M53/Avon Masks) |
|
4 |
Drink tube sampling adapters (M40 Mask) |
|
1 |
Mesh bag |
In addition, the following is needed to operate the PATI:
Qty |
Item |
|
1 box |
Alcohol, reagent grade, (Quantity of 16, 30 ml bottles) |
Replacement Parts and Supplies
Unit of Issue |
Item |
Mfg. Part No. |
NATO Stock No. |
|
Pkg. of 1 |
Alcohol, reagent grade, (Quantity of 16, 30 ml bottles) |
8016M |
6810-01-382-2904 |
|
Pkg. of 1 |
Pre-Soaked Isopropyl Alcohol Wicks, Box 50 each |
803105 |
|
|
Pkg. of 1 |
Model 8020M Operator’s Manual (this manual) |
1980132 |
|
|
Pkg. of 1 |
8020M M41 PATI Power Supply (115/230 AC adapter with North American line cord) |
803106 |
|
|
Pkg. of 1 |
European line cord for AC adapter |
803149 |
|
|
Pkg. of 1 |
Twin tube assembly |
1081285 |
4240-01-382-3652 |
|
Pkg. of 1 |
Alcohol wick kit |
1081322 |
9390-01-379-6385 |
|
Pkg. of 1 |
PATS-NL Mask Adapter Kit, replacement |
803108 |
|
|
Pkg. of 1 |
Carry Case (MDPE), 8020M M41 PATS |
803102 |
|
|
Pkg. of 1 |
Lower Foam Insert replacement, Carry Case (MDPE) |
803103 |
|
|
Pkg. of 1 |
Upper Foam Insert replacement, Carry Case (MDPE) |
803104 |
|
|
Pkg. of 1 |
Alcohol fill capsule |
1081397 |
4240-01-382-3584 |
|
Pkg. of 1 |
Alcohol cartridge (with one wick) |
1081282 |
4240-01-382-3519 |
|
Pkg. of 1 |
Storage cap |
1081181 |
5340-01-378-2291 |
|
Pkg. of 1 |
HEPA filter |
1602066M |
4240-01-340-3715 |
|
Pkg. of 1 |
Data port plug |
803144 |
|
|
Pkg. of 1 |
USB port plug |
803145 |
|
|
Pkg. of 1 |
USB cable |
803148 |
|
|
Pkg. of 1 |
PATI Battery Pack |
803100 |
|
|
Pkg. of 1 |
Lithium Military Battery Pack Cable |
803101 |
Equipment Data
Size |
|
|
Instrument |
9.3 in. x 6.4 in. x 5.6 in. (24 cm x 16 cm x 14 cm) |
|
Carrying case |
16.3 in. x 14.4 in. x 8.3 in. (41 cm x 37 cm x 20 cm) |
Weight |
|
|
Instrument |
3.1 lbs (1.4 kg ) |
|
Carrying case |
14 lbs (6 kg) |
|
Fit factor range |
1 to greater than 50,000 |
|
Particle concentration range |
0.01 to 500,000 particles/cm3 |
|
Particle size range |
0.02 to greater than 1 μm |
|
Test duration (per exercise) |
40 seconds |
Power requirements |
|
|
Battery |
Optional |
Temperature range |
|
|
Operation |
32 to 100°F (0 to 38°C) |
|
Storage |
-20 to 120°F (-30 to 50°C) |
|
Sample flow rate |
0.7 L/min (nominal) |
Alcohol |
|
|
Hours of operation per charge |
8 hours at 70°F (21°C) |
|
Alcohol type |
Reagent grade isopropyl |
|
Recommended factory recalibration interval |
One year |
|
Warranty |
One year on workmanship and materials |
|
Optional accessories and supplies |
FitPro+ Fit Test 3.1 SoftwarePATI battery pack (TSI P/N 803100)Pre-soaked isopropyl alcohol wicks, box 50 ea. (TSI P/N 803105) |
|
Items Included With the 8020M |
1 Protection Assessment Test System Instrument2 Alcohol cartridge/fill capsule assemblies1 AC power supply2 HEPA filters for system check2 Twin-tube sampling hoses1 Hard-sided carry case |
PATI Physical Description
The following figures identify the main parts of the PATI. Become familiar with them before proceeding with the setup.
|
Front of PATI |

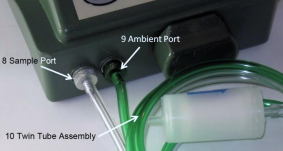
8. Sample Port The Sample port is the inlet used when sampling air from a respirator during a fit test. The sample port fitting is colored silver.9. Ambient Port The ambient port is the inlet used when sampling ambient air during a fit test. The ambient port fitting is colored green.10. Twin Tube Assembly The twin tube assembly consists of a pair of tubes. The ambient tube is green in color, has the word “AMBIENT” marked on it, and connects to the green colored ambient port. The clear sample tube has the word “SAMPLE” marked on it, and connects to the silver colored sample port. The twin tube assembly is about 5 feet (150cm) long and must never be lengthened for fit testing. The sample tube is 2.0 inches (51mm) longer than the ambient tube on the end which fits to the mask.
11. Exhaust Port The pump exhaust exits through the exhaust port on the underside of the PATI. DO NOT block this port.
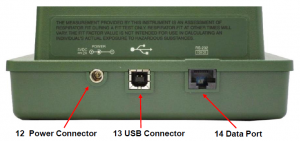
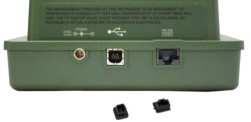
12. Power Connector The power connector is a round metal connector marked with the voltage requirement and polarity just above it.13. USB Connector The USB connector allows communication with the PATI. It is used to transmit data to a computer.14. Data Port The Data Port allows the PATI to communicate with applications using the RS-232 protocol.
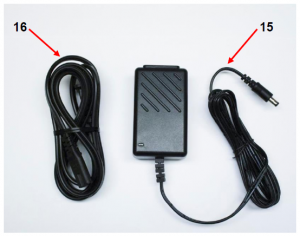
15. AC Adapter The AC adapter that is supplied with the Model 8020M plugs into the power connector on the back of the PATI. The AC adapter is a dual voltage type and can be used with either 115 VAC or 230 VAC nominal voltages.16. Line Cord The line cord attaches the AC adapter to an external power source.
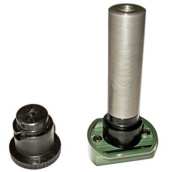
17. Cartridge Cavity The cartridge cavity is where the alcohol cartridge is inserted during use. It is very important to make certain that dirt and lint do not enter the cartridge cavity.18. Storage Cap The storage cap is used to cover the cartridge cavity of the PATI when not in use or to cover the alcohol fill capsule when it is not holding the alcohol cartridge.19. Spare Alcohol Wicks with Screen and Wick Removal Tool Spare alcohol wicks and screens are included with the Model 8020M. The wick is inserted into the alcohol cartridge to absorb the alcohol, and the screen prevents contaminants from entering the cartridge cavity. A wick removal tool (wood dowel) is included with each wick.20. Alcohol Fill Capsule The alcohol fill capsule is used to store and fill the alcohol cartridge.21. Alcohol Cartridge The alcohol cartridge consists of an alcohol cartridge cap and a wick retainer which holds the alcohol wick and screen.
 Operational Components and Cartridge Cavity
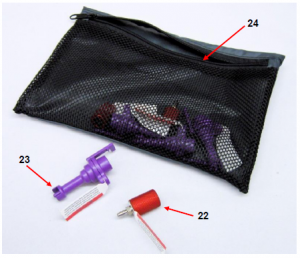
22. Drink Tube Sampling Adapter The drink tube sampling adapters provided with the Model 8020M allow the instrument to sample air from inside a mask using the drink tube. It is used with masks equipped with drink tubes such as the M40.
23. Drink Tube Sampling Adapter The drink tube sampling adapters provided with the Model 8020M allow the instrument to sample air from inside a mask using the drink tube. This adapter is used with masks equipped with drink tubes such as the M53.
24. Mesh bag The mesh bag holds the drink tube sampling adapters which make up the mask sampling kit.
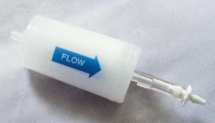
25. HEPA Filter The HEPA Filter is provided for the purpose of performing a System Check on the PATI.
26. Model 8020M Operator’s Manual for Protection Assessment Test System (this manual) The Model 8020M Operator’s Manual provides detailed instructions on operating, maintaining and troubleshooting the unit.
27. Model 8020M Software CD The Model 8020M Software CD includes the FitPro+™ Fit Test Software and files necessary to load and run the software on a personal computer.

28. Computer Interface Cable The Computer Interface Cable connects the PATI to the USB port of a personal computer.

29. Lithium Battery Adapter Cable The Lithium Battery Adapter Cable lets you connect an optional military lithium battery pack to use as a power source for the PATI. The battery pack is not included with the Model 8020M.

30. Carrying Case The Carrying Case is a rugged case that provides protection and storage for the Model 8020M.
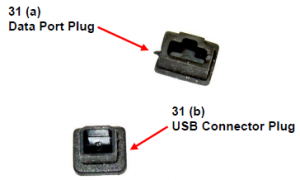
![]()
31. (a) Data Port Plug and (b) USB Connector Plug The Data Port Plug and USB Connector Plug are used to protect the data port and USB port from contamination or damage when either port is not being used.
Chapter 2
PATI SET UP
Modes of Operation
There are two modes of operation for the PATI: stand-alone mode and external control mode.
Stand-alone Mode
The PATI is operating in stand-alone mode when it is first powered on. It automatically begins a warm-up period and when that is over it displays an idle System Check screen. The PATI is then ready for a system check, fit testing, and other stand-alone operations.
External Control Mode
The PATI is operating in external control mode when it is being controlled by FitPro+ software running on your computer. The PATI will also be operating in external control mode when using a product such as TSI’s Mask Integrity Test Accessory (MITA). To start external control mode, place the PATI display on the idle System Check screen. Connect the PATI to the computer using the USB cable supplied with the 8020M and initiate control from the software. When the PATI is in external control mode Locked will be the displayed on the screen. Refer to the FitPro+ Fit Test Software User’s Manual located on the CD for more information.
Preventive Maintenance Checks and Services (PMCS) 1) Before
Item No. |
Items to be inspected |
Procedure |
Corrective Action |
|
1 |
Alcohol Capsule & Cartridge |
Check the cartridge for dirt and other foreign matter. |
Clean as needed. |
|
2 |
Alcohol Capsule & Cartridge |
Make certain that the capsule is filled with the alcohol when the cartridge is in the capsule. |
Refill the cartridge with the reagent grade (≥99.5%) alcohol to the fill line. |
|
3 |
Twin Tube Assembly |
Check the twin tube assembly to make sure there is no condensation on the inside walls. |
Refer to “Drying the twin tube assembly” section. |
|
4 |
Storage Cap |
Check the storage cap for dirt and other foreign matter. |
Clean as needed. |
2) During
Item No. |
Items to be inspected |
Procedure |
Corrective Action |
|
1 |
Twin Tube Assembly |
When the PATI is turned on, but not in use, attach the HEPA filter to the Sample tube to prevent dust and debris from accidentally being drawn into the instrument. |
Install HEPA filter to the Sample tube of the twin tube assembly. |
3) After
Item No. |
Items to be inspected |
Procedure |
Corrective Action |
|
1 |
Storage Cap |
Make sure that the storage cap is installed on the PATI and the alcohol cartridge is stored in the alcohol fill capsule. |
Refer to the storage procedures. |
Installing Data Port and USB Connector Plugs
Insert the data port plug into the data port and the USB connector plug into the USB connector if not already installed.
Plugs for the USB Connector and the Data Port
Twin Tube Assembly
Attach the green tube to the green fitting (ambient port) and attach the clear tube to the silver fitting (sample port) as shown.
Twin Tube Assembly Connections
Connecting the AC Power Supply
The PATI may be operated with either the supplied AC adapter or with a military lithium battery. If the AC adapter is to be used, follow the instructions below. If a battery is to be used, refer to the next section in this chapter. The AC adapter supplied with the PATI is a dual-voltage type power supply. It will automatically detect the AC voltage level (nominally 115 or 230 VAC) and adjust itself accordingly.
- Locate the AC adapter and line cord in the carrying case.
- Plug the female end of the line cord into the socket on one end of the AC adapter and plug the male end of the line cord into an available AC power outlet.
- The AC adapter has a cable permanently attached on the opposite side from the line cord socket. Plug the small round connector on the end of this cable into the power connector on the back of the PATI.

Connecting the AC Adapter to the PATI
Connecting the Optional Battery
The PATI may be operated with a military lithium battery. If a battery is to be used instead of the AC adapter, follow the instructions below. Use military battery NSN 6135-01-090-5364 or 6135-01-455-7946 or BA-5347/U Li-MnO2 (Lithium Manganese Dioxide). The lithium battery is not included with the Model 8020M.
W A R N I N G |
|
Note
- For handling and disposal precautions, refer to Battery Safety and Disposal of this manual.
- DO NOT USE THE PATI IF THE TEMPERATURE IN THE TESTING AREA IS BELOW 32°F OR ABOVE 100°F (0°C or above 38°C).
- Obtain the battery connector cable from the Model 8020M case. Connect the cable to the battery as shown.
- Plug the small round connector on the end of this cable into the power connector on the back of the PATI.

Battery with Cable Connected
Adding Alcohol
Maintaining an adequate alcohol supply inside the PATI is critical to its operation and requires strict adherence to the directions that follow. The PATI will consume alcohol at the approximate rate of one ml per hour when the ambient temperature is near 75°F (24°C). At higher temperatures alcohol will be consumed faster and at lower temperatures alcohol will be consumed more slowly.
Note
If using the Presoaked Alcohol Wicks (TSI P/N 803105, box 50 ea.) the following steps for adding alcohol are not necessary. Simply insert the Presoaked Alcohol Wick into the Alcohol Cartridge.
W A R N I N G
- Isopropyl alcohol is hazardous material. DO NOT allow alcohol to get into your eyes. Avoid contact with the skin. DO NOT swallow or ingest in any way. Alcohol is extremely flammable. DO NOT expose to open flame or source of ignition. Consuming the alcohol will result in severe illness or death.
- Refer to the Material Safety Data Sheet (MSDS) located in Appendix A of this manual for safety precautions.
To add alcohol to the PATI, you will need the following items:
- Reagent grade isopropyl alcohol (99.5% pure or better)
- Alcohol fill capsule
- Storage cap
- Alcohol cartridge
C a u t i o n
- The alcohol used with this system is 99.5% pure reagent grade isopropyl alcohol. The use of other grades of alcohol or the use of contaminated alcohol will damage the instrument. Dispose of any alcohol with visible contamination (refer to Appendix A). Always recap alcohol fill capsule and other containers immediately to prevent absorption of moisture.
- Any dirt or debris that gets into the PATI can plug the small internal nozzle and prevent operation. Do not allow the Alcohol Cartridge or Storage Cap or Alcohol Capsule to make contact with any surface that may be dirty.
- Ensure that the PATI is turned off. Never install or remove the alcohol cartridge when the PATI is in operation.
- Open the alcohol fill capsule by twisting the storage cap (or alcohol cartridge) 1/8 turn. Set the storage cap and alcohol cartridge down on a clean surface or with the ends standing up as shown.
 Storage Cap and Alcohol Cartridge
 - Open a bottle of alcohol. Invert the bottle and insert the nozzle end into the alcohol fill capsule to make certain that you cannot inadvertently spray alcohol anywhere except down into the capsule.
- Squeeze alcohol into the alcohol fill capsule until liquid level is even with the fill-line near the base. If the alcohol bottle is not empty you may recap it and store it for later use.Filling Capsule with Alcohol
- Make certain that the alcohol cartridge is clean (Chapter 6, “Cleaning the Storage Cap and Alcohol Cartridge”). Insert the alcohol cartridge into the alcohol fill capsule by aligning the groove with the pin and turning 1/8 turn until it locks into place.
- Set the Alcohol Fill Capsule down and wait at least 2 minutes while the wick inside the Alcohol Cartridge soaks up alcohol. Never leave the cartridge cavity open longer than necessary. For intervals longer than 2 minutes use the storage cap to cover the cartridge cavity when the alcohol cartridge is not installed.
- Remove the alcohol cartridge from the capsule and gently shake it to allow excess alcohol to drain back into the alcohol fill capsule. Stop when excess alcohol is no longer dripping.Inserting Cartridge into Capsule
- Insert the alcohol cartridge into the Cartridge Cavity of the PATI. Twist the alcohol cartridge counterclockwise until the locking pin begins to engage, and then firmly twist it clockwise until it is fully seated. It should snap into position. After installation of the alcohol cartridge, the PATI must always remain in the upright position to prevent flooding.Inserting Cartridge into PATI
- Recap the alcohol fill capsule with the storage cap.Alcohol Cartridge Correctly (Fully) Seated
 Storage Cap and Alcohol Cartridge
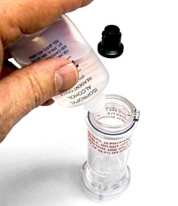 Filling Capsule with Alcohol
 Inserting Cartridge into Capsule
 Inserting Cartridge into PATI
 Alcohol Cartridge Correctly (Fully) Seated
Short-Term Storage and Shipment
It is important to remove all alcohol from the Model 8020M during transportation and storage. Anytime you put the PATI back into the carrying case you should:
- Remove the alcohol cartridge from the PATI and store it in the alcohol fill capsule. The alcohol fill capsule is designed to be a safe transportation and storage container for alcohol. The alcohol cartridge can be left soaking in alcohol for up to three months (see long-term storage requirements below). Installing the storage cap into the cartridge cavity prevents dirt or lint from getting inside the PATI.
- Cover the cartridge cavity with the storage cap.
- Never ship the PATI without the carrying case and accessories. Always include basic issue items in the carrying case during transportation.Alcohol Cartridge Properly Stored in Alcohol Fill Capsule
 Alcohol Cartridge Properly Stored in Alcohol Fill Capsule
C a u t i o n
- Never transport or store the PATI with the alcohol cartridge inside the cartridge cavity. Flooding of the optics may occur.
- Always keep the alcohol cartridge in the alcohol fill capsule during transport and storage.
- Always use the alcohol storage cap to cover the cartridge cavity of the PATI during transport and storage.
- Never leave the cartridge cavity open.
Long-Term Storage
If the PATI is to be stored for a period of time exceeding three months, follow the instructions below in addition to the short term storage instructions outlined above.
- Remove and properly dispose of all alcohol inside the alcohol fill capsule. See Appendix A.
- Remove and properly dispose of the used alcohol wick inside the alcohol cartridge. See Appendix A.
- Install a new, dry wick into the alcohol cartridge. See Chapter 6, “Changing the Alcohol Wick.”
- Remove all alcohol bottles from the Model 8020M carrying case, and store in an authorized storage.
- Remove all batteries from the Model 8020M carrying case and store in an authorized storage area.
Chapter 3
PERFORMING A MASK FIT TEST
Before any fit testing can be accomplished, the procedures in Chapter 2 must be completed.
Performing a System Check
Every time the PATI is turned on, the system check should be performed.
- Turn the PATI on by pressing the ON/OFF button on the keypad.
- Wait for the display to warm up (60 seconds). If you encounter any errors, refer to Chapter 5,”Troubleshooting.”
- Verify the SYSTEM CHECK button is lit and the display shows SYSTEM CHECK. Also check that there is nothing attached to the ends of the sample and ambient tubes, such as a filter or mask.
- Press the START/STOP TEST button to begin the System Check (ambient air check).
- Check that the display reads “Ambient Check Passed” and displays a particle count of 1000 #/cm3 or higher. This particle count is necessary to make sure a test can be conducted successfully. If the display reads “Ambient Check Failed” and the reading is lower than 1000 #/cm3, a mask Fit Test cannot be performed. Refer to Chapter 5, “Troubleshooting.”
- Perform a Zero-check by attaching the supplied HEPA filter to the clear sample tube, marked “SAMPLE”. Make sure the arrow on the filter is pointing towards the PATI.Attaching a HEPA Filter
- Press the START/STOP TEST button to perform a Zero Check and watch the display. The display should read near 0.00 /cm3 within 30 seconds and display “Pass” when the Zero Check and Maximum Fit Factor Tests are complete. If this step fails refer to Chapter 5, “Troubleshooting” to help solve the problem.
- Press the START/STOP TEST button if the System Check passed.
- The instrument automatically proceeds to the Fit Testing mode (the FIT TEST button LED is lit) and the default mask protocol is displayed. To change the protocol, refer to Chapter 4 SETTINGS MENU. If you want to perform a Real Time Test, press the REAL TIME button and refer to Conducting a Real Time Test below.
 Attaching a HEPA Filter
C a u t i o n
- Always attach the HEPA filter to the sample line marked “SAMPLE” when the PATI is turned on, but not testing a mask. This will extend the life of the instrument by preventing dust and debris from being drawn into the PATI.
- Make certain that the end of the twin tube assembly is never allowed to fall to the ground or any place where dirt or moisture or debris could be drawn into the tubes.
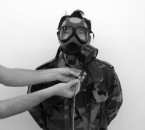
Prepare Mask and Subject for Fit Test
Note
- No Smoking in immediate area; test subject should not smoke for at least 30 minutes before test.
- Visually inspect mask inside and outside for dirt, mud, sand, powder, greasy or oily substances.
- Adjust face piece and tighten head harness.
- Ensure face piece is properly fitted and that no hair is under the sealing surface of the face piece.
- Check that canister is attached.
This section is specific to testing masks with a drink tube adapter. Methods for attaching the PATI to other mask systems will differ.
C a u t i o n
It is important that the mask be clean and free of any loose foreign material prior to conducting a fit test. Presence of these substances may affect the face piece seal and result in inaccurate readings.
1. Visually inspect both the inside and outside of the mask for dirt, mud, sand, powder, and greasy or oily substances. The inside of the face piece should be cleaned with a damp sponge and dried with a lint-free cloth. The outlet valve disk should also be carefully inspected to ensure it is clean and seated properly.
2. Attach the drink tube sampling adapter to the drink tube quick disconnect coupling as illustrated. DO NOT attach the sample line of PATI to the sampling adapter at this time. Note that different masks use different drink tube couplings.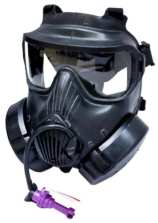
Drink Tube Sampling Adapter Connected to the Quick Disconnect Coupling
Note
- When using the red sampling adapter: If a distinct “snap action” can no longer be felt when engaging the drink tube quick disconnect coupling to the drink tube adapter, stop using the adapter and discard it. Replace the adapter. The absence of a “snap” indicates that the O-rings are dry from excessive wear.
- When using the purple sampling adapter : Insert the drink tube quick disconnect coupling fully into the adapter and twist such that the “flag” prevents the coupling from pulling out during fit testing.
- Some military masks have a manual drink valve in addition to the quick connect coupling (M17A1 for example). Have the person being fit tested hold the drink valve open during the entire fit test if the mask has a manual drink valve. If the drink valve is left closed, air cannot be drawn from inside the mask and the fit test will result in a false pass.
3. Have the test subject sit down for the mask fit test.
C a u t i o n
All water or foreign material must be expelled from the mask drink tube before the PATI sample line is connected so that liquid will not be drawn into the PATI. If liquid is drawn into the PATI, it may become inoperable.
4. Instruct the test subject to blow as hard as possible several times into the internal drink tube mouthpiece to remove any trapped fluids or foreign matter. The drink
This is a critical step. tube must be cleared so that foreign matter will not be drawn into the PATI and so that the PATI will be able to draw air from inside the mask.
Note
- Make certain the sample tube is not attached while the test subject blows into the drink tube mouthpiece. If the tube is attached, any fluid will be blown into the instrument and make the instrument inoperable.
- If the drink tube is obstructed and the blockage cannot be removed, the mask cannot be used for Fit Testing and should be sent for maintenance.
5. Adjust the face piece and tighten the head harness following the instructions outlined in the Operator’s Manual for the mask being tested.
6. Ensure that the face piece is properly fitted and that no hair is under the sealing surface of the face piece.
7. Check that the canister is firmly attached.
Conducting a Mask Fit Test
Note
- The measurement provided by this instrument is an assessment of mask fit during a fit test only. Mask fit at other times will vary. The fit factor value is not intended for use in calculating an individual’s actual exposure to hazardous substances.
- This instrument is designed to operate in an enclosed, sheltered area at ambient temperatures between 32°F and 100°F (0°C and 38°C). TO AVOID INACCURATE READINGS, DO NOT USE THE PATI IF THE TEMPERATURE IN THE TESTING AREA IS BELOW 32°F OR ABOVE 100°F (0°C or above 38°C).
- It is important that smoking not be permitted in the immediate area where the mask fit testing is to be conducted. Also, it is very important that the test subject not smoke for at least 30 minutes before the test begins.
- To achieve proper results the test subject should not talk during the test.
1. Remove the HEPA filter from the PATI twin tube assembly.
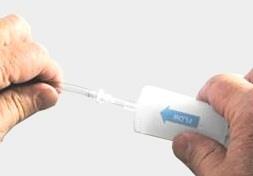
2. Attach the end of the clear tube marked “SAMPLE” to the barbed fitting on the end of the drink tube sampling adapter as shown.
Connecting PATI Sample Line to Drink Tube Sampling Adapter
Note
Before continuing to the next step, brief the test subject on how to perform the exercises outlined below. The test subject should be instructed to breathe normally during all exercises except the deep breathing exercise. Each time the exercise on the PATI display changes, a “beep” sounds. Immediately instruct the test subject to start the next exercise.
3. Press the START/STOP TEST button. Testing begins immediately.
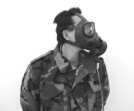
4. Instruct the test subject to perform the exercises as displayed on the instrument. Each time the exercise changes, a “beep” sounds to prompt the subject to start the next exercise. The exercises may occur in the following order:
a. Normal breathing; keep the head motionless.
b. Deep breathing; slowly but deeply inhale through nose and exhale from mouth.
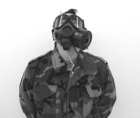
c. Head movement side to side; look over each shoulder in one second intervals (see Exercise 3 photos.)
d. Head movement up and down: look at the ceiling then the floor in one-second intervals (see Exercise 4 photos.)
e. Rotate chin: move the jaw in a circular pattern with mouth slightly open.
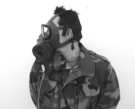
Exercise 3: Moving Head Side To Side, Look Over Each Shoulder

Exercise 4: Move Head Up And Down, Look at Ceiling and Floor
Note
After the pass or fail indication, you will hear a series of three beeps. An overall test result will then be displayed.
5. If the test is a PASS, have the test subject remove mask and continue with the next step. If the test is a FAIL, follow the directions outlined in step 8.
6. Remove the drink tube sampling adapter from the test subject’s mask and attach the HEPA filter to the tube marked “SAMPLE” until you start the next fit test.
7. When finished testing, follow this closing procedure:
a. Turn the PATI off by pressing the ON/OFF button on the keypad
b. Remove the HEPA filter from the SAMPLE tube.
c. Remove the storage cap from the alcohol fill capsule.
d. Remove the alcohol cartridge and place it in the alcohol fill capsule.
e. Replace the storage cap to the PATI Cartridge Cavity.
f. Disconnect the AC power supply.
g. Repack all the basic issue items in the carrying case.
8. If the mask fails the test, do the following:
a. Check to ensure head harness pad is centered correctly.
b. Re-tighten straps after adjustment of head harness pad.
c. Check for hair under face piece sealing surfaces.
d. Make sure all connections are correct.
e. The mask may be faulty; verify its condition.
f. Perform a Real Time Test (see below).
g. Repeat Fit Test.
h. Try using a different size mask with the test subject. A smaller size face piece usually seals better than a larger size.
C a u t i o n
It is normal for moisture to be seen in the Model 8020M tube assembly due to condensation from the test subject’s breath. It is IMPORTANT, however, that the moisture not build up to the point where it drips down into the PATI.
9. If enough moisture builds up in the tubing until it might drip into the PATI, remove the twin tube assembly and replace it with the spare dry twin tube assembly. Dry the twin tube assembly in accordance with the maintenance procedure in
Chapter 6.
Note
- Eventually, the alcohol wick inside the alcohol cartridge absorbs enough moisture to prevent proper operation. Symptoms of excess moisture are: low particle counts even though there is plenty of alcohol and there are plenty of particles in the room, and the need to frequently replenish the alcohol supply (for example, every hour or even more frequently). Refer to Chapter 5, Troubleshooting.
- The life of an alcohol wick depends on the conditions of use. When the PATI is used heavily (for example: 8 hours a day, day after day), the wick may need to be replaced as often as every 5th day. Lighter use requires less frequent wick changes, possibly months apart.
Performing a Real Time Test
A Real Time Test can be very useful when troubleshooting a mask that fails the fit test. A Real Time Test can also be used to assist in optimizing the fit of a mask in training. It allows a test subject to experiment with strap tension and other adjustments while watching the effect in real time. You can perform a Real Time Test at any time.
To perform a Real Time Test:
1. Have the subject don the mask as if preparing for a Fit Test. See Preparing the Mask for Fit Testing.
2. Press the Real Time button on the PATI display. The LED on the button lights to indicate you have selected this mode of operation and the PATI immediately begins to sample the ambient air (for 5 seconds).
3. After sampling the ambient air, the PATI begins to sample the mask air and
displays a bar graph indicating how well the mask fits.
4. The ˄ indicates the the Pass/Fail protocol setting for the mask. If the fit is “poor” (bar falls short of the ˄ indicator) attempt to improve the fit by adjusting the mask. Check the following:
a. Check to ensure head harness pad is centered correctly.
b. Re-tighten straps after adjustment of head harness pad.
c. Check for hair under face piece sealing surfaces.
d. Make sure all connections are correct.
e. Try using a different size mask with the test subject. A smaller size face piece usually seals better than a larger size.
5. The PATI runs in this mode for five minutes and then pauses to resample ambient air. Operation then resumes.
27
6. To end the Real Time Test, press the START/STOP TEST button. (This page intentionally left blank)
28
Chapter 4
SETTINGS MENU
The PATI includes a menu that lets you set various parameters and obtain information for diagnostics and other operations. The photo below shows the six buttons along the bottom edge of the display that provide the functionality for navigating the menu.
1
The menu can be activated by first placing the PATI at an idle screen and then pressing the button marked 1. Once the menu is activated, the following icons will be displayed.
Icon
Displayed
Action
˄
Scrolls up; increases a value (for example when setting time or date).
˅
Scrolls down to the next menu item or option; decreases a value (for example when setting time or date).
˂
Scrolls to the left to select available options.
˃
Scrolls to the right to select available options.
Selects the current option; returns to the previous screen (and saves changes if changes were made).
ESC
Returns to the previous screen; nothing is saved. Exits the Menu.
29
MENU
Select Protocol CBRN Pass/Fail Settings 10000 Number of Exercises 5 Test Length 409 Sec Enter Count Mode
General Settings
Diagnostics
The following table lists the options and sub-options available in the Menu.
Menu Item
Options
Description
Select Protocol
Select the protocol to use for the Fit Tests.
Pass/Fail Settings
For information only. The Fit Test fails if the fit factor is below this setting. The number is determined by the protocol selected. No options are available.
Number of
Exercises
For information only. The number of exercises in the Fit Test. The number is determined by the protocol selected. No options are available.
Test Length
For information only. The total time a Fit Test will take. The number is determined by the protocol selected. No options are available.
Enter Count Mode
Displays the concentration count (#/cm3) currently being drawn through the clear sample tube. No options are available. Press ESC to exit when finished using Count Mode.
General Settings
View/change various settings for the instrument.
Contrast
Sets the contrast for the display: 0 (lowest contrast) 10 (highest contrast).
Show Fit
Factor
Enables/Disables viewing of the Fit Factor while testing. When Enabled, the Fit Factor and pass/fail are displayed. When Disabled, only pass/fail is displayed.
Set Time
Sets the time used to calculate service interval.
Set Date
Sets the date used to calcuate service interval.
Date
Format
Sets the date format. Options are MM/DD/YY or DD/MM/YY.
Number
Format
Sets the format of numbers. Options are: XX,XXX.YY or XX.XXX,YY.
Backlight
Sets the backlighting for the display. Options are Auto, Disable and Enable. Auto turns backlighting off during idle periods. Enable turns backlighting on. Disable turns backlighting off.
Beeper
Turns the audible beeper on or off. Enabled means the beeper is turned on. Disabled means the beeper is turned off.
Diagnostics
Displays information about the status of the instrument that might be useful when troubleshooting problems. There are no user settings available.
30
Chapter 5
TROUBLESHOOTING
This chapter lists a series of symptoms, their possible causes and recommended solutions for problems with the PATI. If your symptom is not listed, or if none of the solutions solves your problem, please contact TSI. Additional help is available from the TSI Web site www.tsi.com or by sending e-mail to
Always perform the System Check as the first troubleshooting step. Passing the System Check usually indicates that the PATI is working properly and that the problem is elsewhere, such as the connection to the respirator and/or the respirator itself.
On-line Troubleshooting Guides
Note
Additional application notes on troubleshooting are located on the FitPro+™ software CD or visit TSI’s website at http://fittest.tsi.com
Symptom Possible Causes Solution
“Service is
recommended”
Message appears
after warm-up.
The service interval for your instrument has expired
Return the instrument for service. See PATI Maintenance in Chapter 6.
“Service is required” message appears
after warm-up.
A critical operating parameter has been exceeded.
Return the instrument for service.
Ambient
Concentration Low message
Low on alcohol.
See also: Causes and Solutions for Low Alcohol Message
Twin Tube Assembly hoses are reversed on instrument.
Wrong hose is connected to respirator.
Twin Tube Assembly is kinked, pinched, or blocked.
Particle count in area really is low.
Plugged internal nozzle.
Replenish alcohol.
Verify the hoses are connected to the proper inlet ports on the
instrument.
Connect the proper (clear) tube to the respirator.
Straighten out the Twin Tube
Assembly or remove the obstruction.
Move to another location or use a particle generator (such as the 8026 Particle Generator).
See “Clearing The Nozzle” in
Chapter 6
31
Symptom Possible Causes Solution
Ambient
Concentration Low message (cont.)
PATI is flooded with alcohol.
Unit needs recalibration and cleaning.
Remove Alcohol Cartridge and install Storage Cap. Run 2 or more hours to dry optics.
Return the instrument for service.
Low Alcohol Message
Low on alcohol.
Excessive moisture build-up inside alcohol cartridge.
Inferior or contaminated alcohol
Operating beyond recommended ambient temperature range.
Replenish alcohol
Change wick inside alcohol cartridge; dump old alcohol from the Fill Capsule and add fresh alcohol.
Use only approved alcohol (99.5 % or better isopropyl).
Change wick inside alcohol cartridge; dump old alcohol from the Fill Capsule and add fresh alcohol.
Move to an environment which meets the instrument’s operating temperature range
Does not switch on
AC Adapter not plugged in to unit or AC outlet.
If operating instrument from battery power, battery is fully depleted.
Connect AC Adapter
Replace batteries
Low Battery message
If operating instrument from battery power, battery is nearly depleted.
AC adapter is malfunctioning.
Replace batteries
Replace AC adapter.
Zero Check fails (step of the System Check)
Alcohol Cartridge is loose. Twin Tube Assembly leaks. Zero check filter leaks.
Ends of Twin Tube Assembly are poorly sealed.
Twin Tube Assembly is
disconnected from the
instrument.
O-ring on alcohol cartridge is not sealing.
Inlet port fittings on PATI are loose.
Instrument slightly flooded with alcohol.
Unit needs recalibration and cleaning.
Tightly close the Alcohol Cartridge. Replace the Twin Tube Assembly. Repeat the test with a different filter.
Cut off the worn ends on the Twin Tube Assembly.
Connect the Twin Tube Assembly to the PATI.
Use the spare alcohol cartridge supplied in the kit.
Hand tighten fittings.
Remove Alcohol Cartridge and install Storage Cap. Run 2 hours to dry optics.
Return the instrument for service.
32
Symptom Possible Causes Solution
Maximum Fit Factor Check fails (step of the System Check)
Alcohol in nozzle
Instrument slightly flooded with alcohol.
Alcohol level is low.
Unit needs recalibration and cleaning.
See “Clearing The Nozzle” in
Chapter 6.
Remove Alcohol Cartridge and install Storage Cap. Run overnight to dry optics.
Replenish alcohol. See
“Adding Alcohol” in Chapter 2. Return the instrument for service.
Fit test fails
consistently.
NOTE: Verify the
PATI passes the
System Check. Then the problem is with the respirator, not the PATI.
Filters or canister not installed or not installed tightly
Respirator leaks, has loose filters, or a malfunctioning
exhalation valve.
Twin Tube Assembly is not connected to respirator.
Alcohol level is low.
Drink tube is blocked
Drink tube sampling adapter leaks.
Install filters or canister and properly tighten.
Repair or replace the respirator.
Connect the Twin Tube Assembly (clear tube) to the drink tube
sampling adapter.
Add alcohol to the PATI.
Blow out drink tube.
Replace drink tube sampling
adapter.
Requires frequent
refill of alcohol (every hour or less)
Moisture build-up inside Alcohol Wick.
Change wick inside alcohol cartridge; dump old alcohol from the Fill Capsule and add fresh alcohol.
Alcohol visible in Twin Tube Assembly or coming out of
Exhaust Port
PATI is flooded with alcohol.
Remove Alcohol Cartridge and install Storage Cap. Run overnight to dry.
Excessive moisture visible in twin tube assembly.
Condensation from breath or moisture from inside the twin tube assembly.
Replace twin tube assembly with a dry tube. Allow wet tube to dry before using it again (see Drying the Twin Tube Assembly in Chapter 6 ).
33
Symptom Possible Causes Solution
High Concentration message
A near-by particle generator is elevating ambient concentration levels.
The room ventilation system is reduced or turned off.
Ambient concentration is
naturally elevated,
Turn off or turn down any particle generators operating in the vicinity such as humidifiers or the Model 8026 Particle Generator.
Keep all forms of particle generation at least 6 ft (1.8 m) from the PATI during fit testing.
Increase room ventilation.
In situations where the ambient concentration is elevated through pollution, construction, or other means where it cannot be controlled, the PATI will continue to operate.
Note that prolonged exposure to excessive particle concentration levels could degrade the
performance of the PATI over time, requiring more frequent
maintenance.
34
Chapter 6
PATI MAINTENANCE
The PATI should be cleaned and recalibrated periodically. If the recommended service interval has expired a “Service is recommended” message will be displayed each time the unit is powered on and the warm-up sequence completes. PATI allows this message to be dismissed and the fit testing to continue. Schedule an instrument clean and calibration with your service provider.
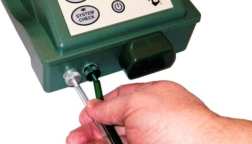
Clearing the Nozzle
In the event that the PATI gets alcohol in the internal nozzle, follow these steps:
1 Remove the alcohol cartridge from the PATI and place it in the alcohol fill capsule.
2 Install the storage cap into the cartridge cavity of the PATI.
3 Turn the PATI on and put it into Count Mode (see Settings Menu in
Chapter 4). Make certain that the HEPA filter is not attached to the twin tube assembly.
4 Place your thumb over the end of the sample
tube marked “SAMPLE” to stop the flow of air into the PATI. Stop the flow for about 10 seconds and then suddenly release it. Repeat these three or
four times.
Interrupting the Air Flow to Clear the Nozzle
5 Replace the alcohol cartridge in the PATI and conduct a System Check. If the System Check passes, continue Fit Testing.
6 If the System Check fails, remove the alcohol cartridge and install the storage cap in the cartridge cavity of the PATI. Allow the PATI to run in Count mode (see Settings Menu in Chapter 4) overnight. Then perform a System check (Chapter 3) to ensure that the system is operational. If the system is not operating, seek higher level support.
35
Changing the Alcohol Wick
Follow the instructions below to change the PATI alcohol wick. Spare wicks are included with the Model 8020M and are packaged in plastic sleeves. Each sleeve contains one wick and one screen. There is a wick removal tool (wood dowel) attached to each sleeve.
C a u t i o n
Always install a screen each time you install a new wick. Follow proper procedures when disposing of alcohol and alcohol soaked wicks. See Appendix A.
1 To remove the alcohol wick from the alcohol cartridge, grasp the cartridge with both hands, with your thumbs near the seam
toward the cap. Firmly apply
pressure to separate the alcohol cartridge into two pieces. The
alcohol cartridge will snap apart exposing the white alcohol wick.
Separating Alcohol Cartridge
2 After separating the two parts, push the alcohol wick and screen out of the wick retainer from the opposite end with the wick
removal tool.
Removing the Alcohol Wick and Screen
C a u t i o n
Before installing a new alcohol wick, make certain that all parts are clean. Small bits of the wick or lint can cause serious problems if they get into the PATI.
36
3 Inspect the inside surfaces of the alcohol cartridge and the wick
retainer.
4 Clean alcohol cartridge and wick retainer. See cleaning
procedures.
5 Remove a new wick and screen from the plastic sleeve. Blow air onto all surfaces of the new wick to make certain that any loose particles that may have shed from the wick are removed.
6 Drop the screen into the wick retainer and make sure it lies flat on the bottom of the wick retainer.
Inserting Screen
7 Slide alcohol wick into the wick retainer and push firmly until the alcohol wick is fully inserted.
8 Align the two parts of the alcohol cartridge and press them together firmly until they snap in place. If they do not snap in place easily then inspect the O-ring at the
joint. If the O-ring is very dry, wet it with a very small amount of
alcohol. It is not necessary to
remove the O-ring from the
cartridge.
9 Discard the old screen, empty sleeve and wick removal tool.
Dispose of the used wick
properly. See Appendix A.
Inserting Alcohol Wick into Wick Retainer
37
Cleaning the Storage Cap and Alcohol Cartridge
C a u t i o n
It is important that the storage cap and alcohol cartridge be kept clean at all times. Dirt, dust, and many other contaminants can have damaging effects on the operation of the PATI. Cleaning must be done with a lint-free applicator and reagent grade isopropyl alcohol.
1 Place several drops of reagent grade isopropyl alcohol on the applicator.
Applying Alcohol to Applicator
2 Wipe the contaminated areas of the storage cap and alcohol
cartridge with the applicator until the items are clean.
3 Replace the dirty applicator as required.
Cleaning the Alcohol Cartridge and Storage Cap
38
Drying the Twin Tube Assembly
C a u t i o n
∙ During repeated use of the PATI, moisture from the test subject’s breath may result in condensation inside the twin tube assembly which could be pulled into the PATI causing damage.
∙ Be careful not to lift the twin tube assembly when removing it in order to prevent moisture from draining into the PATI.
∙ Ensure that the moist twin tube assembly does not f20touch the ground during removal or drying.
1 Remove the moist twin tube assembly and replace it with a dry twin tube assembly.
2 Drape the moist twin tube assembly over an elevated, protruding object to allow drainage and drying of the moisture buildup inside the twin tube assembly.
Drying the Twin Tube Assembly
39
Trimming the Ends of the Twin Tube Assembly
Note
The twin tube assembly must never be shorter than 48 inches.
If the twin tube assembly ends become cracked, stretched or deformed, they can be trimmed.
1 Separate the twin tube assembly sample tube from the ambient tube by pulling them apart as far as required.
Separating the Twin Tube Assembly
2 With a sharp instrument, remove the bad ends of the twin tube
assembly by trimming an equal amount from the sample and
ambient tubes on the damaged ends.
3 Ensure that one end of the twin tube assembly contains evenly trimmed sample and ambient
tubes while the opposite end of the twin tube assembly contains a sample tube that is two inches longer than the ambient tube.
Trimming the Twin Tube Assembly
40
Appendix A
STORAGE, CARE AND DISPOSAL OF ALCOHOL AND WICKS
Unused portions of alcohol can be left in their original plastic bottles, recapped, and stored for later use.
Full or partly filled alcohol bottles which are no longer needed must be properly disposed of using local procedures for disposal of liquid flammable wastes. Waste alcohol should be placed in a suitable, properly marked, flammable waste container and returned to a designated disposal collection area, according to your local standard operating procedure (SOP).
Alcohol soaked wicks must be properly disposed of using local procedures for disposal of liquid flammable wastes. Waste wicks should be placed in a suitable, properly marked, flammable waste container and returned to a designated disposal collection area, according to your local SOP.
W A R N I N G
Isopropyl alcohol is a hazardous material. DO NOT allow alcohol to get into your eyes. Avoid contact with the skin. DO NOT swallow or ingest in any way. Alcohol is extremely flammable. DO NOT expose to open flame or source of ignition. Refer to the Material Safety Data Sheet (MSDS) on the following pages for safety precautions.
41
42
43
44
45
46
47
48
49
50
51
TSI Incorporated – Visit our website www.tsi.com for more information.
USA Tel: +1 800 680 1220 UK Tel: +44 149 4 459200 France Tel: +33 1 41 19 21 99 Germany Tel: +49 241 523030
India Tel: +91 80 67877200 China Tel: +86 10 8219 7688 Singapore Tel: +65 6595 6388
P/N 1980132 Rev. P ©2019 TSI Incorporated Printed in U.S.A.
[xyz-ips snippet=”download-snippet”]