TST Tire Pressure Monitoring System User Guide
MONITOR YOUR TIRES FROM THE DRIVER’S SEAT
Real time tire temperature and pressure readings are transmitted directly to our display. Increased awareness brings increased safety, tire life and fuel economy.
WHAT SETS TST TPMS KITS APART?
- Full Color Wide Screen Display
- Factory Installed Repeater & Internal Sensors
- Monitors 1 power unit, 4 Trailers and 115 Tires
- Audible, Visual and Textual Alerts
- 3 Year Warranty
- Lifetime Customer Support
WHAT’S INSTALLED ON YOUR RV?
- REPEATER Boosts sensor signal to display
- INTERNAL SENSOR Securely mounted inside the wheel/tire assembly
NEXT STEPS: PAIR AND ACTIVATE YOUR PRODUCT
MY RV CAME WITH A DISPLAY
Please follow these instructions to get paired, activated and on the road!: Sensor Installation & Pairing
- Internal, banded sensors are mounted on the wheel at the factory, 180º from the valve stem.
- In some applications, your sensors may be externally installed on the valve stem.
- See instructions on page 2 of this brochure for pairing sensors to Display.Activate your Product Warranty
MY RV CAME WITHOUT A DISPLAY
Contact an authorized TST Dealer to purchase a TST TPMS Display.
- Return to the Dealer where you purchased your RV.
- Email TST at to locate an authorized TST Dealer.
- Call (770) 889-9102 to speak with TST Customer Support.
Sensor Installation & Pairing
- Internal, banded sensors are mounted on the wheel at the factory, 180º from the valve stem.
- In some applications, your sensors may be externally installed on the valve stem.
- See instructions on page 2 of this brochure for pairing sensors to Display.Activate your Product Warranty
I HAVE QUESTIONS OR NEED SUPPORT
WEB: www.TSTtruck.com/product-supportEMAIL: s[email protected]PHONE: (770) 889-9102HOURS: Monday-Friday 9am-8pm,Saturday 9am-2pm (EST)
YOUR SYSTEM IS EXPANDABLE!
See the back cover of this guide for additional information.
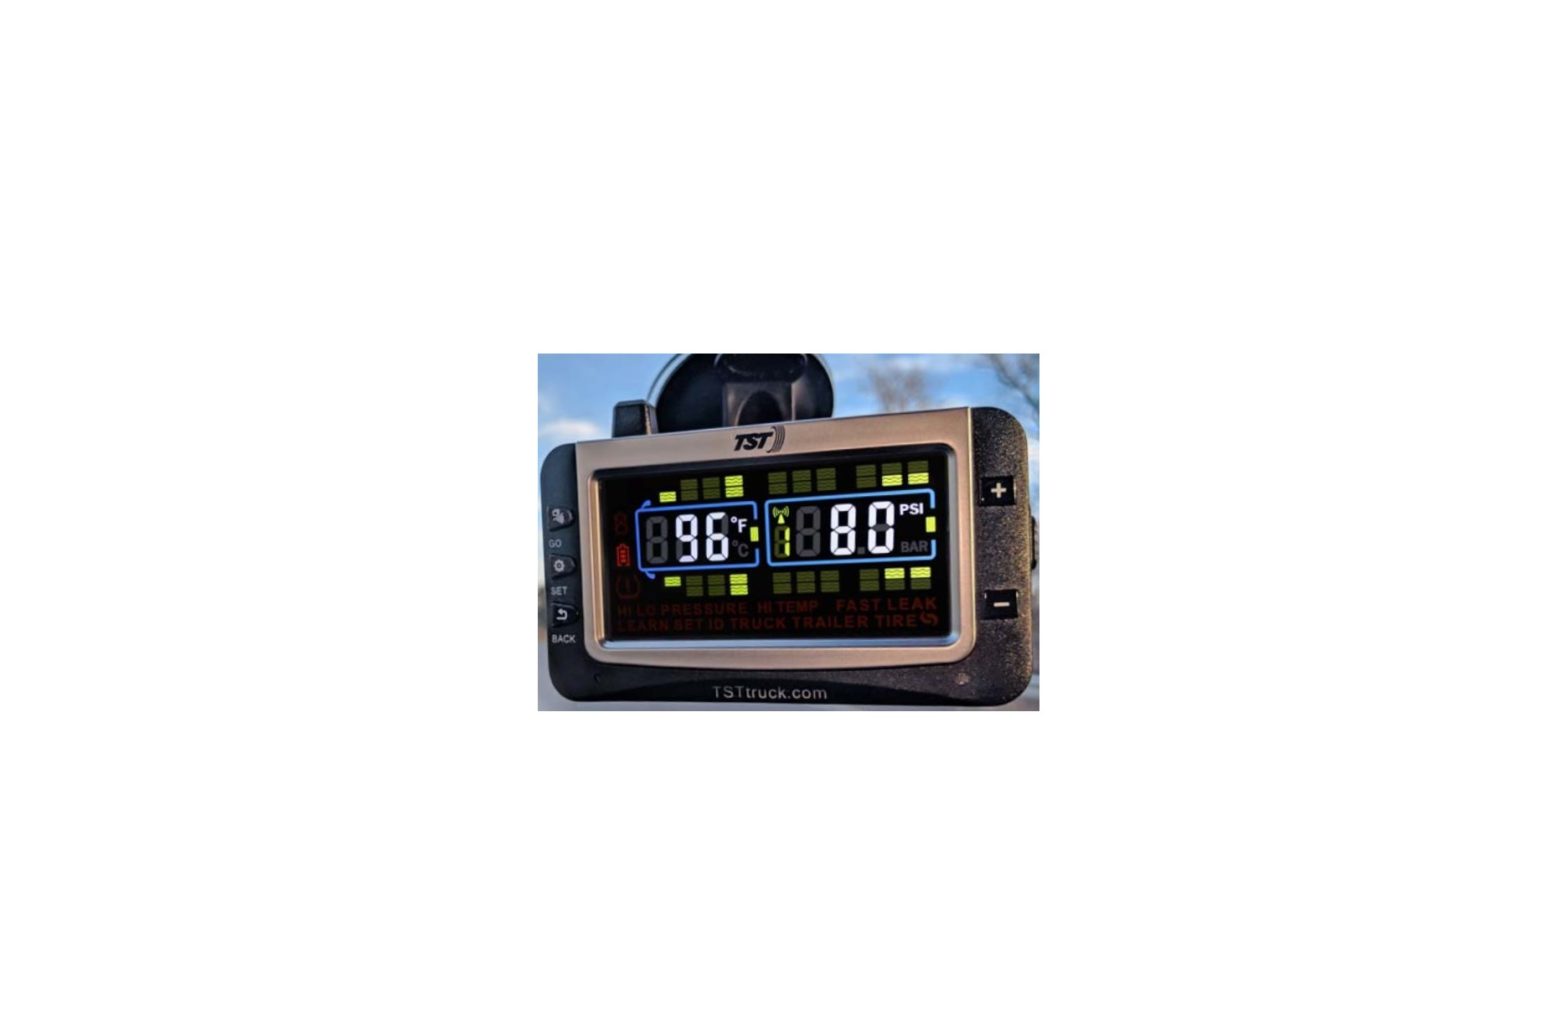
PROGRAMMING YOUR TST TIRE PRESSURE MONITORING SYSTEM
Power ON the display. The ON/OFF switch is on the right side of the display.
PROGRAM SENSORS TO DISPLAY
- Press and hold SET until it beeps. Display is now in programming mode. The words HI PRESSURE SET will appear at the bottom of the screen. Press 5 times to scroll through the parameters until LEARN ID appears.
- Press and release SET . The first tire on the display will blink. Press to move to the desired tire position. Press and release SET again and FFF FFF will blink. Hold the Display next to the sensor for that tire position (see diagram for Internal Sensor position). Press and release GO . ID LF will appear on the screen, then the 6 digit sensor ID code will appear. Press and release SET to save the code to that tire position. When coded correctly, a six (6) digit unique code will be displayed (You may record this code by wheel position using the Sensor Code Diagram included with this guide).
- Use + to move to the next tire position to be programmed. Repeat Step 2 until all sensors have been programmed.
- When complete, press and release BACK twice to return to the main screen (the sensors will begin reading 0 pressure and an alarm will sound. This is part of the normal setup process Press + to silence the alarm while continuing the setup).
SET THE FOLLOWING BEFORE PAIRING SENSORS: PRESSURE UNITS
Note: Default setting is PSI.
To change the Pressure Unit, press and hold SET until it beeps. Press + three (3) times and SET will appear at the bottom of the screen and BAR and PSI will be blinking on the screen. Press and release SET again, then use to select BAR or PSI. Press SET again to save. Press and release BACK to go to the Main Screen.
TEMPERATURE UNITSNote: Default setting is °F.
To change the Temperature Unit, press and hold SET until it beeps. Press + four (4) times and SET will appear at the bottom of the screen and °F and °C will be blinking on the screen. Press and release SET again, then use to select °F or °C. Press and release SET again to save. Press and release BACK 2 times to go to the Main Screen.
HIGH TEMPERATURE ALARMNote: Default setting is 158°F (70º C).We recommend that you do not change the temperature alarm setting.To set the High Temperature Alarm, press and hold SET until it beeps. Press twice and HI TEMP SET will appear. Press and release SET again, then use or to adjust the High Temperature Alarm, if desired. Press and release SET to save. Press and release BACK 2 times to go to the Main Screen.
LOW PRESSURE ALARM
Note: If the vehicle recommended tire pressure is below 100 PSI, the Low Pressure Alarm must be set first, then set the High Pressure Alarm. The High Pressure Alarm cannot go below the default Low Pressure Alarm of 100 PSI until the Low Pressure Alarm is reduced.
To set up the Low Pressure Alarm, press and hold SET until it beeps. Press + once and LOW PRESSURE SET will appear. Press and release SET , then press and release GO to select the appropriate axle. Press + or – to adjust the Low Pressure Alarm 10% below your normal tire pressure for that axle. Press and release GO to move to the next axle. For a trailer setup, see below.*
HIGH PRESSURE ALARMTo set up the High Pressure Alarm, press and hold SET until it beeps.
HI PRESSURE SET will appear at the bottom of the screen. Press and release SET , then press and release GO to select the appropriate axle. Press or to adjust the High Pressure Alarm to 25% over your normal tire pressure for that axle. Press and release GO to move to the next axle. When finished setting each axle, press and release SET to save. Press and release BACK 2 times to go to the Main Screen. For a trailer setup, see below.**Trailer setup – Up to four trailers can be configured to a single display. When you get to the trailer section of the display, all the trailer axles on that section will flash in groups of three. You can set the High & Low Pressure Alarms for that group. Press and release GO to move to the next group or the next trailer. The trailer number will appear in the middle of the screen (#1 to #4). Press and release SET to save settings. Press and release BACK 2 times to return to the Main Screen.
REPEATER INSTALLATION
- The repeater is used to boost the sensor signal. A repeater is factory installed with this system.
- The repeater is wired to a 12V source that will be constant while driving. The red light on the repeater will illuminate “constant or blinking” (the repeater will illuminate with a constant light when power is applied, once the display is on and the sensors are reporting. The light will blink when transmitting information to the display).No additional setup is needed for the repeater
EXTERNAL CAP SENSOR INSTALLATION – After Programming
- Hand-tighten the corresponding sensor on the valve stem for that tire position until the air stops leaking, then tighten 1/4 turn further.
- DO NOT OVER TIGHTEN!
FREQUENTLY ASKED QUESTIONS
WHAT DO I DO IF MY SENSOR IS NOT READING?
- If your sensor is not transmitting data to the display, try recoding the sensor to the same tire position using the “PROGRAM SENSORS TO DISPLAY” instructions on the previous page.
- If after repeated attempts, and you think it may be a sensor issue please contact Customer Support using the information below.
WHY DOES MY DISPLAY SOMETIMES “DROP” SENSOR DATA FROM A TIRE POSITION?
Be aware that an indoor/outdoor thermometer with an external temperature sensor may interfere with the TST TPMS. Temporarily remove all the batteries in the temperature display AND exterior temperature sensor and see if the problem is corrected. A thermometer with a higher frequency (915 MHZ) may be required. Atomic clocks can also cause interference with the sensors.
WHY DOES MY DISPLAY SOMETIMES ALARM WHILE I AM SITTING STILL IN THE EVENING?
As night approaches and outdoor temperatures decrease, your tire pressures may drop below the parameters you have set, thus causing an out of spec alarm. When temperatures drop, turn your display off overnight. As the air temperature rises the next day or as you start driving, the tires will also heat up and come back into your parameters.
WHY CAN’T I SET A LOWER PRESSURE THAN 100 PSI FOR THE HIGH OR LOW PRESSURE ALARM?The high-pressure alarm cannot go lower than the low-pressure alarm setting. If your tire pressure settings are below 100 PSI, you must first set the low-pressure alarm settings and then set the axles’ high-pressure settings. When done, be sure to press and release the “SET” button to save all the parameter settings.
WHAT CONDITIONS CAUSE THE DISPLAY TO ALARM?The display will alarm for the following reasons:
- A rapid leak of 2 psi per minute or greater (FAST LEAK at bottom of screen).
- A low sensor battery (upper left battery icon flashes).
- An overheating tire, increasing the temperature (HIGH TEMP at bottom of screen).
- A high or low-pressure reading (be sure your parameters are set correctly).In every instance, the tire Pressure and Temperature numbers will also flash when the tire with the problem blinks.
HOW DO I REMOVE MY TRAILER FROM THE DISPLAY SCREEN WHEN I AM NOT USING IT?To electronically disconnect the trailer tire icons from the screen:
- Momentarily press the GO and + buttons.
- The trailer section on the display will disappear.
- To electronically reconnect the trailer section, momentarily press the GO and buttons again.
HOW DO I REMOVE MY TOWING VEHICLE FROM THE DISPLAY SCREEN WHEN IT IS PARKED?To electronically disconnect the towing vehicle tire icons from the screen:
1. Momentarily press and hold the GO and + buttons.2. The towing vehicle section on the display will disappear.3. To electronically reconnect the towing vehicle section, momentarily press the GO and + buttons again.
HOW DO I REMOVE AN UNWANTED TIRE ICON FROM THE DISPLAY?To delete a single sensor code press and hold SET until it beeps (approx. 3 seconds). Press and scroll through the parameters until LEARN ID appears. Press and release SET . Use or to scroll to the tire you wish to remove. Press and release SET to select that tire. It will start flashing. Press and hold BACK for 3 seconds. You will hear 3 beeps. The code will change to FFF FFF which will be flashing. Press and release SET . The flashing will stop and the ID code will be deleted. To cancel the function, press and release BACK 2 times.
HOW DO I DELETE ALL TIRE CODES FOR MY DISPLAY?To delete all of the tire codes when in the LEARN ID mode: Press and hold the BACK button until you hear 6 beeps. DEL ALL. will appear on the screen. Press and release SET . You will hear one beep. FFF FFF will appear. ALL ID codes are deleted. To return to the main screen, press and release BACK 2 times.
CUSTOMER SUPPORT INFORMATION:
WEB: www.TSTtruck.com/product-supportEMAIL: s[email protected]
PHONE: (770) 889-9102HOURS: Monday-Friday 9am-8pm, Saturday 9am-2pm (EST)
YOUR TPMS SYSTEM IS EXPANDABLE!
- Your TST TPMS System is expandable to include all of your tire monitoring needs:
- In addition to your RV, you can add sensors to your Tow Vehicle, Boat Trailer, ATVs, Side-by-sides & other “Toys”
- Easy Installation Kits Come Complete with Everything You Need
- User-Replaceable Batteries on Cap & Flow-thru Sensors
- Sensors Do Not Lose Code Lock when Changing Batteries
- All sensors are compatible with each other so you can mix & match for your specific application
Contact your selling dealer or search for TST TPMS on the web for more ways to add to your system!
A SENSOR FOR EVERY APPLICATION
ALL TST products are compatible with your factory installed TPMS!
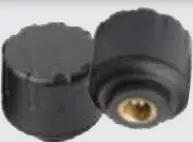
- CAP SENSOR Up to 2 Year Battery Life with User Replaceable Batteries

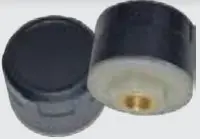
- FLOW-THRU SENSOR Add Air to your Tires without Sensor Removal
- HYBRID SENSOR Light, Compact Water Resistant Sensors
- INTERNAL SENSOR Securely Mounted Inside the Wheel/Tire Assembly
- 5th Wheels
- Side-by-sides, ATVs & other Toys!
- Marine Trailers
- Motorhomes, RVs & Tow Vehicles
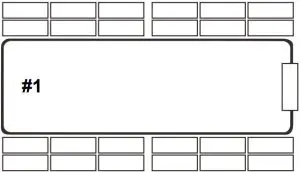
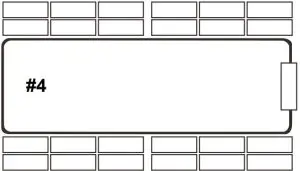
- SENSOR CODE DIAGRAM After pairing your sensors, you may record their 6 digit code (or sensor number) by wheel position using these RV/Tow Vehicle and Trailer diagrams. This allows you to know which sensor is programmed to which tire position at a glance.


 report this ad
CUSTOMER SUPPORT INFORMATION:WEB: www.TSTtruck.com/product-supportEMAIL: [email protected]PHONE: (770) 889-9102HOURS: Monday-Friday 9am-8pm,Saturday 9am-2pm (EST)
References
[xyz-ips snippet=”download-snippet”]