
![]()
Cardio Fit Bike B35
GB USER MANUAL ……………………. 3 – 12

User Manual · Cardio Fit Bike B35 GB
Contents
WELCOME …………………………… 3SAFETY WARNINGS ………….. 3ASSEMBLY …………………………… 4Parts out of box ……………………… 4Hardware kit ………………………….. 4General assembly information . 4Assembly steps …………………….. 5USE ……………………………………… 7Adjusting the level pads ……….. 7Handlebar setup …………………… 7Adjusting the vertical seat position ….. 7WORKOUTS …………………….. 7Pulse rate measurement ……… 8Maximum heart rate …………… 8USER INTERFACE …………. 8Functional button ……………… 8Functions and operations ….. 9Specifications ……………………. 9Extra notes ………………………. 10Adjusting resistance …………. 10EXERCISE INSTRUCTIONS …. 10The warming up phase ….. 10The exercise phase ………… 10The cool down phase ……. 11Muscle toning ……………….. 11Weight loss ……………………. 11ADDITIONAL INFORMATION … 11Care and maintenance ………….. 11LIMITED WARRANTY …….. 12Ordering replacement parts …. 12TRANSPORT AND STORAGE … 12DISCLAIMER ……………………. 12
SPECIFICATIONS ……………. 78Parts list ………………………………. 79Exploded view ……………………. 80
Welcome
Welcome to the world of Tunturi New Fitness! Thank you for purchasing this piece of Tunturi equipment. Tunturi offers a wide range of fitness equipment, including cross trainers, exercise bikes, and rowers. But also stationary multigym stations, benches, dumbbells and much more. The Tunturi equipment is suitable for the entire family, no matter what fitness level. For more information, please visit our website www.Tunturi.com
Safety warnings
WARNING![]() Read the safety warnings and the instructions. Failure to follow the safety warnings and the instructions can cause personal injury or damage to the equipment. Keep the safety warnings and the instructions for future reference.
Read the safety warnings and the instructions. Failure to follow the safety warnings and the instructions can cause personal injury or damage to the equipment. Keep the safety warnings and the instructions for future reference.
WARNING![]() Heart rate monitoring systems may be inaccurate. Over exercise may result in serious injury or death. If you feel faint stop exercising immediately.
Heart rate monitoring systems may be inaccurate. Over exercise may result in serious injury or death. If you feel faint stop exercising immediately.
- The equipment is suitable for home use only Max. usage is limited to 2 hrs a day. The equipment is not suitable for full commercial use (e.g. large gyms).
- The use of this equipment by children or persons with a physical, sensory, mental or motorial disability, or lack of experience and knowledge can give cause to hazards. Persons responsible for their safety must give explicit instructions or supervise the use of the equipment.
- Before starting your workout, consult a physician to check your health.
- If you experience nausea, dizziness or other abnormal symptoms, immediately stop your workout and consult a physician.
3
![]()
- To avoid muscular pain and strain start each workout by warming up and finish each workout by cooling down. Remember to stretch at the end of the workout.
- The equipment is suitable for indoor use only. The equipment is not suitable for outdoor use.
- Only use the equipment in environments with adequate ventilation. Do not use the equipment in draughty environments in order not to catch a cold.
- Only use the equipment in environments with ambient temperatures between 10 °C and 35 °C. Only store the equipment in environments with ambient temperatures between 5 °C and 45 °C.
- Do not use or store the equipment in humid surroundings. The air humidity must never be more than 80%.
- Only use the equipment for its intended purpose. Do not use the equipment for other purposes than described in the manual.
- Do not use the equipment if any part is damaged or defective. If a part is damaged or defective, contact your dealer.
- Keep your hands, feet and other body parts away from the moving parts.
- Keep your hair away from the moving parts.
- Wear appropriate clothing and shoes.
- Keep clothing, jewellery and other objects away from the moving parts.
- Make sure that only one person uses the equipment at a time. The equipment must not be used by persons weighing more than 110 kg (242 lbs).
- Do not open equipment without consulting your dealer.
Assembly
PARTS OUT OF BOX

HARDWARE KIT

 The package contains the fasteners as shown in figure.
If a part is missing, contact your dealer
GENERAL ASSEMBLY INFORMATION
WARNING
- Assemble the equipment in the given order.
- Carry and move the equipment with at least two persons.
4 User Manual · Cardio Fit Bike B35
User Manual · Cardio Fit Bike B35 GB
CAUTION
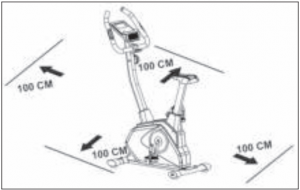
- Place the equipment on a firm, level surface.
- Place the equipment on a protective base to prevent damage to the floor surface.
- Allow at least 100 cm of clearance around the equipment.
Refer to the illustrations for the correct assembly of the equipment.
ASSEMBLY STEPS
Assembly step 1

- Fit front stabilizer by using the shown hardware.
- Fit rear stabilizer by using the shown hardware.
Remark:First put all screws/ bolts in correct place before tightening them fully.
Assembly step 2
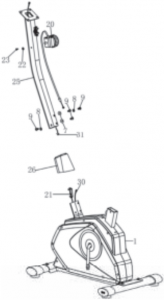
- Place the resistance adjustment knob on its place and attach it to the front tube with a screw from the other side of the front tube.
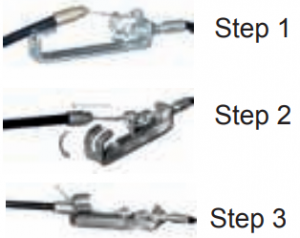
- Connect the wires from upright tube and main frame and hook up the tension cable as shown in pictures below (set tension knob to max. level to ease the cable connection) before sliding the upright tube in position.
- Use the enclosed Allen key to tighten the fastening screws, turning them clockwise.
Remark:First put all screws/ bolts in correct place before tightening them fully.
5
![]()
Assembly step 3
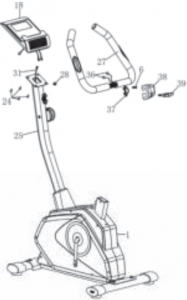
- Lead the wires for hand pulse reading through the hole towards the display assembly opening.
- Fit the handlebar to the upright tube by using the shown hardware.
Remark:First put all screws/ bolts in correct place before tightening them fully.
- Connect the hand pulse wires and data cable with the console.
- Fix the console to the console bracket.
Remark:Avoid the wires to damage during assembly
Assembly step 4
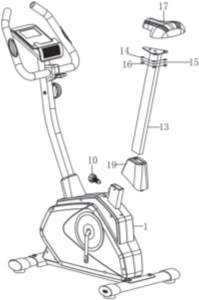
- Fix seat to the seat tube
- Fit seat tube cover on seat tube before sliding the seat tube into main frame.
- Secure seat tube with the seat height adjustment knob.
Remark:First put all screws/ bolts in correct place before tightening them fully.
6 User Manual · Cardio Fit Bike B35
User Manual · Cardio Fit Bike B35 GB
Assembly step 5
Remark:There is a marker for Right (R) and Left (L) pedal in pedal axle.
- Fix Left pedal to the crank arm by turning in counter clock wise direction.
- Fix Right pedal to the crank arm by turning in the clock wise direction.
Remark:Make sure the pedals are tightened fully.
Use
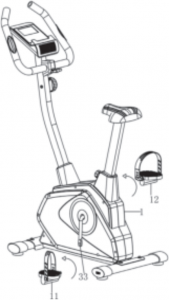
ADJUSTING THE LEVEL PADSThe equipment is equipped with 2 level pads on If the equipment is not stable, the level pads can be adjusted.
- Turn the level pads (located on rear stabilizer tube) as required to put the equipment in a stable position.
HANDLEBAR SETUP
- Loosen the locking screw on the front of the handlebar support and find the right angle at which to position the handlebar.
- Tighten the locking screw.
ADJUSTING THE VERTICAL SEAT POSITIONThe vertical seat position can be adjusted by setting the seat tube to the required position. With the leg almost straight, the arch of the foot must touch the pedal at its lowermost point.
- Loosen the seat tube adjustment knob. ( Turn CCW )
- Move the seat tube to the required position.
- Fix the seat tube adjustment knob. (Turn CW )
Remark:
- Always make sure that the locking knob is properly fastened before starting to exercise!
- Do not exceed the maximum seat height adjustment. “Stop” mark on seat tube indicates the maximum height.
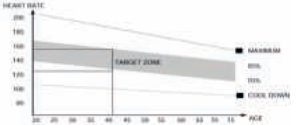
WorkoutsThe workout must be suitably light, but of long duration. Aerobic exercise is based on improving the body’s maximum oxygen uptake, which in turn improves endurance and fitness. You should perspire, but you should not get out of breath during the workout. To reach and maintain a basic fitness level, exercise at least three times a week, 30 minutes at a time. Increase the number of exercise sessions to improve your fitness level. It is worthwhile to combine regular exercise with a healthy diet. A person committed to dieting should exercise daily, at first 30 minutes or less at a time, gradually increasing the daily workout time to one hour. Start your workout at low speed and low resistance to prevent the cardiovascular system from being subjected to excessive strain. As the fitness level improves, speed and resistance can be increased gradually. The efficiency of your exercise can be measured by monitoring your heart rate and your pulse rate.
7
![]()
PULSE RATE MEASUREMENT(hand pulse sensors)The pulse rate is measured by sensors in the handlebars when the user is touching both sensors at the same time.
![]() WARNING
WARNING
Heart rate monitoring systems may be inaccurate. Over exercise may result in serious injury or death. If you feel faint stop exercising immediately.
Most accurate pulse measurement is achieved when the skin is slightly moist and constantly touching the hand pulse sensors. If the skin is too dry or too moist, the pulse rate measurement might become less accurate.
MAXIMUM HEART RATE(during training)The maximum heart rate is the highest heart rate a person can safely achieve through exercise stress. The following formula is used to calculate the average maximum heart rate: 220 – AGE. The maximum heart rate varies from person to person.
![]() WARNING
WARNING
Make sure that you do not exceed your maximum heart rate during your workout. If you belong to a risk group, consult a physician.
Beginner: (50-60% of max. heart rate) Suitable for beginners, weight-watchers, convalescents and persons who have not exercised for a long time. Exercise at least three times a week, 30 minutes at a time.
Advance: (60-70% or max. heart rate) Suitable for persons who want to improve and maintain fitness. Exercise at least three times a week, 30 minutes at a time.
Expert: (70-80% or max. heart rate) Suitable for the fittest of persons who are used to long-endurance workouts.
User interface
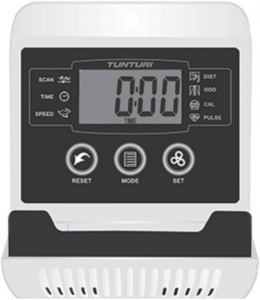
FUNCTIONAL BUTTON
MODE
- Press MODE button to select console functions; TIME, SPEED, DISTANCE, ODOMETER, CALORIES, PULSE.
- Push and hold for 4 seconds to reset: TIME, DISTANCE, CALORIES and PULSE.
SETSet the values for: TIME, DISTANCE, CALORIES and PULSE, when not in scan mode.
- Press SET button to set console in goal input mode.
- Press MODE to select goal you like to set. (the selected goal will blink when able to set value.)
- Press SET Button to higher the goal input, hold SET button for 3 seconds to automatically higher the value fast. Press SET button shortly to stop Automatically higher the value.
- Press RESET button shortly to reset the changed selected goal.
- Press MODE Button to active next optional goal to be set.1st goal to be set is: TIME+ 1 min ( 1 ~ 99)2nd goal to be set is: SPEEDcannot change ( max. 99,9 KM/H)3rd goal to be set is: DIST
8 User Manual · Cardio Fit Bike B35
User Manual · Cardio Fit Bike B35 GB
+ 0,5KM ( 0,5KM ~ 99,50KM )4Th goal to be set is; ODOcannot change ( max. 999,9 KM)5th goal to be set is: CAL+ 1 ( 1 ~ 999 )6th Limit to be set is: PULSE+ 1 ( 40 ~ 240 )
NOTE:
- When you set a goals the set goal value will count down in active mode.
- When goal is reached the console will notify by 4 dual acoustic beep signals. The reached value will now count up starting from “0”.
- You can set more than one goal, all goals will notify when goal is reached.
- When you set a limit for pulse, the console will notify by a continues triple acoustic beep signal when exceed the set limit.
RESET
- Push and hold for 4 seconds to reset: TIME, DISTANCE, CALORIES and PULSE.
NOTE:ODOMETER can only be reset by a batteries exchange.
FUNCTIONS AND OPERATIONS
SCANAutomatically scan functions for : TIME, SPEED, DISTANCE, ODOMETER, CALORIES and PULSE.Each display will be hold 4 seconds
TIMEAutomatically accumulates workout time when exercising.
SPEEDDisplay current speed when exercising.
DISTANCEAutomatically accumulates the distance from exercise when exercising.
CALORIEAutomatically accumulates calories burnt when exercising.
ODOMETERAutomatically accumulates the Total distance for all exercise sessions.
PULSE RATEDisplay current heart rate if measured.
Before measuring your pulse rate, please place your palms of your hands on both of your contact pads and the monitor will show your current heart beat rate in beats per minute(BPM) on the LCD after 6~7 seconds.
Remark: During the process of pulse measurement, because of the contact jamming, the measurement value may be higher than the virtual pulse rate during the first 2~3 seconds, then will return to normal level. The measurement value cannot be regarded as the basis of medical treatment.
NOTE:
- If the display is faint or shows no figures, please replace the batteries.
- The monitor will automatically shut in standby mode if there is no signal received after 4 minutes.
- The monitor will be auto-powered on when starting to exercise or at the push of a button.
- The monitor will automatically start calculating when you start to exercise and will stop calculating when you stop exercising for 4 seconds.
SPECIFICATIONS:
Function
- Auto scan Every 4 seconds
- Time 0:00 ~ 99:59
- Current speed The maximum speed to be displayed is 99,9 KM/H
- Trip Distance 0.00 ~ 99.99 KM
- Calories 0.0 ~ 999.9 K.Cal
- ODO 0.1 ~ 999.9 KM
- Pulse rate 40 ~ 240 BPM
9
![]()
Battery type 2 pcs AA typeOperating Temperature 0°C ~ +40°CStorage Temperature -10°C ~ +60°C
EXTRA NOTES
- If the display is faint or shows no figures, please replace the batteries.
- The monitor will automatically shut off if there is no signal received after 4 minutes.
- The monitor will be auto-powered on when starting to exercise push button w/signal in.
- The monitor will automatically start calculating when you start to exercise and will stop calculating when you stop exercising for 4 seconds .
ADJUSTING RESISTANCETo increase or decrease resistance, turn the adjustment knob at the top of the handlebar support tube clockwise (+ direction) to increase resistance and counterclockwise (- direction) to decrease resistance.The scale above the knob (1-8) helps you find and reset a suitable resistance.
Exercise InstructionsUsing your fitness trainer will provide you with several benefits, it will improve your physical fitness, tone muscle and in conjunction with a calorie controlled diet help you lose weight.
THE WARMING UP PHASEThis stage helps get the blood flowing around the body and the muscles working properly. It will also reduce the risk of cramp and muscle injury. It is advisable to do a few stretching exercises as shown below. Each stretch should be held for approximately 30 seconds, do not force or jerk your muscles into a stretch – if it hurts, STOP.
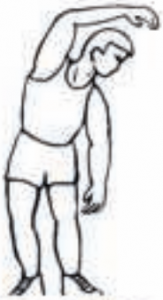

SIDE BENDS Forward Bends
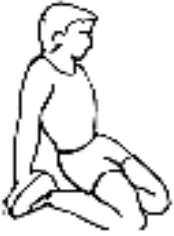
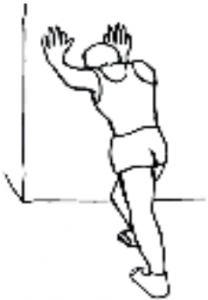
Outer Thigh Calf Achilles
THE EXERCISE PHASEThis is the stage where you put the effort in. After regular use, the muscles in your legs will become more flexible. Work to your but it is very important to maintain a steady tempo throughout. The rate of work should be sufficient to raise your heart beat into the target zone shown on the graph below.
This stage should last for a minimum of 12 minutes though most people start at about 15-20 minutes
10 User Manual · Cardio Fit Bike B35
User Manual · Cardio Fit Bike B35 GB
THE COOL DOWN PHASEThis stage is to let your Cardio-vascular System and muscles wind down. This is a repeat of the warm up exercise e.g. reduce your tempo, continue for approximately 5 minutes. The stretching exercises should now be repeated, again remembering not to force or jerk your muscles into the stretch. As you get fitter you may need to train longer and harder. It is advisable to train at least three times a week, and if possible space your workouts evenly throughout the week.
MUSCLE TONINGTo tone muscle while on your fitness trainer you will need to have the resistance set quite high. This will put more strain on our leg muscles and may mean you cannot train for as long as you would like. If you are also trying to improve your fitness you need to alter your training program. You should train as normal during the warm up and cool down phases, but towards the end of the exercise phase you should increase resistance making your legs work harder. You will have to reduce your speed to keep your heart rate in the target zone.
WEIGHT LOSSThe important factor here is the amount of effort you put in. The harder and longer you work the more calories you will burn. Effectively this is the same as if you were training to improve your fitness, the difference is the goal.
Additional information
PACKAGING DISPOSAL ![]()
Government guidelines ask that we reduce the amount of waste material disposed of in land fill sites. We therefore ask that you dispose of all packaging waste responsibly at public recycling centres.
END OF LIFE DISPOSAL 
We at Tunturi hope you enjoy many years of enjoyable use from your fitness trainer. However, a time will come when your fitness trainer will come to the end of its useful life. Under `European WEEE Legislation you are responsible for the appropriate disposal of your fitness trainer to a recognised public collection facility.
CARE AND MAINTENANCE
- Inspect and tighten all parts before using the fitness trainer.
- The fitness trainer can be cleaned using a damp cloth and mild nonabrasive detergent. DO NOT use solvents.
- Examine the fitness trainer regularly for signs of damage or wear.
- Failure to examine the fitness trainer regularly may affect the safety level of the equipment.
- Replace any defective components immediately and/or keep the fitness trainer out of use until repair.
11
![]()
Limited warrantyTunturi warrants this product to be free from defects in workmanship and material, under normal use and service conditions, for a period of one year from the date of purchase. This warranty extends only to the original purchaser. Tunturi’s obligation under this Warranty is limited to replacing damaged or faulty parts at Tunturi’s option. All returns must be pre authorised by Tunturi. This warranty does not extend to any product or damage to a product caused by or attributable to freight damage, abuse, misuse, improper or abnormal usage, purchasers own repairs or for products used for commercial or rental purposes. No other warranty beyond that specifically set forth above is authorized by Tunturi. Tunturi is not responsible or liable for indirect, special or consequential damages arising out of or in connection with the use or performance of the product or other damages with respect to any economic loss, loss of property, loss of revenues or profits, loss of enjoyments or use, costs of removal, installation or other consequential damages or whatsoever natures. The warranty extended hereunder is in lieu of any and all other warranties and any implied warranties of merchantability or fitness for a particular purpose is limited in its scope and duration to the terms set forth herein. Your statutory rights are not affected.
ORDERING REPLACEMENT PARTSDefects and malfunctions Despite continuous quality control, defects and malfunctions caused by individual parts can occur in the equipment. In most cases, it will be sufficient to replace the defective part.
- If the equipment does not function properly, immediately contact the dealer.
- Provide the model number and the serial number of the equipment to the dealer.State the nature of the problem, conditions of use and purchase date.
Transport and storage
![]() WARNING
WARNING
Carry and move the equipment with at least two persons.
- Remain standing in front of the equipment on each side and take a sturdy grip at the handlebars. Lift the front of the equipment so as to lift the rear of the equipment on the wheels. Move the equipment and carefully put the equipment down. Place the equipment on a protective base to prevent damage to the floor surface.
- Move the equipment carefully over uneven surfaces. Do not move the equipment upstairs using the wheels, but carry the equipment by the handlebars.
- Store the equipment in a dry place with as little temperature variation as possible.
Disclaimer
2016 Tunturi New Fitness B.V. All rights reserved
The product and the manual are subject to change. Specifications can be changed without further notice
12 User Manual · Cardio Fit Bike B35
Specifications
ProductOperating system ….Manual AdjustmentFlywheel weight …………………………4 kgRotating mass …………………………..7 kgPower supply …….2 x AA type batteriesMax user weight ………. 110 kg / 242 lbs.
MonitorDisplay size ………………….LCD ( 49×24)Display type ………………… monochromeResistance level ……………………………. 8Programs total ……………………………….-Quick start/ manual ……………………….. 1
FunctionsAuto Scan ……………….Every 4 secondsRunning time ………………. 00:00 ~ 99:59Current speed ……….. 1,9 ~ 99,9 KM/ HTrip distance ……………0,00 ~ 99,99 KMCalories …………………. 0,1 ~ 999,9 Kcal.ODO …………………………0.1 ~ 999,9 KMPulse rate ………………….. 40 ~ 240 BPM
ErgonomicsHandlebar ……………………….AdjustableContact heart rate …………………….. YesTelemetric hr receiver …………………… –Bottle holder ………………………………… –Transport wheels ……………………… Yes
QualityOperating environment …………….HomeEn-957 class ……………………………… HC
78 User Manual • Cardio Fit Bike B35
User Manual • Cardio Fit Bike B35 GB
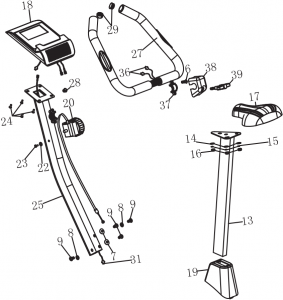
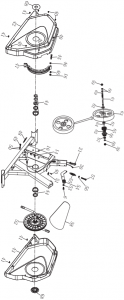
PARTS LIST
Part No. Description Qty1 Main frame 12 Front stabilizer 13 Rear stabilizer 14L/R End cap for front stabilizer L/R 1/15 End cap for rear stabilizer 26 Allen screw (M8*60) 27 Curved washer (Φ8) 68 Flat washer (Φ8) 29 Allen screw (M8*16) 410 Quick release knob 111 Left pedal 112 Right pedal 113 Seat post 114 Flat washer (Φ17*Φ8) 415 Spring washer (Φ8) 316 Nylon nut (M8) 517 Seat 118 Computer 119 Cover for seat post 120 Tension Control Knob w/cable 121 Tension cable 122 Flat washer 123 Bolt M6 124 Philips screw (M5*12) 425 Front post 126 Cover for front post 127 Handlebar 128 Grommet 129 End cap for handlebar 230 Sensor wire 131 Extension sensor wire 132 Seat post bushing 133 Crank 134 Allen screw M8*55 435 Spring washer 436 Hand pulse wire 237 Clamp 138 Cover for clamp 139 T-type knob 140 Self-tapping screw (ST5*15) 841 Self-tapping screw (ST5*20) 442 Chain cover (LH) 143 Chain cover (RH) 144 BB Assembly 145 Hex head bolt (M8*105) 146 Plastic spacer 247 Magnet assembly 148 Spring 149 Hex head screw (M6*25) 150 Hex head nut (M6) 251 Sensor bracket 152 Belt pulley 153 Powder spacer 154 Idler wheel assembly 155 Spring for Idler wheel 156 Hex head nut (M8) 157 Adjusting bolt 158 Belt 159 Flange nut 260 Locknut (M10) 361 Axle for flywheel 162 Bearing (6000) 363 Flywheel 164 Flat washer (Φ10*15) 165 Spring clutch 166 Small pulley 167 Bearing (6900) 168 Crank cover 269 Bowl shaped spacer 1
79
![]()
EXPLODED VIEW

80 User Manual • Cardio Fit Bike B35
User Manual • Cardio Fit Bike B35 GB
81
![]()
NOTES
82 User Manual • Cardio Fit Bike B35
![]()
Tunturi New Fitness B.V.P.O. Box 600011320 AAThe Netherlands
20160811
References
[xyz-ips snippet=”download-snippet”]