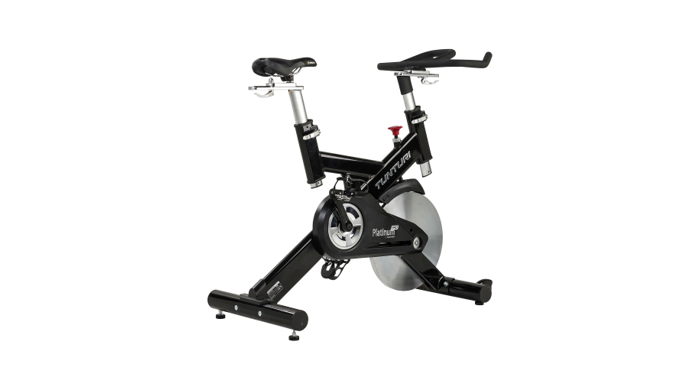
 Attention– Please read this Owner’s manual before assembling this product.

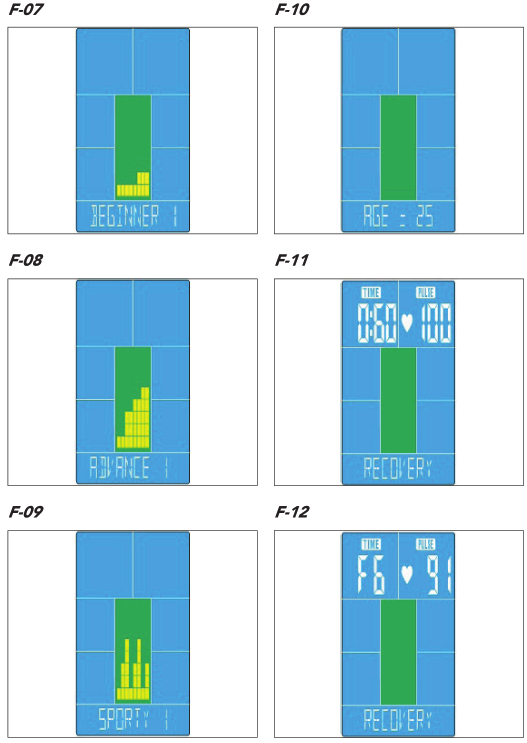 F-13
F-13
| 1 | 2 | 3 | 4 | 5 | 6 | 7 | 8 | 9 | 10 | 11 | 12 | 13 | 14 | 15 | 16 | 17 | 18 | 19 | 20 | |
| Beginner 1 | 1 | 1 | 1 | 1 | 5 | 5 | 5 | 5 | 5 | 17 | 17 | 17 | 17 | 17 | 9 | 9 | 9 | 9 | 9 | |
| Beginner 2 | 1 | I | 1 | 1 | 5 | 5 | 5 | 5 | 9 | 9 | 9 | 9 | 13 | 13 | 13 | 13 | 17 | 17 | 17 | 17 |
| Beginner 3 | 1 | 1 | 5 | 5 | 1 | 1 | 9 | 9 | 5 | 5 | 5 | 13 | 13 | 13 | 9 | 9 | 17 | 17 | 9 | 9 |
| Beginner 4 | 1 | 1 | 5 | 5 | 9 | 9 | 9 | 9 | 13 | 13 | 13 | 13 | 9 | 9 | 9 | 9 | 5 | 5 | 1 | 1 |
F-14
| 1 | 2 | 3 | 4 | 5 | 6 | 7 | 8 | 9 | 10 | 11 | 12 | 13 | 14 | 15 | 16 | 17 | 18 | 19 | 20 | |
| Advance 1 | 1 | 1 | 9 | 9 | 13 | 13 | 17 | 17 | 13 | 17 | 17 | 13 | 17 | 17 | 13 | 13 | 9 | 9 | 1 | 1 |
| Advance 2 | 1 | 1 | 1 | 5 | 5 | 9 | 9 | 13 | 13 | 9 | 9 | 17 | 17 | 17 | 9 | 9 | 5 | 5 | 1 | 1 |
| Advance 3 | 1 | 1 | 1 | 9 | 9 | 9 | 9 | 9 | 9 | 1 | 1 | 1 | 17 | 17 | 17 | 17 | 17 | 1 | 1 | 1 |
| Advance 4 | 1 | 1 | 1 | 5 | 5 | 5 | 9 | 9 | 9 | 13 | 13 | 13 | 17 | 17 | 5 | 5 | 5 | 5 | 1 | 1 |
F-15
| 1 | 2 | 3 | 4 | 5 | 6 | 7 | 8 | 9 | 10 | 11 | 12 | 13 | 14 | 15 | 16 | 17 | 18 | 19 | 20 | |
| Sporty 1 | 1 | 9 | 17 | 1 | 9 | 17 | 1 | 9 | 17 | 1 | 9 | 17 | 1 | 9 | 17 | 1 | 9 | 17 | 1 | 1 |
| Sporty 2 | 1 | 5 | 9 | 13 | 17 | 1 | 5 | 9 | 13 | 17 | 1 | 5 | 9 | 13 | 17 | 1 | 5 | 9 | 13 | 17 |
| Sporty 3 | 1 | 1 | 9 | 9 | 1 | 1 | 17 | 1 | 1 | 9 | 9 | 1 | 1 | 17 | 1 | 1 | 9 | 9 | 1 | 1 |
| Sporty 4 | 1 | 1 | 17 | 17 | 1 | 1 | 17 | 17 | 1 | 1 | 17 | 17 | 1 | 1 | 17 | 17 | 1 | 1 | 17 | 17 |
Upright Bike
Welcome to the world of Tunturi New Fitness!Thank you for purchasing this piece of Tunturi equipment. Tunturi offers a wide range of home fitness equipment, including cross trainers, treadmills, exercise bikes and rowers. The Tunturi equipment is suitable for the entire family, no matter what fitness level. For more information, please visit our website www.tunturi.com.
Safety warnings
![]() WARNING• Read the safety warnings and the instructions. Failure to follow the safety warnings and the instructions can cause personal injury or damage to the equipment. Keep the safety warnings and the instructions for future reference.– The equipment is suitable for domestic use only. The equipment is not suitable for commercial use.– Max. usage is limited to 3 hrs a day.– The use of this equipment by children or persons with a physical, sensory, mental, or motor disability, or lack of experience and knowledge can give cause to hazards. Persons responsible for their safety must give explicit instructions or supervise the use of the equipment.– Before starting your workout, consult a physician to check your health.– If you experience nausea, dizziness, or other abnormal symptoms, immediately stop your workout and consult a physician.– To avoid muscular pain and strain, start each workout by warming up and finish each workout by cooling down. Remember to stretch at the end of the workout.– The equipment is suitable for indoor use only. The equipment is not suitable for outdoor use.– Only use the equipment in environments with adequate ventilation. Do not use the equipment in draughty environments in order not to catch a cold.– Only use the equipment in environments with ambient temperatures between 10 °C and 35 °C. Only store the equipment in environments with ambient temperatures between 5 °C and 45 °C.– Do not use or store the equipment in humid surroundings. The air humidity must ever be more than 80%.– Only use the equipment for its intended purpose. Do not use the equipment for other purposes than described in the manual.– Do not use the equipment if any part is damaged or defective. If a part is damaged or defective, contact your dealer.– Keep your hands, feet, and other body parts away from the moving parts.– Keep your hair away from the moving parts. – Wear appropriate clothing and shoes.– Keep clothing, jewelry, and other objects away from the moving parts.– Make sure that only one person uses the equipment at a time. The equipment must not be used by persons weighing more than 150 kg (330 lbs).– Do not open equipment without consulting your dealer.
WARNING• Read the safety warnings and the instructions. Failure to follow the safety warnings and the instructions can cause personal injury or damage to the equipment. Keep the safety warnings and the instructions for future reference.– The equipment is suitable for domestic use only. The equipment is not suitable for commercial use.– Max. usage is limited to 3 hrs a day.– The use of this equipment by children or persons with a physical, sensory, mental, or motor disability, or lack of experience and knowledge can give cause to hazards. Persons responsible for their safety must give explicit instructions or supervise the use of the equipment.– Before starting your workout, consult a physician to check your health.– If you experience nausea, dizziness, or other abnormal symptoms, immediately stop your workout and consult a physician.– To avoid muscular pain and strain, start each workout by warming up and finish each workout by cooling down. Remember to stretch at the end of the workout.– The equipment is suitable for indoor use only. The equipment is not suitable for outdoor use.– Only use the equipment in environments with adequate ventilation. Do not use the equipment in draughty environments in order not to catch a cold.– Only use the equipment in environments with ambient temperatures between 10 °C and 35 °C. Only store the equipment in environments with ambient temperatures between 5 °C and 45 °C.– Do not use or store the equipment in humid surroundings. The air humidity must ever be more than 80%.– Only use the equipment for its intended purpose. Do not use the equipment for other purposes than described in the manual.– Do not use the equipment if any part is damaged or defective. If a part is damaged or defective, contact your dealer.– Keep your hands, feet, and other body parts away from the moving parts.– Keep your hair away from the moving parts. – Wear appropriate clothing and shoes.– Keep clothing, jewelry, and other objects away from the moving parts.– Make sure that only one person uses the equipment at a time. The equipment must not be used by persons weighing more than 150 kg (330 lbs).– Do not open equipment without consulting your dealer.
Electrical safety
(Only for equipment with electric power)– Before use, always check that the mains voltage is the same as the voltage on the rating plate of the equipment.– Do not use an extension cable.– Keep the mains cable away from heat, oil, and sharp edges.– Do not alter or modify the mains cable or the mains plug.– Do not use the equipment if the mains cable or the mains plug is damaged or defective. If the mains cable or the mains plug is damaged or defective, contact your dealer.– Always fully unwind the mains cable.– Do not run the mains cable underneath the equipment. Do not run the mains cable underneath a carpet. Do not place any objects on the mains cable.– Make sure that the mains cable does not hang over the edge of a table.– Make sure that the mains cable cannot be caught accidentally or tripped over.– Do not leave the equipment unattended when the mains plug is inserted into the wall socket.– Do not pull the mains cable to remove the mains plug from the wall socket.– Remove the mains plug from the wall socket when the equipment is not in use, before assembly or disassembly and before cleaning and maintenance.
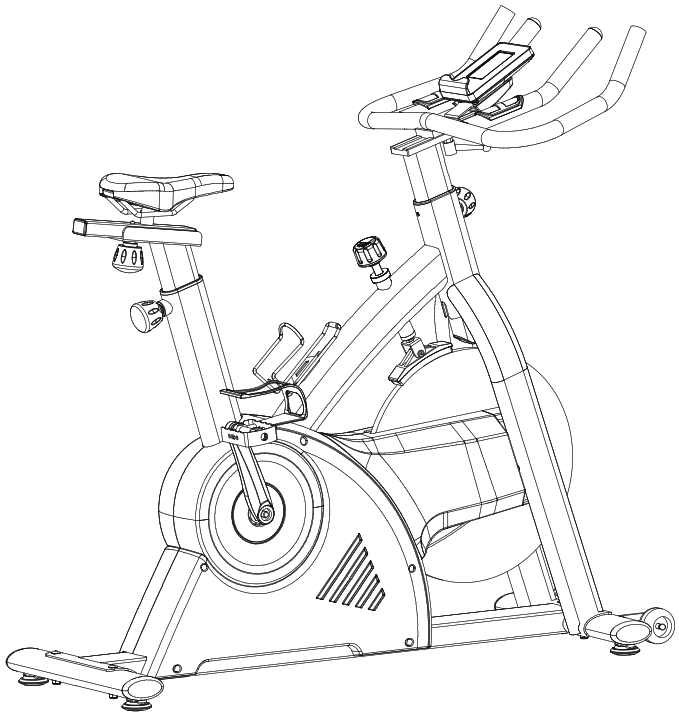
Description (fig. A)
Your upright bike is a piece of stationary fitness equipment used to simulate cycling without causing excessive pressure to the joints.
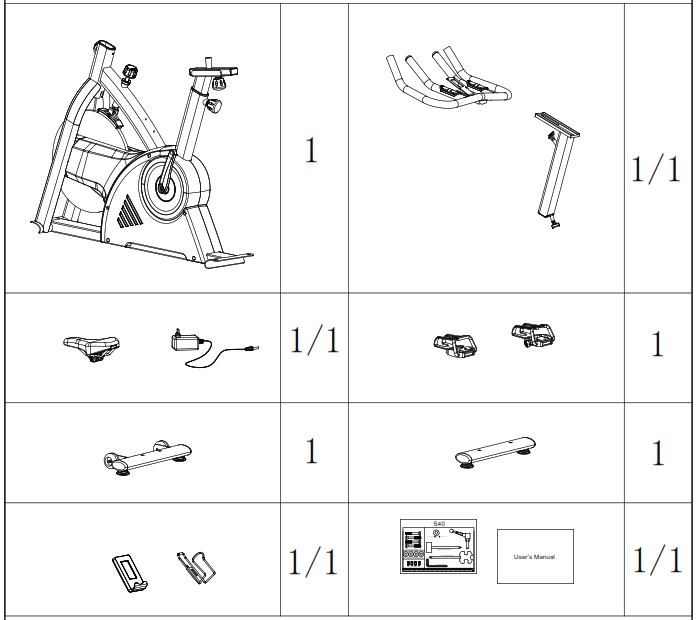
Package contents (fig. B & C)
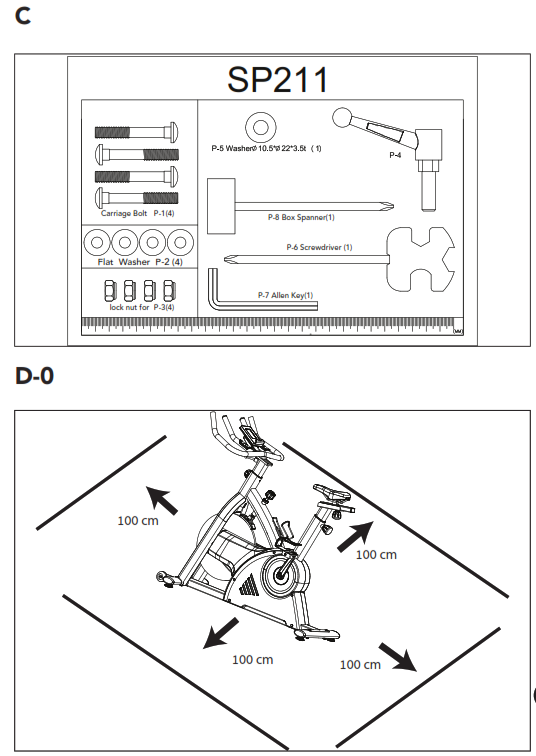
– The package contains the parts as shown in fig. B.– The package contains the fasteners as shown in fig. C. Refer to the section “Description”![]()
![]()
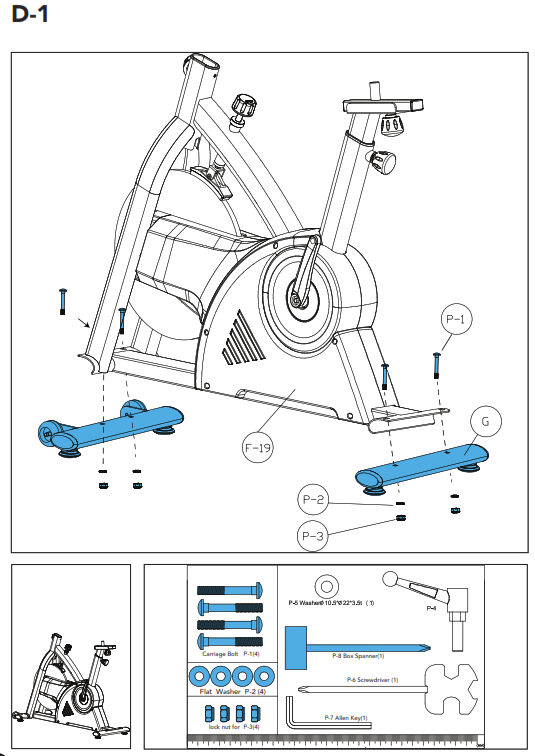
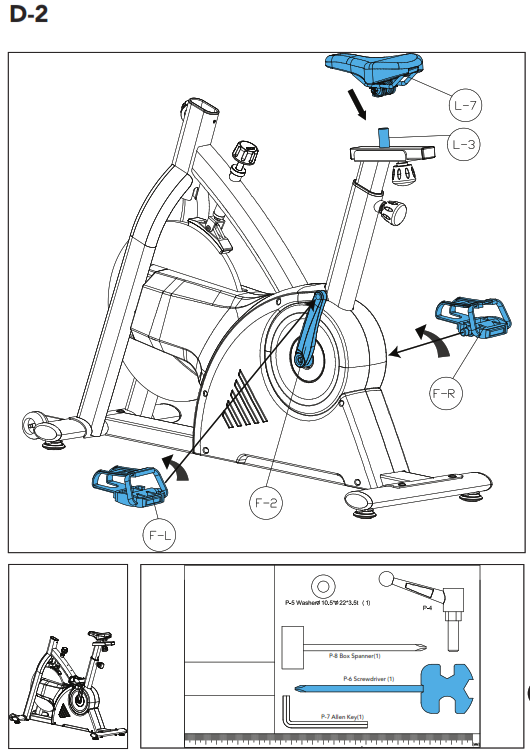
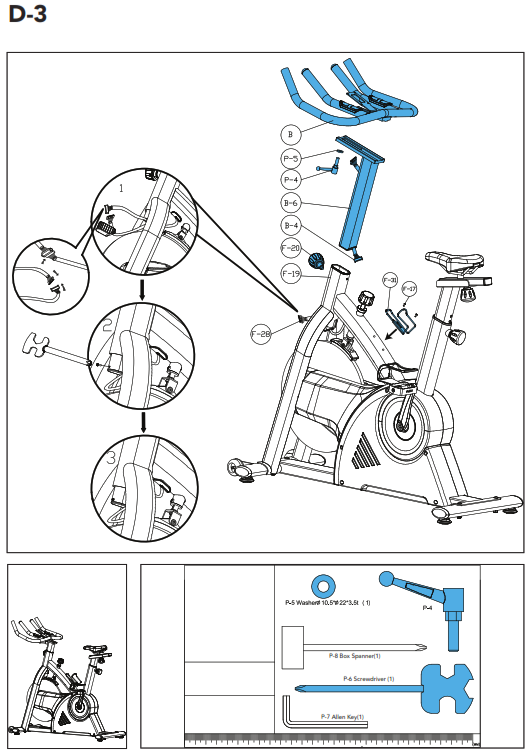
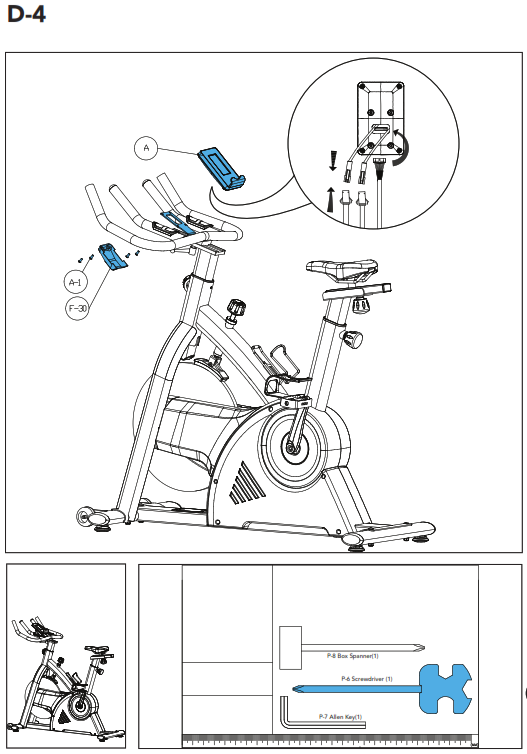
Assembly (fig. D)
![]()
![]()
![]()
![]()
![]()
![]()
![]()
![]()
![]()
![]()
![]()
![]()
![]()
![]()
![]()
![]()
![]()
![]()
![]()
![]()
Workouts
The workout must be suitably light but of long duration. Aerobic exercise is based on improving the body’s maximum oxygen uptake, which in turn improves endurance and fitness. You should perspire, but you should not get out of breath during the workout. To reach and maintain a basic fitness level, exercise at least three times a week, 30 minutes at a time. Increase the number of exercise sessions to improve your fitness level. It is worthwhile to combine regular exercise with a healthy diet. A person committed to dieting should exercise daily, at first 30 minutes or less at a time, gradually increasing the daily workout time to one hour. Start your workout at low speed and low resistance to prevent the cardiovascular system from being subjected to excessive strain. As the fitness level improves, speed and resistance can be increased gradually. The efficiency of your exercise can be measured by monitoring your heart rate and your pulse rate.Pulse rate measurement (hand pulse sensors)The pulse rate is measured by sensors in the handlebars when the user is touching both sensors at the same time. Accurate pulse measurement requires that the skin is slightly moist and constantly touching the hand pulse sensors. If the skin is too dry or too moist, the pulse rate measurement will become less accurate.![]()
![]()
![]()
![]()
![]()
![]()
![]()
![]()
![]()
![]()
![]()
![]()
![]()
![]()
![]()
![]()
![]()
![]()
![]()
![]()
![]()
![]()
![]()
![]()
![]()
![]()
![]()
![]()
![]()
![]()
![]()
![]()
![]()
![]()
![]()
![]()
![]()
![]()
![]()
![]()
![]()
![]()
Use
Adjusting the support feetThe equipment is equipped with 4 support feet. If the equipment is not stable, the support feet can be adjusted.– Turn the support feet as required to put the equipment in a stable position.– Tighten the locknuts to lock the support feet. Adjusting the horizontal seat position can be adjusted by setting the seat to the required position.– Loosen the seat adjustment knob.– Move the seat to the required position.– Tighten the seat adjustment knob.Adjusting the vertical seat positionThe vertical seat position can be adjusted by setting the seat tube to the required position. With the leg almost straight, the arch of the foot must touch the pedal at its lowermost point.– Loosen the seat tube adjustment knob.– Move the seat tube to the required position.– Tighten the seat tube adjustment knob.Adjusting the handlebarThe handlebar can be adjusted according to the height and the exercise position of the user.– Loosen the handlebar adjustment knob.– Move the handlebar to the required position.– Tighten the handlebar adjustment knob.Emergency brake knobTo apply the brake, press down on the brake tension knob.
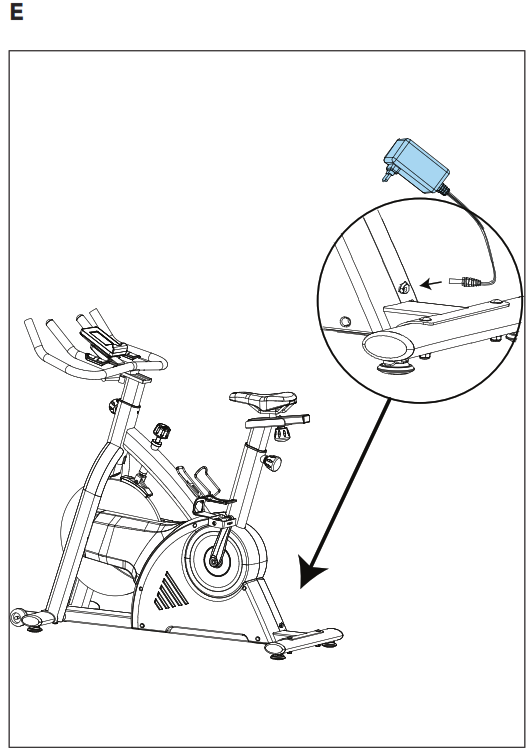
Power supply (Fig. E)
The trainer is powered by an external power supply.Refer to the illustration to locate the trainer power input.NOTE• Connect the power supply with the trainer before connecting it to the wall outlet.• Always remove the power cord when• machine is not in use.
Console (fig F)

![]()
![]()
![]()
![]()
![]()
![]()
![]()
![]()
![]()
![]()
NOTE• The console switches to standby mode when the equipment is not used for 4 minutes. If the console is in standby mode.
Display functions
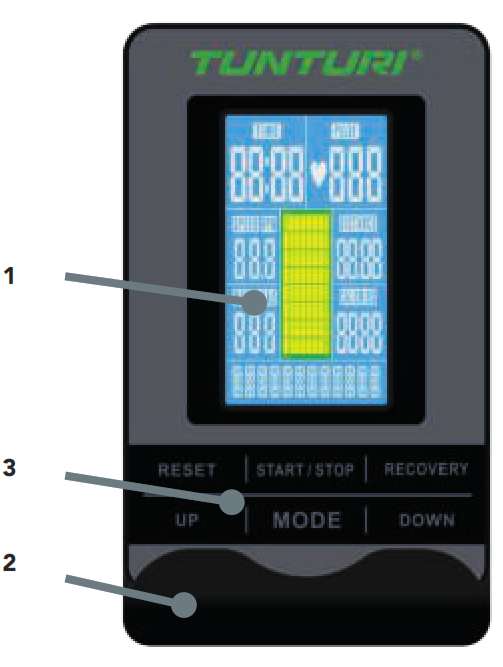
Time window :– Shows workout time during exercise Range: 0:00 ~ 99:59Speed window :– Shows actual speed during exercise Range: 0.0 ~ 99.9RPM window :– Shows revolutions per minute during exercise Range: 0 ~ 999Pulse window :– Shows pulse in bpm during exerciseDistance window :– Shows workout distance during exercise. Range: 0.0 ~99.9Calories window :– Shows burned calories during exercise Range: 0 ~999
Key functions
Recovery– Test heart rate recovery status.Down– Decrease resistance level during a workout.– In setting selection lower value.Mode– Confirm setting or selectionUp– Increase resistance level during a workout.– In setting selection upper value.Reset– When press and hold for 2 seconds, the display will reboot and start from the main menu. (all shown data will be lost)– Reverse to the main menu during presetting workout value or stop modeStart/ stop– Start workout when in idle mode.– Stop/ pause workout when in active mode.
Extra functions
When setting one or more targets, the target value starts to count up when reached “0”
Operation
Power on– Press any key to power on the console when being in sleep mode.– Start pedaling to power on the console when being in sleep mode.Power offWithout any signal being transmitted into the monitor for 4 minutes, the monitor will enter SLEEP mode automatically.
Programs
Power on the display or use the reset key function to go to the main menu. Press Up key or Down Key to select workout program. Available programs are Quickstart, Manual, beginner, Advance, Sporty, and Cardio.
Manual mode
For Quickstart you canPress the Start/ Stop key to start the workout without any preset setting. During the workout, you can press the Up/ Down key to adjust the resistance level. Quickstart mode stops when no input for longer than 4 minutes or when Start/stop key is pressed.When settings in manual mode are required then you;– Press the Up/ Down key to select workout program, choose Manual mode, and press the mode key to enter the next setting entry for the manual mode program.– Press the Up/ Down key to preset training time, and press the Mode key to confirm the setting.![]()
![]()
![]()
![]()
![]()
![]()
Beginner mode
– Press the Up/ Down key to select workout program, choose beginner mode, and press the Mode key to enter the next setting menu for beginner mode.– There can be 4 beginner modes selected: beginner 1, beginner 2, beginner 3, and beginner 4, select one by using the Up/ Down key and confirm selected by pressing the Mode key.– Press Up/ Down key to present training time, and press the Mode key to confirm the setting.![]()
![]()
![]()
![]()
![]()
![]()
Advanced mode
– Press the Up/ Down key to select workout program, choose beginner mode and press the Mode key to enter next setting menu for beginner mode.– There can be 4 beginner modes selected: Advance 1, Advance 2, Advance 3, and Advance 4, select one by using the Up/ Down key and confirm selected by pressing the Mode key.– Press the Up/ Down key to present training time, and press the Mode key to confirm the setting.![]()
![]()
![]()
![]()
![]()
![]()
Sporty mode
– Press the Up/ Down key to select workout program, choose beginner mode and press the Mode key to enter the next setting menu for beginner mode.– There can be 4 beginner modes selected: Sporty 1, Sporty 2, Sporty 3, and Sporty 4, select one by using the Up/ Down key and confirm selected by pressing the Mode key.– Press the Up/ Down key to present training time, and press the Mode key to confirm the setting.![]()
![]()
![]()
Cardio mode
– Press Up/ Down key to select the workout program, choose Cardio mode and press the Mode key to enter the next setting menu for advance mode.– Press Up/ Down key to set your age and confirm by pressing the mode key.– There can be 4 Cardio modes selected:1. 55% (of maximum HR = 220 – age x 55%)2. 75% (of maximum HR = 220 – age x 75%)3. 90% (of maximum HR = 220 – age x 90%)4. TAG (Target Heart Rate, a default set on 100Use Up/ Down key to change, and confirm by pressing mode key). Select one by using the Up/ Down key and confirm selected by pressing Mode key.– Press the Up/ Down key to pre-set training time, and press the Mode key to confirm the setting.– Press the Start/ stop key to pause the workout.– Press the Reset key to return to the main menu. (Active training data will be lost)![]()
![]()
![]()
Recovery
– The RECOVERY key will only be valid if the pulse is detected.– TIME will show „0:60“ (seconds) and counts down to 0.– Computer will show F1 to F6 after the countdown to test heart rate recovery status. Users can find the heart rate recovery level based on the chart below.– Press the RECOVERY key again to return to the beginning.
| F1 | Outstanding |
| F2 | Excellent |
| F3 | Good |
| F4 | Fair |
| F5 | below average |
| F6 | Poor |
Cleaning and maintenance
The equipment does not require special maintenance. The equipment does not require recalibration when it is assembled, used, and serviced according to the instructions.![]()
![]()
![]()
![]()
![]()
![]()
![]()
![]()
![]()
![]()
Defects and malfunctions
Despite continuous quality control, defects, and malfunctions caused by individual parts can occur in the equipment. In most cases, it will be sufficient to replace the defective part.– If the equipment does not function properly, immediately contact the dealer.– Provide the model number and the serial number of the equipment to the dealer. State the nature of the problem, conditions of use, and purchase date.Troubleshooting:– When the display of the LCD is dim, it means the batteries need to be changed.– If there is no signal when you pedal, please check if the cable is well connected.NOTE• When stop training for 4 minutes, the main screen will be off.• If the computer displays abnormally, please reinstall the transformer and try again.
Transport and storage
![]()
![]()
![]()
![]()
![]()
![]()
![]()
![]()
![]()
![]()
Additional information
Packaging disposalGovernment guidelines ask that we reduce the amount of waste material disposed of in landfill sites. We, therefore, ask that you dispose of all packaging waste responsibly at public recycling centers. End-of-life disposalWe at Tunturi hope you enjoy many years of enjoyable use from your fitness trainer. However, a time will come when your fitness trainer will come to the end of its useful life. Under ‘European WEEE Legislation you are responsible for the appropriate disposal of your fitness trainer to a recognized public collection facility.
Technical data
| Parameter | Unit of measurement | Value |
| Length | cm | 110 |
| inch | 43.3 | |
| Width | cm | 52 |
| inch | 20.5 | |
| Height | cm | 126 |
| inch | 49.6 | |
| Weight | kg | 49.0 |
| lbs | 108.0 | |
| Max. user weight | kg | 150 |
| lbs | 330 | |
| Adapter | ||
| Voltage | V | 9V-DC |
| Current | Ma. | 0.5 A |
Warranty
Tunturi purchaser‘s warranty
Warranty terms
The consumer is entitled to the applicable legal rights stated in the national legislation concerning the commerce of consumer goods. This warranty does not restrict these rights. The Purchaser’s Warranty is only valid if the item is used in an environment approved by Tunturi New Fitness BV for that particular equipment. The product-specific approved environment is stated in the Owner’s Manual provided with your equipment.
Warranty conditions
The warranty conditions commence from the date of purchase. Warranty conditions may vary per country, so please consult your local dealer for the warranty conditions.
Warranty coverage
Under no circumstances shall Tunturi New Fitness BV or the Tunturi Distributor be liable by virtue of this warranty or otherwise for any special, indirect, secondary, or consequential damages of any nature arising out of any use or inability to use this equipment.
Warranty limitations
This warranty covers manufacturing defects in the fitness equipment as originally packed by Tunturi New Fitness BV. The warranty shall apply only under conditions of normal, recommended use of the product as described in the Owner’s Manual and providing that Tunturi New Fitness BV’s instructions for installation, maintenance, and use have been complied with. Neither Tunturi New Fitness BV’s nor the Tunturi Distributors’ obligations apply to defects due to reasons beyond their control. The warranty applies only to the original purchaser and is valid only in countries where Tunturi New Fitness BV has an authorized importer. The warranty does not extend to fitness equipment or components that have been modified without the consent of Tunturi New Fitness BV. Defects resulting from normal wear, misuse, abuse, corrosion, or damage incurred during loading or transportation are not covered.
The warranty does not cover sounds or noises emitted during use where these do not substantially impede the use of the equipment and where they are not caused by a fault in the equipment. The warranty does not cover defects arising from the failure to carry periodic maintenance as outlined within the Owner’s Manual for the product. Furthermore, the warranty does not cover defects arising from usage and storage within an unsuitable environment as described within the Owner’s Manual which should be indoors, dry, dust, and grit-free and within a temperature range of +15°C to +35°C. The warranty does not cover maintenance activities, such as cleaning, lubricating, and normal part adjustments, nor installation procedures that customers can accomplish themselves, such as changing uncomplicated meters, pedals, and other similar parts not requiring any dismantling/ reassembling of the fitness equipment. Warranty repairs carried out by other than authorized Tunturi representatives are not covered. Failure to follow the instructions given in the Owner’s Manual will invalidate the product’s warranty.
Declaration of the manufacturer
Tunturi New Fitness BV declares that the product is in conformity with the following standards and directives: EN 957 (HB), 89/336/EEC. The product, therefore, carries the CE label. 01-2017 Tunturi New Fitness BV Purmerweg 1 1311 XE Almere The Netherlands
Disclaimer
© 2017 Tunturi New Fitness BVAll rights reserved.The product and the manual are subject to change.Specifications can be changed without further notice.
| No | Description | Qty |
| A | Console | 1PCS |
| A-1 | Screw M 5×10 | 4PCS |
| B | Handlebar | 1PCS |
| B-1 | Limit sleeve | 1PCS |
| B-2 | Hex screw M5x12L | 1PCS |
| B-3 | Self-tap screw M3x12L | 1PCS |
| B-4 | Cable, upper | 1PCS |
| B-5 | Handlebar cap | 1PCS |
| B-6 | Handlebar post | 1PCS |
| B-7 | Wire cap | 1PCS |
| B-8 | Hand pulse sensor | 2PCS |
| B-9 | Hand pulse sensor wire | 2PCS |
| D | Front foot | 1PCS |
| D-1 | Foot cap | 2PCS |
| D-2 | Adjust cushion pad | 2PCS |
| D-3 | Transport wheel | 2PCS |
| D-4 | Nut | 2PCS |
| D-5 | C-clip | 4PCS |
| E | Flywheel compl. (incl. E-1-E8) | 1SET |
| E-1 | Bearing 6000R5 | 1PCS |
| E-2 | Bearing 6900R5 | 1PCS |
| E-3 | Flywheel axle | 1PCS |
| E-4 | Plastic bushing | 1PCS |
| E-5 | Flat washer | 2PCS |
| E-6 | Star washer | 2PCS |
| E-7 | Nut 3/8′-26×4.5t | SPCS |
| E-8 | Bushing | 1PCS |
| F | Pedal, pair (sport type) | 1SET |
| F-1 | Pattern nut | 2PCS |
| F-2 | Crank, L | 1PCS |
| No | Description | Qty |
| F-3 | Side cover, L | 1 PCS |
| F-4 | Self-tap screw M4x5OL | 4PCS |
| F-5 | Self-tap screw M4x16L | 4PCS |
| F-6 | Front cover, L | 1 PCS |
| F-7 | Front cover, R | 1 PCS |
| F-8 | Nut M20 | 2PCS |
| F-9 | Bearinbq 6004RS | 2PCS |
| F-10 | Drive pulley | 1PCS |
| F-11 | Hex screw M6x3OL (code: 8.8) | 2PCS |
| F-12 | Axle | 1PCS |
| F-13 | Hex screw M8x12L | 3PCS |
| F-14 | Side cover, R | 1PCS |
| F-15 | Crank, R | 1PCS |
| F-16 | DC wire | 1PCS |
| F-17 | Screw M5x14L | 4PCS |
| F-18 | Flywheel adjust plate | 2PCS |
| F-19 | Frame | 1SET |
| F-20 | Handlebar post knob | 1 PCS |
| F-21 | Sensor box + wire | 1 PCS |
| F-22 | Sensor holder | 1 PCS |
| F-23 | Machine screw M4x1OL | 1 PCS |
| F-24 | Seat post knob | 1 PCS |
| F-25 | Handlebar post sleeve | 1 PCS |
| F-26 | Seat post sleeve | 1 PCS |
| F-27 | End cap | 2PCS |
| F-28 | Cable, lower | 1 PCS |
| F-29 | Drive belt | 1 PCS |
| F-30 | Cover | 1 PCS |
| G | Rear foot | 1PCS |
| G-1 | Foot cap | 2PCS |
| No | Description | Qty |
| G-2 | Adjust cushion pad | 2PCS |
| J | Servo motor and magnet brake set | 1SET |
| J-1 | Hex screw M6xP1.0*16L | 2PCS |
| J-2 | Spring washer | 2PCS |
| J-3 | Flat washer 06x013x1t | 2PCS |
| J-4 | Flat washer 08•019•2T | 2PCS |
| J-5 | Bushing | 1PCS |
| J-6 | Adjustor | 1PCS |
| J-7 | Screw M8x22L | 1PCS |
| J-8 | Hex Nut M6 | 2PCS |
| K | Flywheel set [incl. K1-10) | 1SET |
| K-1 | Nut | 6PCS |
| K-2 | Bearing 6202RS | 2PCS |
| K-3 | Flywheel | 1PCS |
| K-4 | Bushing | 1PCS |
| K-5 | 2-way flywheel axle | 1 PCS |
| K-6 | Belt | 1PCS |
| K-7 | Flat washer 015x025x1t | 2PCS |
| L | Seat sliding tube set | 1SET |
| L-1 | Tube cap | 2PCS |
| L-2 | Screw fixing bracket | 1 PCS |
| L-3 | Seat sliding tube | 1PCS |
| L-4 | Flat washer | 1PCS |
| L-5 | Seat locking knob | 1PCS |
| L-6 | Seat post | 1PCS |
| L-7 | Seat | 1PCS |
| M | Brake assembly set | 1SET |
| M-1 | Brake knob | 1PCS |
| M-2 | Fixing nut | 1PCS |
| M-3 | Adjustment pole(lower) | 1PCS |
| No | Description | Qty |
| M.4 | Fixing tube | 1 PCS |
| M-5 | Spring 015•1.6T•86L | 1PCS |
| M.6 | Hex Nut M8 | 2PCS |
| M-7 | Brake bracket | 1PCS |
| M•El | Bushing 09.2•18L | 1PCS |
| M-9 | Screw M5x8 | 2PCS |
| M-10 | Flat washer 010x014x1t | 2PCS |
| M-11 | Teflon washer 013.5×018.5×0.5t | 1 PCS |
| M-12 | Brake set | 1PCS |
| N | Belt tightener set (incl. N-1 -N-9) | 1 SET |
| N-1 | Hex nut M10 | 1PCS |
| N-2 | Hex nut M6 | 2PCS |
| N-3 | Adjustor | 1 PCS |
| NA | Bushing 010x014x4mmL | 1PCS |
| N-5 | Pulley wheel | 1 PCS |
| N-6 | Pulley wheel axle | 1 PCS |
| N-7 | Flat washer 06x013x1t | 1 PCS |
| N-8 | Spring washer 06 | 1 PCS |
| N-9 | Hex screw M6xP1.0x12L | 1 PCS |
| P | Hardware kit (incl. P-1 -P-8) | 1SET |
| P-1 | Carriage bolt M8x55L | 4PCS |
| P-2 | Flat washer 08×019 | 8PCS |
| P-3 | Nylon nut M8 | 4PCS |
| P-4 | Quick-release knob | 1 PCS |
| P-5 | Copper sasher | 1PCS |
| P.O | Harpoon wrench | 1 PCS |
| P-7 | Allen wrench | 1PCS |
| P-8 | Spann wrench | 1 PCS |
| 0 | Switching power adaptor | 1 PCS |


Tunturi New Fitness BVPurmerweg 1 NL – 1311 XE AlmereP.O. Box 60001 NL – 1320 AA AlmereThe Netherlandswww.tunturi-fitness.com[email protected]fitness.com


References
[xyz-ips snippet=”download-snippet”]

