

BMW E46 Non-M Skid Plate Installation Instructions
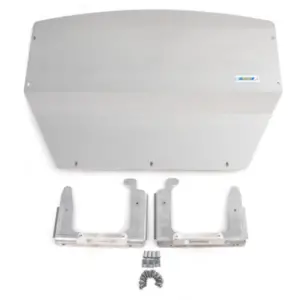
Introducing the new Turner E46 Non-M Skid Plate! The Turner engineering team set out to design a nocompromise belly pan replacement which requires no modification to the vehicle, and offers some serious protection for the bottom of your vehicle! The finished product was this; the ultimate upgrade for your belly pan replacement woes, all for nearly the same cost as the plastic OEM replacement.Our heavy duty aluminum skid plate features vehicle specific mounting braces which bolt right up to existing mounting points in the chassis.Installation of the kit can be done easily in a driveway if needed, and we’ve included everything you need to make this a fast and easy upgrade.Installation time: 1 hour
Proper service and repair procedures are vital to the safe, reliable operation of all motor vehicles as well as the personal safety of those performing the repairs. Standard safety procedures and precautions (including use of safety goggles and proper tools and equipment) should be followed at all times to eliminate the possibility of personal injury or improper service which could damage the vehicle or compromise its safety.
Installing the New Skid Plate Kit
Step 1
• Safely lift and support the vehicle. We recommend removing the front wheels for better access.• Remove the center insulation panel and lower fender liners (Step 1 photo).
Step 2
• Remove the ducts from each fenderwell (LH shown in Step 2 photo).
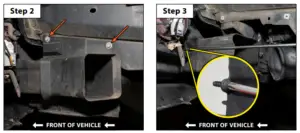
Step 3
- Remove the inlet ducts from the front bumper cover (LH shown in Step 3 photo).– A long Phillips head screwdriver works well for this step.
Installing the New Skid Plate Kit
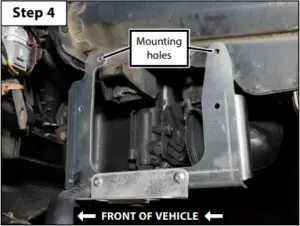
Step 4
• Identify the mounting holes for each support brace (LH shown in the Step 4 photo below).
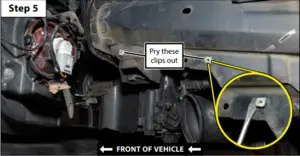
Step 5
- Remove the plastic clips from the mounting holes (LH shown in Step 5 photo below).– A small pick or flathead screwdriver works well for this step.
Installing the New Skid Plate Kit
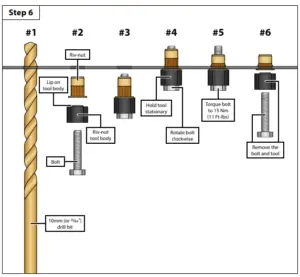
Step 6
• Prepare the mounting holes by drilling it out using a 10mm (or 25/64”) drill bit (#1).– You can find a 10mm drill bit on our site by clicking HERE.– Be sure to apply paint to the hole after drilling to prevent corrosion.• Align the lip on the riv-nut tool body with the flanged side of the riv-nut (#2).• Thread the bolt through the tool body and into the riv-nut by hand until it is fully seated (#3).• Insert the riv-nut into the mounting hole, making sure that it is fully seated (#4).• While holding the tool body stationary with a wrench, rotate the bolt clockwise to expand the riv-nut (#5).• Torque the bolt to 15 Nm (11 Ft-lbs), then remove the bolt and tool from the riv-nut (#6).• Repeat this procedure to install the other three riv-nuts.
Installing the New Skid Plate Kit
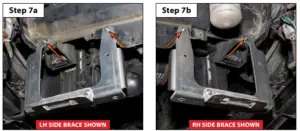
Step 7
- Install both support braces onto the vehicle using the supplied M6 bolts (arrows).
- Tighten the bolts until snug.– Be sure to orient the brackets so that the threaded holes are level with the underside of the vehicle and are facing toward each other (LH shown in Step 7a photo, RH shown in Step 7b photo).
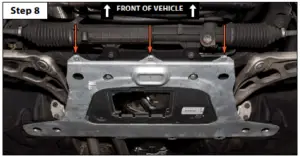
Step 8
- Install the supplied speed nuts onto the stock aluminum brace (arrows in the Step 8 photo).
Installing the New Skid Plate Kit
Step 9
- Loosely install the skid plate using the supplied M6 bolts.
- djust the skid plate as needed for proper fitment, then hand tighten all of the bolts until snug.
 Turner BMW E46 Non-M Skid Plate Installation Instructions Manual – Turner BMW E46 Non-M Skid Plate Installation Instructions Manual –
[xyz-ips snippet=”download-snippet”]