TuyaSmart Wifi Alarm Kit User Manual
Package Contents
Gateway *1 Doorbell button*1SOS button *1 PIR sensor*13M sticker *1 B attery (CR2032)*1Bracket*1 Screw pack*1
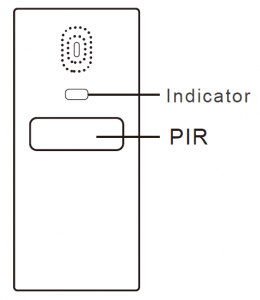
4 . PIR sensor
Main Function:
When the 433MHz device is triggered, it will send a wireless signal to the gateway. Once the gateway receives the signal,with WiFi connectivity, the data stating the trigger will be uploaded to the Cloud and a push notification will be sent to theuser’s mobile phone.
Operating Instructions
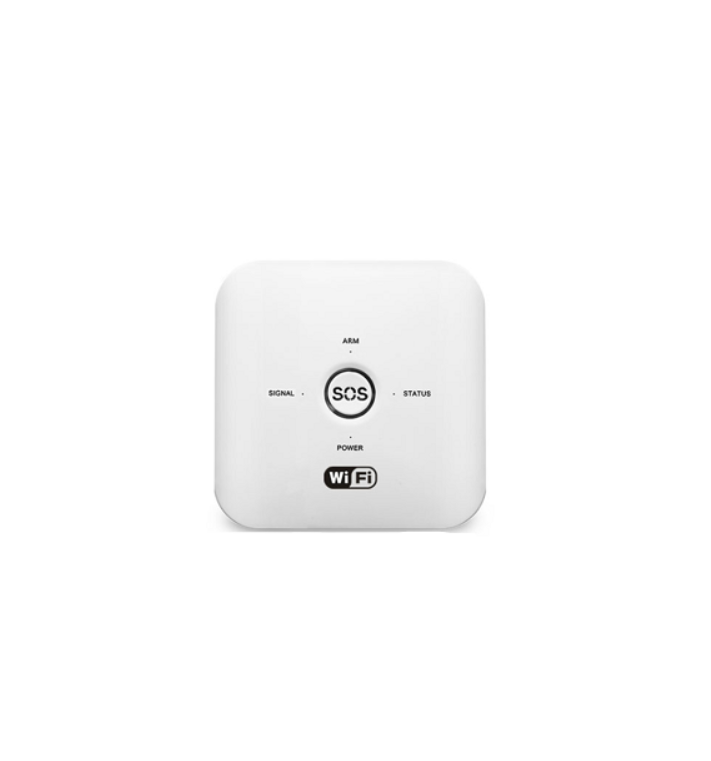
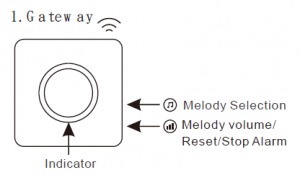
A: Gateway
Selecting the melodyPress “![]() ” on the side of the gateway to select the melody. There are 16 melodies for option.
” on the side of the gateway to select the melody. There are 16 melodies for option.
Adjusting the volume
Press ” ![]() ” on the side of the gateway to adjust the volume. 4 levels (High, Medium, Low and Silent) for option.
” on the side of the gateway to adjust the volume. 4 levels (High, Medium, Low and Silent) for option.
Stopping the alarm sound
When an alarm sounds, press ” ![]() ” to stop the sound.
” to stop the sound.
Reset the gateway
Press and hold ” ![]() ” on the side of the gateway for above 5 seconds, the red indicator light of the gateway will rapidlyflash to indicate that it has entered into the Reset status. Then, connect your mobile phone to the 2.4G WiFi and follow the adding process to add the gateway.
” on the side of the gateway for above 5 seconds, the red indicator light of the gateway will rapidlyflash to indicate that it has entered into the Reset status. Then, connect your mobile phone to the 2.4G WiFi and follow the adding process to add the gateway.
Indicator Light
The red indicator light indicate the network status as below. Rapid blink: In Smart Config mode, configuring WiFi ..(2 blinks/second)Double blink: Connecting WiFi.. Steady On: WiFi connected, connecting to the Cloud..
- Remove the insulation sheet from the battery compartment.
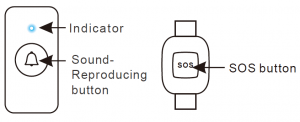
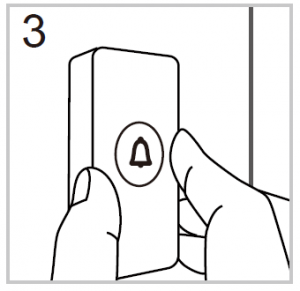
- Paste the 3M sticker supplied on the back of the Doorbell button.
- Paste the Doorbell button on the wall or door.

C . PIR sensor
- Install the bracket.
- Attach the unit to the bracket and adjust the angle accordingly.The detecting angle of the PIR
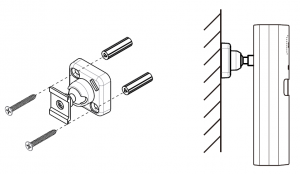
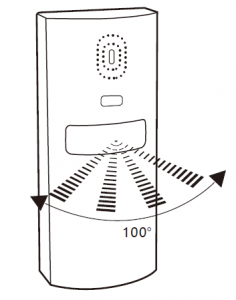 The detecting angle of the PIR
When the PIR sensor detects human movements, its indicator light will turn on and send a wireless signal to the gateway.Once the gateway receives the signal, a push notification will be sent to the mobile phone via WiFi.
D. Downloading the APP
Download the APP to your smart mobile phone by one of the following methods:
- On your mobile phone go to the App Store or Google Play. Then, do a search for “TuyaSmart”.
- Scan the QR code below to download.Android 5.0 / iOS 7.0 or higher
 Android 5.0 / iOS 7.0 or higher
E. Adding the Gateway
- Place the unit next to the home router(2.4G WiFi) and ensure it has connected to power source.
- Please connect your mobile phone and the gateway to the same WiFi network, and then launch the APP ” TuyaSmart “.
- For the steps of adding the gateway, please check the Help documents. Tap “Me” on the lower right of the screen and then tap “FAQ & Feedback”.
NOTE:
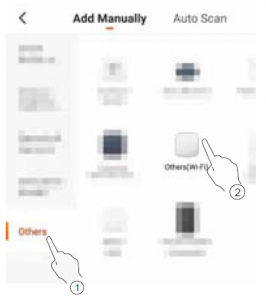
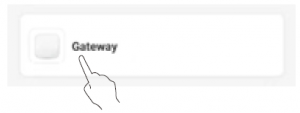
- During the setup process, select “+ (Add Device) > Others > Others (Wi-Fi)” as below.
- After reset, the indicator light will flash rapidly. For the details, please refer to the chapter “Reset the Gateway”.
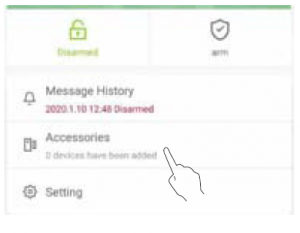
F. Adding Sub Devices into the Gateway
- In the de vice list, tap the gate way you just added .
- Tap “Accesso ries”.
- Tap “add new device”.
- Within 60 seconds, trigger the sub device and its indicator light will turn on. On the other hand, if the gateway receives the signal from the sub device, it will sound two “beep” tones to indicate that adding the sub device is successful. Only one sub device can be added once.


G. Description of Gateway’s APP interface
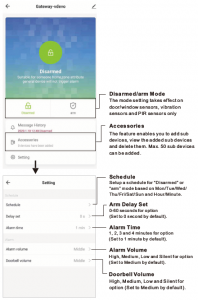
Remove Device
This will reset the gateway back to WiFi configuration, yet the sub devices previously added will NOT be deleted.
Restore to Factory Default
This will reset the gateway back to WiFi configuration, and all the sub devices previously added will be deleted.
Trouble Shooting
P: The gateway’s red indicator settles into “Double blink” for a long time.S: Please check the router to see if it works properly and also check the signal strength.
P: The gateway’s red indicator settles into “Steady On” for a long time.S: The gateway has connected to the router and is connecting to the Cloud. Please make sure there is no problem to connect to the Internet.
P: Unable to add the gateway.S:
- Please check whether the network you connected is 2.4GWiFi
- Please check whether the WiFi password you typed is correct
- If the above operation is correct, reset the device and add it again.
P: Unable to add the sub device.S:
- During adding the sub device, you should trigger the sub device so that it can send a wireless signal to the gateway.
- If the sub device you are triggering has already been added, it will give a long “beep” tone.
- If done, please check if the network works properly.
P: Unable to receive push notifications.S:
- Please check if the network works properly.
- Please check if the mobile phone allows push notifications.
- Please go to the sub device setting to see if push notification function is accidentally disabled.
- For the PIR sensors, vibration sensors and door/window sensors, please check if the gateway is set to “Disarmed” mode. In “Disarmed” mode, no push notificationwill be received.
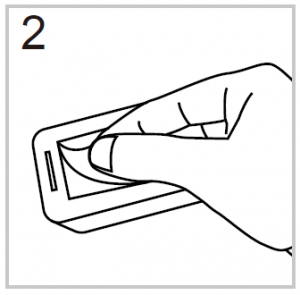
Installing the battery to the doorbell button
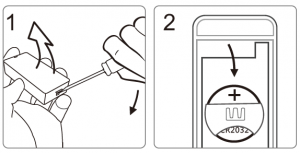
 When installing the battery , make sure the positive side faces upward.
Technical Specifications
| Power | AC100~260V 50Hz~60Hz |
| Working Power Consumption | <3W |
| Volume (30cm | Low:60-70dB Medium:70-80dB High:80-90dB |
| Demodulation | OOK/FSK |
| Distance (Open Area) | OOK: ≥ 80m FSK: ≥150m |
| Frequency | 433.92MHz±250KHz WIFI 2.4GHz |
| Wireless Distance between theDevice and Router | Open Area: 80m(±20%) Indoor: 15m(±20%) |
| Working Temperature | -10℃~50℃ |
The product is for indoor use only. Do notinstall outside.
FCC Warnings
- This device complies with Part 15 of the FCC Rules. Operation is subject to the following two conditions:1) This device may not cause harmful interference.2) This device must accept any interference received, including interference that may cause undesired operation.
- Changes or modifications not expressly approved by the party responsible for compliance could void the user’s authority to operate the equipment
NOTE: This equipment has been tested and found to comply with the limits for a Class B digital device, pursuant to Part 15 of the FCC Rules. These limits are designed to provide reasonable protection against harmful interference in a residential installation. This equipment generates uses and can radiate radio frequency energy and, if not installed and used in accordance with the instructions, may cause harmful interference to radio communications. However, there is no guarantee that interference will not occur in a particular installation. If this equipment does cause harmful interference to radio or television reception, which can be determined by turning the equipment off and on, the user is encouraged to try to correct the interference by one or more of the following measures:
- Reorient or relocate the receiving antenna.
- Increase the separation between the equipment and receiver.
- Connect the equipment into an outlet on a circuit different from that to which the receiver is connected.
- Consult the dealer or an experienced radio/TV technician for help.
FCC Radiation Exposure Statement
This equipment complies with FCC radiation exposure limits set forth for an uncontrolled environment. This equipment should be installed and operated with minimum distance 20cm between the radiator & your body.
Read More About This Manual & Download PDF:
[xyz-ips snippet=”download-snippet”]