
Twinkly™ Line Instructions Guide
rev.08.05.L
GENERATION II
Attention
Read and follow all safety instructions.
- READ AND FOLLOW ALL SAFETY INSTRUCTIONS.
- Do not use seasonal products outdoors unless marked suitable for indoor and outdoor use. When products are used in outdoor applications, connect the product to a Ground Fault Circuit Interrupting (GFCI) outlet. If one is not provided, contact a qualified electrician for proper installation.
- This seasonal use product is not intended for permanent installation or use.
- Do not mount or place near gas or electric heaters, fireplaces, candles, or other similar sources of heat.
- Do not secure the wiring of the product with staples or nails, or place on sharp hooks or nails.
- Do not let lamps rest on the supply cord or on any wire.
- Unplug the product when leaving the house, or when retiring for the night, or if left unattended.
- This is an electric product — not a toy! To avoid the risk of fire, burns, personal injury, and electric shock it should not be played with or placed where small children can reach it.
- Do not use this product for other than its intended use.
- Do not hang ornaments or other objects from the cord, wire, or light string.
- Do not cover the product with cloth, paper, or any material not part of the product when in use.
- Do not close doors or windows on the product or extension cords as this may damage the wire insulation.
- Read and follow all instructions that are on the product or provided with the product.
- SAVE THESE INSTRUCTIONS.
Use and care instructions
a. When the product is placed on a live tree, the tree should be well maintained and fresh. Do not place on live trees in which the needles are brown or break off easily. Keep the live tree holder filled with water.
b. If the product is placed on a tree, the tree should be well-secured and stable.
c. Before using or reusing, inspect the product carefully. Discard any products that have cut, damaged, or frayed wire insulation or cords, cracks in the lamp holders or enclosures, loose connections, or exposed copper wire.
d. When storing the product, carefully remove the product from wherever it is placed, including trees, branches, or bushes, to avoid any undue strain or stress on the product conductors, connections, and wires.
e. When not in use, store neatly in a cool, dry location protected from sunlight.
WARNING – To reduce the risk of fire and electric shock:
a. Do not install on trees having needles, leaves or branch coverings of metal or materials which look like metal.
b. Do not mount or support wires in a manner that can cut or damage wire insulation.
Class A Disclaimer: This equipment has been tested and found to comply with the limits for a Class A digital device, pursuant to Part 15 of the FCC Rules. These limits are designed to provide reasonable protection against harmful interference in a residential installation. This equipment generates, uses and can radiate radio frequency energy and, if not installed and used in accordance with the instructions, may cause harmful interference to radio communications. However, there is no guarantee that interference will not occur in a particular installation. If this equipment does cause harmful interference to radio or television reception, which can be determined by turning the equipment off and on, the user is encouraged to try to correct the interference by one or more of the following measures:
- Reorient or relocate the receiving antenna.
- Increase the separation between the equipment and receiver.
- Connect the equipment into an outlet on a circuit different from that to which the receiver is connected.
- Consult the dealer or an experienced radio/television technician for help.
![]() WARNING!
WARNING!
Do not connect the light string to the power supply while it is in the packaging. The connecting cable cannot be repaired or replaced. THE LAMPS ARE NOT REPLACEABLE. The lighting chain must not be used without all gaskets being in place. Lighting chains don’t intend for interconnection. Do not connect this light string electrically to devices from another manufacturer. CAUTION! Strangulation hazard. Keep out of reach of young children.
![]() The crossed-out wheeled bin symbol indicates that the item should be disposed of separately from household waste. The item should be handed in for recycling in accordance with local environmental regulations for waste disposal.
The crossed-out wheeled bin symbol indicates that the item should be disposed of separately from household waste. The item should be handed in for recycling in accordance with local environmental regulations for waste disposal.
The manufacturer, Ledworks Srl, declares that this device complies with the (LVD) 2014/35/EU, (RED) 2014/53/EU, (EMC) 2014/30/EU, (RoHS) 2011/65/EU directives. The full text of the EU declaration of conformity is available at the following Internet address: www.twinkly.com/certifications
System RequirementThe minimum system requirement for mobile phones are iOS 11 and Android 5 Check the app store for the latest update to ensure the best performance.
Technical SpecificationsPower supply: see labelIP protection: IP20
Physical Setup
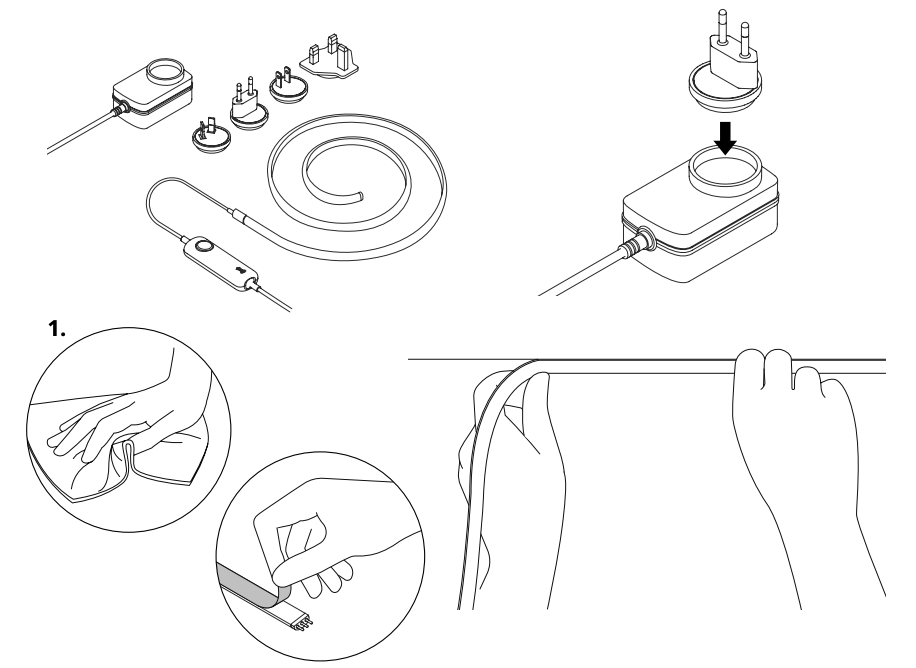
Note: All plug illustrations in this document are a mere representation of the functionality and might vary in different countries.
1. Clean the surface where you want to place Line on, remove the double adhesive liner, and stick Line onto the surface.
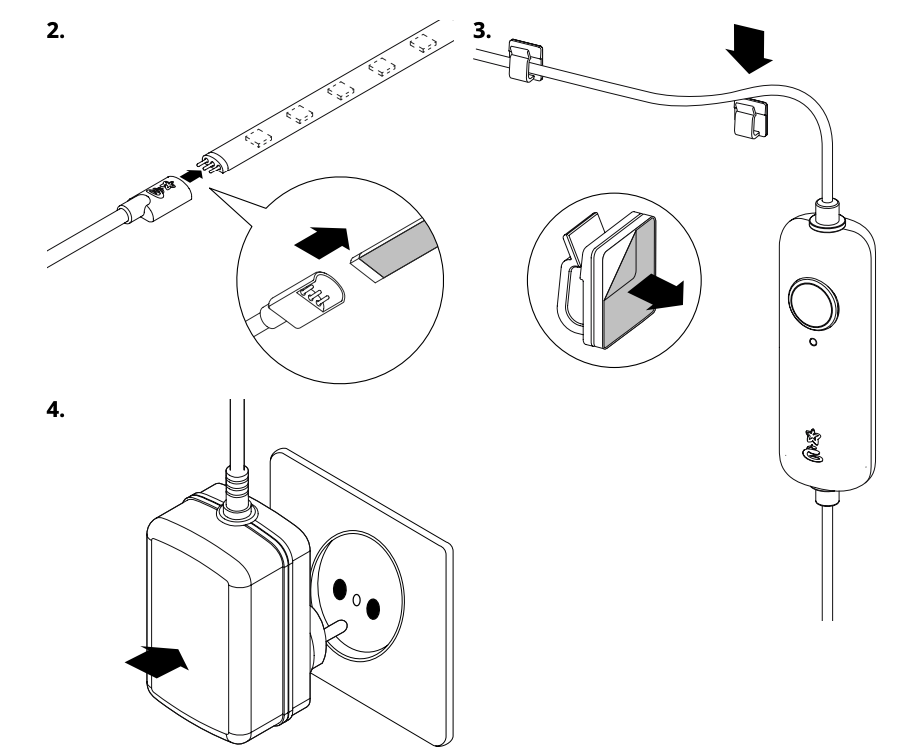
2. Connect Line to the controller connector.
3. Use the provided adhesive cable clips to keep the lead cable steady and organized.
4. Insert the plug into the power adapter and connect to a power source. The lights will switch on automatically.
Length Extension

Twinkly Line Starter Kit can be extended using Twinkly Line Extension Kit.
A. Direct extension: Best for linear layouts. Connect the male and female pins of a starter kit strip and an extension strip.
B. Extension cable: Best for curved layouts. Use the extension cable to connect two LED strips.
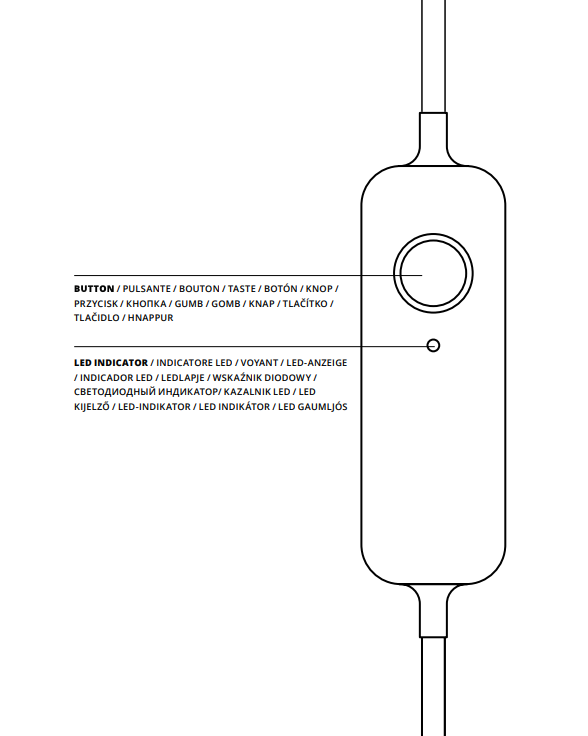
Controller
- CONTINUOUS GREEN: Direct Wi-Fi mode, connected
- FLASHING GREEN: Direct Wi-Fi mode, no device connected
- CONTINUOUS BLUE: Home Wi-Fi network mode, connected
- FLASHING BLUE: Home Wi-Fi network mode, connection in progress
- FLASHING RED: Home Wi-Fi network mode, unable to connect
- LIGHT BLUE: SETUP MODE (Bluetooth ON)
- YELLOW: Firmware Update in progress
- CONTINUOUS RED: General error
- FLASHING WHITE: Reset procedure in progress
App Download

Go to App Store/Google Play Store (or scan QR code). Download and install the Twinkly app
Note: All app illustrations in this document are a mere representation of the functionality and might vary from the actual app visuals.
Setup Twinkly
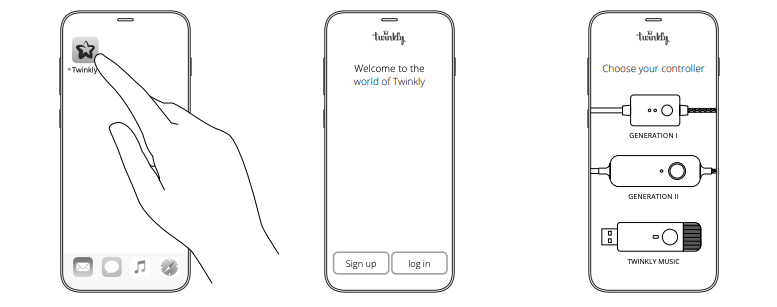
- Launch Twinkly app.
- Sign up/log in to your account (necessary for using smart home features).
- Follow the setup process on the app.
Connection Modes
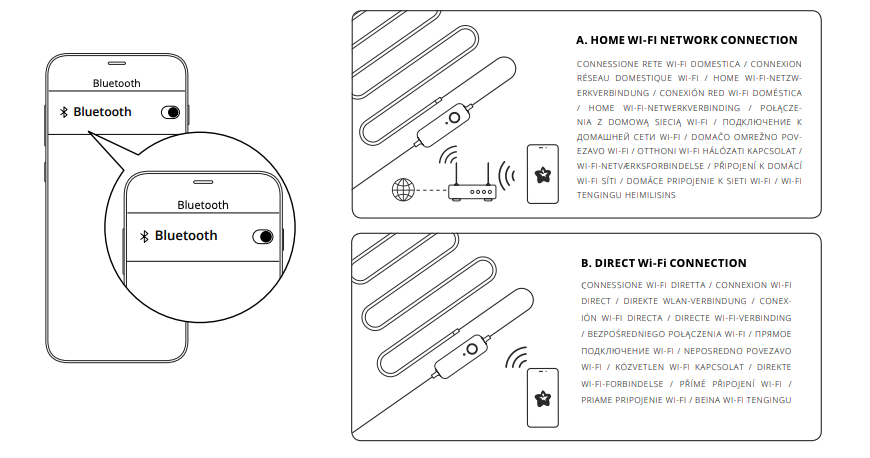
Twinkly uses Bluetooth for the setup process only. Wi-Fi connection is required for operation. You can use:
A. Home Wi-Fi network connection (recommended): Connect with your home/office WiFi from the list of available networks.
B. Direct Wi-Fi connection: Select “Twinkly_xxxxxx” WiFi from the list of available networks. Password: Twinkly2019
(NOTE: the internet on your phone will not be available in this case)
Mapping
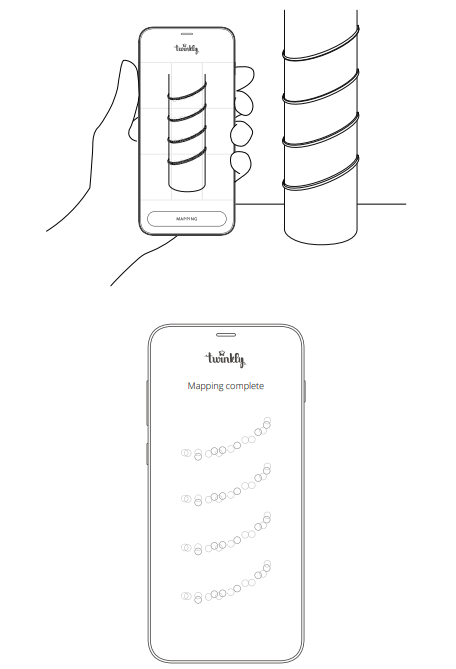
Map the layout of your decoration to unlock the full potential of your Twinkly lights like advanced effects, drawing and many upcoming features.
Mapping Tips
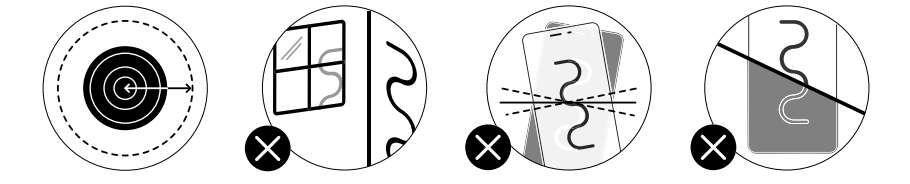
Note: For best results, avoid reflective surfaces behind the tree, keep the mobile cam steady during the process and ensure a moderate ambient light (not too dark).
Troubleshooting
Q THE LIGHTS DO NOT SWITCH ON
- Check that the power adapter is plugged in and that the controller is correctly connected to the device
- Check that the LED status indicator on the controller is lit
- Briefly press the button on the controller
- If this doesn’t work, unplug the power adapter, wait 30 seconds and plug in again
Q THE LIGHTS TURNED ON BUT ARE BLOCKED
- Briefly press the button on the controller
- If this does not work, unplug the power adapter, wait 30 seconds and plug it in again
Q THE LED INDICATOR IS LIGHT BLUE, BUT MY SMARTPHONE CANNOT FIND TWINKLY
- Unplug the power adapter, wait 30 seconds, plug it in again and repeat Configuration procedure
- If this does not work, try to Reset (see Reset procedure below)
- If this won’t work, see online reference manual http://www.twinkly.com/support
Q HOW CAN I CONNECT TWINKLY WITHOUT HOME WI-FI NETWORK?
- Open Wi-Fi settings on your smartphone
- Find and select “Twinkly_XXXXXX” network
- Enter the Wi-Fi password “ Twinkly2019 ” and ensure that the “Twinkly_XXXXXX” network is connected
Q TWINKLY SETUP WAS SUCCESSFUL, BUT THE LIGHTS DON’T RESPOND TO COMMANDS
- Within the Twinkly application, open “Devices” and check that the Twinkly device is selected
- If this does not work, stop the Twinkly application and launch it again
- If this does not work, try to Reset (see Reset procedure below)
- If this does not work, delete the Twinkly application from your smartphone, then download the latest version from AppStore or Google Play Store
For any problem write us to [email protected]
Reset Twinkly
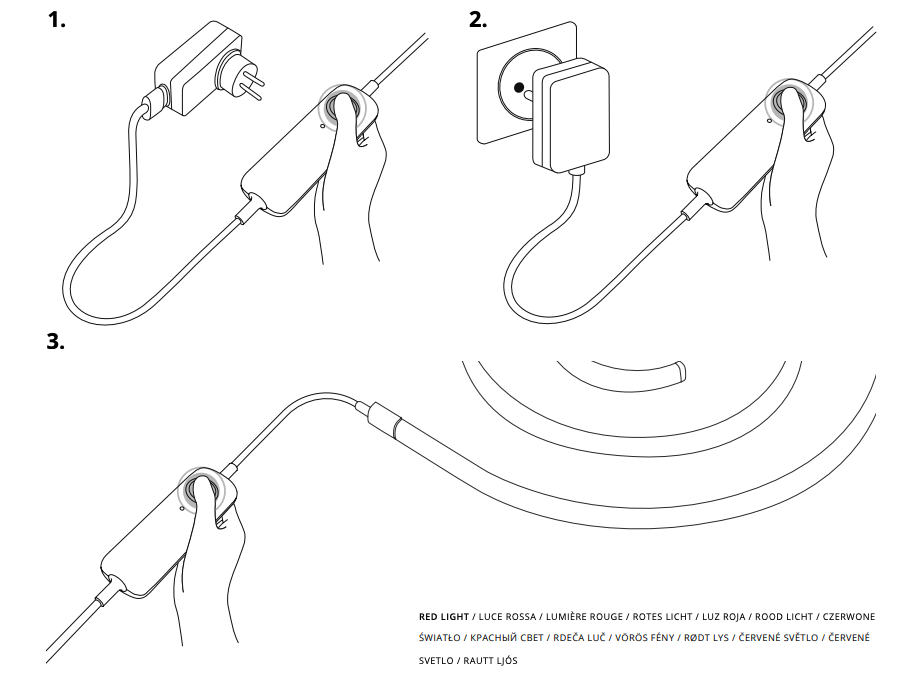
- Unplug Twinkly from the power socket. Press and hold the controller button.
- While holding the button, plug in Twinkly.
- Keep holding the button until all LEDs turn red (or amber for Gold Edition), then release the button.
Online Manual
 For all these features and more, see www.twinkly.com/support

References
[xyz-ips snippet=”download-snippet”]