 USER MANUALApril 30th, 2021
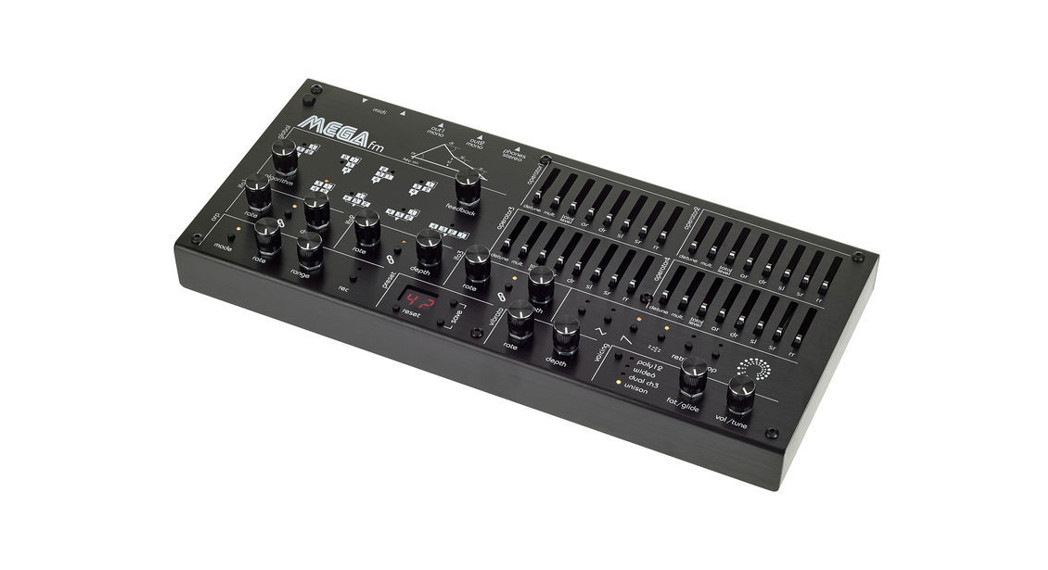
We always value feedback and ideas, so feel free to reach out.Please check the website for the latest firmware!THANK-YOU!Thank you for adopting MEGAfm, the product of several years of work & play. We are particularly fond of the YM2612 as they offer a unique gritty texture that is uncommon in the FM world, plus hands-on FM experience that is unprecedented in the hardware FM synthesizer world.We hope that you will enjoy making music with MEGAfm as much as we have enjoyed and continue to enjoy developing it!
YM2612 Overview
“The Yamaha 2612 Frequency Modulation (FM) sound synthesis IC resembles the Yamaha 2151 (used in Sega’s coin-op machines) and the chips used in Yamaha’s synthesizers.It is famously known as the Sega Megadrive’s voice.An FM channel is capable of expressing, with a high degree of realism, a single note in almost any instrument’s voice. Chords are generally created by using multiple FM channels.The standard FM channels each have a single overall frequency and data for how to turn this frequency into the complex final waveform (the voice). This conversion process uses four dedicated channel components called ‘operators’, each possessing a frequency (a variant of the overall frequency), an envelope, and the capability to modulate its input using the frequency and envelope. The operator frequencies are offsets of integral multiples of the overall frequency.There are 6 FM channels. Channels 3 and 6, have the capability to use a totally separate frequency for each operator rather than offsets of integral multiples (ch3 special mode). This works well for sound effects and experimental instruments. “
Operators
There are four dedicated operators per voice which may be arranged in eight different configurations, called “algorithms”. Following is a diagram of the algorithms.
| Algorithm # | Layout | Suggested uses |
| 0 | Distortion guitar, “high hat chopper” (?) bass | |
| 1 | Harp, PSG (programmable sound generator) sound | |
| 2 | Bass, electric guitar, bass, piano, woods | |
| 3 | Strings, folk guitar, chimes | |
| 4 | Flute, bells, chorus, bass drum, snare drum, tom-tom | |
| 5 | Brass, organ | |
| 6 | Xylophone, tom-tom, organ, vibraphone, snare drum, bass drum | |
| 7 | Pipe organ |
Slots are indicated by shading.
Envelope Specification
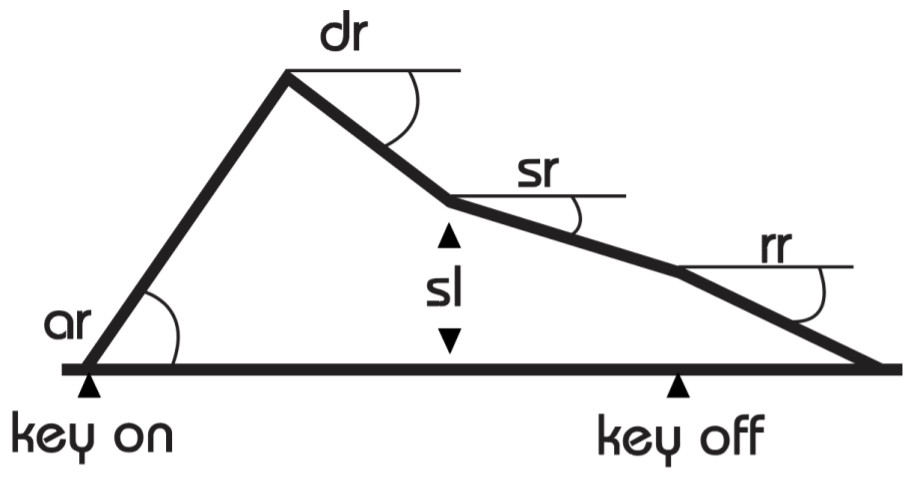
The sound starts when the key is depressed, a process called ‘key on’.The sound has an attack, a strong primary decay, followed by slow secondary decay. The sound continues this secondary decay until the key is released, a process called ‘key off’. The sound then begins a rapid final decay, representing for example a piano note after the key has been released and the damper has come down on the strings.The envelope is represented by the above amplitudes and angles, used in the above diagram are:
| TL | Total level, the highest amplitude of the waveform. |
| AR | Attack rate, the angle of initial amplitude increase. This can be made very steep if desired. The problem with slow attack rates is that if the notes are short, the release (called ‘key off’) occurs before the note has reached a reasonable level. |
| DR | The angle of initial amplitude decrease. |
| SL | The amplitude at which the slower amplitude decrease starts. |
| SR | The angle of secondary amplitude decrease. This will continue indefinitely unless ‘key off’ occurs. |
| RR | The final angle of amplitude decrease, after ‘key off’. |
Thanks MAXIM for the above excerpts:https://www.smspower.org/maxim/Documents/YM2612
Voicing
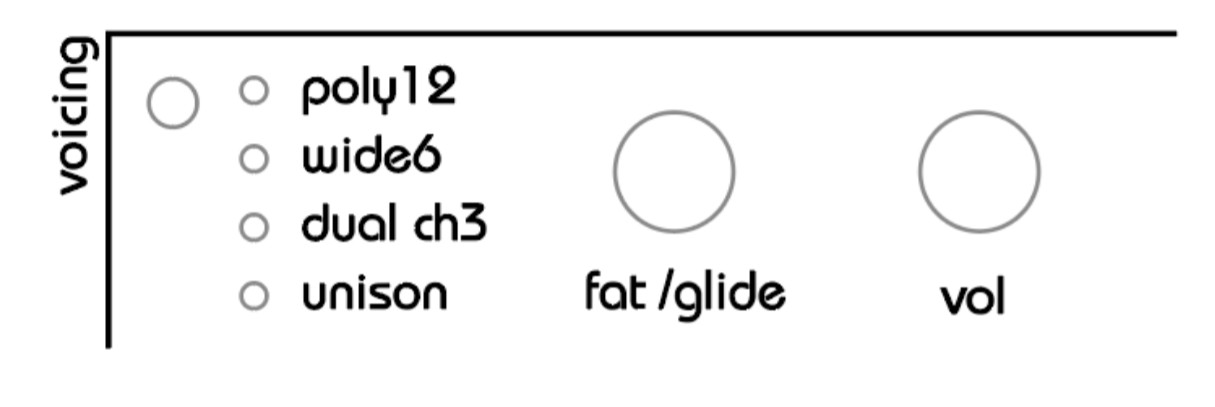
MEGAfm offers up to 12 voice polyphony.The 12 voices are spread across two YM2612 chips.In all modes, you can use the fat knob to detune the voices.Hold the voicing mode button and the fat knob becomes glide.Glide knob determines the time it takes for each voice to change pitch when a new note is played.Mono Mode:When a single TS 6.35mm jack is plugged into output1, both chips are summed to output1.Stereo Mode:When a second TS 6.35mm jack is plugged into output2, the 2 chips will be split between outputs 1 and 2 (6 voices per chip/output)There are 4 Voicing modes available. Press the voicing button to change the current voice Voicing mode.Poly1212 voice polyphony scattered between both chips in a Left/right/left/ right etc mannerWide6Both chips play the same 6 notes but can be detuned with the fat knobDual ch3YM2612 offers a special mode where the 4 operators of channel3 can be individually detuned to arbitrary frequencies as described above in the YM2612 Overview. Recommended for experimental/percussive sounds.UnisonAll voices are played at once in unison and detuned using the fat knob.Turn the fat knob clockwise to gradually detune all 12 voices. At maximum fat, the 12 voices are arranged in a chord.FatUse the fat knob to detune the 12 voices in any voice mode. In Unison mode you can detune the voices from slightly detuned (aka fat) all the way to a grand chord, THX style!In all other modes, you can detune the voices either by 1 semitone or 1 octave. See setup to choose between the 2 options.GlideWhen you hold the voicing button the fat knob becomes glide. Adding glide increases the time it takes each voice to reach its new pitch.VolumeUse the volume knob to set the volume of the current preset.Note about volume: A digital potentiometer is used to set the volume so that it can be recalled between presets. Digital potentiometers can make a clicking noise is known as zipper noise when changing values, in order to reduce this noise the volume is only updated after the knob has been adjusted, not during so please allow a quarter second for the volume to change.Preset tuning Hold voicing and use the VOL knob to tune your preset within a 1-octave range.
Algorithms & Feedback
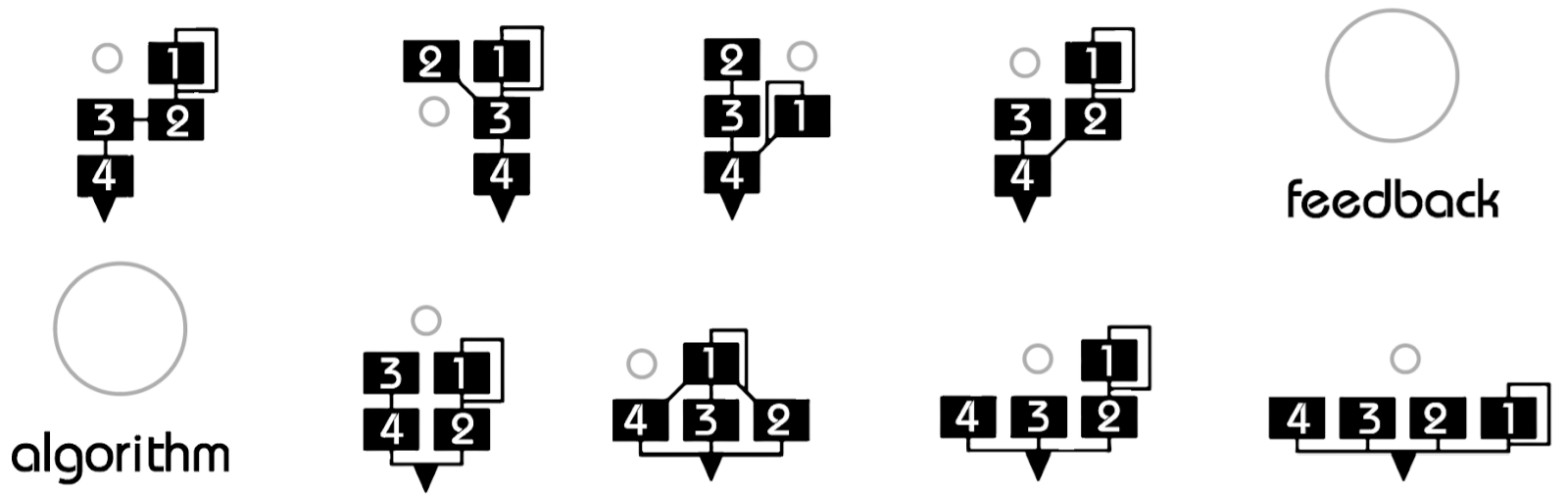
Use the algorithm knob to select any of the 8 algorithms and the feedback knob to set the amount of operator1 feedback.Note: both parameters can be modulated by LFO!
Vibrato
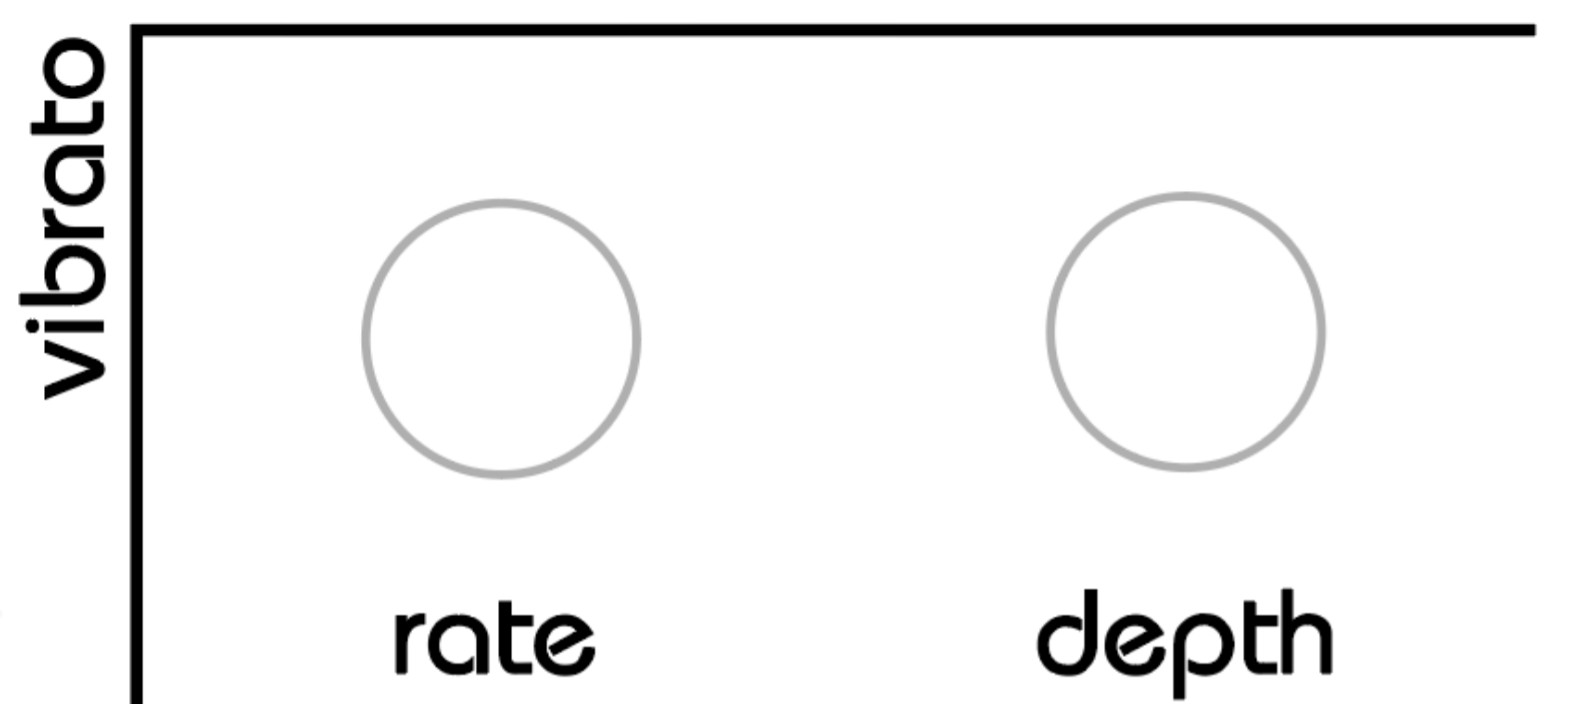
Use the depth knob to add vibrato to the overall pitch of MEGAfm.Use the vibrato rate knob to set the vibrato’s speed.The vibrato can be configured to sync to the incoming MIDI clock at 8 different speeds, please refer to SETUP instructions for more details.
Arpeggiator and Sequencer
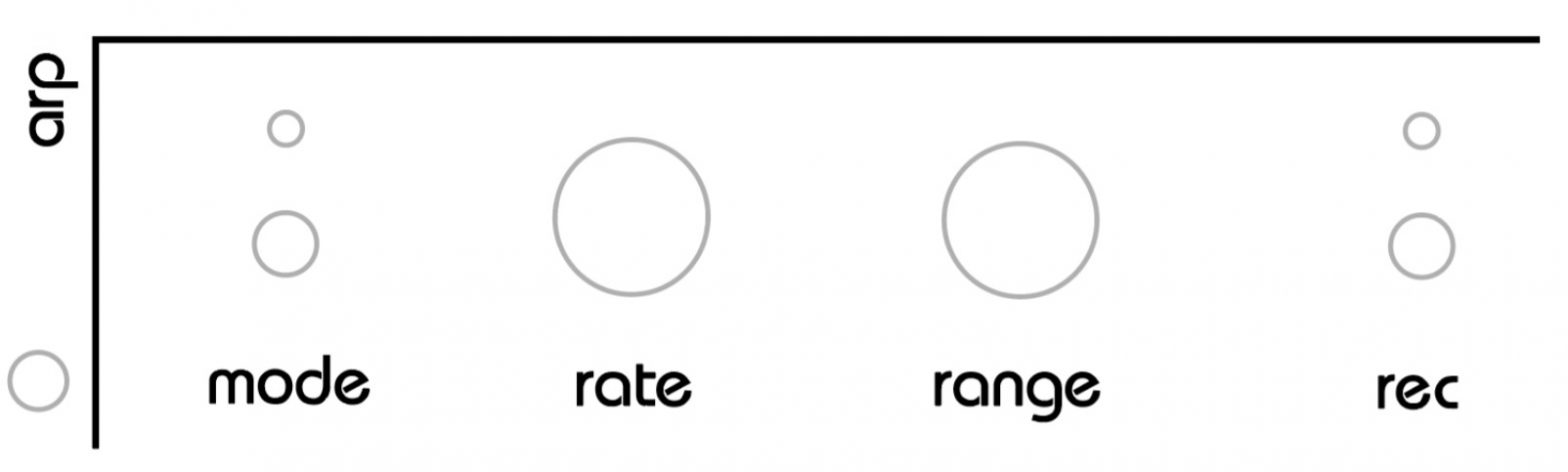
When unison voice mode is active the arpeggiator can be used.The arpeggiator has 7 modes:Up (shown as “UP” on the numeric display)Down (shown as “in” on the numeric display)Up/Down aka pendulum (shown as “Ud” on the numeric display)Random1 (shown as “r1” on the numeric display)The arpeggiator chooses and plays any of the held keys at random.Random2 (shown as “r2” on the numeric display)The arpeggiator chooses and plays any notes at random.Sequencer1 and 2 (shown as “S1” and “S2” on the numeric display)The arpeggiator acts as a sequencer playing up to 16 notes that can be recorded via MIDI.In S2 mode, the sequencer advances a step every time a key is pressed and not in S1 Similarly to a Casio VL Tone.Reminder: The Arp is only active when in unison modeRecording a sequenceTo record a sequence press rec to activate recording mode. The rec LED will flash.Now play up to 16 notes via MIDI. Each preset can store up to 16 notes.Every time you input a note, the step recorder will advance and the numeric display will show the current step.You can use the preset-up button to skip a step. No note will be played.You can also go back a step with the preset down button if you wish to correct a note.The arpeggiator can be set to sync to incoming MIDI clock at 8 different speeds defined by the rate knob. Please refer to Setup for details.
Modulators ( Lfo 1 to 3)

To link a knob or fader to a lfo
 |
move a knob or fader and press a chain-link button. Click the chain button a second time to unlink a knob or fader from a lfo.The LED above the chain button indicates whether the modulator is linked or not. Each knob or fader can link to up to 3 LFOs at once. |
To unlink all the knobs/faders from a LFO
hold the chain button for 4 seconds until the letters CL appear on the numeric display.
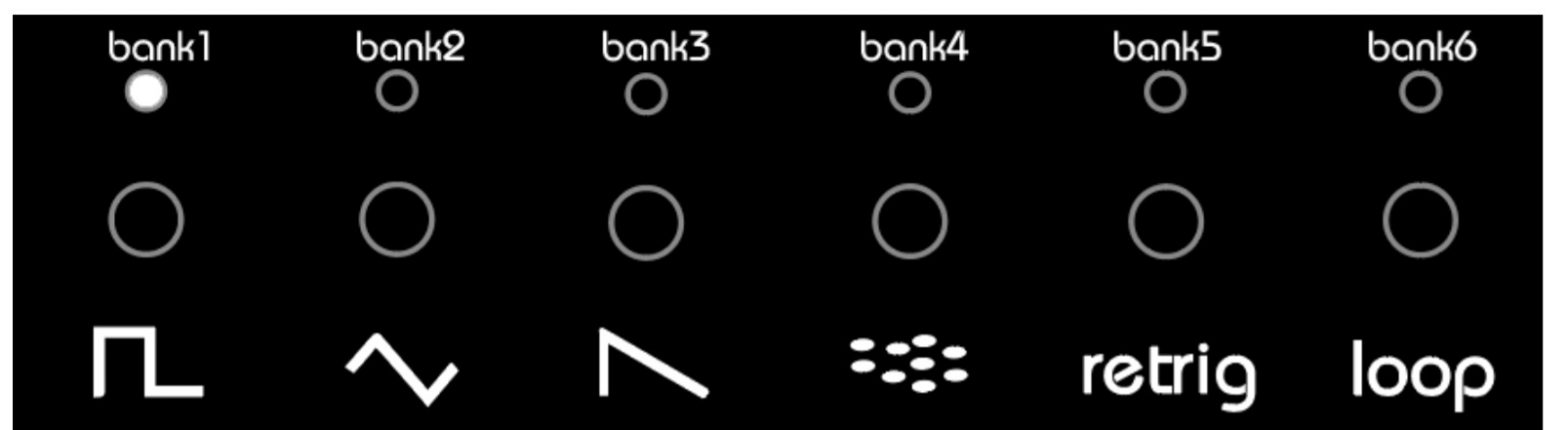
Selecting a lfo waveform
 To select any of the 3 LFOs simply move one of the LFO rates or depth knobs.Use the 4 waveform buttons to select a waveform. Selecting an already lit waveform will put the LFO in manual mode. Now you can adjust the value of the LFO at any time with its depth knobLFO depthSet the depth of an LFO with its depth knob. This defines the amount of effect the lfo will have on the associated knobs or faders.LFO rateSet the rate of an LFO with its rate knob. Each LFO can also individually be configured to sync to the incoming MIDI clock at 8 different speeds, please refer to SETUP instructions for more details. The LFO waveformLED will blink to indicate the rate of the LFO.Note: an LFO can modulate both rates and depths of other LFOs but not those of itself.retrigWhen this feature is active each keypress will retrigger the LFO from the beginning of its cycle. Otherwise, the lfo will only trigger on the first key.loopWhen this feature is active the LFO will loop endlessly instead of in a one-shot manner.Looping noiseWhen an LFO is set to noise, it can send a loop through a table of randomly generated values. The table length can be 8, 16, 32, or infinite values. Press the noise waveform multiple times to set the table length.The screen will show 8, 16,32, or blank (a new random). Every time you press the noise waveform, the tables are regenerated.The table length setting is stored globally for each LFO.Note: an LFO can modulate both rates and depths of other LFOs but not those of itself.
Presets

MEGAfm has 600 preset memory capacity arranged in six banks of 100 presets.MEGAfm currently ships with 50 factories presets (0-49) organized according to the following chart.
| Misc | 0-9 |
| Bass | 10-19 |
| Lead | 20-29 |
| Pads | 30-38 |
| Rhythmic | 39-44 |
| SFX | 45-49 |
Each preset can be edited and stored and preset banks can be transferred to and from a computer via MIDI SYSEX.Loading a PresetSimply press the preset up and down buttons to load a preset.To change bank press preset up or down, and use the 6 LFO waveform button to select a bank within 3 seconds (the current bank is flashing during this time).
Saving a presetYou can save the current preset to any of the 100 slots, first press preset up + preset down simultaneously to enter save mode.The numeric display will flash the current slot number. This starts a 3-second countdown before automatically saving the preset at the same slot.But you can change the destination slot by pressing the preset up or down buttons.Each time you select a new slot the 3-second timer is reset.Once you have selected the destination slot number you can either press preset up+down again to confirm or wait a few seconds for the numeric display to stop flashing.Preset reset / panel updateSometimes a fresh start is nice! Press reset at any time to replace the current preset with preset 0. The numeric display will indicate “P0” for preset zero.Press reset a second time and MEGAfm will read all the faders and knobs as they are set on the control panel. The numeric display will indicate “PA” for the panel.Preset randomizer Hold reset a couple of seconds to completely randomize your preset, anything could happen!

Setup Mode
Hold voicing at startup or anytime for 3 seconds to enter setup mode.“SE” appears on the numeric displayLED BrightnessTurn the vibrato depth knob to adjust brightnessLFO1 to 3 syncs to incoming MIDI clockTurn the respective LFO rate knob to choose whether to link LFO1,2 or 3 to the MIDI clock.Above 12 o clock the setting is on, below the setting is off.The setting is indicated by ON/OF on the numeric displayVibrato sync to incoming MIDI clockTurn the vibrato rate knob to choose whether to link the vibrato to the MIDI clock.Above 12 o clock the setting is on, below the setting is off.The setting is indicated by ON/OF on the numeric displayVelocity controls LFO1Turn the vibrato depth knob to choose whether to control lfo1 with MIDI velocity. With this option activated, the MIDI velocity will control the depth of lfo1 when the rate of lfo1 is above zero. When the rate is zero (stopped lfo) MIDI velocity will override the lfo and directly modulate all parameters associated to the lfo. Use the depth knob to adjust the amount of effect.Above 12 o clock the setting is on, below the setting is off.The setting is indicated by ON/OF on the numeric displayThe numeric display will indicate “Ve” followed by “On” or “Of”Mod wheel controls LFO2Turn the vibrato depth knob to choose whether to control lfo2 with the mod wheel. With this option activated, the mod wheel (CC1) will control the depth of lfo2 when the rate of lfo2 is above zero. When the rate is zero (stopped lfo) the mod wheel will override the lfo and directly modulate all parameters associated with the lfo. Use the depth knob to adjust the amount of effect.Above 12 o clock the setting is on, below the setting is off.The setting is indicated by ON/OF on the numeric displayThe numeric display will indicate “C1” (for MIDI CC1) followed by “On” or “Of”MIDI Aftertouch controls LFO3Turn the vibrato depth knob to choose whether to control lfo3 with the mod wheel. With this option activated, MIDI aftertouch will control the depth of lfo3 when the rate of lfo3 is above zero. When the rate is zero (stopped lfo) Aftertouch will override the lfo and directly modulate all parameters associated with the lfo. Use the depth knob to adjust the amount of effect.Above 12 o clock the setting is on, below the setting is off.The setting is indicated by ON/OF on the numeric displayThe numeric display will indicate “At” followed by “On” or “Of”Arp sync to incoming MIDI clockTurn the arp rate knob to choose whether to link the arp to the MIDI clock.Preset Volume on/offTurn the volume knob to turn preset volume loading on or off.When set to off, the present volume will be ignored when changing preset.Above 12 o clock the setting is on, below the setting is off.The setting is indicated by ON/OF on the numeric displayMIDI THRUPress the LFO1 link button to toggle MIDI THRU on/off.When on, all incoming MIDI is sent to the MIDI output.By default, this setting is OFF.Important: When MIDI Thru is ON, MEGAfm will no longer generate MIDI & will only echo the incoming MIDI – it will no longer transmit on preset change or fader movement for example.Midi Channel, Pitch bend up & down LearnIn setup mode, you can set the input channel simply by sending MEGAfm a NOTE ON message on any midi channel. When a new Midi channel is registered, it is displayed on the numeric display after the letters “Ch”
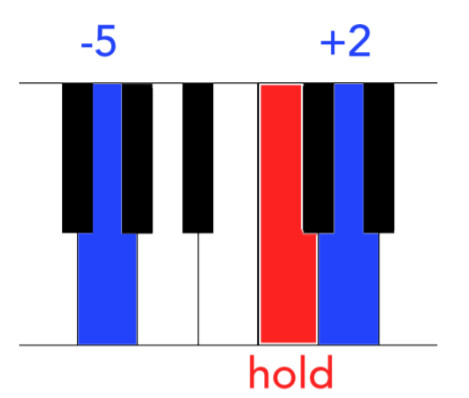 MEGAfm can also learn the pitch bend ranges.Pitch up and down can be any value from 1 to 48. Hold any key then press a key above the first key to define the pitch bend up range or a key below it to define the pitch down range (without releasing the first key).For example, if you wish for MEGAfm to bend up 2 semitones and down 5 semitones, hold C and press D then G without releasing C.Fat mode range (in all modes but unison)When you are in all voice modes but unison, the fat knob will detune the 12 voices in 2 possible ways: by 1 semitone (set the fat/glide knob below 51%) or by 1 octave (set the fat/glide knob above 50%).The LED display will indicate 1S (1 semi) or 1o (1 octave) as you adjust the setting.MultiChannel MPE modeMEGAfm has a special multichannel mode that allows you to control it with an MPE device with multichannel pitch bends, in this mode you can continuously bend each voice within up to 4 octaves.Press the arp mode button to toggle this special mode on or off. When the LED is on, MEGAfm is in normal single channel mode, when LED is off MPE mode is active. When you choose MPE mode, the pitch bend range is set to +/-48semi by default, you are free to change it before exiting setup.IMPORTANT: MPE mode only uses poly12 voice mode at this time.The voice mode button won’t respond when MPE mode is active…Exit setupPress voice mode button again to exit setup.MIDI ImplementationMEGAfm responds to the following MIDI controls.You can also control it with the Plugin (available for free download on the website) which uses the following MIDI parameters.
| Parameter | MIDI CC | Range |
| GLOBAL | ||
| FM Algorithm | 4 | 8-Jan |
| Feedback | 3 | 0-127 |
| Fat | 28 | 0-127 |
| Volume | 7 | 0-127 |
| OPERATOR 1 | ||
| Op1 Detune | 18 | 0-127 |
| Op1 Multiplier | 27 | 0-127 |
| Op1 Total Level | 19 | 0-127 |
| Op1 Attack Rate | 29 | 0-127 |
| Op1 Decay Rate | 21 | 0-127 |
| Op1 Sustain Level | 25 | 0-127 |
| Op1 Sustain Rate | 17 | 0-127 |
| Op1 Release Rate | 30 | 0-127 |
| OPERATOR 2 | ||
| Op3 Detune | 31 | 0-127 |
| Op3 Multiplier | 32 | 0-127 |
| Op3 Total Level | 40 | 0-127 |
| Op3 Attack Rate | 36 | 0-127 |
| Op3 Decay Rate | 44 | 0-127 |
| Op3 Sustain Level | 42 | 0-127 |
| Op3 Sustain Rate | 34 | 0-127 |
| Op3 Release Rate | 11 | 0-127 |
| OPERATOR 3 | ||
| Op2 Detune | 20 | 0-127 |
| Op2 Multiplier | 24 | 0-127 |
| Op2 Total Level | 16 | 0-127 |
| Op2 Attack Rate | 49 | 0-127 |
| Op2 Decay Rate | 50 | 0-127 |
| Op2 Sustain Level | 51 | 0-127 |
| Op2 Sustain Rate | 45 | 0-127 |
| Op2 Release Rate | 37 | 0-127 |
| OPERATOR 4 | ||
| Op4 Detune | 47 | 0-127 |
| Op4 Multiplier | 39 | 0-127 |
| Op4 Total Level | 38 | 0-127 |
| Op4 Attack Rate | 46 | 0-127 |
| Op4 Decay Rate | 33 | 0-127 |
| Op4 Sustain Level | 41 | 0-127 |
| Op4 Sustain Rate | 43 | 0-127 |
| Op4 Release Rate | 35 | 0-127 |
| LFO | ||
| LFO1 Rate | 15 | 0-127 |
| LFO1 Depth | 12 | 0-127 |
| LFO1 Depth (When Active in setup) | Velocity | 0-127 |
| LFO2 Rate | 10 | 0-127 |
| LFO2 Depth | 9 | 0-127 |
| LFO2 Depth (When Active in setup) | 1 (mod wheel) | 0-127 |
| LFO3 Rate | 14 | 0-127 |
| LFO3 Depth | 2 | 0-127 |
| LFO3 Depth (When Active in setup) | Aftertouch | 0-127 |
| ARP | ||
| ARP Rate | 6 | 0-127 |
| ARP Range | 5 | 0-127 |
| VIBRATO | ||
| Arp Rate | 48 | 0-127 |
| Arp Depth | 13 | 0-127 |
Preset Upload/Download (SYSEX DUMP)
MEGAfm holds 600 presets in its memory. The presets are divided into 6 banks of 100 presets.You can transfer 50 presets at a time (or half a bank) to and from MEGAfm via MIDI SYSEX.To download a half bank from MEGAfm to a computer hold preset DOWN at startup. Then choose a BANK using the 6 LFO waveform buttons. Press the BANK button to toggle between A (first half / presets 0-49) or B (second half / presets 50-99).When ready press preset DOWN again to send the presets.MEGAfm will reboot when finished.To upload a half bank to MEGAfm from a computer hold preset UP at startup. Then choose a BANK using the 6 LFO waveform buttons. Press the BANK button again to toggle between A (first half / presets 0-49) or B (second half / presets 50-99).When ready press preset UP again to prepare MEGAfm for the presets.Now send the presets from your computer via a recommended MIDISYSEX software. MEGAfm counts to 99 while it stores the presets and will reboot when finished.
Firmware update
You can transfer new (or old) firmware to MEGAfm via MIDI SYSEX.Hold Arp MODE at startup. This will put MEGAfm in update mode with all LEDs on. Now transfer the SYSEX file with recommended software via a MIDI interface. The LEDS will blink during the transfer, and MEGAfm will reboot when complete.For SYSEX transfers we recommend SYEX LIBRARIAN for MAC and MIDIOX for Windows.Note: the firmware version is displayed as X.X for a half-second at startup for revisions 1.1 and onwards.Firmware files are independent. You can safely install any version on to any other, earlier or later.
Factory Reset
If you wish to restore the device to factory state, hold reset at startup.This will erase internal EEPROM and replace presets 0-50 with built-in factory presets. During the procedure, MEGAfm will display “RE” for reset. Then it will play a test tune in an endless loop (some chords and notes at various volume levels). When you hear the sound, it is safe to turn the unit off and on again.
Power specifications
Your MEGAfm ships with a power supply suited to your region (USA/EU/ UK). The recommended PSU is 9V 500mA Centre Positive
Frequently Asked Questions
- Q: I can no longer change voice mode!A: Please check that you haven’t activated MPE mode in setup.Indeed MPE mode only uses poly 12 mode.If you wish to use other voice modes Please return setup and press arp mode to turn MPE off ( display should show 1C aka single channel).
References
[xyz-ips snippet=”download-snippet”]