
TypeS Appl Controlled Smart Light Bar
Instruction Manual
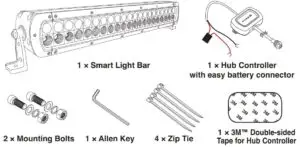
PACKAGE CONTENTS
SPECIFICATIONS (PER LIGHT)
- Working voltage: DC 12V Only
- Bluetooth distance: 30 ft (9.14 m) (no obstacle)
- Frequency band: 2.4 GHz
- Watt: 136W
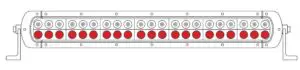
- LEDs: 21 × Super White LED (each light)
- 21 × Multicolor LED (each light)
- Raw Lumens: 18480
- Effective Lumens: 4700
- Weatherproof Light: IP67 Rated (Light bar only)
- Weight: 3.15 kg / 6.94 lb
- Maximum amperage draw: 5.5A
- Replacement Fuse: 10A
INSTALLATION
1) INSTALLING THE LIGHT:
Tools Required:
1/4” drill bit & Drill / Pliers / Wrench
- Choose your desired location to install the light. Make sure the location is strong enough to hold the lights.
- Carefully mark the drilling location through the mounting brackets for a precise installation.
- Install the lights with the provided mounting bracket and bolts.
- Adjust the light to the desired angle with the Allen key provided.
2) CONNECT THE LIGHT TO THE HUB CONTROLLER
- Connect the Smart Off-Road Light cable to the Hub controller. Make sure the connectors are securely fastened and route cables away from engine. The connectors are directional, make sure to connect to the correct position and fasten each end of the cap.

3) INSTALLING THE HUB CONTROLLER:

WARNING: DO NOT mix up the cables or allow the metal ends to touch together because this may damage the battery, charging system and/or electronics on a vehicle. When installing, please make sure your engine is not running.
- For use with 12V power only
- Hub controller hardware cables are color-coded,RED for POSITIVE (+) and BLACK for NEGATIVE (-).
- Connect the RED cable to the POSITIVE (+) battery clamp as illustrated.The POSITIVE battery post will be slightly larger than the NEGATIVEpost, and will be marked with a PLUS (+) sign.There may also be a RED protective cover over the positive battery post.
- Connect the BLACK cable to the NEGATIVE (-) battery clamp as illustrated.The NEGATIVE will be marked with a MINUS (-) sign.There may also be a BLACK plastic protective cover over the negative battery post.
NOTE: After connecting the Smart Hub controller to the car battery, the LED power indicator will flash Blue. If the LED power indicator does not flash once connected, please recheck your power connections.
4) DOWNLOAD THE APP AND START CUSTOMIZING YOUR LIGHTS
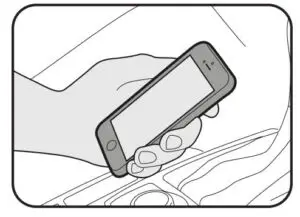
APP INSTALLATION
- Install Smart Lighting APP on your smart device. Scan below QR code or search for the Winplus Type S LED APP in the APP Store or Google Play.
- Once installed, open the APP and begin enjoying your Type S Smart Off-Road lights
USING THE APP
Smart Lighting Home Page
- Tap “Smart Off-Road” icon to start the APP
- APP will automatically pair to the Hub when both the lights and your device are powered on and within the 9.14 m (30 ft) Bluetooth range. We strongly recommend that you set up a private password to prevent unauthorized devices from connecting to your Hub. (Refer to Password instructions on the following page)
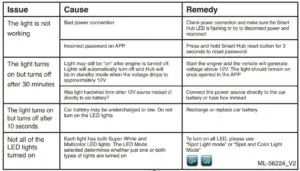
NOTE: The HUB controller has built-in voltage protection to prevent car battery drain in case the lights are accidentally left on. The lights will automatically turn off and the HUB will be on standby mode when the voltage drops to approximately 12V. Once on standby mode, if the car battery is producing below 12V, do not turn on the LED lights until your next engine start or when power is back to 12V or above.

- Master On/Off Switch
- PasswordYou can set up a password to prevent other devices from controlling your lights. Once you have entered your password, it will be saved in the APP and the Smart Hub Controller.
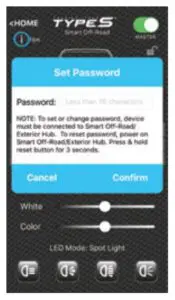
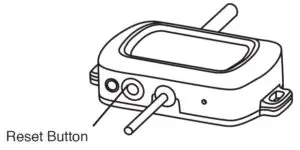
NOTE: To set or change the password, your device must be connected to the Smart Off-Road / Exterior Hub and simply follow on-screen instructions. Changing the password without connecting to the Smart Off-Road / Exterior HUB may cause an invalid password the next time your App and Smart Hub Controller are activated. If you forget your password, simply reset by pressing theSmart Hub Controller reset button for 3 seconds or disconnect the power fromthe car battery.
LED Zone Functions:
Connect and control up to four separate Smart Off-Road Hub Controllers.
Zone On/Off:
Press each zone icon to turn LED On or Off.
Move Zone Icon:
Press and hold zone icon, select “Move” to position each zone icon at your desired location.
Rename Zone Icon:
Press and hold zone icon, select “Rename” to rename each icon. (Note: Maximum 4 characters).
Select Multiple:
You can select and control multiple zones at once. Press and hold zone icon, select “Select Multiple” then select your desired zones by pressing “Confirm.” To ungroup your selection, press and hold zone icon and select “Ungroup.”
Select Vehicle Schematic:
Press >, select your desired vehicle schematic.
Save Preset:
Save your favorite settings.After choosing your settings, press “Save Preset” and enter your preset name. Save up to 10 Presets.
Select Preset:
To select your previously saved preset setting, simply press “Select Preset” and choose your saved setting.
Delete Saved Preset Setting:
To delete a saved preset setting, press “Select Preset”, press and hold the preset you wish to delete. Press “Yes” to delete.
NOTE: Make sure the preset you wish to delete is not currently in use.
Select Color:
Choose from up to 49 different colors. Press “Select Color,” select your desired color and press “Confirm.”
NOTE: Only Multicolor LED lights will show custom colors from color wheel selection.
Brightness:
You can adjust brightness settings on both Multicolor LEDs and Super White LEDs. Slide bar to adjust brightness.
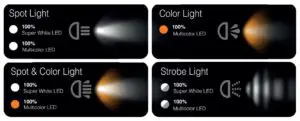
LED Mode:
Choose from 4 different modes and customize the Multicolor LED color in “Select Color.”
ADDITIONAL SMART LIGHTING
Smart Off-Road
WARNING
WARNING: Check your state or provincial laws before installing. Vehicle owner must comply with all applicable laws. This product is intended solely for off road purposes. Manufacturer and Seller assume no liability for installation or use, which are solely the responsibility of the purchaser. This product is not DOT approved and is designed and intended for off road uses only.
WARNINGS:
- Do not install or use product if it, in any way, impairs the safe operation of your vehicle.
- NEVER use the APP while operating your vehicle. Use the APP when vehicle is stationary only.
- Follow manufacturer’s instructions to ensure the product is properly and safely installed.
- Check your state or provincial laws before installing. Vehicle owner must comply with all applicable laws.
- This product is intended solely for off road purposes. Manufacturer and Seller assume no liability for installation or use, which are solely the responsibility of the purchaser.
- This product is not DOT approved and is designed and intended for off road uses only.
- The Manufacturer and Seller are not responsible or liable for consequential, incidental, or indirect damages, whether to person or property, resulting from the installation or improper use of this product.
WARNING: This product can expose you to chemicals including LEAD, DEHP, which are known to the State of California to cause cancer and birth defects or other reproductive harm. For more information go to www.P65Warnings.ca.gov.
Apple, the Apple logo, iPhone, iPad and iPod touch are trademarks of Apple Inc.. App Store is a service mark of Apple Inc. Android, Google Play, and the Google Play logo are trademarks of Google Inc.
3MTM is a trademark of 3M Company.
The Bluetooth® word mark and logos are registered trademarks owned by the Bluetooth SIG, Inc. and any use of such marks by Winplus Co. Ltd is under license. Other trademarks and trade names are those of their respective owners.
WARNING
FCC / IC Compliance Statement:
This device complies with Part 15 of the FCC Rules and Industry Canada license-exempt RSS standard(s). Operation is subject to the following two conditions:
- This device may not cause harmful interference, and
- This device must accept any interference received, including interference that may cause undesired operation.
Changes or modifications to this unit not expressly approved by the party responsible for compliance could void the user’s authority to operate the equipment.
The manufacturer is not responsible for any radio or TV interference caused by unauthorized modifications or change to this equipment. Such modifications or change could void the user’s authority to operate the equipment.
This equipment has been tested and found to comply with the limits for a Class B digital device, pursuant to Part 15 of the FCC Rules. These limits are designed to provide reasonable protection against harmful interference in a residential installation.
This equipment generates, uses and can radiate radio frequency energy, and, if not installed and used in accordance with the instructions, may cause harmful interference to radio communications. However, there is no guarantee that interference will not occur in a particular installation.
If this equipment does cause harmful interference to radio or television reception, which can be determined by turning the equipment off and on, the user is encouraged to try to correct the interference by one of the following measures:
- Reorient or relocate the receiving antenna
- Increase the separation between the equipment and receiver
- Connect the equipment into an outlet on a circuit different from that to which the receiver is connected
- Consult the dealer or an experienced radio/TV technician for help.
The device has been evaluated to meet general RF exposure requirement.
To maintain compliance with FCC/IC’s RF exposure guidelines, this equipmentshould be installed and operated with a minimum distance of 20cm between the radiator and your body.
CAN ICES-005 (B) / NMB-005 (B)
TROUBLESHOOTING
Read More About This User Manuals…
report this adQuestions about your Manual? Post in the comments!
[xyz-ips snippet=”download-snippet”]