TYTUS A10002 Grills Natural Gas Conversion Kit
Warning
To reduce the risk of fire, burn hazard or other injury, read the manual carefully and completely before using your grill.
Warning: For Outdoor Use Only.
Questions, problems, missing part?
Contact Customer Service via:Phone: 855-969-5185Email: [email protected]
Natural Gas Safety Instructions
- Your grill is designed to be natural gas convertible, at a pressure of 7″ water column (W.C.)(1/ 4 psig or 1. 75 kpa), regulated at the residential meter. Check with your gas utility company for local gas pressure and with your local municipality for building code requirements. If your residential gas line pressure has not been regulated to 7″ W.C., contact your local gas utility company for professional assistance.
- You must use the gas pressure regulator supplied with this appliance. This regulator is set for an outlet pressure of 4″ W.C.
- It is recommended that a shut off valve be installed at the gas supply source outdoors. Install the valve at a point after the gas pipe exits the outside wall and before the quick disconnect hose, or install it at the point before the gas line piping enters the ground. See Figure 1 ( Page #8).
- You must use pipe sealing compound or pipe thread tape that’s resistant to the action of natural gas on all male pipe threads when making connections.
- Disconnect your gas grill from its fuel source when testing the gas supply at high pressures. This gas grill and its individual shut off valve must be disconnected from the gas supply pipe system during any pressure testing greater than 1/2 psi (3.5 kPa).
- Turn off your gas grill when testing the gas supply at low pressures. During any pressure testing at pressures equal to or less than 1/2 psi (3.5 kPa), you must close the individual manual shut off valve to isolate the grill from the gas supply pipe system.
- The quick disconnect is attached to a 3/8-inch NPT thread from the gas source. The quick disconnect fitting is a hand-operated device that automatically shuts off the flow of gas from the source when it is disconnected.
- The quick disconnect fitting can be installed horizontally or pointing downward. DO NOT install the fitting with the opening pointing upward because the fitting could collect water and debris.
- Dust covers (plastic plugs) are provided with the quick disconnect to help keep the open ends clean while disconnected.
- The outdoor connector must be firmly attached to a ridged permanent construction.
- The quick disconnect MUST BE installed above ground.
- WARNING: Do not route the 1O-foot quick disconnect hose under a deck. The hose must be visible and inspected prior to each grill use.
Gas Line Piping
- If you are using less than 50 feet of gas line, use a 5/ 8″ O.D. tube. For lengths greater than 50 feet, use one size larger.
- Gas piping may be copper tubing (type Kor L), polyethylene plastic tube (with a minimum wall thickness of 0.062 in.), or standard weight (schedule 40) steel or wrought iron pipe.
- Copper tubing must be tin-lined if the gas contains more than 0.3 grams of hydrogen sulfide per 100 ft.3 of gas.
- Plastic tubing is suitable only for outdoor, underground use.
- Gas piping in contact with earth, or any other material which may corrode the piping, must be protected against corrosion in an approved manner.
- Underground piping must have a minimum of 18″ cover.
Test ConnectionsAll connections and joints must be thoroughly tested for leaks in accordance with local codes and all listed procedures in the latest edition of ANSI 221.58-2018/CSA 1.6-2018.
DANGERDo not use an open flame to check for gas leaks. Be sure there are no sparks or open flames in the area while you check for gas leaks. This will result in a fire or explosion which can cause serious bodily injury or death and damage to property.
WARNINGThe installation must conform with local codes or, in the absence of local codes, with either the National Fuel Gas Code, ANSI 2223.1/ NFPA 54, or the Natural Gas and Propane Installation Code, CSA 8149.1, or the Propane Storage and Handling Code, CSA 8149.2, or the Standard for Recreational Vehicles, ANSI A119.2/ NFPA 1192, and CSA 2240 RV Series, Recreational Vehicle Code, as applicable.Convert to Natura I Gas
Preparation:Before beginning conversion, make sure all parts are present. Place the grill on flat, level surface. Make sure all the control knobs are in the OFF position, LP tank valve is closed, and tank is disconnected from regulator and removed from the grill.
Step 1: Remove the flame tamers, cooking grates, and the warming rack.
Step 2: Remove the cotter pins.
Step 3: Remove the burners.
Step 4: Remove the LP orifices.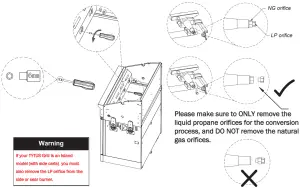
Step 5: Remove the control knobs and use flathead tool to make two counterclockwise turns. Turning this will allow natural gas to flow when it is connected.
Step 6: Install the burners.Make sure the cross lighting ports are toward the bottom when installing.
Step 7: Install the cotter pins.
Step 8: Install the control knobs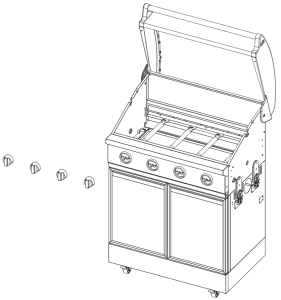
Step 9: Install the NG regulator on the bracket and install the kit on bottom box.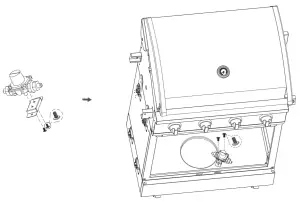
Step 10: Connect to the natural gas source.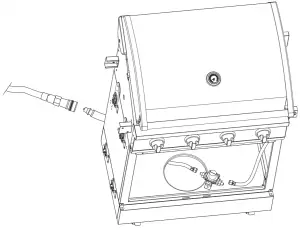
- Reinstall the four flame tamers, two cooking grates, and warming rack
- Typical NG Grill Pipe Installation . Hose
-
- The TYTUS Grills conversion kit is designed to ONLY fit TYTUS LP convertible Grills and Grill
- If the hose becomes worn or damaged, please contact customer
Figure 1
 report this ad
[xyz-ips snippet=”download-snippet”]