USER MANUALCompact Wireless Microphone system
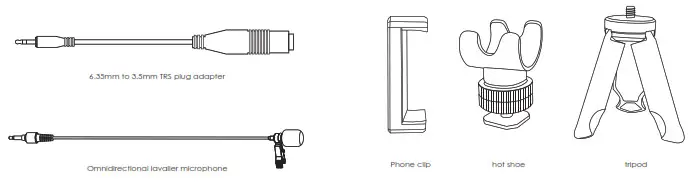
Accessories
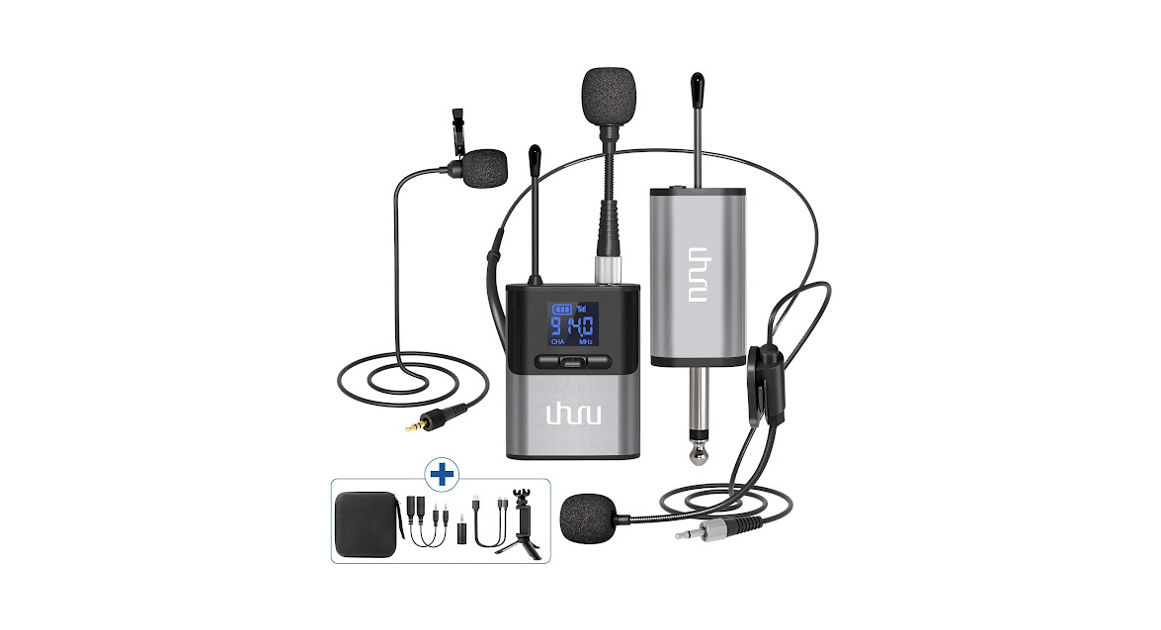
Discerption
WM-720 compact wireless microphone system utilizes UHF (Ultra High Frequency) for audio signal transmission. It is extremely compact, lightweight, and has a long communication range. The built-in battery lasts up to 7 hours. It also has a full metal body that not only looks premium but also sturdy. There is an LCD to show the operation status. WM-720 can be used for voice amplifying, audio recording, and live streaming.
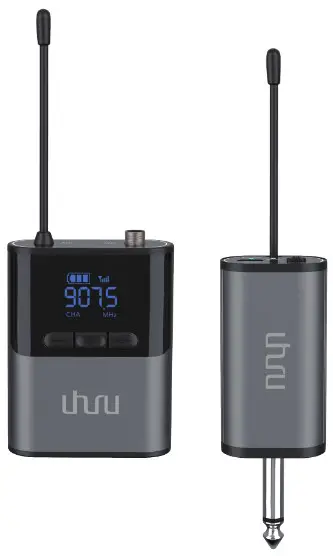
Transmitter
![]()
- Antenna
- Microphone port—support lavalier/headset/stand/condenser microphone.
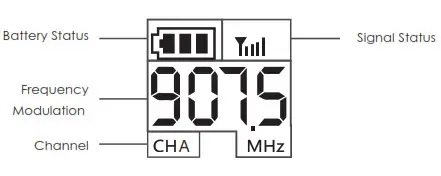
- LED display—display the battery status, transmission frequency, and channel.
- Operation button—“– ” key for volume decrease and “+ ” key for volume increase. Long press the“ +” key to change the channel.
- Power on/off button—long-press for power off.
- LED charging indicator—Red light means charging and blue light means 100% charged.
- MicroUSB charging port—requires DC5V1A external power supply.
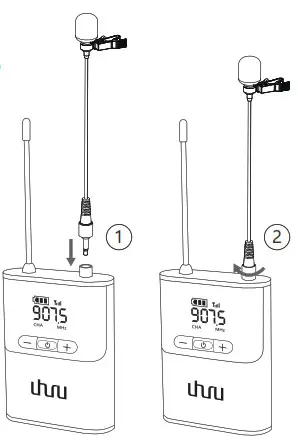
Mount the microphone to the Transmitter
Insert the microphone( lavalier or ear hook)into the jack marked with “MIC” on the transmitter. To ensure a secure connection, be sure to tighten it by rotating the ring.
NoteAfter turning off the transmitter, be sure to remove the microphone to prevent damage to the plug during storage
Features
| Reliable UHF Transmission. | 32 Switchable Channel to Avoid Interference |
| Compact and Lightweight. | Frequency Auto Match. |
| Built-in Battery. | Easy-to-use. |
| Up to 7 hours of operation. | LED Screen |
| High-sensitivity Microphone. | Compatible with multiple devices. |
| Clear Sound. | (Additional accessories may require) |
| Omnidirectional Polar Pattern. | Metal Body. Sturdy and Heavy-Duty. |
Receiver
- Antenna
- Power on/off—short press to turn on the device and long press to turn off.
- LED low-battery indicator—blue light is on when it is fully charged, red light on when the batterylevel is low. Please recharge the device when the red light is on.
- LED indicator of RF/AF—the green light is on when receiving the signal from the transmitter. The yellow light will be on when the audio is being outputted.
- 6.35mm TS plug
- LED charging indicator—red light is on when charging and blue light on when fully charged.
- MicroUSB Charging port—requires DC5V1A external power supply
How to use it with an audio device
Note Insert the 6.35mm jack into the 6.35mm audio port of the audio devices.
How to use it with a smartphone
| Install the hot shoe and clip on the tripod according to the image
|
Put the smartphone on the clip and adjust it to make it stable.Then install the receiver on the hot shoe. |
Connect smartphone with the receiver via a 6.35mmto 3.5mm TRRS adapter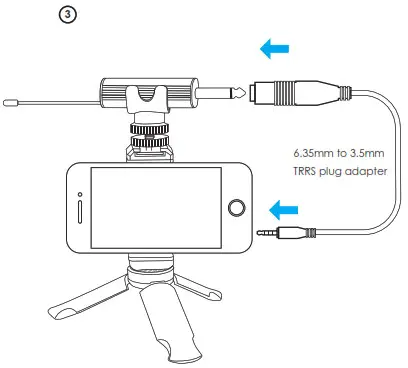 |
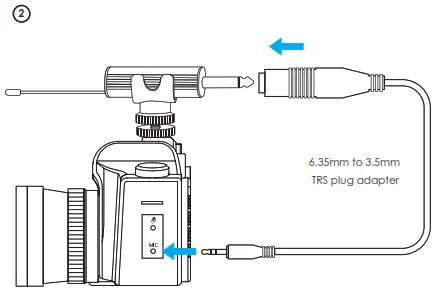
How to use it with a camera
Install the receiver and hot shoe on the camera

Connect the camera with the receiver via a 6.35mm to 3.5mm TRS adapter
Display
Please read the following instructions carefully before using this product.
- Plug the receiver into an audio device with a 6.35mm audio jack.
- Short press the power button of the micro receiver to turn on the receiver.
- Short press the power button of the transmitter to turn on the transmitter.
- When the “RF” indicator light of the micro receiver is on, the wireless microphone system is under working condition.
If you need to use multiple microphone systems in the same room, you can follow the guideline below to lock the channel
- Power on the receiver to be paired
- Press the ” -” key of the transmitter and then simultaneously press the power button of the transmitter until the display board is on.
- When the receiver RF/AF indicator shows blue light, it is successfully paired.
- After pairing, long-press the key “+ ” or “_ ” of the transmitter until CHXX appears on the display board. Then you can set the channel by “ +” or “ _“ key.
- 5 seconds after the channel is set, the transmitter exits the channel selection window. Short Press the “+ ” or “_ ” key to set the output volume of the receiver.
WM-720 System specification
| modulation Mode | Digital Frequency Modulate |
| Frequency Range | UHF 500-980MHz |
| Preset Frequencies | 32 Channels (Automatically Paring) |
| Frequency Response | 75Hz-18kHz ± 3d8 |
| Max. Deviation Range | ±50kHz (with level limiting) |
| T.H.D | < 1.0% gl kHz |
| S/ N | > 98d8 |
| Working Range | Up to 50m |
| RF Cartier Stability | +0.005% (-10°C-50t) |
Receiver
| Dimension | 90 x 18 x 32 mm |
| Power Supply | Built-in U-on Rechargeable battery ( 650mAh) |
| Power Consumption | 80mA ± 10 Ma |
| Battery Life | 6 hours Max. |
| Recharging Time | 2 hours |
Transmitter
| Dimension | 64x18x50(mm) |
| Carrier Frequency Power | 10mw |
| Battery Type | Built-in Li-on Rechargeable battery (650mAh) |
| Power Consumption | 110mA ±10mA |
| Battery Life | 6 hours Max. |
| Recharging Time | 2 hours |
Troubleshooting
If you encounter any problems when using the WM-720 wireless microphone system, please check the following method to troubleshoot. If you still have problems, please contact us.
| Status | Reason | Measures |
| Squeal | Use the speaker to play the
sound recorded by the microphone in the same sound field (indoor) |
Avoid using speakers to play the sound recorded by the microphone in the same sound field (indoor) |
| Cannot boot | The battery is dead | Connect the device to a power supply to charge. |
| The environment is too cold | The battery consumption in a cold environment is higher than in normal conditions. | |
| Noisy or distortion, including electric current, base noise, boom, etc. | The signal is interrupted, |
|
| Noisy sound, distortion, and choppy | The signal of the transmitter is
blocked |
Ensure that the line of sight between the transmitter and receiver antennas is unobstructed. Your body, clothes, and the stage scenery can cause obstacles. Be sure the transmitter and receiver are within 50 meters. If there are obstacles,
you may need to shorten the distance between the transmitter and receiver. |
| Cracking voice | The microphone is too close to
the sound source |
Adjust the distance between the microphone
and sound source. It may cause clipping if they are too close. |
| Too much ambient
sound being picked up |
The lavalier microphone that comes with the system is a unidirectional microphone. It may pick up too much ambient sound. | Be sure to keep the microphone as close to the filming object as possible |
| No sound | Not properly plugged | Be sure the 6.35 audio jack of the receiver is connected to the Mic port of the speaker |
| The volume of the transmitter
is too low |
Adjust the volume of the receiver. | |
| Cannot change the channel | Didn’t follow the channel
setting guidelines to set the channel |
Long press the “ + ” or “ _ “ key to enter the channel selection window, then set the channel by “ + ” or “ _ “ key. |
Technical support[email protected]www.uhurumobility.com
WM-720
References
[xyz-ips snippet=”download-snippet”]