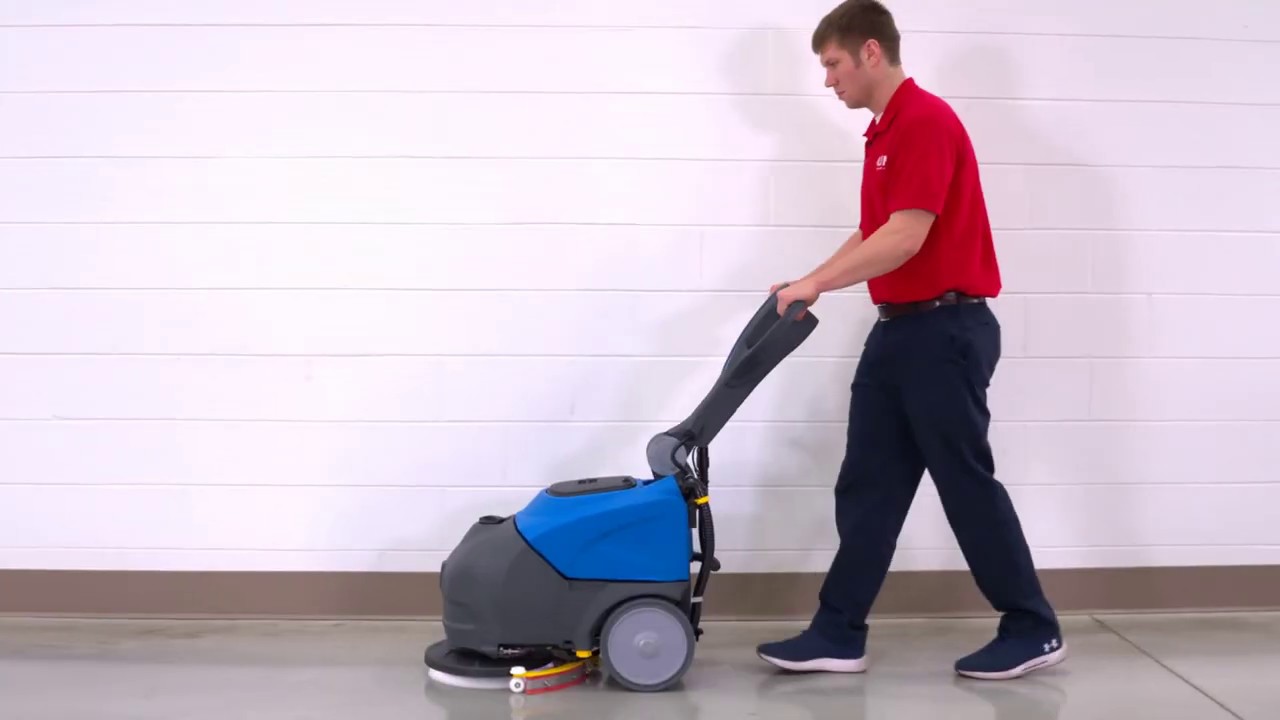
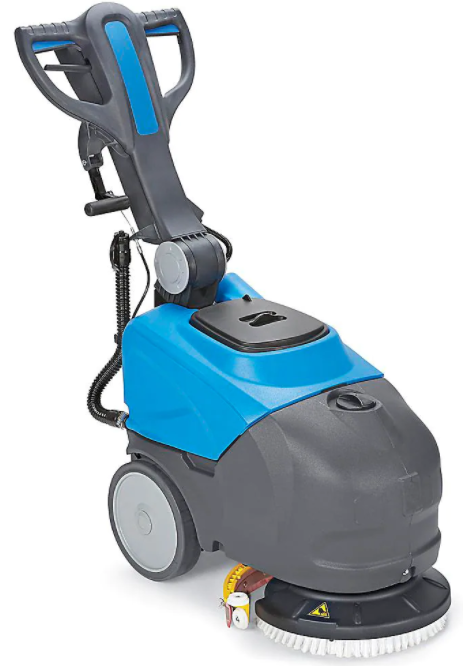
ULINE Compact Auto Floor Scrubber
SAFETY
- Disconnect the scrubber from the main power socket before performing maintenance.
- Only use the scrubber as instructed in these instructions. Only use the accessories recommended by the manufacturer.
- Do not move or transport the scrubber by pulling on its power cable. Do not use the power cable as a handle, close doors on it or pull it over sharp objects or corners. Do not run over the power cable with the scrubber. Keep the power cable completely clear of hot surfaces.
- Do not disconnect the scrubber by pulling on the power cable. Grip the plug, not the cable, to disconnect the scrubber.
- Switch off all controls before unplugging the scrubber.
- Do not use the scrubber to clean flammable or combustible liquids like gasoline. Do not operate the scrubber in areas where such liquids may be present.
GENERAL INFORMATION
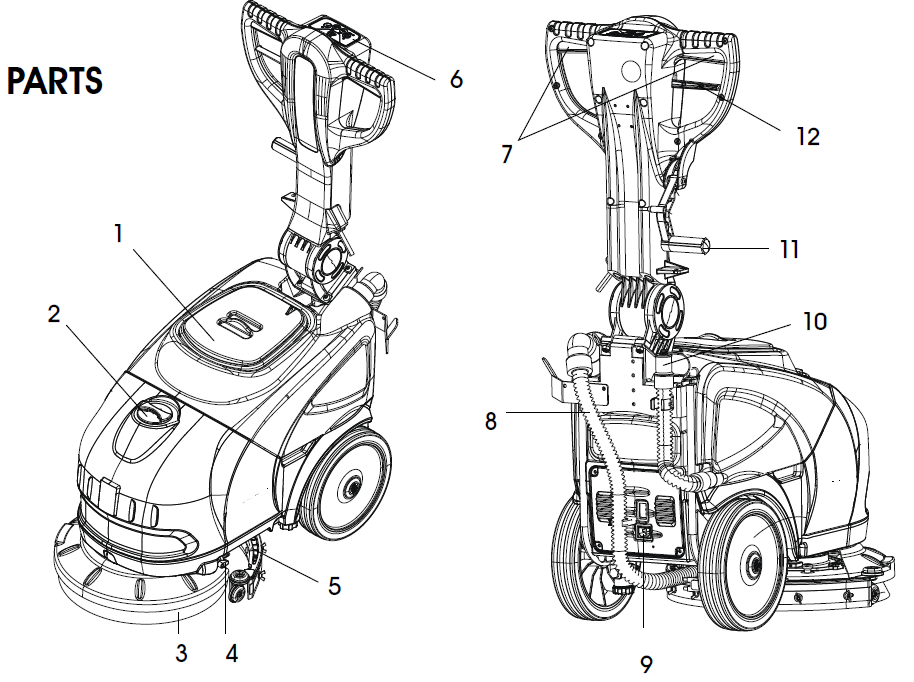
DESCRIPTION
- Recovery Tank
- Detergent Tank
- Nylon Brush
- Detergent Tap
- Squeegee
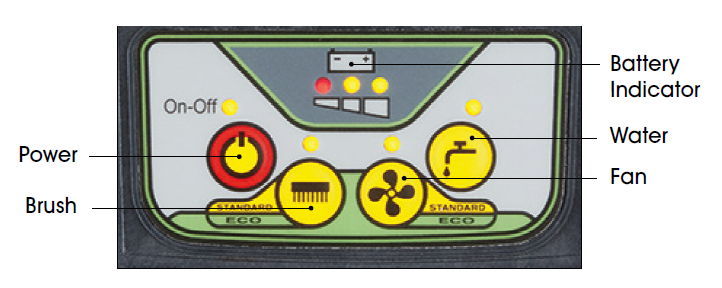
- Control Panel
- Drive Lever
- Recovery Tank Hose
- Power Inlet
- Drain Hose
- Squeegee Release
- Handle Release
ASSEMBLY
NOTE: Battery must be fully charged before first use.
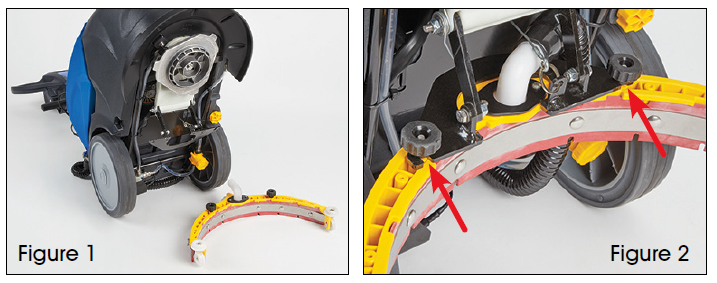
ASSEMBLE SQUEEGEE
- Tilt unit back and attach squeegee to scrubber by inserting the black knobs into the notches on the black bar. Turn knobs clockwise to tighten. (See Figures 1 and 2)

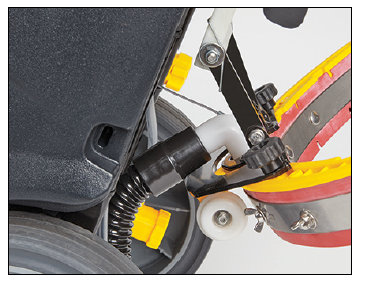
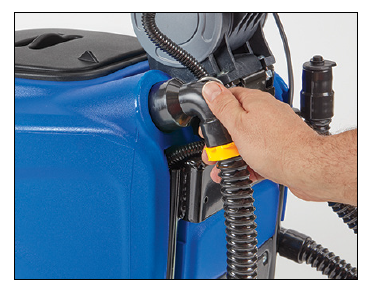
- Connect hose end to squeegee. (See Figure 3)
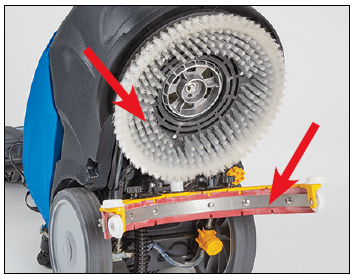
ASSEMBLE BRUSH
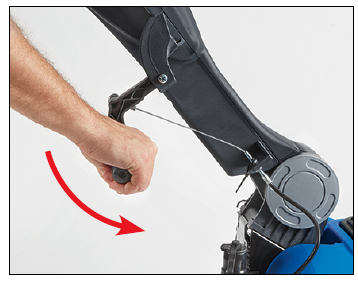
Install the brush by rotating it on counterclockwise. Reposition the unit upright. (See Figure 4)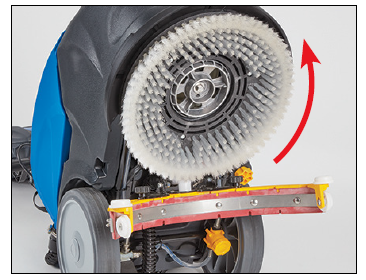
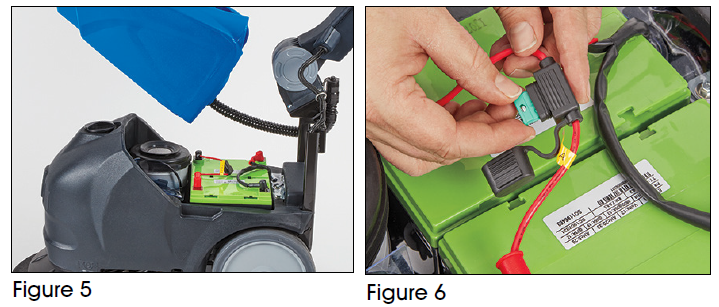
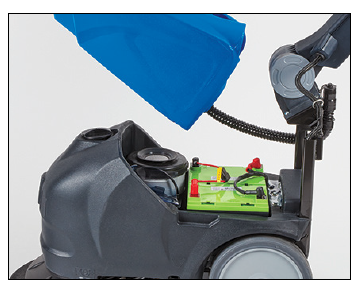
INSTALL FUSE
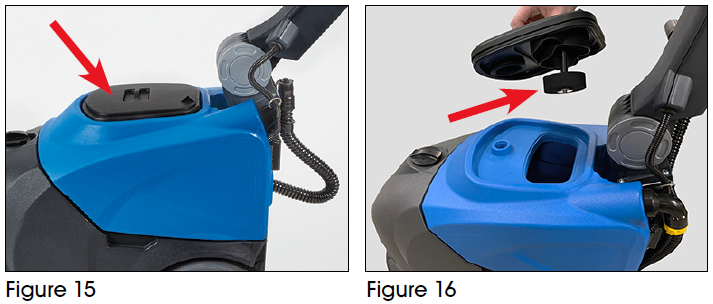
- Locate fuse in plastic parts bag. Lift recovery tank off unit to expose fuse connector. Connect fuse and close connector. Replace recovery tank on unit and place lid on top. (See Figures 5 and 6)
- Connect hose to tank. (See Figure 7)
OPERATION
FILL TANK
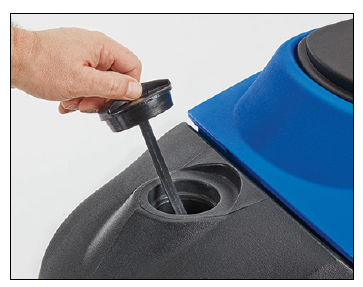
- Add water and detergent into the tank. (See Figure 8)NOTE: Use a non-foaming detergent with a pH range between 7-11. Be sure to follow the detergent instructions for proper dilution.
- Open flow from detergent tank by pushing lever up to horizontal position. Leave open. (See Figure 9)
 NOTE: Use a non-foaming detergent with a pH range between 7-11. Be sure to follow the detergent instructions for proper dilution.
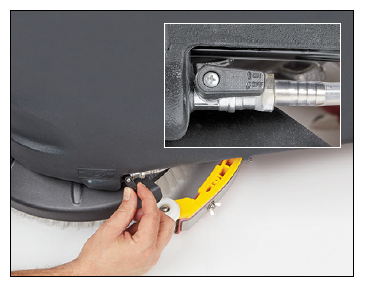
BEGIN WORK
- Lower squeegee by pushing handle down. (See Figure 10)
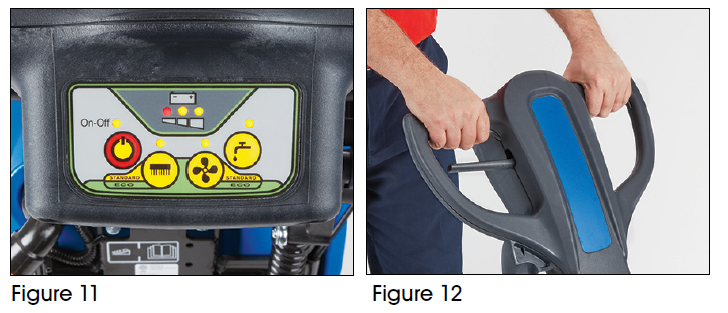
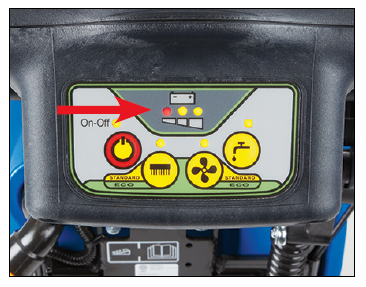
- Turn on unit and press brush button. All lights will light up and unit is fully functional. (See Figures 11 and 12)
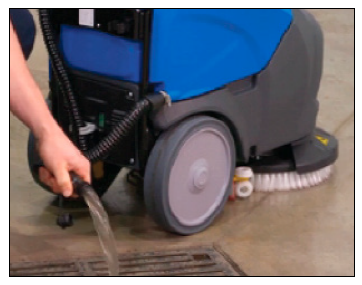
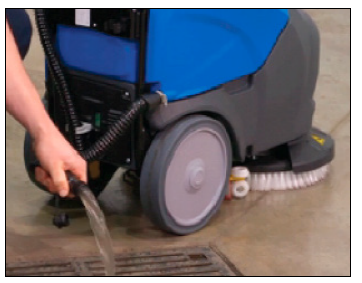
- After use, empty the recovery tank by using the attached drain hose. (See Figure 13)
- Once finished, charge the battery.
NOTE: The battery should be charged after every use. For optimal battery life, leave plugged in when not in use.
WHEN FINISHED CLEANING
- Turn machine off by pressing the On/Off button for at least four seconds.
- Raise squeegee.
- Close the detergent tap.
- Empty the recovery tank (see Maintenance).
- Charge the battery (see Maintenance).
MAINTENANCE
DAILY MAINTENANCE
- Use the attached drain hose to empty the dirty water from the recovery tank. (See Figure 14)
- Remove lid and check that dirty water tank float is undamaged, clean and moves freely on pin. (See Figures 15 and 16)
- Lift off recovery tank to clean. (See Figure 17)
- Clean brush and check squeegee is clean and blades are not damaged. (See Figure 18)
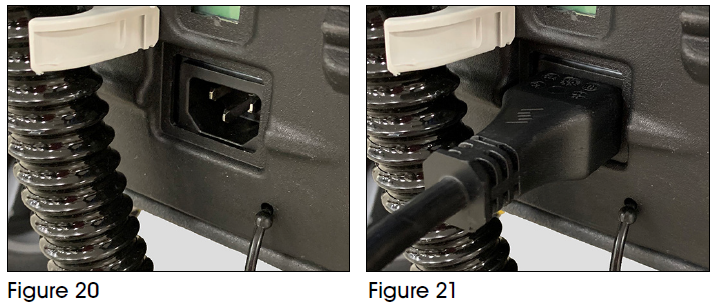
- Check battery charge. (See Figure 19)
- To recharge batteries, plug in battery charger using electrical cord provided with machine. Charge is complete when the green LED light is on. (See Figures 20 and 21)
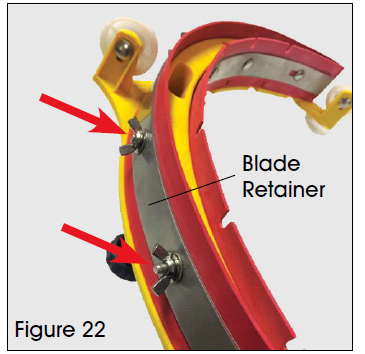
REPLACING THE SQUEEGEE BLADE
- Remove the squeegee assembly using the two black knobs.
- Remove the squeegee blade by removing the screws, wing nuts and blade retainers. (See Figure 22)
- Reuse the same blade by reversing the edge in contact with the floor. The blades should be reused until all four edges are worn out and can be replaced at once.
- Align the new (or reversed) blades with the tabs and screw holes on the squeegee body.
- Reposition the two blade retainers, and insert the screws. Attach and tighten the wing nuts.
BRUSH REPLACEMENT
- With the underside exposed, remove brush by rotating clockwise off the center hub.
- Install new brush by rotating counterclockwise onto the center hub.
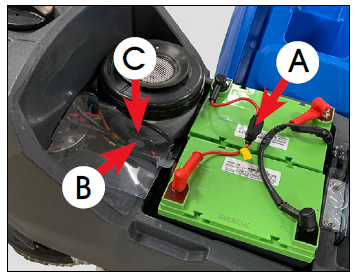
CHECK MOTOR FUSES
NOTE: Fuses need to be replaced with the correct value. Value is listed on the fuse.
- Main fuse (A) between batteries – 30 amp
- Brush motor (B) – 25 amp
- Vacuum motor (C) – 20 amp
- Lift off recovery tank. (See Figure 23)
- Locate fuses. (See Figure 24)
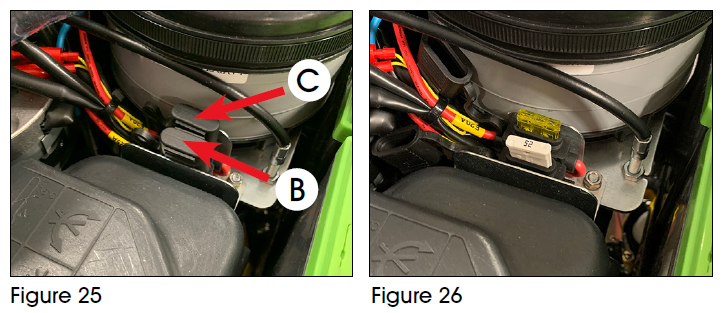
- Pull off black caps from the brush motor fuse (B) and the vacuum motor fuse (C). (See Figures 25 and 26)
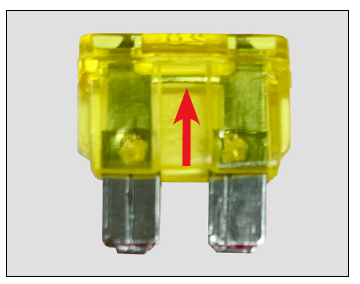
- Check the fuse to see if it is blown by looking in the fuse window. If the metal wire is present and not broken, the fuse is good. If the metal wire is missing or broken, the fuse is bad and needs to be replaced with a new fuse. (See Figure 27)

TROUBLESHOOTING
| OPERATING ISSUE | CAUSES | RECOMMENDATIONS |
| The machine does not work. | The batteries need to be charged. | Charge the batteries. |
| The brush does not rotate. | The brush button LED is off.
The brush motor thermal cutout has tripped; the motor has overheated. The batteries need to be charged. The brush motor fuse has blown. |
Press the brush button.
Turn the unit off. Let the machine cool down for at least 45 minutes. Charge the batteries. Replace the brush motor fuse. |
| The machine does not clean evenly. | The brush or floor cleaning pad is worn. | Replace the worn brush or floor cleaning pad. |
| OPERATING ISSUE | CAUSES | RECOMMENDATIONS |
| No detergent is delivered. | The detergent button LED is off. The detergent tank is empty.
The brush motor is off.
The hose delivering the detergent to the brush is blocked. The detergent tap is dirty or faulty.
The in-line filter is dirty (left side from operator’s position near the wheel). |
Press the detergent button. Fill the detergent tank.
Turn the motor on by pressing the brush button. Unblock and open the detergent tank tap. Have the detergent tap cleaned or replaced. Clean the filter. Make sure to close the detergent tap prior to cleaning. |
| The suction motor does not start. | The fan button LED is off.
The vacuum motor fuse is blown. |
Press the fan button.
Replace the vacuum motor fuse. |
| The squeegee does not clean or has poor suction. | The edge of the squeegee blades in contact with the floor is worn.
The squeegee or hose is blocked or damaged. The float switch has tripped (dirty water drum), is clogged by dirt or broken. The suction hose is blocked. The suction hose is not connected to the squeegee or is damaged. Debris is trapped between the squeegee blades. |
Replace the squeegee blades.
Unblock and repair the damage.
Empty the recovery tank or reset the float switch.
Unblock the hose. Connect or repair the hose.
Clean out debris from the squeegee blades. |
| The machine leaves stripes of wet floor. | Dust or debris on the floor is catching on the squeegee blades.
Debris is trapped between the squeegee blades. The squeegee blades are worn. |
Sweep the floor prior to using the machine.
Clean out debris from the squeegee blades. Replace the squeegee blades. |
| The batteries do not provide the nominal work time. | The battery charger is not working. | See battery charging instructions. |
| The battery discharges too fast during use, even though it has been charged correctly. | The battery is new and does not deliver 100% of its expected capacity. | This is normal. New batteries require a break-in period of approximately 10 charging cycles. Unplug unit and use as normal. Charge after use. |
ERROR CODE DISPLAY
| ERROR CODE | ERROR |
| Brush Button LED:
2 quick flashes / pause / 2 quick flashes. |
Brush short circuit error. |
| Brush Button LED: 1 flash / pause/ 1 flash. | Overcurrent error. |
| Fan Button LED:
2 quick flashes / pause / 2 quick flashes. |
Suction short circuit error. |
| Fan Button LED: 1 flash / pause / 1 flash. | Overcurrent error. |
| Brush Button LED: + Fan Button LED, synchronized flash / pause / synchronized flash. | Electronic board temperature error. |
| Brush Button LED:
4 quick flashes / pause / 4 quick flashes. |
Brush thermal protector error. |
| Battery indicator yellow LED:
7 quick flashes / pause / 7 quick flashes. |
Machine on with battery charger powered error. |
| Battery indicator yellow LED:
5 quick flashes / pause / 5 quick flashes. |
Excess battery voltage error. |
BATTERY CHARGER VISUAL SIGNALS
NOTE: Refer to Battery Charger manual for full instructions.
OPERATING SIGNALS
Red LED Flashing (twice)Battery charger is set to charge.Red LED OnFirst phase of charge in progress.Yellow LED OnSecond phase of charge in progress.Green LED OnCharge complete.
TROUBLESHOOTING
Yellow LED FlashingUnsuitable battery OR battery not connected OR output short circuit.Red LED FlashingBattery has reached its maximum charging time limit.NOTE: This is normal. New batteries require a break-in period of approximately ten charging cycles. Unplug unit and use as normal. Charge after use.
![]()
[xyz-ips snippet=”download-snippet”]