ULINE H-1981 Automatic Label Dispenser Instruction Manual
OPERATING INSTRUCTIONS
- Pull photo eye away from unit approximately 2½” or so and turn on Move sensor back and forth with finger to observe how it turns motor on and off. Shut motor off.
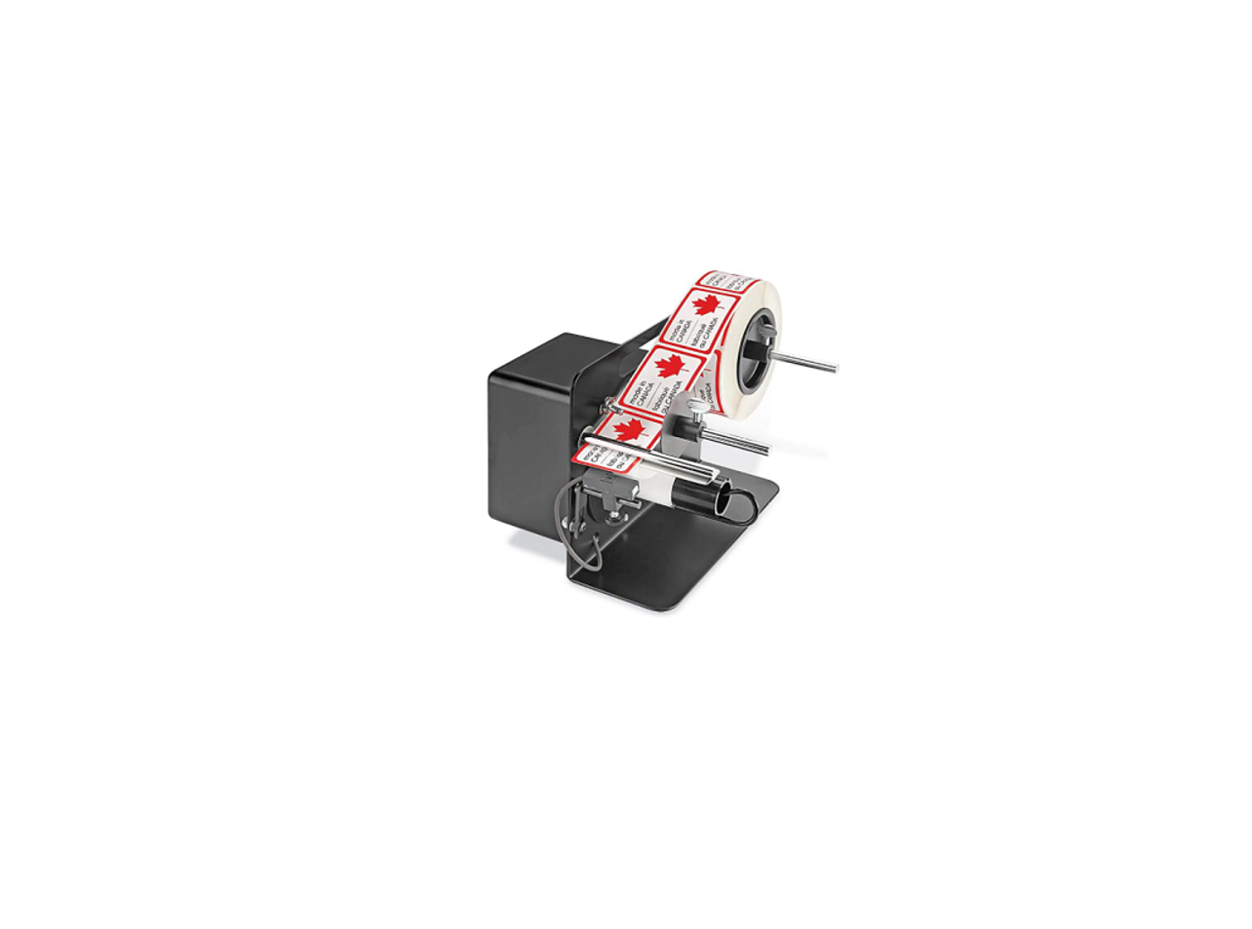
- If label roll has 3″ core, install core inserts in each side of roll – place on roll holder rod (M) at rear and tighten locking collar with thumb screw into position against core insert to hold roll and other core insert against side collar and side plate of unit.
- If label roll has smaller core diameter, mount first core insert on rod (M) with flange against dispenser side plate, then slide roll of labels on rod, install second core insert against roll and then lock collar with thumb screw.
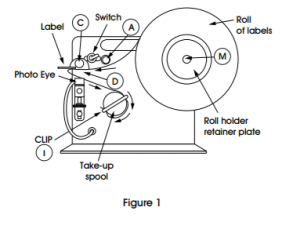
- Pull leading edge of carrier paper web under the first chrome bar then between the next chrome bar (C) and plate (D) and back around plate, down toward take-up spool.(See Figure 1)
- About 5″ of carrier paper is needed for a leader for dispensing Attach leader to take up spool by pulling clip “I” off of spool and then sliding the clip back on over the leader – leader is now engaged.
- Adjust side guide (A) flush against web, with left edge of print-out web about 1/8″ from side plate of
- Position photo eye to shut off motor just as rear of label emerges from under rod (C). You should be able to just see the end of the If the label is permitted to advance too far, it can fall off web or may continue down on the web without being seen by the photo eye sensor. Adjust eye position for smooth operation of unit as labels are removed.
- FOR NARROW LABELS: Factory setting of the switch accommodates labels 1¼” wide or For narrower labels, adjust lateral switch setting by removing one or more of the spacers on the unit. (See Figure 2) To do this, remove lock nut and remove button head screw with a small Allen wrench. Remove spacers until photo eye is positioned in the center of the label. Tighten assembly against the side plate. Replace and tighten lock nut.OPERATING INSTRUCTIONS CONTINUED
- Proper Dispensing: label releases from the carrier paper and the front edge of the label is seen by the sensor of the eye causing the motor to stop. If the edge of the label is not seen, adjust the directionof the label advance. Loosen the socket head cap screw (F) with the larger Allen wrench included and tilt (D) up or down until the label correctly hits the sensor. Tighten screw. (See Figure 3)
- PROBLEM LABELS: It is not always possible to advance the label full If the eye is set to advance full length and the label does not have sufficient body to activate the sensor, it may be necessary to shorten the label advance by moving the eye in toward the dispenser. The label is dispensed by lifting the front edge off the eye and lifting up slightly as it feeds out so it continues to clear the sensor. Labels exceeding 3″ in length can be dispensed in the same manner.
- WASTE CARRIER PAPER REMOVAL: The more carrier paper winds around the take-up spool, the faster the movement of the web thru the This may or may not be beneficial to the dispensing operation. Remove periodically as necessary. It only takes a few moments when done properly.CAUTION: We do not recommend pulling out the spring clip from the take-up spool when waste is wound around it. To remove the waste, rotate the roll of waste counterclockwise on the take-up spool—reversing its winding direction and loosening the winding. When sufficiently loose, pull waste roll away from and off the take-up spool until the spring clip is exposed and free. Remove spring clip and balance of waste.
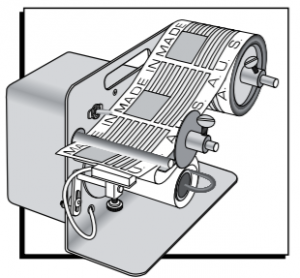
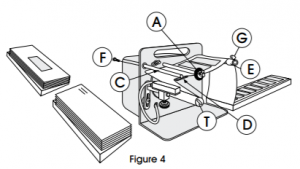
- Unit will dispense fan-fold computer print-out label forms within its width Place print-out to rear of dispenser with label side up to feed bottom of print-out first. Last label printed is first label removed. (See Figure 4) Print-out can feed over side collar.
- Place material to be labeled in a stack directly at front (delivery end) of machine – affix label with one hand, remove labeled piece with the other. Stack addressed material to left of stack of blank Keep the stack high enough to keep movement of label to a minimum.
 OPERATING INSTRUCTIONS CONTINUED
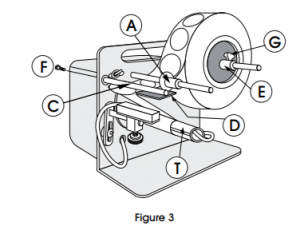
Read More About This Manual & Download PDF:
[xyz-ips snippet=”download-snippet”]