
ULINE H-2508 Adjustable Pallet Stand Installation Guide
1-800-295-5510uline.com
SAFETY
![]() WARNING! Follow these safety instructions to avoid any personal injuries.
WARNING! Follow these safety instructions to avoid any personal injuries.
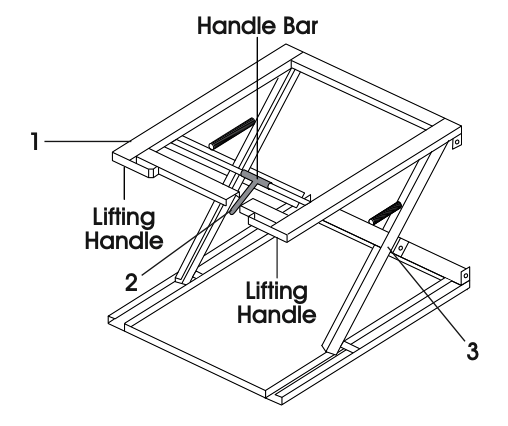
- Raise and lower the pallet stand only from side with lifting handles and handle bar.
- Do not raise or lower the pallet stand while loaded.
- Do not stand on the pallet stand.
- Do not crawl under the pallet stand at any time.
- Keep hands, feet, and foreign objects out from underneath pallet stand.
- Do not exceed maximum loading capacity of 5,000 pounds.
- Ensure pallet stand is evenly loaded for safety.
- Visually check that the top of the scissor leg is securely in lock notch.
- Make sure all operator safety labels are in place.
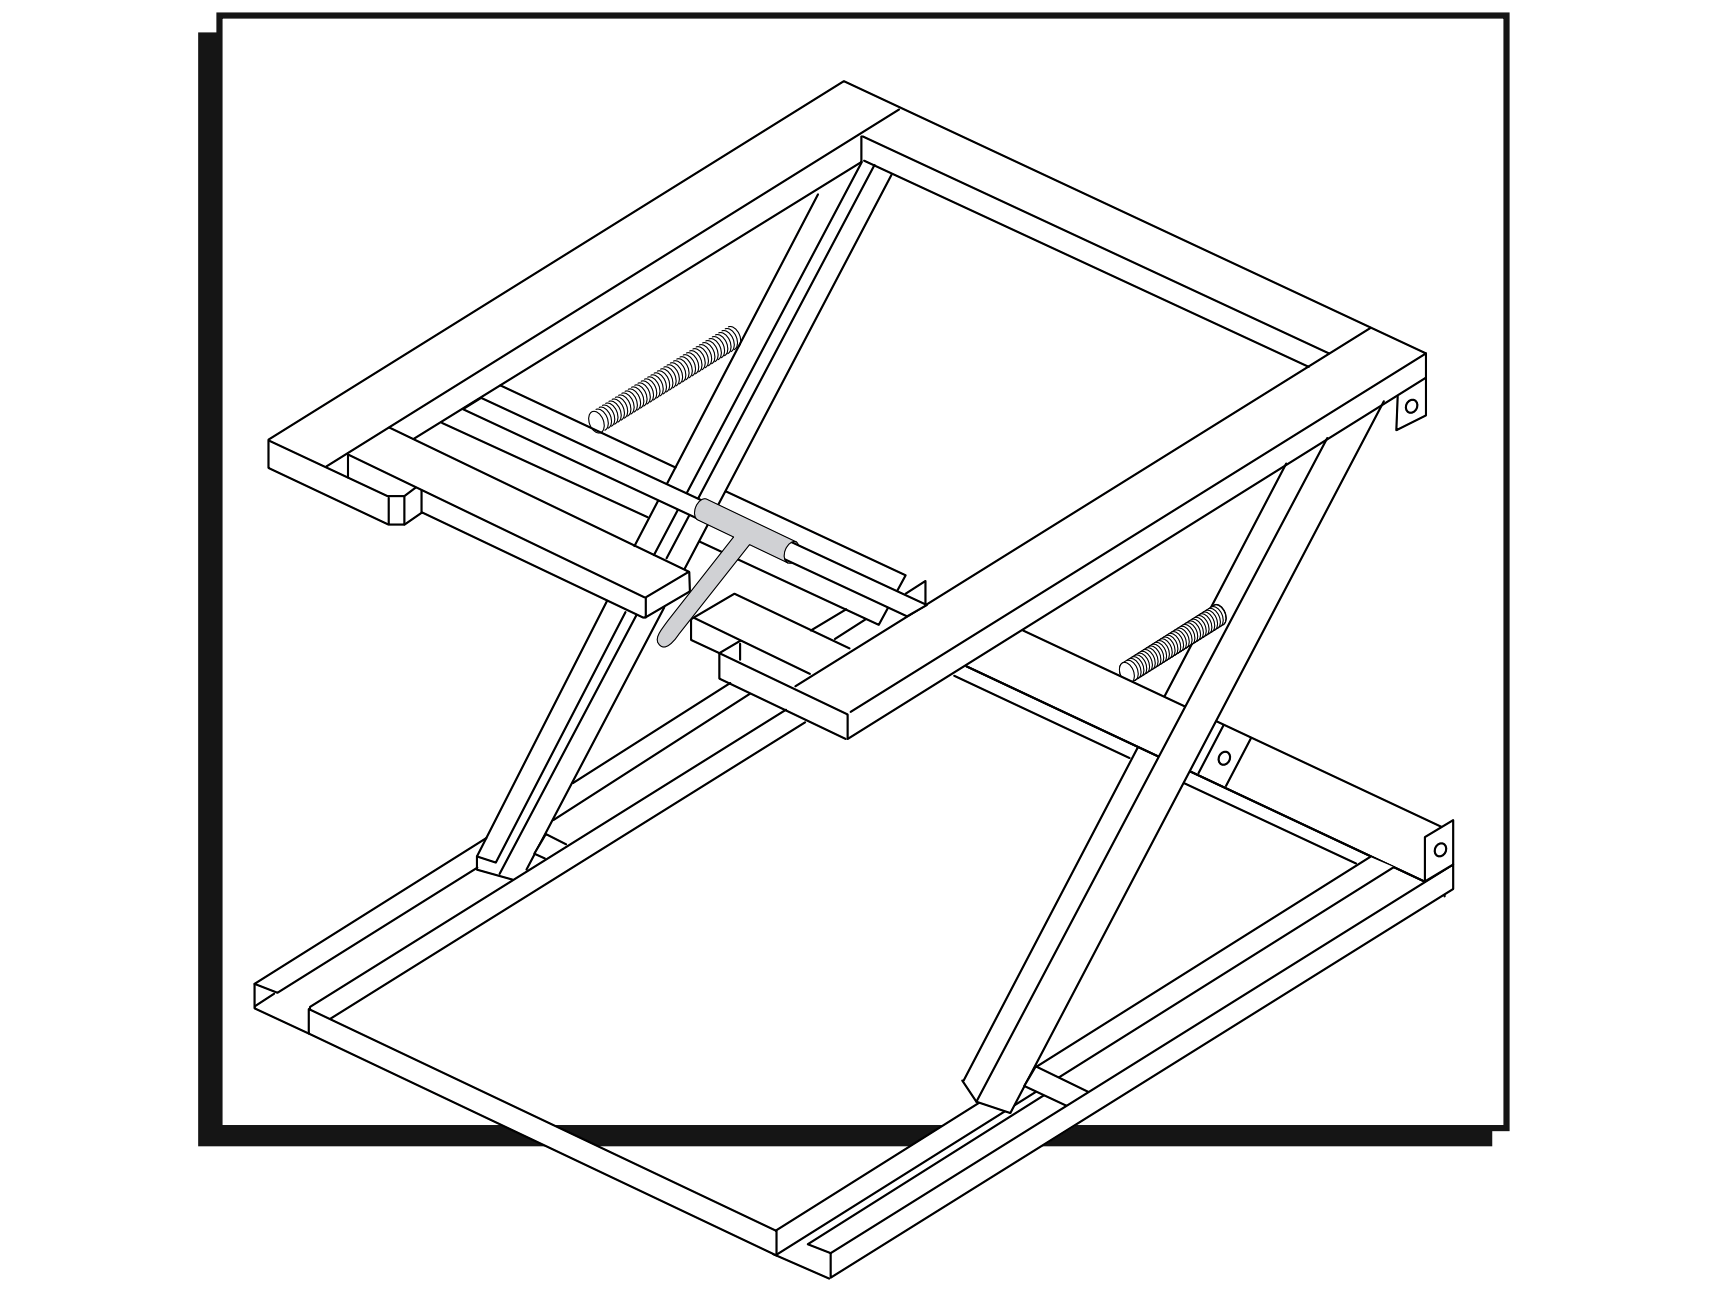
INSTALLATION
Spring must be installed prior to use of the Pallet Stand.
![]() NOTE: For spring installation two people are recommended.
NOTE: For spring installation two people are recommended.
1. Handle bar has three settings. The Middle, or neutral setting, is for storage only. The Left setting is for moving the stand from the storage position into the first position only or vice versa. The Right setting is for is for moving the stand from the first position to the second or third position and vice versa.
2. Move handle bar securely into the Left setting.
3. Lift stand from the storage position into the first operating position using a lift handle and handle bar.
![]() NOTE: Be sure the unit is locked into position before proceeding on to the next step.
NOTE: Be sure the unit is locked into position before proceeding on to the next step.
4. Slide the handle bar from the Left into the Right setting.
5. Lift stand from the first operating position to the third operating position.
![]() NOTE: Be sure the unit is locked into position before proceeding on to the next step.
NOTE: Be sure the unit is locked into position before proceeding on to the next step.
6. The unit should be in the third operating position (raised all the way). Attach springs to washers that are located in-between the scissor legs, just above the pivot point.
OPERATING
- The Adjustable Pallet Stand has three operating heights at 19″, 28″ and 33″. The unit collapses down to 9″ for storage only.
- To raise the stand from the storage position into the first operating position, slide the handle bar from the Middle setting to the Left setting. Grip one lifting handle and the handle bar and lift the stand until it locks into the first operating position.
- To raise the stand from the first operating position to a higher operating position, slide the handle bar into the Right setting. Grip one lifting handle and the handle bar and lift the stand until it locks into the desired operating position.
- To lower the stand into the first operating position, slide the handle bar into the Right setting. Grip one lifting handle and slightly raise the platform to unlock its position. Grip the handle bar and lower the stand into the first operating position.
- To lower the stand into the storage position from the first operating position, slide the handle bar to the Left setting. Grip one lifting handle and slightly raise the platform to unlock its position. Grip the handle bar and lower the stand into the storage position.
WARNING LABELS
- WARNING! To adjust height engage handle bar and lift on either lifting handle to engage positive locking device.
- WARNING! Grip here.
- WARNING! Keep clear of pinch point.
WARRANTY
This product is warrantied for 90 DAYS from date of purchase to be free of manufacturing defects in material and workmanship. The manufacturer’s obligation hereunder is limited to repairing such products during the warranty period, provided the product is sent prepaid back to the factory.
This warranty does not cover normal wear of parts or damage resulting from any of the following: negligent use or misuse of the product, use or application contrary to installation instructions, or disassembly, repair or alteration by any person prior to authorization from a factory representative.
![]()
1-800-295-5510
uline.com
0621 IH-2508
[xyz-ips snippet=”download-snippet”]