
ULINE H-3518 Green Air Pillow Machine Instruction Manual
TOOLS NEEDED FOR MAINTENANCE
- 4mm Allen Wrench

- 3mm Allen Wrench
- Needle Nose Pliers


SPECIFICTIONS
The Uline Green Machine converts rolls of pre perforated, sealed flat tubing into air cushions for use as void fill packaging.
![]() CAUTION!For safety reasons the cushions are to be used ONLY as a packaging material and MUST NOT be used as a flotation aid, a toy or for other unspecified use.
CAUTION!For safety reasons the cushions are to be used ONLY as a packaging material and MUST NOT be used as a flotation aid, a toy or for other unspecified use.
TECHNICAL SPECIFICATIONS
|
Machine Dimensions (L x W x H) |
14 x 12 x 11″ |
| Machine Weight |
19 lbs. |
|
Power Supply |
110V |
| Film Material |
High-Density Polyethylene Tubing |
|
Roll Length |
1,640′ or 1,066′ |
| Roll Width |
8″ or 16″ |
SAFETY INSTRUCTIONS
Operators must never use the machine other than as specified by the instructions in this manual.
- Removal of the front cover will void the warranty.
- Keep hands away from all moving parts while operating machine.
- The machine will automatically shut down in the event of a To restart the machine, clear the jam and press reset. Press the start button to restart.
- Do not place flammable materials over the heat sealing section.
- In the event of an emergency, press the red emergency stop To restart the machine, rotate the emergency stop button so that it springs out to the normal operating position.
- If the machine is to remain inactive for longer periods of time, the machine should be switched off using the main power switch located where the power cable enters the machine.
OPERATING INSTRUCTIONS
LOADING THE FILM (SEE FIGURE 1)
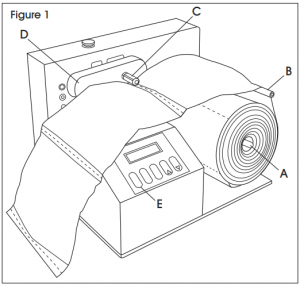
- Place machine on a level, stable surface, leaving sufficient clearance from the floor to prevent the cushions from backing up into the machine.
- Slide the roll onto the axle (A). Ensure that the open end of the film is closest to the machine.
- Take the film and loop it back over the top roller (B).
- Open the heat seal mechanism by lifting the handle (C).
- Thread the open end of the film onto the guide bar and pull through the open heat seal mechanism and through the rubber drive wheel mechanism (D).
NOTE: Ensure that the perforation is NOT on the drive wheel.
- Using the control pad (E), select the size of film that has been (See Operating the Machine).
- The film is now ready to run.
OPERATING THE MACHINEThere are four settings that the operator can adjust on the machine: Film Type, Batch Size, Blower Adjust and Heat Adjust.
Pressing the Select button on the control pad will allow the operator to see the current setting for each of the parameters listed above. Use up/down arrows to adjust the value of the displayed parameter. (See Figure 2).

FILM TYPEBefore attempting to run the machine, verify that the Film Type setting is consistent with the pillow size that has been loaded on the machine:
- Press Select until the Film Type parameter appears on the screen.
- Film Type will be displayed as a pillow size. Use the up and down arrows to find the Film Type setting that matches the pillow size loaded on the machine.
- Once the correct pillow size is shown on the control panel, the machine is set to run that film.
BATCH SIZEBatch Size is the number of cushions the machine will produce before automatically stopping. This number is 5,000 by default. To change the batch size:
- Press Select until the Batch Size parameter appears on the batch size.
- Use the up and down arrows to adjust the number Hold the up or down arrow to adjust this number more quickly.
- The machine is now set up to run this number of bags before automatically stopping.
BLOWER ADJUSTBlower Adjust represents the amount of air that will go into each bag. To change the blower adjust setting:
- Press Select until the Blower Adjust parameter appears on the screen.
- Use the up and down arrows to select a setting between 0 and 10 is the maximum fill. Adjust to your preference.
- The machine is now set to run bags at this level of This setting can be changed while the machine is running.
HEAT ADJUSTHeat Adjust determines the amount of heat applied to seal the pillows once they have been filled with air. To adjust:
- Press Select until the Heat Adjust parameter appears on the screen.
- Use the up and down arrows to select a setting between 70% and 100%. 100% will offer the highest heat available from the heating mechanism, while 70% will offer a lesser amount of heat.
- The ideal setting will vary by environment. Experiment with running the film between these settings until the seals are complete and strong.
- The machine is now set to run at this level of heat. This setting can be changed while the machine is running.
NOTE: Do not turn off main power switch or disconnect power from machine within 30 seconds of making a change to any machine setting.
RESTARTING AFTER THE ROLL OF FILM HAS RUN OUT
When the roll has finished, the display on the control panel will read OUT OF FILM. Reload a new roll and press the START button.
OPERATOR ASSISTANCE MESSAGES
In the instance of an error occurring, the following messages may appear on the control panel:
- Under Voltage
- Under Current
- Over Voltage
- Over CurrentEEPROM Error
If an error message appears, please follow the instructions below:
- Press the emergency stop button.
- Leave for 30 seconds.
- Retry the machine.
If this does not clear the error, hold Reset and Up Arrow buttons simultaneously for 5 seconds. This will return the machine to factory defaults. A minor adjustment to the Heat Adjust parameter may be necessary to return to ideal settings for the operator’s environment.
MAINTENANCE
REPLACING A DAMAGED BELT
- Verify that power is off, machine is unplugged and all components are cool.
- Remove thumb screws on plastic belt (See Figure 3).
- Remove plastic belt (See Figure 4).
- Use handle to lift heat seal Slide heating block towards drive wheel to release tension on the belt. (See Figure 5).
- While heat seal mechanism is elevated, remove the belt. (See Figure 6).
- Reverse steps 1 through 5 to replace belt.


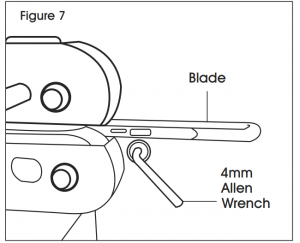
REPLACING A DAMAGED BLADE
- Verify that power is off, the machine is unplugged and all components are Cool.
- Use a 3mm Allen wrench to remove the screws from the back plate.
- On the front of the machine, use a 4mm Allen wrench to loosen the screw below the blade. (See Figure 7).
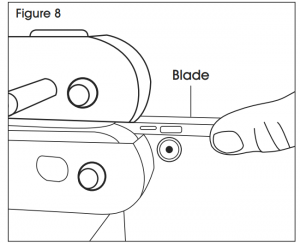
- Apply pressure to the air nozzle assembly to counteract pressure from the sensor wheel. (See Figure 8).
- From the back of machine, use a 3mm Allen wrench to remove the screw that runs through the blade. (See Figure 9).
- With a needle nose pliers, remove the dull bled(See Figure 10).
- To install new blade, reverse steps 1 through 6.


TROUBLESHOOTING
|
OPERATING ISSUE |
RECOMMENDATIONS |
|
Machine does not start |
Check that the emergency stop button is not depressed Check if main power is on |
|
Film comes off guide bar (Display will show OUT OF FILM message) |
Check that the roll has been properly loaded onto the axleCheck that the film has been wound around the rollers in the correct manner Check bags for overinflationEnsure film edge is not dragging against machine chassis |
|
Heat seals are not strong enough |
Check bags for overinflationIncrease Heat Adjust setting on the Control PanelIf this does not work, consult Uline Repairs Department |
| Heat seals are burning through |
Reduce the Heat Adjust setting on the Control PanelReduce the Blower Adjust on the Control Panel as over inflation can cause stretching, particularly on the smaller cushion size |
| Cushions deflate
(This may occur if too much or too little heat is used) |
Change Heat Adjust setting on the Control PanelCheck bags for overinflation, reduce Blower Adjust on the Control Panel |
| Film not sealing |
Check for damaged belt |
|
Film jams |
Remove jam and press the START button to restart production Check for damaged belt or dull blade |
| Film winding around heat seal/rollers |
Check for damaged beltReduce Heat Adjust setting on the Control Panel |
Recommended: Daily inspection of belts will help prevent the above issues.
1-800-295-5510WEB : uline.come
 1-800-295-5510WEB :
[xyz-ips snippet=”download-snippet”]