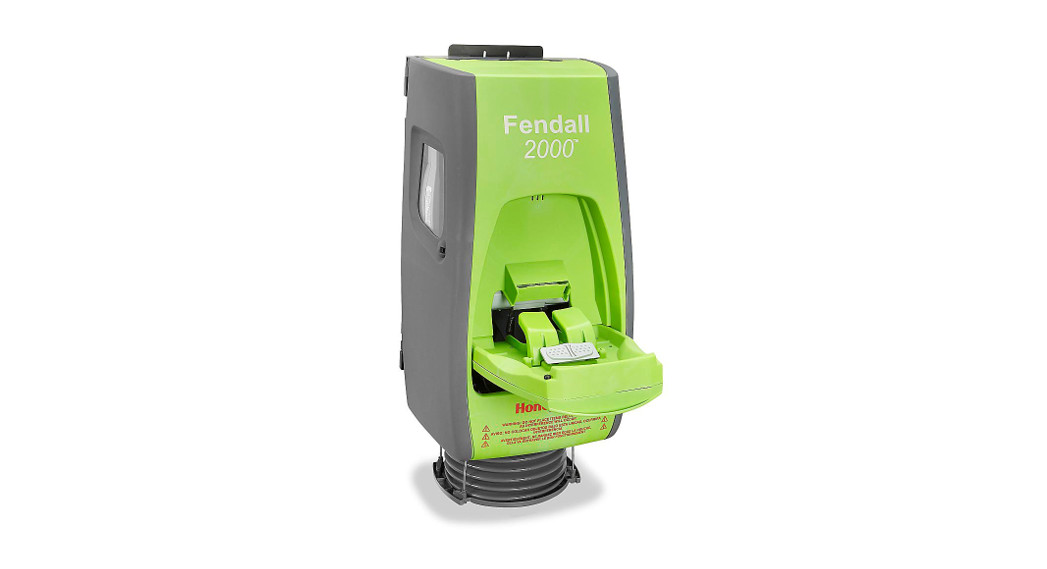
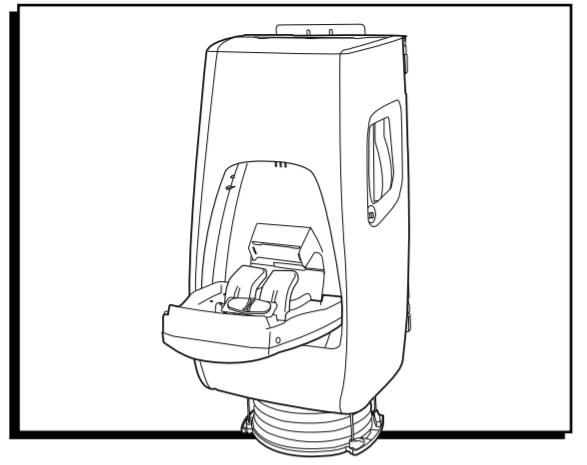
![]() H-3838FENDALL 2000TM EYEWASH STATION7 Gallon Capacity
H-3838FENDALL 2000TM EYEWASH STATION7 Gallon Capacity
 TOOLS NEEDED
 TOOLS NEEDED
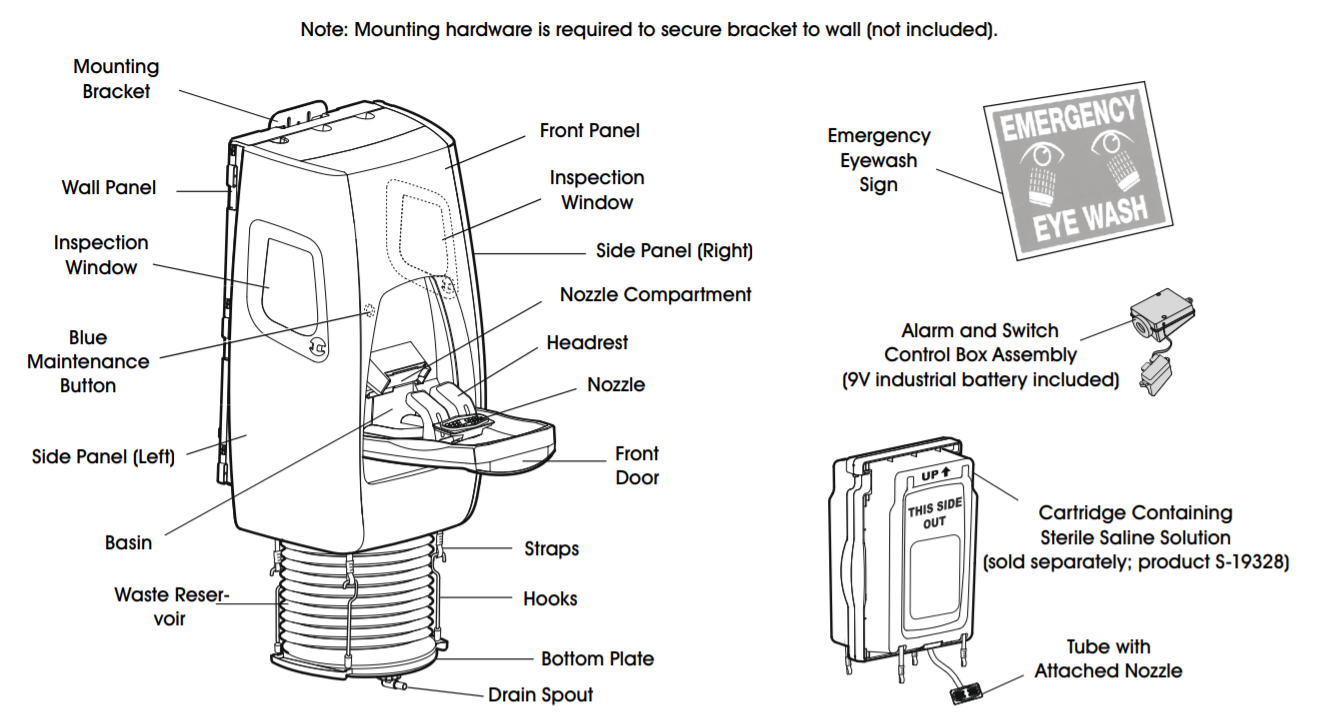
PARTS
SAFETY
 SAFETY
![]() WARNING! The Fendall 2000TM Eyewash Station is not for outside use. Do not install in an outside location. Installation in an outside location may prevent the unit from functioning properly in an emergency situation.
WARNING! The Fendall 2000TM Eyewash Station is not for outside use. Do not install in an outside location. Installation in an outside location may prevent the unit from functioning properly in an emergency situation.
- The unit must be level for proper operation.CAUTION! Failure to properly mount the unit may cause the unit to function improperly in an emergency.
- The unit weighs approximately 100 lbs. when installed with the cartridge. Assistance may be required when installing the eyewash station and/or the replacement cartridge.
- The area under the unit must be kept clear to allow the wastewater reservoir to drop during use.
- Employees must be instructed in the use of eyewash stations.
- The eyewash station is intended for the emergency first aid of victims exposed to fluid, chemical, or particle eye contamination to help flush contaminating substances from the eyes. In all cases, the victim must seek medical attention immediately after flushing.
- An individual or department must inspect this unit regularly (monthly maintenance is recommended). Records of these inspections should be kept with the unit as a log. CAUTION! Never use an expired cartridge. Use of an expired cartridge may result in serious personal injury or serious illness, including blindness.
- During the inspection, follow the proper disarmament procedure or else fluid flow will begin. Once the fluid flow has started, it cannot be stopped, and a new Saline cartridge must be installed.
![]() CAUTION! Failure to follow and comply with all cautions and safety instructions may result in serious personal injury, blindness, or death.
CAUTION! Failure to follow and comply with all cautions and safety instructions may result in serious personal injury, blindness, or death.
THE ANSI STANDARD Z358.1-2014 REQUIRES THAT:
- The unit shall be positioned with the fluid nozzle no less than 33″ and no greater than 53″ above the surface on which the user stands, and no less than 6″ from the wall or nearest obstruction.
- Eyewash units shall be inaccessible locations that require no more than 10 seconds to reach. The eyewash station shall be located on the same level as the hazard and the path of travel shall be free of obstructions that may inhibit the immediate use of the equipment. For a strong acid or a strong caustic, the eyewash station should be immediately adjacent to the hazard.
- Each eyewash station shall be identified with a highly visible sign provided with the unit, positioned so the sign shall be visible within the area served by the eyewash station. The area around the eyewash station shall be well lit.NOTE: It is recommended that a consulting physician or appropriate professional be contacted for advice on the proper distance from the hazard to install the eyewash unit.
INSTALLATION
UNIT INSTALLATION
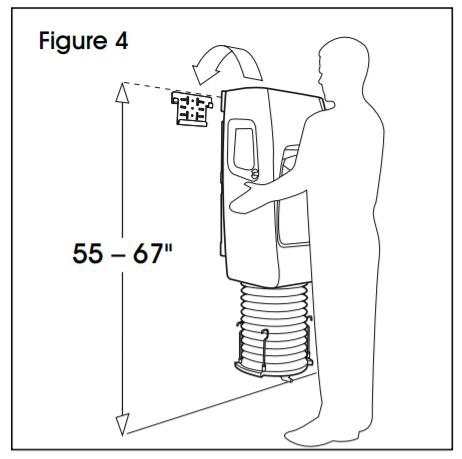
- On a secure wall, using a tape measure (or the tape provided), mark a height between 55″ and 67″, depending on the desired height of the unit. (See Figure 1)NOTE: Mounting must support 100 lbs. plus the weight of a person leaning on the unit.
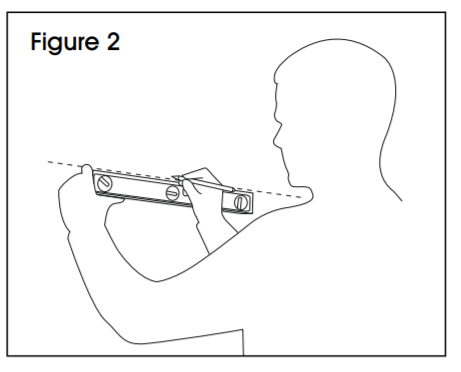
- Use a level to draw a horizontal line at the mark made in step 1. (See Figure 2)
- Align the top of the bracket with the horizontal line and mount the bracket. Mount with appropriate mounting hardware (not included). (See Figure 3)
- Keep the unit assembled and hang it on the mounted wall bracket. (See Figure 4)
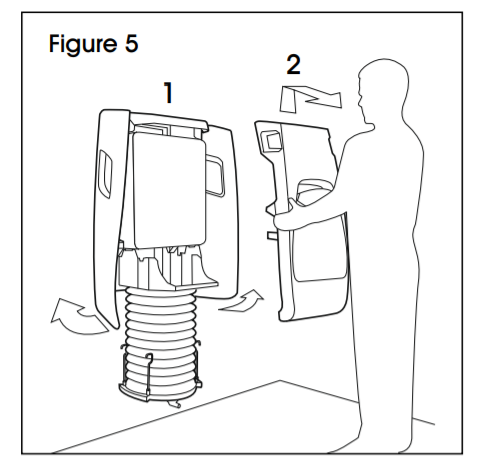
- Open side panels by snapping them out of the front panel. Remove the front panel by lifting upwards and then pulling forward. (See Figure 5)
- Discard the shipping insert if Figure 6 any. (See Figure 6)


CARTRIDGE INSTALLATION (S-19328)
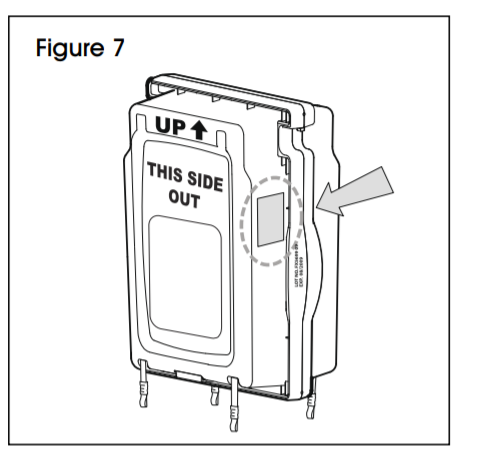
- Inspect label and review expiration date to determine if the cartridge is current and ready for use. (See Figure 7)NOTE: Label contains product information and identifying lot number.
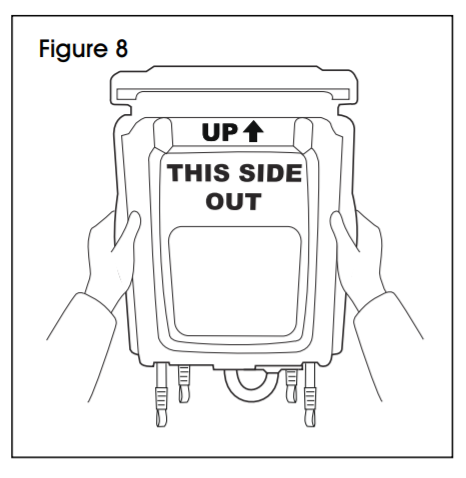
- Hold the cartridge by side handles, making sure the nozzle and tube are facing downward and the sticker on the front face of the cartridge is facing out. (See Figure 8) NOTE: When lifting the cartridge, remember to lift close to your body, keeping your feet shoulder-width apart. Bend your knees and keep your back straight, lifting with your legs. CAUTION! The cartridge weighs approximately 75 lbs. and may require assistance to lift.
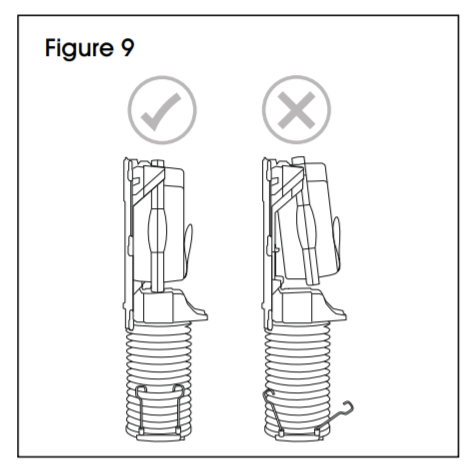
- Hang cartridge on brackets. (See Figure 9)NOTE: Ensure that the hooks are properly seated and the cartridge is against the wall panel.
- Remove the polybag protecting the nozzle and free the tube by removing the rubber band (let the nozzle hang in the basin underneath the cartridge). (See Figure 10)
- Remove the ties holding the four straps and let them hang on each side of the waste reservoir. (See Figure 11)
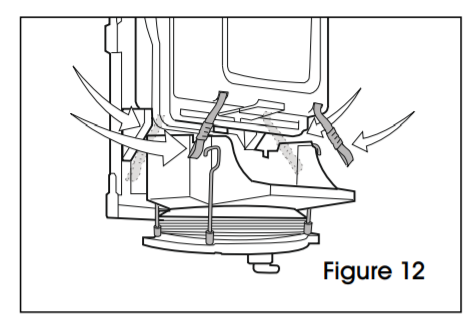
- Compress the waste reservoir by pushing it forward. Slide all four straps (two front and two rear) into the hooks, making sure the straps are not twisted. Visually inspect all four corners of the bottom plate, making sure they are equal in height. (See Figure 12)WARNING! If the waste reservoir is not properly compressed, the unit will not function properly on activation. Make sure the area underneath the eyewash station is kept clear.
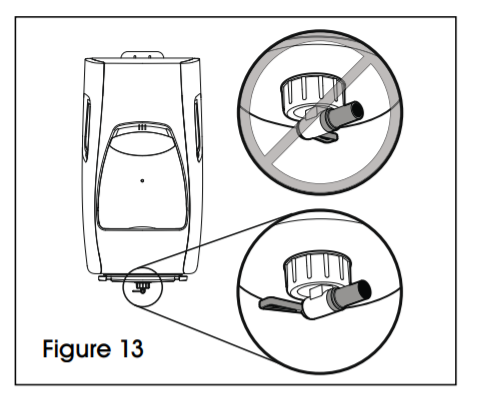
- Make sure the drain spout is in its closed (left) position. (See Figure 13)
- Move switch into “ON” position. Place front panel back on the unit and close side panels. (See Figure 14)


 Move switch into “ON” position. Place front panel back on the unit and close side panels. (See Figure 14)
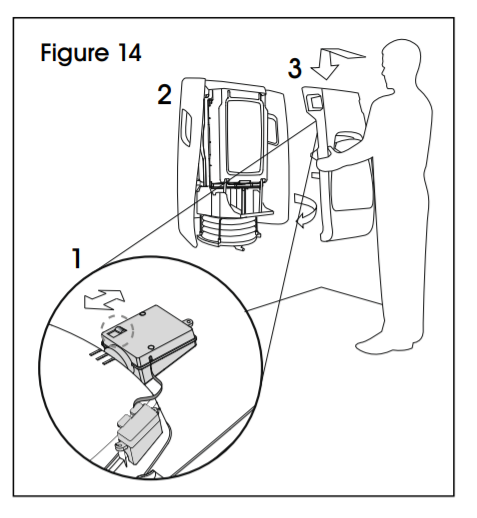
ARMING UNIT
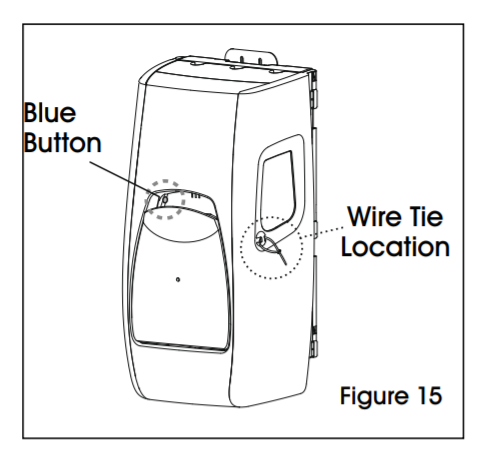
- Push the blue button and hold for 3 seconds until a beep is heard to disarm the alarm. (See Figure 15)NOTE: To
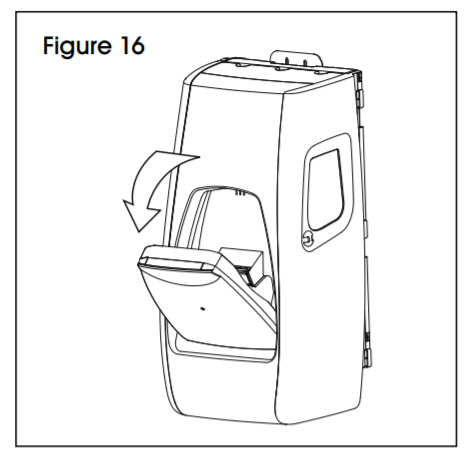
- Open the front door. (See Figure 16)
- Pull the headrest toward you. (See Figure 17)
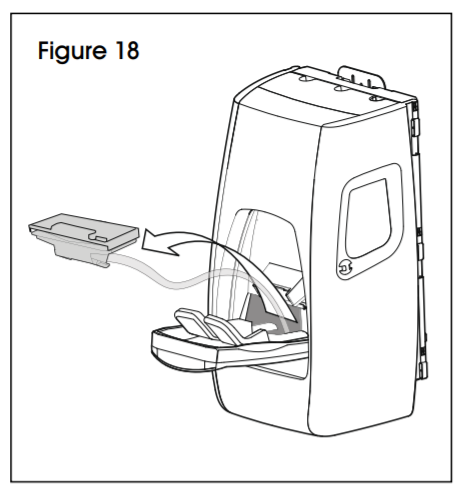
- Pull nozzle from the basin. (See Figure 18)
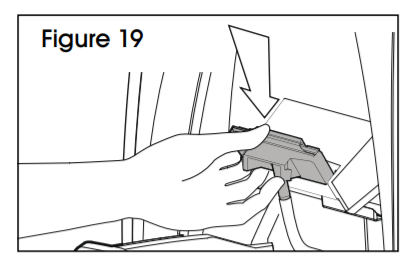
- Slide nozzle onto nozzle compartment, making sure the tube is not twisted. (See Figure 19)
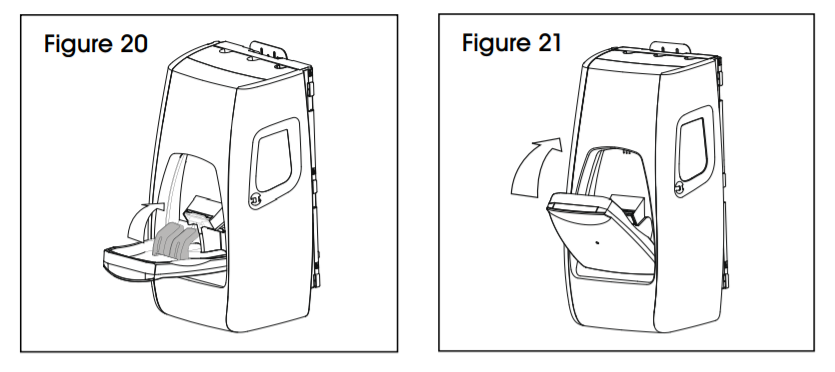
- Push the headrest back to its original position until an audible click is heard. (See Figure 20)
- Close door. A click will be heard confirming the nozzle is engaged and the alarm is reactivated. (See Figure 21)CAUTION! The station is now armed and will activate if the door is opened.
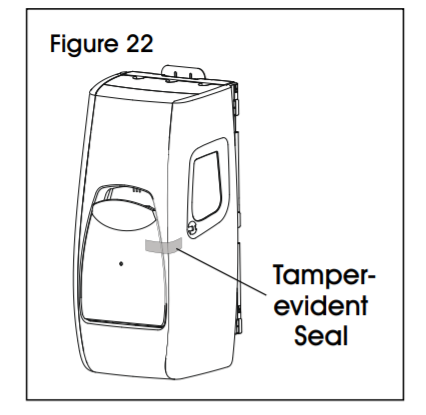
- Place tamper-evident seal over the door and the front face of the unit. (See Figure 22)CAUTION! The area under the unit must be kept clear at all times to allow the waste reservoir to drop during the use of the system. Failure to drop will cause the eyewash station to malfunction in an emergency. (See Figure 23)


OPERATION
TO ACTIVATE UNIT
- Pull on the door to activate the unit. The alarm will sound for 30 seconds to alert that the unit is activated. (See Figure 24)CAUTION! Once the seal is broken, the flow cannot be stopped.
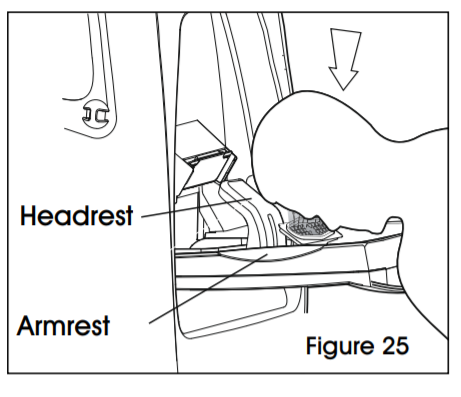
- Place eyes in fluid flow, keeping eyes open (use fingers to keep eyelids open if necessary). If it is difficult to do so, get someone to assist. (See Figure 25)NOTE: If desired, the head can be positioned on a headrest for comfort or arms can be placed on the sides of the station.
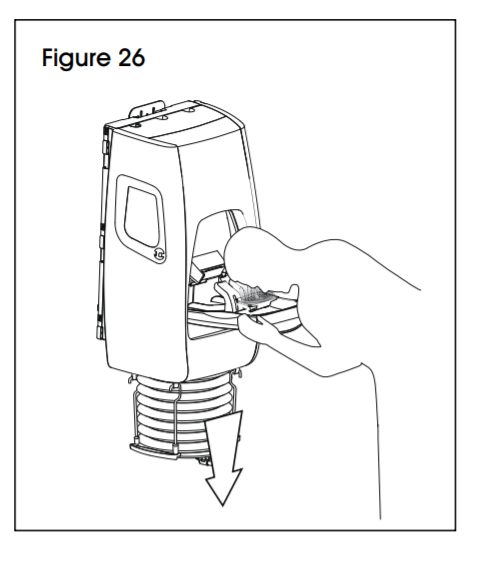
- Wash eyes for the duration of flow. The alarm will sound at the end of 15 minutes to alert that immediate medical assistance should be sought. (See Figure 26)NOTE: The waste reservoir will begin to lower from the bottom of the unit. This will continue to lower until all fluid has been used. Following 15 minute flush, seek immediate medical attention.

MAINTENANCE
![]() NOTE: It is important to inspect the unit on a routine basis to ensure that the system is properly set up for use and that the eyewash solution has not expired. The fluid is usable until the date marked on the side of the sterile fluid cartridge. Failure to properly set up and maintain the unit within recommended guidelines could result in serious personal injury or illness including blindness.
NOTE: It is important to inspect the unit on a routine basis to ensure that the system is properly set up for use and that the eyewash solution has not expired. The fluid is usable until the date marked on the side of the sterile fluid cartridge. Failure to properly set up and maintain the unit within recommended guidelines could result in serious personal injury or illness including blindness.
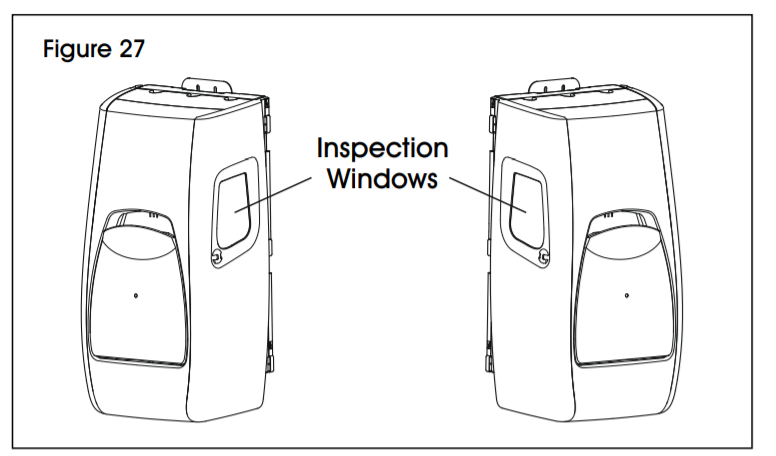
- Inspect cartridge expiration date and product information label through both inspection windows. (See Figure 27)
- Push the blue button and hold for 3 seconds until a beep is heard to disarm the alarm. (See Figure 28)NOTE: Short beep once every 10 seconds indicates a low battery.
- Use a screwdriver or pen to push on the release button. (See Figure 29)
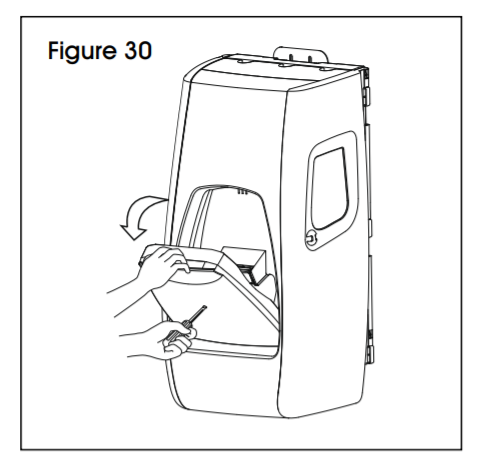
- While the button is pressed in, gently pull the door open (there should be no resistance). (See Figure 30)
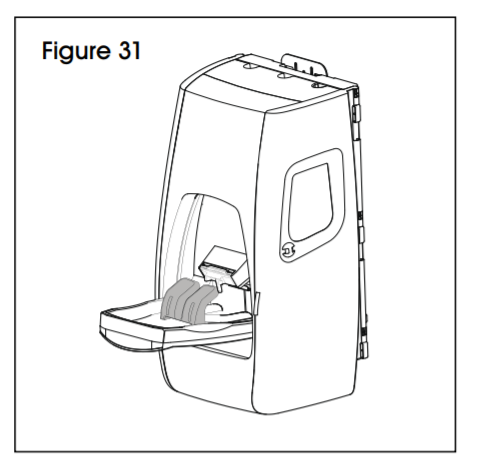
- Inspect the nozzle for correct attachment and hose for possible kinking. Reposition if needed. (See Figure 31)NOTE: Be sure the nozzle seal is intact.
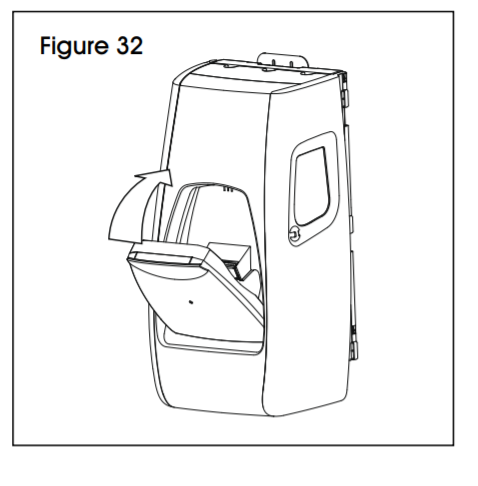
- To re-arm, close the front door. An audible click will be heard to confirm that the nozzle is engaged and the alarm is reactivated. (See Figure 32)CAUTION! The station is now armed and will activate if the door is opened.
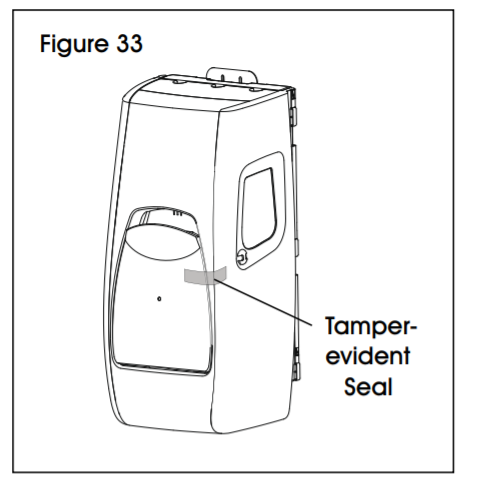
- Place the new tamper seal over the door and front face of the unit. (See Figure 33)


ALARM MAINTENANCE: CHANGING THE BATTERY
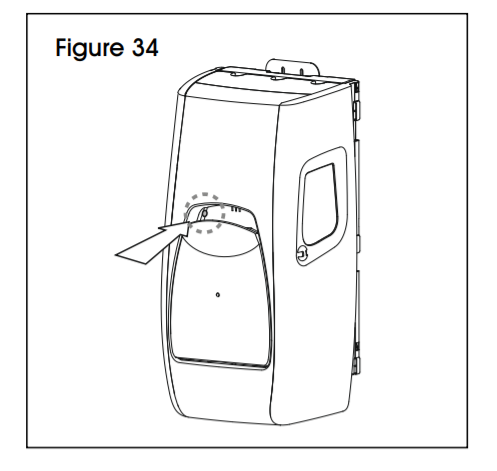
- Push the blue button and hold for 3 seconds until a beep is heard to disarm the alarm. (See Figure 34)NOTE: The battery must be replaced after each use or approximately every 2 years, whichever occurs first, or when a low battery warning is heard (a short beep once every 10 seconds).
- To remove the front panel to replace the battery, use a screwdriver or pen to push on the release button and gently pull the door open. Remove the nozzle from its compartment and pull the headrest towards you. Push nozzle and tube inside the unit, under cartridge. (See Figure 35)
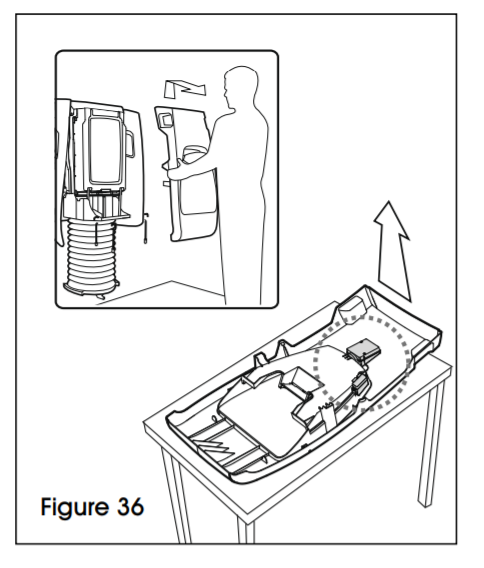
- To change the battery, remove the front panel and lay it on a flat surface, with the inside face up. (See Figure 36)
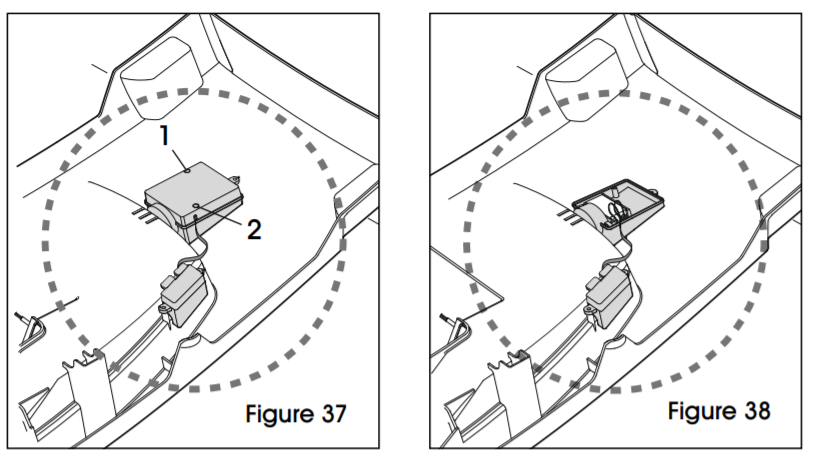
- Unscrew screws 1 and 2 to remove the alarm housing cover. Refer to sticker on alarm housing for battery maintenance information. (See Figure 37)
- Remove the existing 9V industrial battery and replace it with a new one. Put alarm housing cover back and reinsert screws 1 and 2. (See Figures 37-38)WARNING! Short beep once every 10 seconds indicates a low battery.

EMPTYING WASTE RESERVOIR AND REMOVING CARTRIDGE
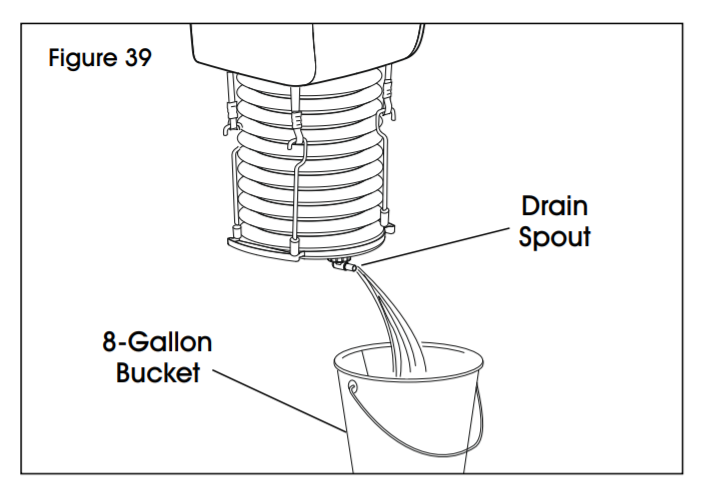
- The following use and after an injured person has sought medical attention, disarm the alarm by pressing and holding the blue button for 3 seconds until a beep is heard. Drain the waste reservoir by placing an 8-gallon bucket under the waste reservoir and open-drain spout (turn to the right). If desired, a hose may be placed over the end of the drain spout to assist in emptying the contents of the waste reservoir. (See Figure 39)
EMPTYING WASTE RESERVOIR AND REMOVING CARTRIDGE CONTINUED
- Once the reservoir is empty, close the drain spout by turning to the left. (See Figure 40)
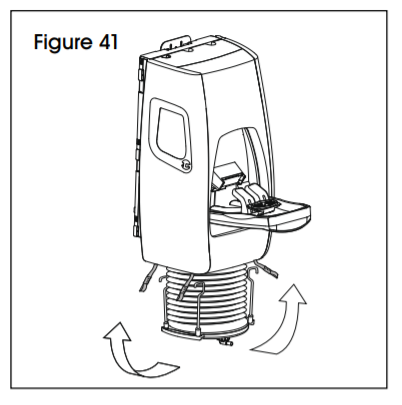
- Unhook the straps from the waste reservoir. (See Figure 41)
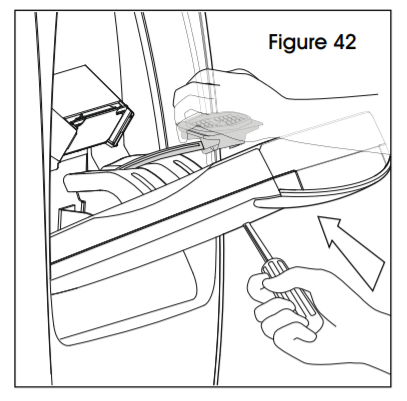
- Use a screwdriver or pen to push on the release button to free the nozzle. (See Figure 42)
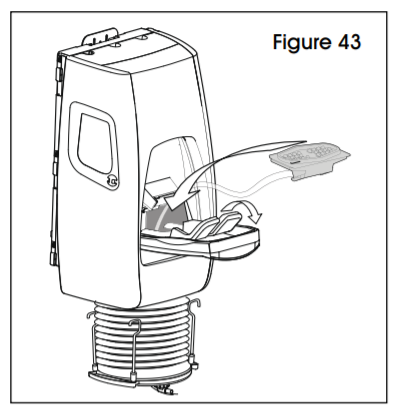
- Pull headrest towards you. Push nozzle and tube inside the unit, under cartridge. (See Figure 43)
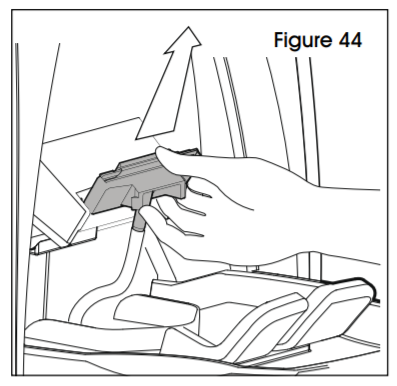
- Remove nozzle cover from nozzle compartment. (See Figure 44)
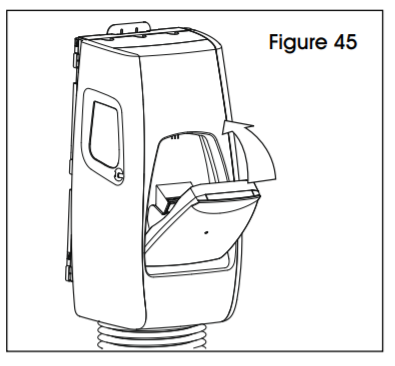
- Flip headrest back into position. (See Figure 45)
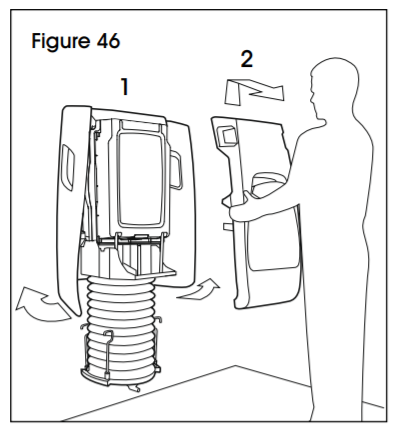
- Open side panels by snapping them out of the front panel and remove the front panel. (See Figure 46)
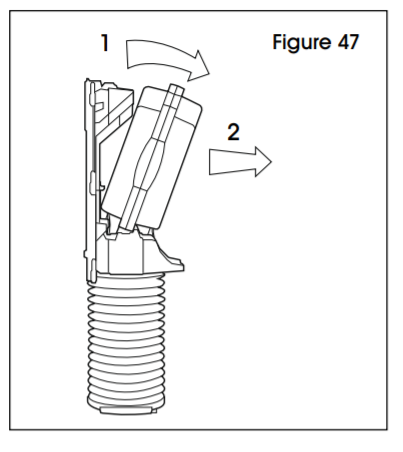
- Remove the cartridge. (See Figure 47)

TROUBLESHOOTING
| OPERATING ISSUE | RECOMMENDATIONS |
| Alarm Sounding. | Make sure the door Is fully closed. (Audible click will be heard). Replace the battery every two years. |
![]() 1-800-295-5510uline.com
1-800-295-5510uline.com
[xyz-ips snippet=”download-snippet”]