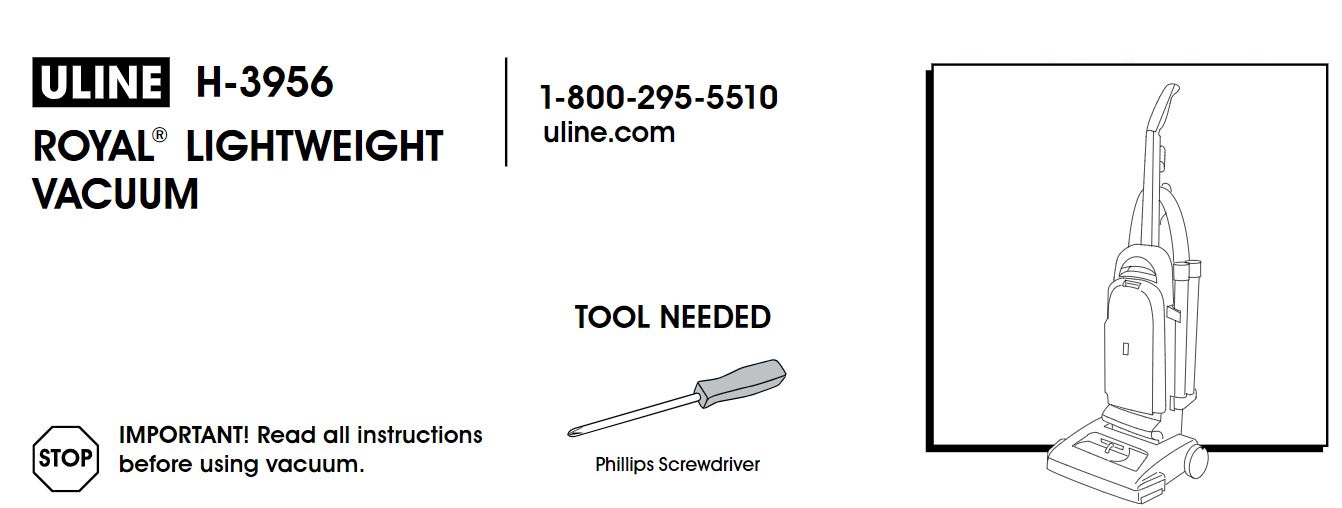
ULINE H-3956 Royal Lightweight Vacuum User Guide
SAFETY
![]() CAUTION! This product contains chemicals known to the state of California to cause cancer, birth defects or reproductive harm. Wash hands after using.
CAUTION! This product contains chemicals known to the state of California to cause cancer, birth defects or reproductive harm. Wash hands after using.![]() CAUTION! To reduce the risk of fire, electric shock, or injury:
CAUTION! To reduce the risk of fire, electric shock, or injury:
- Fully assemble vacuum before operating
- Servicing should be done by the Uline repairs team.
- Do not leave appliance plugged in. Unplug from outlet when not in use and before cleaning or servicing.
- Do not use outdoors or on wet surfaces.
- Do not use as a toy. Only individuals above the age of 12 should operate this product. Close attention is necessary when used by or near children. Keep children away from product to avoid touching, getting caught in rotating parts or placing objects into openings which may result in injury or damage.
- Use only as described in this manual. Use only manufacturer’s recommended attachments and products.
- Do not use with damaged cord or plug. If appliance is not working properly, has been dropped, damaged, left outdoors, or dropped into water, send to Uline Repairs Dept. prior to continuing use.
- Do not pull or carry by cord, use cord as a handle, close a door on the cord, or pull cord around sharp edges or corners. Do not place product on cord. Do not run appliance over cord. Keep cord away from heated surfaces.
- Do not unplug by pulling on cord. To unplug, grasp the plug, not the cord.
- Do not handle plug or appliance with wet hands.
- Do not put any object into openings. Do not use with any opening blocked; keep free of dust, lint, hair and anything that may reduce air flow.
- Keep hair, loose clothing, fingers and all parts of body away from openings and moving parts.
- Turn off all controls before unplugging.
- Use extra care when cleaning on stairs. To avoid personal injury or damage and to prevent the vacuum from falling, always place vacuum at bottom of stairs or on floor. Do not place vacuum on stairs or furniture, as it may result in injury or damage.
- Do not use to pick up flammable or combustible liquids, such as gasoline or fine wood dust or use in areas where they may be present.
- Connect to a properly grounded outlet only. See Grounding Instructions.
- Do not pick up anything that is burning or smoking, such as cigarettes, matches, or hot ashes.
- Do not use without dust bag and filters in place.
- An internal thermal protector protects the vacuum from overheating. When the thermal protector activates, the vacuum will stop running. If this happens proceed as follows:a. Turn vacuum OFF and disconnect it from the electrical outlet.b. Inspect the nozzle and bag inlet openings for any obstructions. Clear obstructions if present.c. When vacuum is unplugged and motor cools for 30 minutes, the thermal protector will deactivate and cleaning may continue.d. If the thermal protector continues to activate after following the above steps, the vacuum may need servicing.
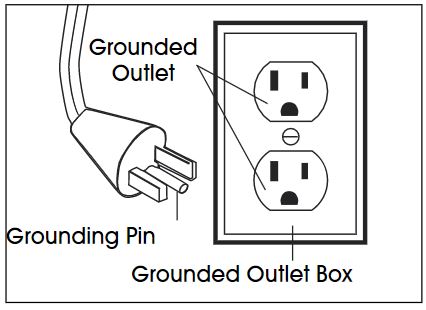
This appliance must be grounded. If it should malfunction or breakdown, grounding reduces the risk of electric shock. This appliance is equipped with a cord having an equipment-grounding conductor and grounding plug. The plug must be inserted into an appropriate outlet that is properly installed and grounded in accordance with all local codes and ordinances
![]() WARNING! Improper connection of the equipment-grounding conductor can result in a risk of electric shock. Check with a qualified electrician or service person if you are in doubt as to whether the outlet is properly grounded.
WARNING! Improper connection of the equipment-grounding conductor can result in a risk of electric shock. Check with a qualified electrician or service person if you are in doubt as to whether the outlet is properly grounded.
![]() WARNING! Do not modify the plug provided with the appliance. If it will not fit the outlet, have a proper outlet installed by a qualified electrician. This appliance is for use on a nominal 120-volt circuit and has a grounding attachment plug that looks like the plug illustrated in the sketch. Make sure that the appliance is connected to an outlet having the same configuration as the plug. No adapter should be used with this appliance.
WARNING! Do not modify the plug provided with the appliance. If it will not fit the outlet, have a proper outlet installed by a qualified electrician. This appliance is for use on a nominal 120-volt circuit and has a grounding attachment plug that looks like the plug illustrated in the sketch. Make sure that the appliance is connected to an outlet having the same configuration as the plug. No adapter should be used with this appliance.
![]() WARNING! Brush roll continues to turn while product is turned on and handle is in upright position. To avoid damage to carpet, rugs and flooring, avoid tipping vacuum or setting it on furniture, fringed area rugs, or carpeted stairs during tool use. Do not use sharp objects to clean out hose as they can cause damage. Avoid picking up hard, sharp objects with this product as they may cause damage. Store in a dry place. Do not expose machine to freezing temperatures.
WARNING! Brush roll continues to turn while product is turned on and handle is in upright position. To avoid damage to carpet, rugs and flooring, avoid tipping vacuum or setting it on furniture, fringed area rugs, or carpeted stairs during tool use. Do not use sharp objects to clean out hose as they can cause damage. Avoid picking up hard, sharp objects with this product as they may cause damage. Store in a dry place. Do not expose machine to freezing temperatures.
ASSEMBLY
CARTON CONTENTSUnpack carton contents and identify parts.
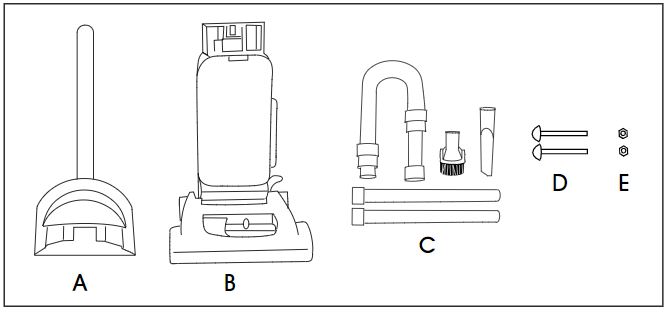
- A. Handle section
- B. Vacuum body
- C. Hose, cleaning tools and wands
- D. Bolts x 2
- E. Nuts x 2
ATTACH HANDLE
![]() NOTE: Switch above bag door should be in OFF position.
NOTE: Switch above bag door should be in OFF position.
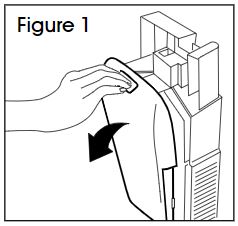
1. Remove bag door on vacuum body by pushing down at top of door and pulling door outward. (See Figure 1)
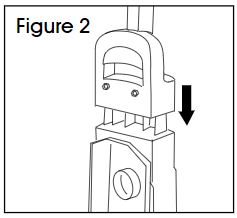
2. Slide handle onto vacuum body. (See Figure 2)
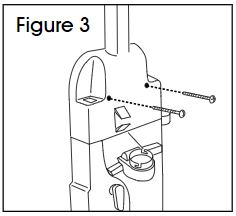
3. Push bolts into holes on back of handle. (See Figure 3)
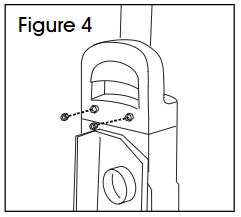
4. Place nuts in recessed areas on front of handle. Hold each nut in place while tightening each bolt securely with a Phillips screwdriver. (See Figure 4)
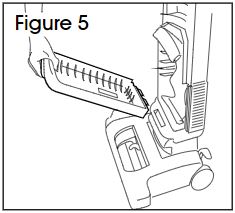
5. Reposition bag door by fitting tabs on bottom of door into opening. Press top of door securely shut. (See Figure 5)
ATTACH HOSE
![]() NOTE: Hose must be connected as shown for all operations.
NOTE: Hose must be connected as shown for all operations.
1. Align end of hose with projections (A) over slots (B) in dirt duct. (See Figure 6)

2. Slide hose into dirt duct and twist hose to lock projection into slot (B). (See Figure 7)

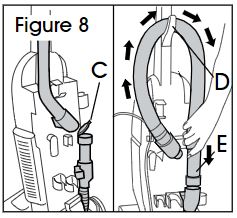
3. Lift hose tube cover (C). Position hose over hose hook (D) and onto hose tube (E). (See Figure 8)
POSITION TOOLS
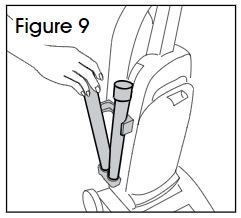
1. Place smaller, smooth end of wand into bottom of rack. Snap wand into clip. Repeat with other wand. (See Figure 9)
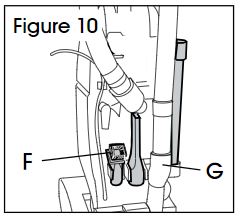
2. Snap ends of dusting brush/ furniture nozzle (F) and crevice tool (G) into clips as shown. (See Figure 10)
PARTS
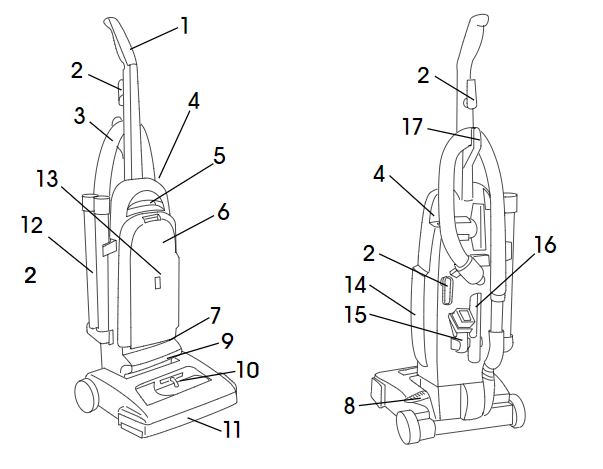
- Handle
- Cord hooks: wrap cord around hooks for storage. The top hook can be rotated right or left for easy cord release.
- Hose
- ON/OFF switch: located on left rear corner of vacuum body
- Carrying handle
- Bag door
- Stair cleaning handle: located on lower edge of bag door
- Handle release lever: step on lever to lower handle to operating or low positions
- Headlight
- Nozzle control knob: slide knob to correct setting for height of carpet being cleaned
- Furniture guard: helps prevent vacuum from marking furniture
- Wands
- Check bag indicator
- Final filter exhaust
- Dusting brush/furniture nozzle
- Crevice tool
- Hose hook
INSTRUCTIONS
![]() CAUTION! Operate vacuum only at voltage specified on data plate on bottom of vacuum.
CAUTION! Operate vacuum only at voltage specified on data plate on bottom of vacuum.
ON/OFF SWITCH
- Plug cord into electrical outlet.
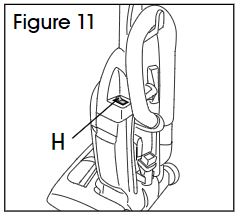
- To turn vacuum ON, push ON/OFF switch (H) toward the front of the vacuum. (See Figure 11)

- To turn vacuum OFF, push switch toward back of vacuum.
CORD STORAGE
![]() CAUTION! Unplug cord from wall before storing.
CAUTION! Unplug cord from wall before storing.
When not in use, wrap cord around cord storage hooks.
HANDLE POSITIONS
The vacuum has three positions:
- Upright for storage and when using cleaning tools.
- Operating position for vacuuming carpet and floors.
- Low for reaching under furniture.
To navigate each position step on the handle release lever and lower the handle. (See Figure 12)

TRANSPORTING VACUUM
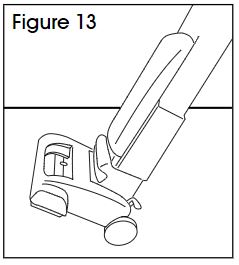
- From upright position, tilt the vacuum back onto the rear wheels and push forward. (See Figure 13)
- The vacuum can also be moved by using the carrying handle. (See Figure 14)

CARPET HEIGHT ADJUSTMENT
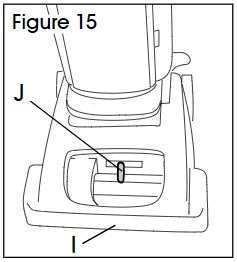
Carpet and rug cleaning takes place at the nozzle (I). When it is necessary to raise and lower the nozzle for various carpet pile heights, slide the nozzle control knob (J) to the desired setting. (See Figure 15) It is best to start with the highest setting and lower one notch at a time until you hear brushes touching the carpet.
HANDLE POSITIONFor ease in sliding knob, the handle should be in the upright position (K). (See Figure 16)

The nozzle will not move into the adjusted position until the vacuum handle is lowered to the operating position (L). (See Figure 16)
SETTINGS
For maximum cleaning performance, the following carpet height settings are recommended:
- Low setting: For bare floor (See Figure 17)
- High settings: For deep pile carpet so vacuum is easier to push. (See Figure 17)

![]() NOTE: If the vacuum is difficult to push, slide knob to the next higher setting.
NOTE: If the vacuum is difficult to push, slide knob to the next higher setting.![]() NOTE: Setting vacuum at too low of a carpet height setting can result in premature wear of belts, brushes and motor.
NOTE: Setting vacuum at too low of a carpet height setting can result in premature wear of belts, brushes and motor.
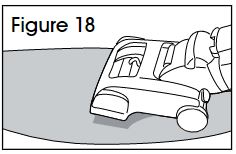
CLEANING LIGHTWEIGHT AREA RUGS
- Stand on one end of a rug and move the vacuum toward the other end of the rug.
- Before reaching the edge, push Figure 18 down on the handle. This will lift up the front of the vacuum and prevent the rug from clinging to the vacuum. (See Figure 18)
- Continue to lift up the nozzle so that when you have reached the edge it is completely off the rug.
- Move the vacuum back to start again, lower the nozzle, and use only forward strokes.
STAIR CLEANING
![]() WARNING! Use extra care when cleaning on stairs. To avoid personal injury or damage, and to prevent the vacuum from falling, always place vacuum at the bottom of the stairs or on the floor. Do not place the vacuum on stairs or furniture, as it may result in injury or damage.
WARNING! Use extra care when cleaning on stairs. To avoid personal injury or damage, and to prevent the vacuum from falling, always place vacuum at the bottom of the stairs or on the floor. Do not place the vacuum on stairs or furniture, as it may result in injury or damage.
A stair cleaning handle has been designed for ease of use. With handle in operating position, place fingers under edge of stair cleaning handle and guide vacuum with other hand on upper handle. (See Figure 19)
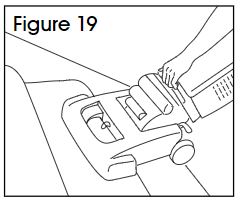
STAIR CLEANING CONTINUEDThe hose and furniture nozzle can also be used for stair cleaning. Clean from bottom to top.
CLEANING TOOLS
![]() WARNING! Brush roll continues to turn while product is turned on and handle is in the upright position. To avoid damage to carpet, rugs and flooring, avoid tipping vacuum or setting it on furniture, fringed area rugs or carpeted stairs during tool use.
WARNING! Brush roll continues to turn while product is turned on and handle is in the upright position. To avoid damage to carpet, rugs and flooring, avoid tipping vacuum or setting it on furniture, fringed area rugs or carpeted stairs during tool use.
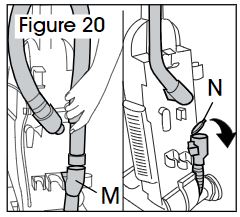
REMOVING HOSE
![]() NOTE: When using cleaning tools, vacuum handle should be in the upright position. Turn vacuum off before disconnecting and connecting hose to hose tube.
NOTE: When using cleaning tools, vacuum handle should be in the upright position. Turn vacuum off before disconnecting and connecting hose to hose tube.
- Remove hose from hose tube (M). (See Figure 20)
- Lower hose tube cover (N). (See Figure 20)
- When finished using cleaning tools, lift cover from hose tube and reposition hose into tube.
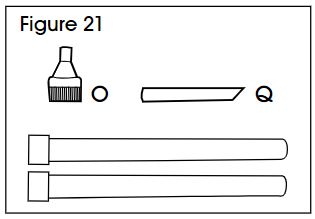
SELECT PROPER TOOL
- Dusting brush (O) may be used for carved furniture, table tops, books, lamps, lighting fixtures, venetian blinds, baseboards, shutters, and registers. To use as a furniture nozzle, press tab and slide brushes off. (See Figure 21)
- Crevice tool (Q) may be used in tight spaces, corners and along edges in such places as dresser drawers, upholstered furniture, stairs and baseboards. (See Figure 21)
- Extension wands are used to give extra length to your hose. Use them with any of the above tools. (See Figure 21)
ATTACH WAND AND TOOLS
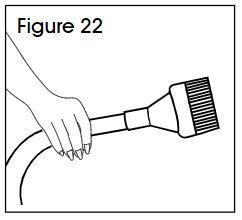
- Attach tool or wand to the hose by pushing it firmly into the hose. (See Figure 22)
- Twist wand or tool slightly to tighten or loosen the connection.
- Repeat with other tools.
CLEAN TOOLS AND HOSE
- To clean hose wipe off dirt with a cloth dampened in a mild detergent. Rinse with a damp cloth.
- Wash tools in warm water with a detergent. Rinse and air dry before using.
CHECK BAG INDICATOR
The indicator (R) will turn red as the filter bag fills with dirt. (See Figure 23)
 Three conditions cause the indicator to become completely red:
- The bag is full; change the bag.
- Fine materials have been picked up, clogging the bag pores; change the bag.
- Blockage in the nozzle, hose, tools or at the bag opening; remove the blockage. (See Clearing Blockages, page 7)
MAINTENANCE
![]() CAUTION! To reduce the risk of injury from moving parts, unplug before servicing.
CAUTION! To reduce the risk of injury from moving parts, unplug before servicing.
FILTER BAG REPLACEMENTChange filter bag when dirt reaches the dotted line or vacuum will not operate effectively.
![]() NOTE: New carpet has loose fibers that fill the filter bag quickly when vacuumed. This type of debris does not activate the indicator. If vacuuming new carpet change the filter bag often.
NOTE: New carpet has loose fibers that fill the filter bag quickly when vacuumed. This type of debris does not activate the indicator. If vacuuming new carpet change the filter bag often.
![]() CAUTION! Fine materials such as face powder or corn starch may seal the filter bag and cause it to burst. When vacuuming material of this nature, change filter bag often.
CAUTION! Fine materials such as face powder or corn starch may seal the filter bag and cause it to burst. When vacuuming material of this nature, change filter bag often.
FILTER BAG REPLACEMENT CONTINUED
CHANGING THE FILTER BAG
- 1. Push down at top of bag door, pull door forward and remove door. (See Figure 24)
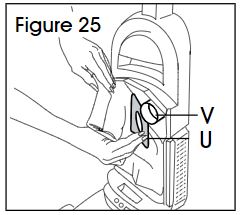
- Grasp filter bag collar (U) and pull collar from tube (V). (See Figure 25)NOTE: Do not clean out old filter bag and reuse. Discard used filter bag.
- To install new filter bag, align opening in filter bag collar with tube. Push bag firmly onto tube. Tuck in filter bag.
- Replace bag door by placing tabs on bottom of door into opening (W). (See Figure 26)


BELT REPLACEMENT
The vacuum’s belt causes the agitator brush roll to rotate and is important for the vacuum to be effective. The belt is located under the bottom plate and should be checked from time to time to be sure it is in good condition.
- Place the handle in the low position and turn the vacuum over so bottom side is up.
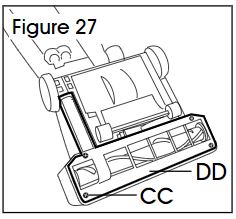
- Unscrew the four screws (CC) with a Phillips screwdriver. Lift off the bottom plate (DD). (See Figure 27)
- If the belt is stretched, cut or broken, replace immediately.
- Remove agitator brush roll and used belt. Discard used belt. (See Figure 28)
- With lettering on outside of the new belt (EE), slide the belt over the motor pulley (FF). (See Figure 29)
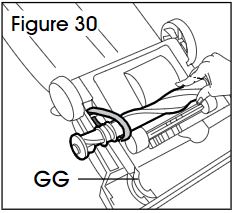
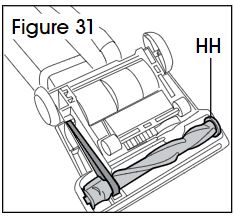
- Insert agitator brush roll through belt and place belt in belt guide (GG) on agitator. (See Figure 30)NOTE: If the agitator shield (HH) becomes dislodged while replacing the belt or the agitator brush roll, reposition below the belt guide. (See Figure 30).
- Grasp agitator brush roll firmly and slide the end opposite of the belt into the rectangular slot (HH) on the side of the vacuum. Pull other side of agitator brush roll into place. (See Figure 31)
- Turn agitator brush roll to ensure belt moves freely.
- Replace the bottom.


CLEANING SECONDARY AND FINAL FILTERS
SECONDARY FILTER
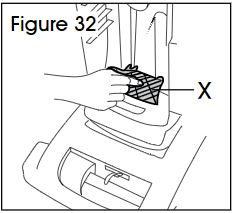
The secondary filter protects the motor from dirt particles. It is located behind the grill in the bottom of the bag compartment.
- Pull off grill (X) and lift filter out Figure 32 of compartment. (See Figure 32)
- Hand wash filter in cold water with mild detergent, then air dry.
- Replace filter and grill.
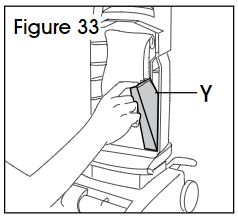
FINAL FILTER
The final filter assists in the filtration process to return clean air to the room.
- Remove bag door and pull down top of filter and lift out of compartment. (See Figure 33)
- Hand wash filter in cold water with mild detergent. Air dry before replacing.
![]() NOTE: Do not operate vacuum without either secondary of final filter in place.
NOTE: Do not operate vacuum without either secondary of final filter in place.
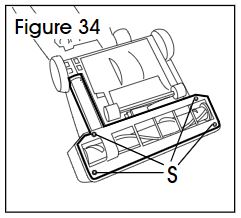
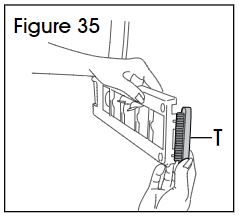
EDGE GROOMER REPLACEMENT
Replace the edge groomers, located on both sides of the nozzle, when they appear worn.
- Place handle in low position and turn vacuum over. Using a Phillips screwdriver remove the four screws (S) on the bottom of the vacuum. (See Figure 34)
- Lift off both old edge groomers (T) and slide new edge groomers into position.(See Figure 35)
- Reposition the bottom plate and reinsert the 4 screws.
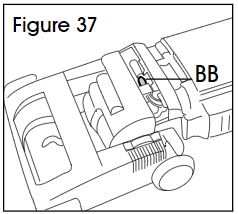
HEADLIGHT REPLACEMENT
![]() CAUTION! Disconnect the vacuum from electrical outlet before removing the lens
CAUTION! Disconnect the vacuum from electrical outlet before removing the lens
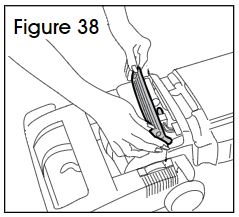
- Using a Phillips screwdriver, remove the two screws (Z) from the lens (AA). Lift the lens off the vacuum. (See Figure 36)
- Pull the old bulb (BB) straight out of the socket and push the new bulb straight into the socket until it locks into place. (See Figure 37) Do not use excessive force.
- Reposition the lens and secure with the screws. (See Figure 38)

AGITATOR BRUSH ROLL REPLACEMENT
- Check the condition of the brushes by placing the edge of a card across the bottom of the plate while turning the agitator brush. (See Figure 39)
- If brushes do not touch the card the agitator brush roll needs to be replaced.
- To replace, remove the bottom plate, belt and agitator brush roll. (See Belt Replacement, page 6)
- Discard the old agitator brush roll and replace with a new one.

CLEARING BLOCKAGES
![]() NOTE: A blockage in the system can cause low suction or pickup.
NOTE: A blockage in the system can cause low suction or pickup.
- Check filter bag. Change if full.
- Turn on vacuum. Check end of hose for suction.a. If there is no suction, disconnect the hose and check for blockage in the hose and tube.
- Check for blockage at the connection at hose tube.
- If blockage is not found in tube, remove bottom plate, belt and agitator. (See Belt Replacement, page 6)
- Remove agitator shield and remove any loose debris which may have accumulated.
ROUTINE MAINTENANCE
DAILY
- Filter Bag – Before each use, check the filter bag and discard if three-quarters full or more.
- Belt – Check the belt for signs of wear. Change the belt when it is loose or has cuts or cracks. Refer to the diagram on the underside of the base for proper installation of belt and brush roll.
- Supply Cord and Plug – Check supply cord and plug for any cuts or damage. If damaged, have the supply cord and plug assembly replaced by Uline service team.
- Motor – If there are unusual sounds or if poor performance occurs, the motor should be inspected immediately by the Uline repairs team.
WEEKLY
- Brush roll Bristle Strips Check the bristles for wear. The bristle strips should be replaced when the bristles are less than 1/4 inch in length.
- Brush Roll Check for and remove any loose material such as string or hair wrapped around the brush roll.
- Filter Check the washable, reusable filters for clogs and clean or rinse as needed.
![]() NOTE: There are two filters and both are washable. If vacuum loses suction or if filters are not clean after washing, filters may need to be replaced.
NOTE: There are two filters and both are washable. If vacuum loses suction or if filters are not clean after washing, filters may need to be replaced.
MONTHLY
- Cleaning Inspect and clean the vacuum, including the fan chamber and under the hood.
- Electrical Inspect the cord assembly for wear and check for proper handle assembly.
- Handle Check the handle assembly for tightness, and replace handle bolts if missing.
- Motor The Uline repairs team should make a routine inspection of the motor every six months. Check the motor immediately if there are any unusual sounds or if poor performance occurs.
- Filter Check the washable, reusable filters for clogs and clean or rinse as needed.
![]() NOTE: There are two filters and both are washable. If vacuum loses suction or if filters are not clean after washing, filters may need to be replaced.
NOTE: There are two filters and both are washable. If vacuum loses suction or if filters are not clean after washing, filters may need to be replaced.
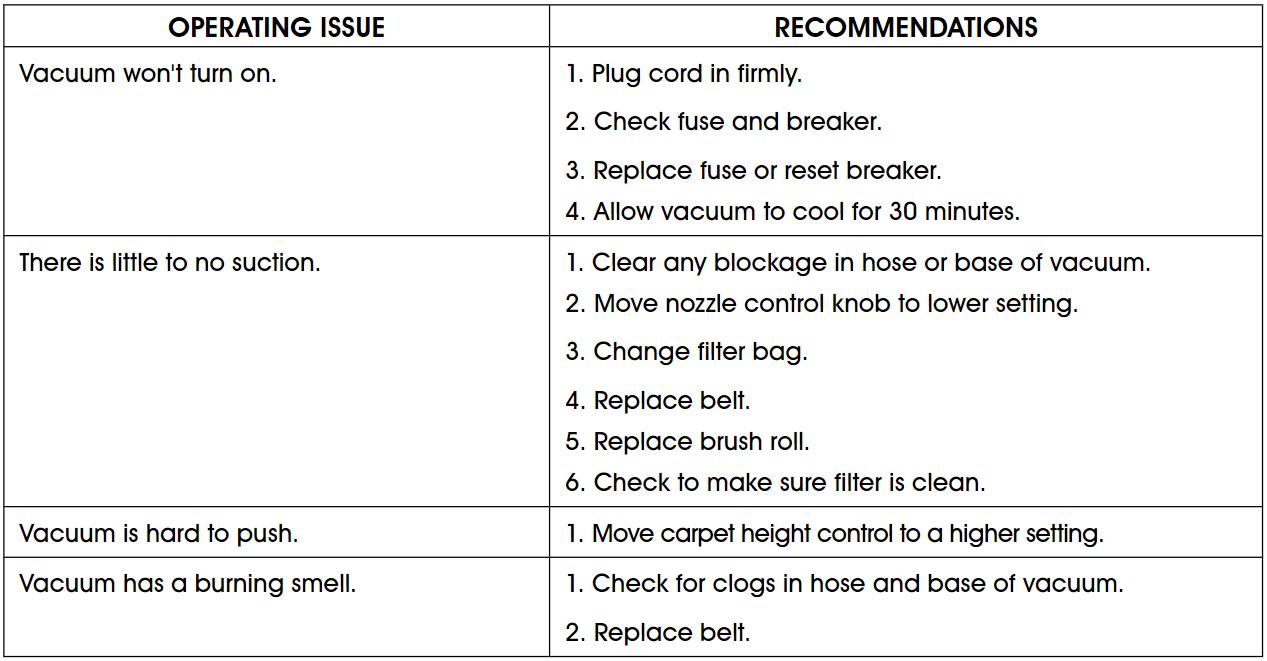
TROUBLESHOOTING
![]()
1-800-295-5510uline.com
[xyz-ips snippet=”download-snippet”]