
ULINE H-4601 Low Profile Floor Scale Printer User Manual
OVERVIEW
WARNING!
 WARNING!
Avoid using the printer in any harsh environment.Only trained professionals are allowed to do repair work.Turn power off before connecting or disconnecting the power source.Do not spill liquids on the printer.
PREPARATION
- Carefully remove contents from the package.
- Connect the interface cable (included) from the printer to the RS-232 serial port of the indicator. Tighten the screws on both sides.
- Turn the printer’s ON/OFF switch to the off position.
- Plug in the power adapter from the printer to a surge-protected power outlet.
- Turn the printer’s ON/OFF switch to the on position.
SETUP
PRINTER SETUP WITH LP-7510 / DISPLAY INDICATOR
- With the LP-7510 display on and displaying weight, press the PRINT and TOTAL buttons at the same time to get into Setup. Display should now show C 01.a Use the LB/KG and GROSS buttons to move the flashing digit left orb Use the TARE and ZERO buttons to increase and decrease the flashing
- Change the display to show C 16 and press thePRINT (Enter) button.a Display shows the date in Y/M/Db Enter the correct date and press the PRINT (Enter)
- Display shows C 17. Press the PRINT (Enter) button.a. Display shows the time in H/M/S format.b. Enter the correct time and press the PRINT (Enter) button.
- Display shows C 18. Press the PRINT (Enter) button.a. Display shows C 18 and a number on the right.b. Change the number on the right to “2” and press the PRINT (Enter) button. The number 2 indicates that the printer is connected.
- Display shows C 19. Press the PRINT (Enter) button.a. Display shows C 19 and a number on the right.b. Change the number on the right to a “3” and press the PRINT (Enter) button. The number 3 signifies the 9600 BaudRate.SETUP CONTINUED
6
- Display shows C 20. Change this to C 30 and press the PRINT (Enter) button.a. Display shows C 30 and a number on the right.C 30 is short for Code 30, which signifies the date format.b. Change the number on the right to achieve desired date format (see below) and press the PRINT (Enter) button.• #1 = mm.dd.yy• #2 = dd.mm.yy• #3 = yy.mm.dd
- Press the COUNT button to exit.
- Display is now set up to match the printer. Press the PRINT button on the LP-7510 display and the printer should print.
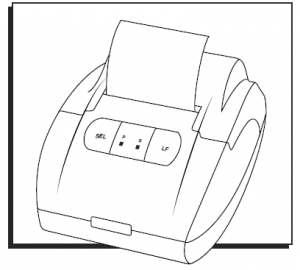
HOW TO PRINT
- To change the printing mode, press the SEL button on the printer once and the green status light should be If the green status light is already on, then pressing the SEL button is not necessary because the printer is already in printing mode.
- Press the PRINT button on the indicator and the printer should start Remember to set up the indicator correctly to enable the printing function.
- Repeat step 2 to print multiple readings from the
- After printing is done, press the SEL button once to exit the printing The green status light should now turn off.
- To roll paper out, press the LF (Line Feed) Press LF button again to stop line feed.
TROUBLESHOOTING
| OPERATING ISSUE | RECOMMENDATIONS |
| The printer is not working. | Ensure the printer is connected to power.
Ensure the thermal paper inside the printer is placed correctly. Ensure the cover of the printer is closed completely. Ensure the indicator is set up to have the print function activated. |
Call Uline Customer Service at 1-800-295-5510 for any technical questions or issues.
Read More About This Manual & Download PDF:
References
[xyz-ips snippet=”download-snippet”]