ULINE H-6984/ H-6985/ H-6986/ H-6987/ H-6988/ H-6989/ H-8594 Drum Fan Instruction Manual
IMPORTANT SAFETY INSTRUCTIONS
NOTE: Read all safety rules and instructions carefully before attempting to operate. Retain for future reference.
![]() DANGER: Never operate this unit when flammable materials or vapors are present because electrical devices produce arcs or sparks that can cause a fire or explosion.
DANGER: Never operate this unit when flammable materials or vapors are present because electrical devices produce arcs or sparks that can cause a fire or explosion.
![]() WARNING: To reduce the risk of fire, electric shock or injury:
WARNING: To reduce the risk of fire, electric shock or injury:
- Do not expose to water or rain – store indoors. Do not immerse the fan in water. This fan is designed for indoor use only.
- Do not allow to be used as a toy. Close attention is necessary when used by or near children.
- Use only as described in this manual. Use only manufacturer’s recommended attachments.
- Do not operate any fan with damaged cord or plug. Discard fan or return to Uline for examination and/ or repair. If appliance is not working as it should, has been dropped, damaged, left outdoors or dropped in water, contact Uline Customer Service for assistance.
- Do not pull or carry by cord, use cord as a handle, close door on cord or pull cord around sharp edges or corners. Do not run appliance over cord. Keep cord away from heated surfaces.
- Do not unplug by pulling on cord. To unplug, grasp the plug; not the cord.
- Do not handle plug or appliance with wet hands.
- Do not insert your hand or other objects into openings. Do not use with any opening blocked; keep free of dust, lint, hair and anything that may reduce air flow.
- Keep hair, loose clothing, fingers and all parts of body away from openings and moving parts.
- Turn off all controls before unplugging. Wait for fan to stop before moving, storing and/or changing operating locations.
- WARNING! To avoid injury or property damage: do not use around explosive liquids or vapors, as electrical devices produce arcs or sparks, which can cause a fire or explosion.
- Do not store or use near flammable or combustible liquids such as gasoline, toxic, carcinogenic, combustible or hazardous materials such as asbestos, arsenic, barium, beryllium, lead, pesticides or other health endangering materials.
- Do not run cord under carpeting. Do not cover cord with throw rugs, runners, or similar coverings. Arrange cord away from traffic area and where it will not be tripped over. Do not route cord under furniture or appliances.
- Operation of this unit can result in foreign objects being blown into eyes, which can result in eye damage. Always wear safety goggles when operating fan.
- Stay alert! Watch what you are doing and use common sense.
- Do not use an extension cord with this fan.
- To guard against electric shock while operating, do not allow fan to come in contact with other grounded objects such as pipes, radiators, etc.
- Do not use high pressure water, or garden hose to spray the fan for cleaning.
- Never use fan without safety grills attached.
- WARNING! To reduce the risk of fire or electric shock, do not use fan with any solid-state speed control device.
READ AND SAVE THESE INSTRUCTIONS
![]() WARNING!
WARNING! ![]() Unplug unit when not in use.
Unplug unit when not in use.
GROUNDING INSTRUCTIONS
![]() WARNING!Improper connection of the equipment grounding conductor can result in a risk of electric shock. Check with a qualified electrician or service person if you are in doubt as to whether the outlet is properly grounded. Do not modify the plug provided with the appliance – if it will not fit the outlet, have a proper outlet installed by a qualified electrician.
WARNING!Improper connection of the equipment grounding conductor can result in a risk of electric shock. Check with a qualified electrician or service person if you are in doubt as to whether the outlet is properly grounded. Do not modify the plug provided with the appliance – if it will not fit the outlet, have a proper outlet installed by a qualified electrician.
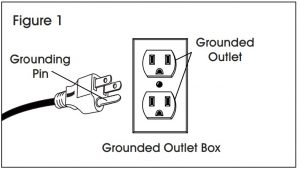
This appliance must be grounded. If it should malfunction or break down, grounding provides a path of least resistance for electric current to reduce the risk of electric shock. This appliance is equipped with a cord having an equipment-grounding conductor and grounding plug. The plug must be inserted into an appropriate outlet that is properly installed and grounded in accordance with all local codes and ordinances.
- This appliance is for use on a nominal 120-volt circuit, and has a grounded plug. (See Figure 1)

- A temporary adaptor may be used to connect this plug to a two-pole receptacle if a properly grounded outlet is not available. The temporary adaptor should be used only until a properly grounded outlet can be installed by a qualified electrician. The green-colored rigid ear, lug or the like extending from the adaptor must be connected to a permanent ground, such as a properly grounded outlet box cover. Whenever the adaptor is used, it must be held in place by a metal screw. (See Figure 2)

NOTE: In Canada, the use of a temporary adaptor is not permitted by the Canadian Electrical Code. Make sure that the appliance is connected to an outlet having the same configuration as the plug. No adaptor should be used with this appliance.
PARTS
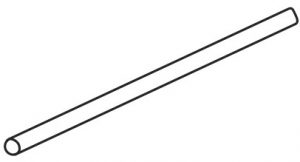
- Axle x 1
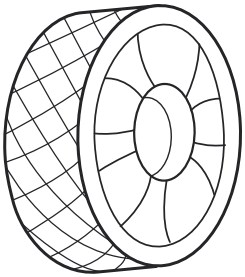
- Wheel x 2
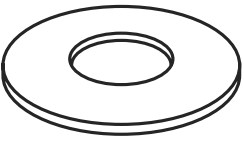
- Washer x 2
- Cotterpin x 2

WHEEL ASSEMBLY
- Unpack fan from carton. Remove banding from unit. Hardware is packed in carton.
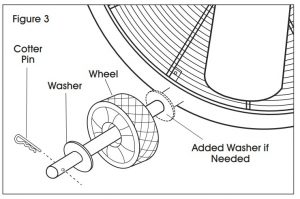
- Place one cotter pin in one end of the axle.
- Slide one washer down the length of the axle to rest on cotter pin.
- Slide wheel onto axle next to washer.
- Locate the wheel/axle bracket on the fan and slide the end without the wheel into the bracket hole until the axle comes out the other end.
- Slide wheel, then washer onto this end.
- Insert cotter pin into the remaining hole in the axle to hold wheel in place. (See Figure 3)NOTE: Additional washers may be needed if wheel fit is too loose
OPERATION
- To use the unit, place it in the area most suitable for your application. Several factors need to be considered; the unit must have a minimum of 3 feet of clearance on both the intake and exhaust sides of the fan to allow for proper airflow. The unit should not be placed where it can become a tripping or safety hazard.
- Plug the unit into the wall.
- Turn unit on and select air speed on top of unit – O = OFF, I = LOW SPEED, II = HIGH SPEED.
- When finished using fan, turn off and follow the instructions for storage . WARNING! Be sure to disconnect power supply before attempting to service or remove any components.
MAINTENANCE
CLEANING
WARNING: To reduce risk of injury from the fan accidentally starting, unplug power cord before cleaning. The outside of the unit may be cleaned with a damp cloth to remove any dust or residue
BELT TIGHTENING (BELT DRIVE UNITS) TOOLS:
- 1/2″ Wrench
- 3/8″ Wrench
- Safety Glasses
- 10 mm Wrench
- Tighten belt after 800 hours of operation.
- Remove bolts from front guard (exhaust side of unit).
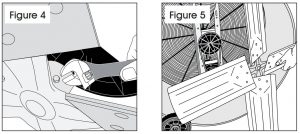
- Loosen set screw on fan blade hub and remove fan blade. (See Figures 4 and 5)
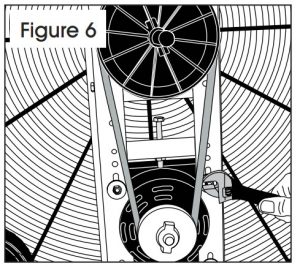
- Loosen four motor nuts on pulley side of motor. (See Figure 6)
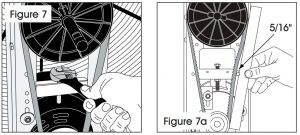
- Loosen two nuts on tension screw to adjust tension. Do not overtighten, as this could cause damage to the unit. (See Figure 7) Set belt deflection to 5/16″ with moderate pressure. (See Figure 7a)
- Make sure nuts are retightened after tension is set.
- Re-tighten four motor nuts on pulley side of motor.
- Reinstall front guard (exhaust side of unit).
BELT REPLACEMENT (BELT DRIVE UNITS)
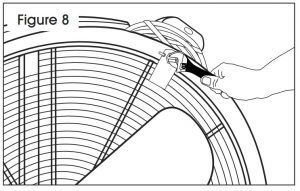
- . Remove bolts from front guard (exhaust side of unit). (See Figure 8)
- Loosen set screw on fan blade hub and remove fan blade. (See Figures 4 and 5)
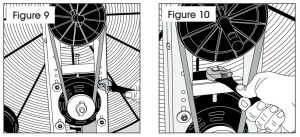
- Loosen four motor nuts. (See Figure 9)
- Loosen tension screw and two nuts. (See Figure 10)
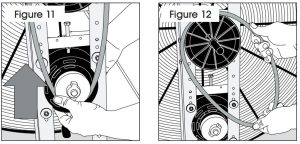
- Slide motor upward. (See Figure 11)
- Remove old belt and replace with new belt. (See Figure 12)
- Slide motor back into correct position.
- Set belt deflection to 5/16″ with moderate pressure.
- Tighten tension screw, the two nuts on the tension screw and motor nuts.
- Replace fan blade and tighten set screw.
- Replace front guard.
USER SERVICING INSTRUCTIONS
![]() WARNING: Be sure to disconnect power supply before attempting to service or remove any components.
WARNING: Be sure to disconnect power supply before attempting to service or remove any components.
Do not attempt to service your fan beyond that described in the user manual.
LUBRICATION
No lubrication is necessary, as the motor is equipped with lifetime lubricated bearings.
STORAGE
- Before storing the unit, it should be cleaned. See “Cleaning”.
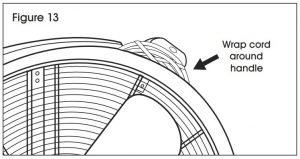
- Wrap the power cord around the handle on the top of the unit to keep it untangled. The fan should be stored indoors. (See Figure 13)
TROUBLESHOOTING
| OPERATING ISSUE | CAUSES | RECOMMENDATIONS |
| Fan will not start | Power cord not plugged into outlet.
No power at the outlet. Defective switch or motor. |
Plug cord into outlet.
Plug cord into another outlet. Contact Uline Customer Service. |
Contact: 1-800-295-5510
Website: uline.com
[xyz-ips snippet=”download-snippet”]