ULINE H-7174 Bulk Soap and Sanitizer Auto Wall-Mount Dispenser 34 OZ. User Guide
INSTALLATION
OPENING DISPENSER
- To open, insert key on the bottom of dispenser, push key upward into the dispenser. (See Figure 1)

- The front will open towards user.

GENERAL MOUNTING INSTRUCTIONS
- Can use double sided tape (not included) on glazed tile, painted or unpainted metal walls. Tape will not work well if wall surface is porous, like brick or wood.
- On all other wall surfaces, use screws and anchors (included) or other appropriate hardware based on surface type.
- Install dispenser at least 8″ above a sink or counter. Never install where it can drip on floor, creating hazardous conditions.
- If dispenser is mounted too close to the sink or counter or if it senses an obstacle in its way, the LED light will blink green frequently. If it is able to make internal adjustments, after 15 seconds the LED light will go back to normal. If it is not able to make the appropriate adjustments, the LED light will blink green and red until obstacle is removed or dispenser is remounted at correct distance from counter or sink.
- To be in compliance with ADA regulations, the dispenser should be mounted no more than 48″ from the ground. NOTE: Dispenser opens towards the front. For ideal placement, the dispenser should be mounted 8″ above any counter top, fixture or obstruction and 2″ below any cabinet, fixture or obstruction.
MOUNTING WITH DOUBLE-SIDED TAPE
- Thoroughly clean wall surface using a general purpose cleaner and a paper towel. Let dry completely. For silicone buildup, use a pumice-type cleaner or grout cleaner to clean the surface. (See Figure 2)
- Peel off paper from the back of tape (not included). Press dispenser firmly to wall and hold for at least 30 seconds to ensure tape has completely adhered to wall.
- Wait 24 hours before filling with soap to ensure that the tape has completely adhered to wall.

MOUNTING WITH SCREWS AND ANCHORS
- Hold dispenser against wall in desired location.
- Open dispenser.
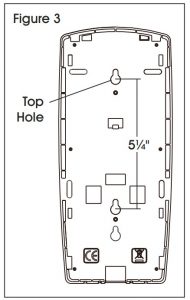
- Using the back of dispenser as a template, mark top hole location on wall. (See Figure 3)
- For bottom hole, measure and mark 5⁄” from top hole as shown.
- Set dispenser down and drill 3/16″ diameter holes for anchors and screws (included).
- Place dispenser on screws and slide down into place
INSTALLING BATTERIES
- Open dispenser and remove plastic fill cartridge by pinching cartridge tabs in and pulling toward user.
- Ensure dispenser is set to OFF. Front LED light will be off.
- Locate the battery compartment cover at top of control box. Pinch in red tabs on each side of cover and pull the cover up and forward away from wall.
- Place six AA alkaline batteries (not included) in the proper orientation. (See Figure 4)
- Replace the battery compartment cover by gently sliding front brackets in place and pushing down. NOTE: When LED light frequently blinks red, change the batteries.

INSTALLING CARTRIDGE
- Open dispenser.
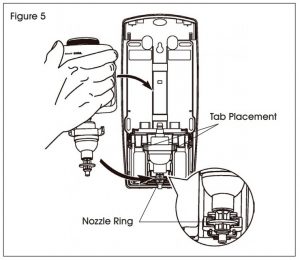
- Slide cartridge into dispenser with pump facing toward front and down, ensuring the tabs click into place and the nozzle ring is fixed into the groove in lower control box. (See Figure 5)
- Close dispenser cover. LED indicator will blink green one time.
FILLING CARTRIDGE
- Open dispenser.
- Unscrew cartridge lid to open.
- Fill with liquid soap or gel hand sanitizer and replace lid.
- Turn on dispenser by pressing ON/OFF button. (See Figure 6)
ADJUSTING DOSAGE
Press dosage button to choose dosage. There are three options. (See Figure 6)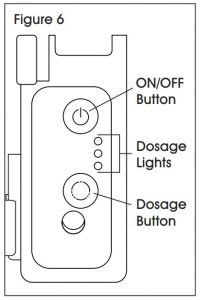
- Indicates one pump each time the dispenser releases soap.
- Indicates two pumps each time the dispenser releases soap.
- Indicates three pumps each time the dispenser releases soap.
TROUBLESHOOTING
![]() NOTE: When battery is low, the red light will blink frequently. User should switch to OFF position, and then change batteries.
NOTE: When battery is low, the red light will blink frequently. User should switch to OFF position, and then change batteries.
Sensor works best when hands are placed within 2″ of dispenser bottom.
TOOLS NEEDED
- Phillips Screwdriver
- Electric Drill


Contact: 1-800-295-5510Website: uline.com
References
[xyz-ips snippet=”download-snippet”]