![]()
H-7605 MONITOR ARM1-800-295-5510uline.com
TOOLS NEEDED

HARDWARE

INSTALLATION
![]() NOTE: Monitor arm includes hardware to attach to a wall or Uline Deluxe Workstations and Packing Stations.
NOTE: Monitor arm includes hardware to attach to a wall or Uline Deluxe Workstations and Packing Stations.
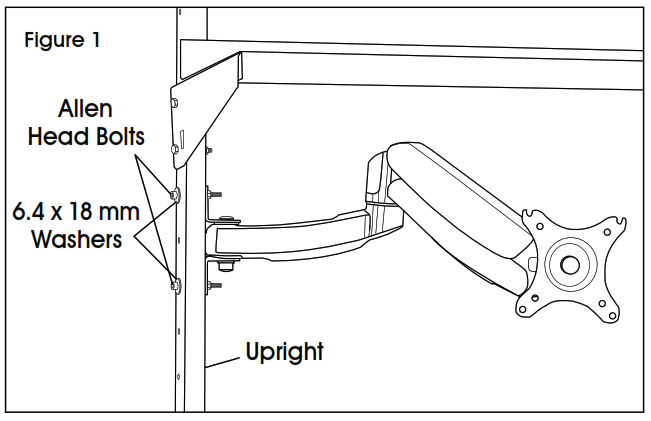
UPRIGHT MOUNTING
- Align monitor arm mounting bracket upright at the desired height.
- Secure to upright with two M6 x35 mm or M6 x 50 mm Allen head bolts, two 6.4 x 18 mm washers, and two hex nuts using an Allen wrench and 10 mm wrench. (See Figure 1)

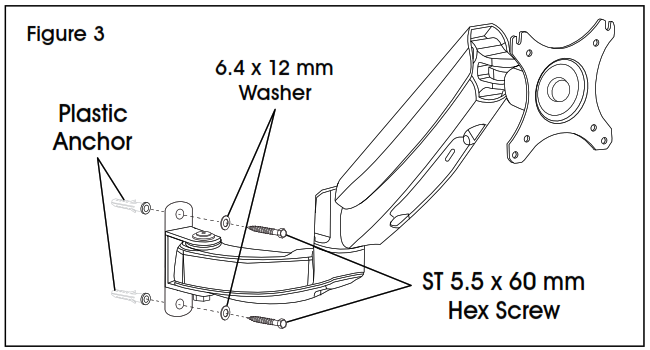
WALL MOUNTING

- Align monitor arm mounting bracket with wall at the desired height. Mark holes where screws are to be located. Drill holes using a 7/16″ drill bit. (See Figure 2) Insert plastic anchors into predrilled holes.
- Position mounting bracket over holes with anchors. Fasten the bracket to the wall with two 6.4 x 12 mm washers and two ST 5.5 x 60 mm hex screws using a 10 mm wrench. (See Figure 3)

 ATTACHING MONITOR
![]() NOTE: Ensure the monitor has a VESA hole pattern of 100 x 100 mm or 75 x 75 mm. (See Figure 4)
NOTE: Ensure the monitor has a VESA hole pattern of 100 x 100 mm or 75 x 75 mm. (See Figure 4)![]() NOTE: If the monitor is attached to a fixed base, remove the monitor from the base.
NOTE: If the monitor is attached to a fixed base, remove the monitor from the base.![]() CAUTION! Be careful not to scratch the screen during installation.
CAUTION! Be careful not to scratch the screen during installation.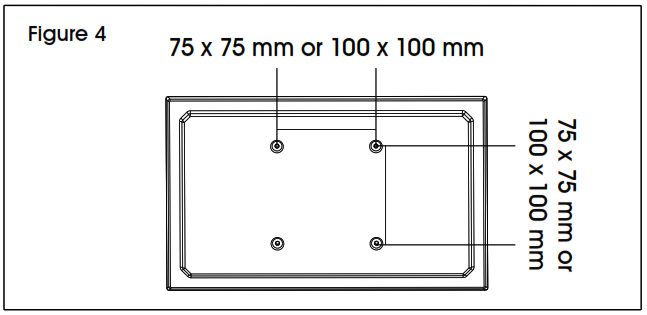
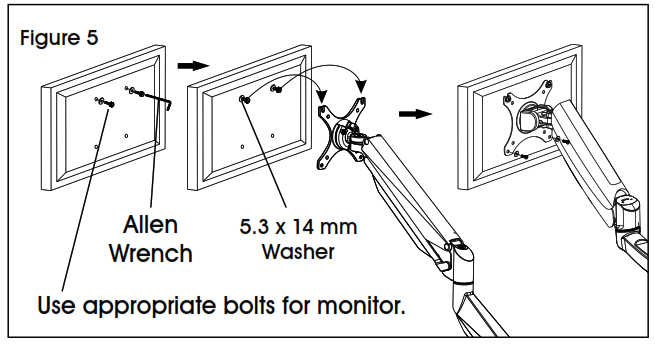
- Easy-adjust monitor mount includes a built-in counterweight system for free-range motion. Arm in mount may need to be adjusted to allow the monitor to stop at the desired position. Attach the monitor to the plate. (See Figure 5)
- To adjust the counterweight, use 5 x 5 Allen wrench on the screw above the middle joint. Turn towards “” if the monitor raises up. Turn towards “+” if the monitor lowers. Adjust until the mount can be stopped at the desired position. (See Figure 6)

CABLE MANAGEMENT
- To remove covers, use a Phillips head screwdriver to unscrew the two screws securing covers to the monitor arm. This allows users to slide cables through covers. Once complete, re-secure the covers to the monitor arm using the Phillips head screws. (See Figure 7)

![]()
1-800-295-5510uline.com
[xyz-ips snippet=”download-snippet”]