ULINE H-8093 Ohaus SF40A Scale Printer
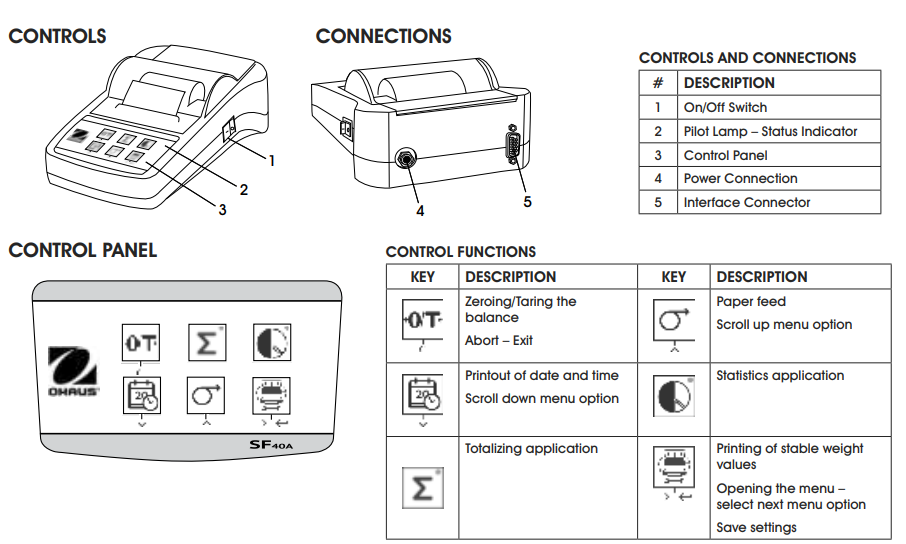
OVERVIEW OF CONTROLS
SETUP
SAFETYThe printer has been tested for the connections and intended purposes documented in these operating instructions. It is your responsibility to perform the necessary tests related to the methods and purposes of its intended use. Observe the following safety measures.
CAUTION! The printer must only be used indoors and never in hazardous areas.
- The electronics of the printer are protected against splashing water and dust. However, since the printer housing is not watertight, it should not be used in the presence of liquids.
- Follow cleaning instructions on page 8. Protect power plug against wet conditions.
- Never open the printer housing. If you have any problems with your printer, contact Uline Customer Service at 1-800-295-5510.
- If the equipment is used in a manner not specified by the manufacturer, the protection provided by the equipment may be impaired.
POWER SUPPLYThe printer is supplied with an AC adapter with a country-specific power cable. The power supply is suitable for all line voltages in the range: of 100 – 240V AC, and 50 – 60 Hz. (See Page 11 for Specifications).
CAUTION! First, check the local line voltage is in the range 100 – 240V AC, 50 – 60 Hz and determine whether the power plug fits your local power supply connection. If this is not the case, do not connect the printer or the AC adapter to the power supply. Contact Uline Customer Service at 1-800-295-5510.
- Only plug the adapter into a grounded socket.WARNING! Before operating, check all cables for damage.
- Guide the cables so that they are not damaged or interfere during the weighing process.
- Make sure that the AC adapter cannot come into contact with liquids.
- The power plug must always be accessible.
PRINTER SETUP
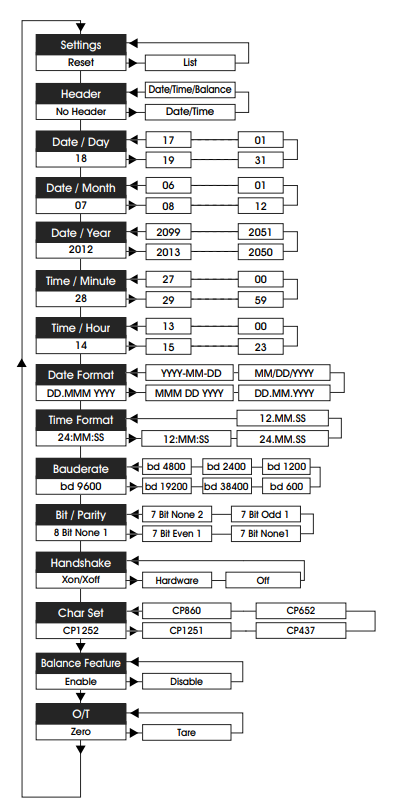
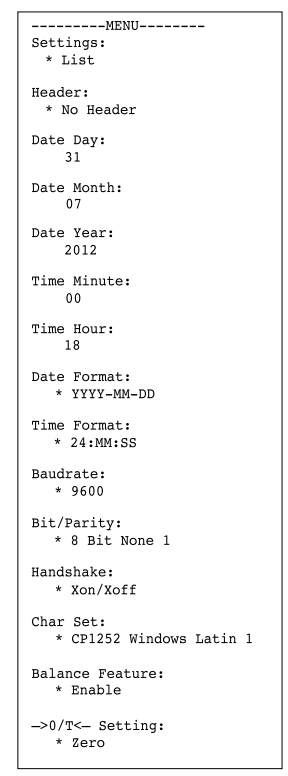
- Default printer settings are shown below. (See Figure 1)


There are two ways to change the default setting:
- Use accompanying software.
- Operate on the printer only.
PRINTER SETUP USING ACCOMPANYING SOFTWARE
- Attach the interconnecting cable to the printer interface on the computer and to the printer.
- Connect printer to the main power supply.
- Use the main switch <I/O> to power on.
- Insert CD into the computer and install the printer software.
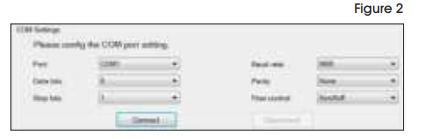
- Run the software and set up the RS-232 parameter of computer, then click the Connect button. (See Figure 2)
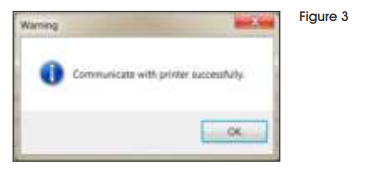
- The following window will appear if connection is successful. Click OK to continue. (See Figure 3)
- The printer Menu setting is now activated and all settings can be changed. (See Figure 4)

- Date Time: Sets date and time for the printer.
- Keep Printer Time: Keep the existing date and time in the printer.
- Current System Time: Get the date and time from your computer.
- Custom: Set date and time manually.
- Header: Sets the header of the printing content.
- No Header: No header for printing content.
- Date/Time: Header with date and time.
- Date/Time/Balance: Header with date, time and S/N.
- Date Format: Sets date format.
- Time Format: Sets time format.
- Char Set: Sets code page for different languages.
- CP 1252 Windows Latin1: Covers Western European languages such as English, German, French, Spanish and Italian.
- CP 1251 Windows Cyrillic: Covers languages that use the Cyrillic alphabet such as Russian, Bulgarian and Serbian Cyrillic.
- CP437 MS-DOS Latin US: Covers Western European languages such as English, German, French, Spanish and Italian.
- CP852 MS-DOS Latin2: Covers Central European languages that use Latin script such as Polish Bosnian, Czech, Hungarian, Croatian, Romanian, Serbian and Slovak.
- CP860 MS-DOS Portuguese: Covers Portuguese language.
- Balance Features:
- Enable/Disable a function: 0/T, Statistics, Totalization.
- Printer connection status: LED light will either blink or stay lit.
- Balance Feature Enabled: 0/T, Statistics and Totalization functions are enabled. The printer connection status LED light will blink if the connection with balance is lost.
- Balance Feature Disable: 0/T, Statistics, Totalization functions are disabled. The printer connection status LED will be lit even if the connection with balance is lost.
- 0/T Setting: Set up the function of the 0/T button.
- Perform Zero: Perform Zero function when pressing the button.
- Perform Tare: Perform Tare function when pressing the button
- Baud rate, Data bits, Parity, Stop bits, Flow Control: Set the parameters of RS-232 setting.
- Settings should be the same as the scale to be connected. For the scale RS-232 settings, please see scale manual.
PRINTER SETUP USING PRINTER ONLY
- Connect the printer to the main power supply.
- Use the main switch <I/O> to power on.
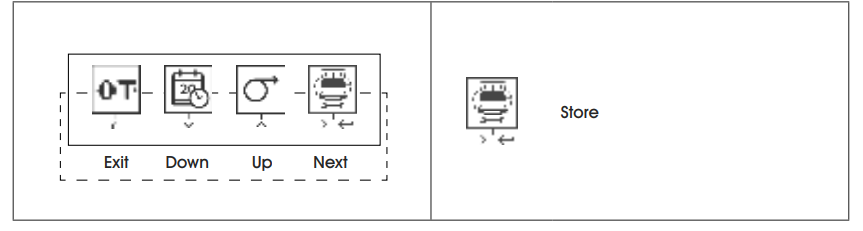
- Press and hold the button to enter the menu list, the printer will print “———-Menu——-“.
- Press to choose which item to change.
- Press to change the parameter.
- Press and hold to save and exit.
- Press to exit without saving.
- Press
The printer will print the content to show the result of every operation. See Operation for total menu structure. (See pages 5-8)
INSTALLING THE PRINTERCONNECTING THE PRINTER TO THE SCALEBefore connecting, make sure the scale and printer have the same RS-232 parameter setting. For scale Baud rate settings, see Recommended Settings on pages 6-7.
- Attach the interconnecting cable to the printer interface of the scale and to the printer.
- Switch the scale on.
SWITCHING THE PRINTER ON
- Connect printer to the main power.
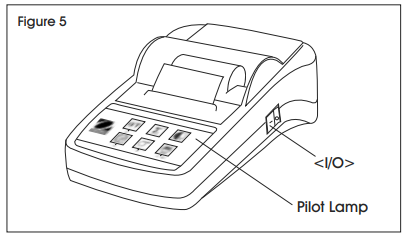
- Use main switch <I/O> to power on. (See Figure 5)
- RS-232 interface only: The pilot lamp will flash until scale is connected. If pilot lamp continues to flash, see Troubleshooting on pages 9-10.
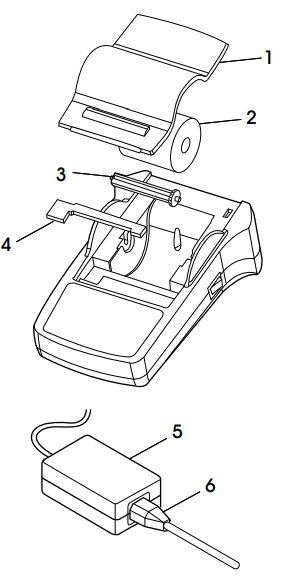
INSERTING PAPER
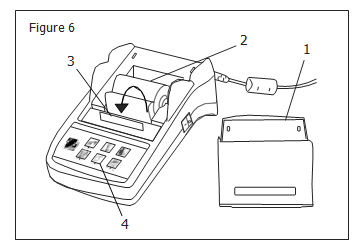
- Pull back of paper cover (1) to remove. (See FIgure 6)
- Insert paper rotary axis through the core of the paper roll (2).
- Feed paper through the slot in the printing unit in the direction of the arrow (3).
- Press and hold until enough paper has been fed (4).
- Replace paper cover (1).
PRINTER TESTThe printer is equipped with a self-test that automatically prints out the character set (standard IBM/DOS).
- Starting the Test – Press the key and power on the printer. The printer prints out the current settings.
- Terminating the Test – Power off the printer.
SAMPLE PRINTOUT
OPERATION
KEYSTROKE FUNCTIONS
OPERATIONAL LEVEL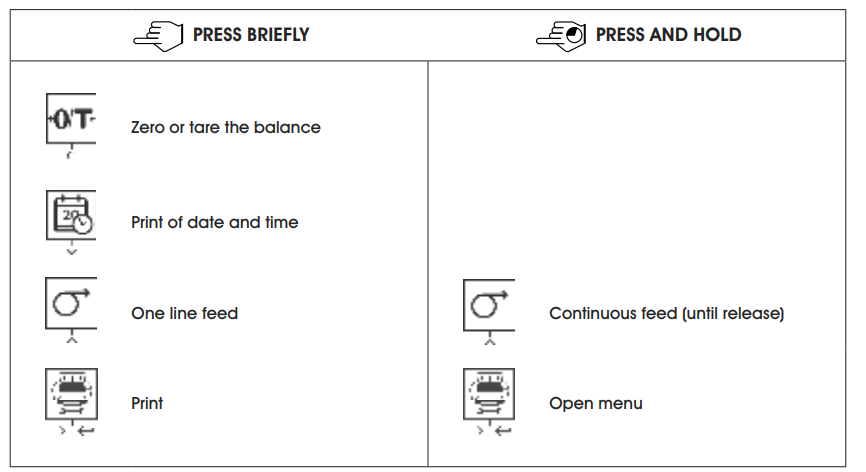
MENU LEVEL
FUNCTION LEVEL

APPLICATIONS

NOTE: Unit change during the application is not permitted.
- Maximum 999 samples.
- Sample weight must be in the range of 70 – 130% of the current average value.
- Minimum sample weights should be larger than 1d.
- During sample change, the scale reading needs to change by more than 100d or the printer will not register the sample change.
- Statistics applications include number of samples, average value, standard deviation, min., max. and min-max differential and total weight.
RECOMMENDED SETTINGS
| CONNECTED DEVICE | DEVICE SETTINGS | PRINTER SETTINGS |
| DV, AV, PA, AR,
SP, TA, NV, NVL, NVT, |
Printer Mode Baud Rate: 9600
Bit/Parity: 8 bit None 1 Handshake: Xon/Xoff |
Factory Settings |
| MB35/45, MB23/25, | ||
| (T31P, T51P, T71P, T32XW, T32WE, | ||
| T51XW, T71XW, CKW)* |
| CONNECTED DEVICE | DEVICE SETTINGS | PRINTER SETTINGS |
| EX | Printer Mode | Factory Settings |
| Baud Rate: 9600 | ||
| Bit/Parity: 8 bit None 1 | ||
| Handshake: Xon/Xoff | ||
| Russian | Printer Mode | CP1251 Windows |
| Baud Rate: 9600 | Cyrillic | |
| Bit/Parity: 8 bit None 1 | ||
| Handshake: Xon/Xoff | ||
| Language: ANSI/WIN | ||
| Russian | ||
| Polish | Printer Mode | CP852 MS-DOS |
| Baud Rate: 9600 | Latin2 | |
| Bit/Parity: 8 bit None 1 | ||
| Handshake: Xon/Xoff | ||
| Language: ANSI/WIN | ||
| Polish | ||
| Czech | Printer Mode | CP852 MS-DOS |
| Baud Rate: 9600 | Latin2 | |
| Bit/Parity: 8 bit None 1 | ||
| Handshake: Xon/Xoff | ||
| Language: ANSI/WIN | ||
| Czech | ||
| Hungarian | Printer Mode | CP852 MS-DOS |
| Baud Rate: 9600 | Latin2 | |
| Bit/Parity: 8 bit None 1 | ||
| Handshake: Xon/Xoff | ||
| Language: ANSI/WIN | ||
| Hungarian | ||
| Portuguese | Printer Mode | CP860 MS-DOS |
| Baud Rate: 9600 | Portuguese | |
| Bit/Parity: 8 bit None 1 | ||
| Handshake: Xon/Xoff | ||
| Language: ANSI/WIN | ||
| Portuguese | ||
| English, French, | Printer Mode | Factory Settings |
| German, Italian, | Baud Rate: 9600 | |
| Spanish, Chinese, | Bit/Parity: 8 bit None 1 | |
| Japanese, Korean | Handshake: Xon/Xoff |
RS-232C INTERFACE
The SF40A printer is equipped with an RS-232C interface to connect Ohaus scales. (See Figure 7)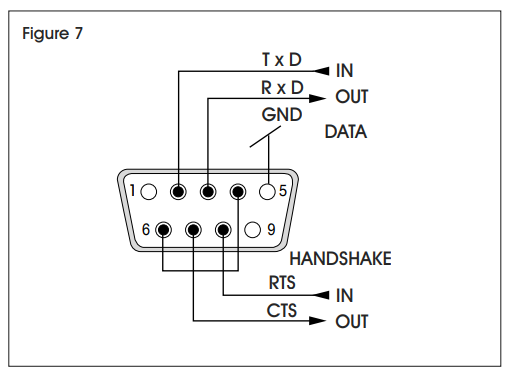
- 9-pin male connector
- Matching to other devices (transmission parameters).
(See Connecting the Printer to the Scale on page 3)
MAINTENANCE
Under normal conditions, the printer requires practically no maintenance. If servicing is required, contact Uline Customer Service at 1-800-295-5510CHANGING THE PAPER ROLLInsertion of a new roll of paper is described in Inserting Paper on page 4. (For paper roll order number, see Consumables and Spare Parts on page 10)NOTE: You may obtain the paper rotary axis from the old paper roll.
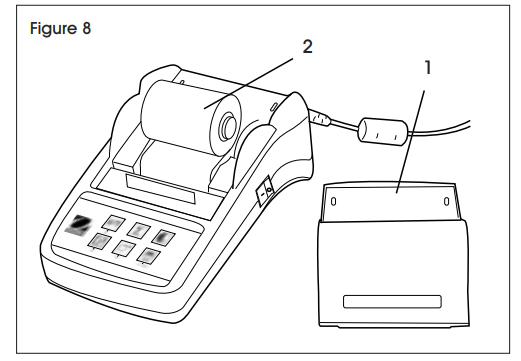
REPLACING THE RIBBON
- Remove the paper cover (1). (See Figure 8)
- Pull paper out of printing unit (2)
- To remove the ribbon cartridge, press in direction of arrow (3). (See Figure 9)
- Insert new ribbon, and if necessary, take up slack with tensioning wheel (4).
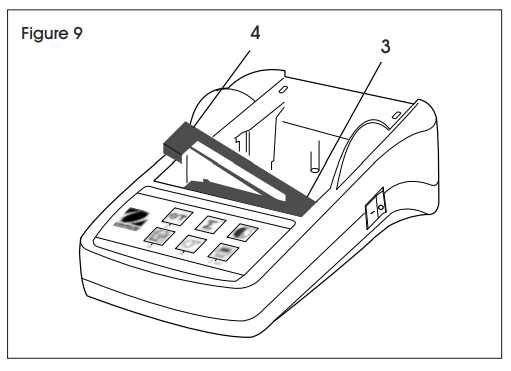
NOTE: For the ribbon cartridge order number, see Consumables and Spare Parts on page 10.NOTE: For insertion of a new roll of paper, seev Inserting Paper on page 4.
TROUBLESHOOTING
| OPERATING ISSUE | CAUSES | RECOMMENDATIONS |
| Printout unreadable. | Ribbon worn or tangled.
Service life of printing unit has ended. |
Change ribbon cartridge or tense the ribbon properly.
Contact Uline Customer Service at 1-800-295-5510. |
| Pilot lamp does not light. | No power.
Power supply fault. |
Switch printer on.
Contact Uline Customer Service at 1-800-295-5510. |
| Pilot lamp flashes. | No connection printer to device.
Printer unable to recognize device settings for the connected scale. |
Make sure that the printer and the scale are connected.
Switch the printer off/on. Alternatively change settings of the printer or the connected scale. (See page 4) |
| ———- Timeout ———- | Data transfer not completed within 45 seconds. | Move scale to a more stable location.
Check the scale. |
| ——– Over Load ——– | Balance in overload range. Zeroing out of the zero range. | Check the sample weight.
Change the zero range of the balance. Change the setting of the printer from zero to tare. |
| ——– Under Load ——– | Scale in underload range.
Weighing pan is not in position. |
Check the scale. |
| —- Transmission Error—- | Scale does not recognize printer instruction. | Check the interface parameter settings on the printer and scale. |
| —– Not Executable —– | Scale cannot execute printer instruction. | Check the scale. |
| — Date/Time Not Set —
—— Memory Error —— |
Printer error messages. | Check the scale. Reset the printer. Set date/time.
Backup battery depleted. Contact Uline Customer Service at 1-800-295-5510. |
| OPERATING ISSUE | CAUSES | RECOMMENDATIONS |
| ——- Memory Full ——- | Statistics or Totaling Memory is full. | Start a new Statistics or Totaling application. |
| — Load/Unload Weight — | No sample or the same sample is on the weighing pan. | Put a new sample on the weighing pan or remove it and put sample on the weighing pan again. |
| Unit change not allowed! | Changed unit during Statistics or Totaling application. | Reset the scale.
Change the unit back to the original unit setting. |
| ——– Out of range ——– | Sample weight is out of range. | Sample weight must be in the range of 70-130% of the current average value. |
CONSUMABLES AND SPARE PARTS
| # | DESCRIPTION | QTY. | ULINE PART NO. | MFG. PART NO. |
| 1 | Paper Cover | 1 | ———– | 30047939 |
| 2 | Paper Roll | 1 | S-23229 | 12120799 |
| 3 | Paper Rotary Axis | 1 | ———– | 30063920 |
| 4 | Ribbon Cartridge, Black | 1 | S-23230 | 12120798 |
|
5 |
AC/DC Adapter (without power cable)
100–240V AC, 50–60 Hz, 12V DC 2.5 A |
1 |
———– |
11107909 |
| Power Cable CH | ———– | 30064089 | ||
| Power Cable EU | ———– | 12120761 | ||
| Power Cable US | H-8093-PCBL | 12120762 | ||
|
6 |
Power Cable IT
Power Cable GB |
1 |
———–
———– |
30064200
12120312 |
| Power Cable AU | ———– | 12120313 | ||
| Power Cable BR | ———– | 83033772 | ||
| Power Cable JP | ———– | 12122638 | ||
| – | RS9 M/F Cable, 1.5 m | 1 | ———– | 12122603 |
SPECIFICATIONS
| Power Supply | AC/DC adapter: 12V DC, 2.5 A Primary: 100 – 240V AC, -50 -60 Hz
Voltage Fluctuations: Up to ± 10% of the nominal voltage Secondary: 12V DC, 2.5 A (with electric overload protection) |
| Cable to AC/DC Adapter | 3-core with country-specific plug. |
| Power Line Voltage | 12V DC |
| Power Consumption | Max. 2.5 A |
| Altitude | Up to 2000 m |
| Ambient Temperature | 0º C – 40º C |
| Relative Humidity | Max. 80% at 31º C, decreasing linearly to 50% at 40º C, noncondensing |
| Overvoltage Category | Class II |
| Pollution Degree | 2 |
| Printing Unit | Dot matrix printer 5 x 7, 40 character line length |
| Printing Speed | 1.2 lines per second |
| Ribbon Cartridge | Exchangeable, black |
| Paper Roll | Standard paper 57.5 x 50-60 mm, integrated in housing, commercial size |
| Print Quality | Light resistant and thermally stable printing (GLP, GMP, ISO9001) |
| Interface | RS-232C |
| Printer Dimensions | (W x D x H) 120 x 203 x 73 mm |
| Packaging Dimensions | (W x D x H) 255 x 205 x 150 mm |
| Net Weight | 740 g (paper roll included) |
| Compatibility Limits | Function Date/Time:
Not applicable in balances with built-in clock (built-in clock has priority). Functions Zeroing/Taring, Statistics and Totalization: Not applicable on all models of balances. |
1-800-295-5510uline.com
References
[xyz-ips snippet=”download-snippet”]