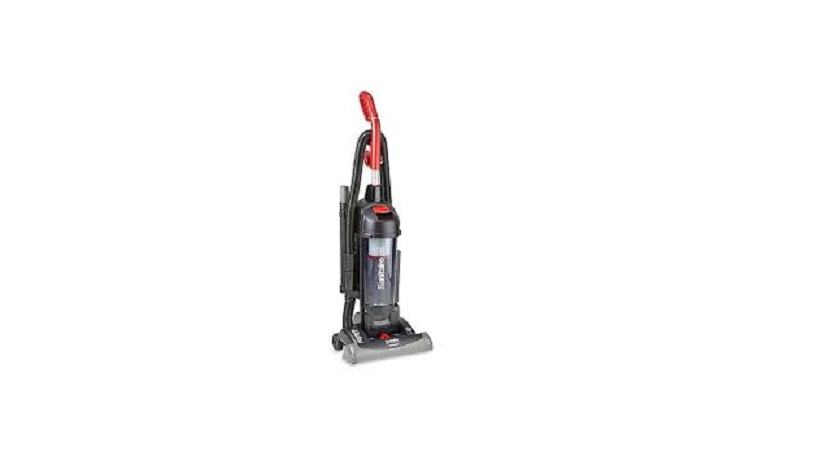
ULINE H-8581 Hoover Taskvac Aspiradora Vertical User Manual
SAFETY
![]() NOTE: When using an electrical appliance, basic precautions should always be followed, including the following: Read all instructions before using this vacuum cleaner.
NOTE: When using an electrical appliance, basic precautions should always be followed, including the following: Read all instructions before using this vacuum cleaner.
![]() WARNING! To reduce the risk of fire, electric shock or injury:
WARNING! To reduce the risk of fire, electric shock or injury:
- Fully assemble before opertaing.
- Operate vacuum only at voltage specified on data label on back of cleaner.
- Do not leave appliance when plugged Unplug from outlet when not in use and before cleaning or servicing.
- Do not use outdoors or on wet surface.
- Do not use as a Not intended for use by children age 12 and under. Close supervision is necessary when used near children. To avoid injury or damage, keep children away from product, and do not allow children to place fingers or other objects into any openings.
- Use only as described in these Use only manufacturer’s recommended attachments and products.
- Do not use with damaged cord or If appliance is not working as it should, has been dropped, damaged, left outdoors or dropped into water, call Uline Customer Service at 1-800-295-5510.
- Do not pull or carry by cord, use cord as a handle, close a door on cord or pull cord around sharp edges or corners. Do not place product on cord. Do not run appliance over Keep cord away from heated surfaces.
- Do not unplug by pulling on To unplug, grasp the plug, not the cord.
- Do not handle plug or appliance with wet hands.
- Do not put any object into Do not use with any opening blocked; keep free of dust, lint, hair and anything that may reduce air flow.
- Keep hair, loose clothing, fingers and all parts of body away from openings and moving parts. Brushroll continues to rotate when in the upright position, unless the cleaner is in “Suction Only Mode” (available on select models only).
- Turn off all controls before unplugging.
- Use extra care when cleaning on To avoid personal injury or damage, and to prevent the cleaner from falling, always place cleaner at bottom of stairs on floor. Do not place cleaner on stairs or furniture, as it may result in injury or damage.
- Do not use to pick up flammable or combustible liquids, such as gasoline or fine wood sandings. Do not use in areas where these may be present.
- Do not pick up anything that is burning or smoking, such as cigarettes, matches or hot asches.
- Do not use without filter bag and/or filters in place.
![]() WARNING! This product contains chemicals known to the state of California to cause cancer, birth defects or reproductive harm. Wash hands after handling.
WARNING! This product contains chemicals known to the state of California to cause cancer, birth defects or reproductive harm. Wash hands after handling.
![]() CAUTION! To reduce the risk of damage:
CAUTION! To reduce the risk of damage:
- Avoid picking up hard, sharp objects with this product, as they may cause damage.
- Store in a dry Do not expose vacuum to freezing temperatures.
- Brushroll continues to turn while product is turned on and handle is in upright To avoid damage to carpet, rugs, furniture and flooring, avoid tipping cleaner or setting it on furniture, fringed area rugs or carpeted stairs during tool use.
- Do not use sharp objects to clean debris from hose, as they can cause damage.
![]() CAUTION! This appliance must be grounded. If it should malfunction or break down, grounding provides a path of least resistance for electrical current to reduce the risk of electric shock.
CAUTION! This appliance must be grounded. If it should malfunction or break down, grounding provides a path of least resistance for electrical current to reduce the risk of electric shock.
![]() NOTE: The appliance is equipped with a cord having an equipment-grounding conductor and grounding plug. The plug must be plugged into an appropriate outlet that is properly installed and grounded in accordance with all local codes and ordinances.
NOTE: The appliance is equipped with a cord having an equipment-grounding conductor and grounding plug. The plug must be plugged into an appropriate outlet that is properly installed and grounded in accordance with all local codes and ordinances.
Improper connection of an equipment-grounding conductor can result in risk of electric shock. Check with a qualified electrician or service person if doubting whether the outlet is properly grounded. Do not modify the plug provided with the appliance. If it does not fit the outlet, have a qualified electrician install a proper outlet.
This vacuum is for use on a nominal 120V circuit and has a grounding plug that looks like the plug illustrated in Figure A. A temporary adapter that looks like the adapter illustrated in Figure B may be used to connect this plug to a two-pole receptacle, as shown, if a properly grounded outlet is not available. The temporary adapter should be used only until a properly grounded outlet, Figure A, can be installed by a qualified electrician. The green-colored rigid ear, lug or the like extending from the adapter must be connected to a permanent ground, such as a properly grounded outlet box cover. Whenever the adapter is used, it must be held in place by a metal screw.

ASSAMBLY
- Handle

- Base
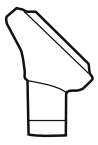
- Wand
- Crevice Tool
- Dusting/Upholstery Tool
- Screw
- Bag Door
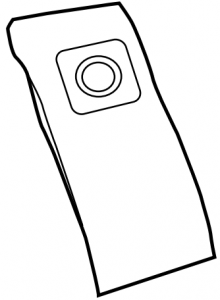
- Disposable Bag


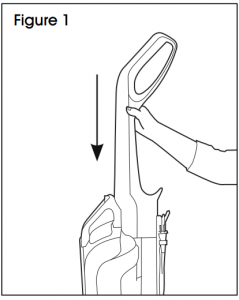
ATTACH HANDLE
![]() NOTE: Remove the screw at the top of the vacuum base and set aside until Step 2.
NOTE: Remove the screw at the top of the vacuum base and set aside until Step 2.
- Insert handle into vacuum Push down firmly. (See Figure 1).
- Using a Phillips screwdriver, fasten screw behind handle into vacuum (See Figure 2).

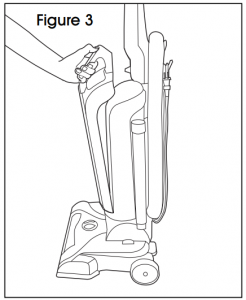
ATTACH BAG DOOR
- Place tabs on bottom of bag door into slots on vacuum body. Ensure disposable bag is securely tucked into (See Figure 3).
- Push door handle back until it clicks into place. (See Figure 3).
STORE TOOLS
- Place crevice tool into wand and slide into tool storage area on left side of vacuum. Place upholstery tool on back of vacuum. (See Figure 4).

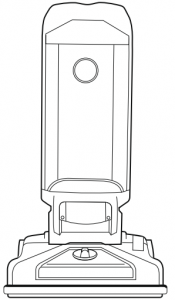
OPERATION
|
# |
DESCRIPTION |
|
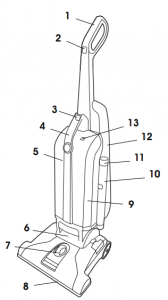
1 |
Handle |
|
2 |
On/Off Switch |
| 3 |
Bag Door Release Button |
|
4 |
Carry Handle |
| 5 |
Bag Door |
|
6 |
Stair Cleaning Handle |
| 7 |
Carpet Height Adjustment |
|
8 |
Furniture Guard |
|
9 |
Filter and Filter Bag Access |
| 10 |
Wand |
|
11 |
Crevice Tool |
|
12 |
Hose |
|
13 |
Bag Check Indicator |
|
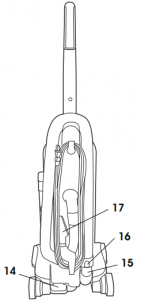
14 |
Handle Release Pedal |
| 15 |
Hose Tube |
|
16 |
Hose Release Button |
|
17 |
Dusting / Upholstery Tool |
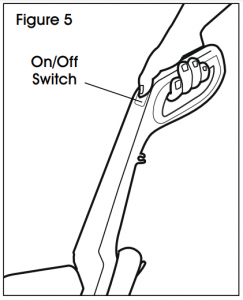
ON/OFF SWITCH
- Plug cord into outlet.
- To turn vacuum on, push On/Off switch once. (See Figure 5).
- To turn vacuum off, push switch (See Figure 5).
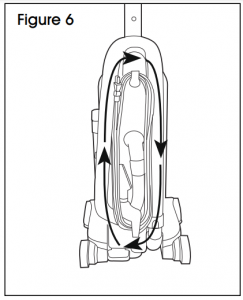
CORD STORAGE
- Wrap cord on hooks for convenient storage. (See Figure 6).
- Attach plug end to card.
CARPET HEIGHT ADJUSTMENT
- To adjust height setting, push down and turn knob to desired (See Figure 7).
- For maximum cleaning performance, the following carpet height settings are recommended:
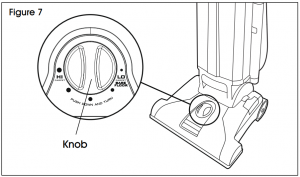
- LO is for all types of carpet and bare floore.
- HI is for very deep pile carpet, where easier pushing effort is desired, while maintaining good cleaning
![]() IMPORTANT! If the vacuum is difficult to push, push down and turn knob to the next higher setting.
IMPORTANT! If the vacuum is difficult to push, push down and turn knob to the next higher setting.
VACUUM FEATURES
Tools allow for cleaning surfaces above the floor and for reaching hard to clean areas.
The vacuum is ready for tool use when handle is in upright position.
![]() IMPORTANT! Brushroll continues to turn while product is turned on and handle is in upright position. To avoid damage to carpet, rugs, furniture and flooring, avoid tipping cleaner or setting it on furniture, fringed area rugs, or carpeted stairs during tool use.
IMPORTANT! Brushroll continues to turn while product is turned on and handle is in upright position. To avoid damage to carpet, rugs, furniture and flooring, avoid tipping cleaner or setting it on furniture, fringed area rugs, or carpeted stairs during tool use.
SELECT PROPER TOOL
- Upholstery tool cleans upholstered furniture, draperies, mattresses, clothing and carpeted stairs.
- Wand gives extra length to hose. Use it with other tools.
- Crevice tool fits into tight spaces, corners and along edges in such places as dresser drawers, upholstered furniture, and basedboards.
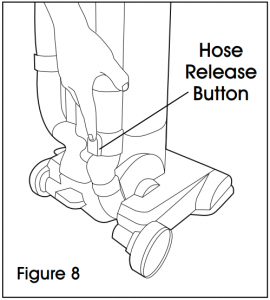
REMOVING HOSE
- To remove hose for tool use, press the hose release button and pull hose end (See Figure 8).
- To lock back into place, push hose into hose tube until it clicks.
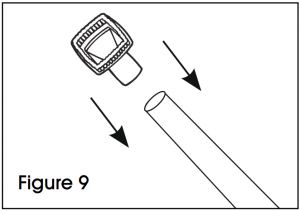
ATTACH WAND AND TOOLS
- To attach tool or wand to hose, push firmly into place. (See Figure 9).
HOW TO CLEAN TOOLS
To clean hose, wipe with a damp cloth. Do not submerge in water.
Other cleaning tools may be washed in warm water with a detergent. Rinse and air dry completely before using.
STAIR CLEANING
- Lift vacuum by stair cleaning handle and position on Clean forward to back. Never leave the vacuum standing on stairs when not cleaning. (See Figure 10).

![]() CAUTION! Use extra care when cleaning on stairs. To avoid personal injury or damage and to prevent the cleaner from falling, always place cleaner at bottom of stairs on floor. Do not leave on stairs or furniture unattended, as it may result in injury or damage.
CAUTION! Use extra care when cleaning on stairs. To avoid personal injury or damage and to prevent the cleaner from falling, always place cleaner at bottom of stairs on floor. Do not leave on stairs or furniture unattended, as it may result in injury or damage.
CHECK BAG INDICATOR
The indicator will begin to show red as the filter bag fills with dirt. (See Figure 11) Three conditions will cause indicator to become completely red: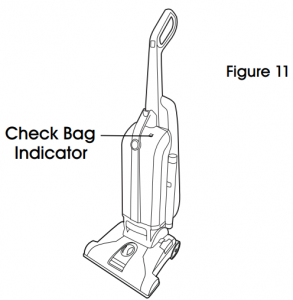
- If the bag is full, change the bag.
- If very fine materials have been picked up, clogging the bag pores, change the bag.
- If there is a blockage in the nozzle, hose, tools or at the bag opening, remove the blockage.
MAITENANCE
Become familiar with these maintenance tasks, as proper use and care of vacuum will ensure continued cleaning effectiveness.
An authorized service representative should perform any other servicing.
If appliance is not working as it should, has been dropped, damaged, left outdoors or dropped into water, take it to a service center prior to continuing use.
![]() NOTE: Vacuum has a thermal protector to prevent overheating. When thermal protector activates, the vacuum will stop running.
NOTE: Vacuum has a thermal protector to prevent overheating. When thermal protector activates, the vacuum will stop running.
- If this happens, proceed as follows:
- Turn vacuum off and unplug it from the electrical outlet.
- Replace disposable bag.
- Inspect and remove blockage along the dirt Blockage may occur at the nozzle inlet, hose connector, hose, bag opening inlet, secondary filter or final filter.
- When vacuum is unplugged and motor cools for 30 minutes, the thermal protector will deactivate, allowing for continued vacuum use.
If the thermal protector continues to activate after following these steps, the vacuum needs servicing.
DISPOSABLE BAG: WHEN TO REPLACE
Check disposable bag from time to time. It is recommended that you change the disposable bag when dirt reaches the dotted line. If more dirt than this accumulates, your cleaner will not operate effectively.
Check bag indicator. If it is red, switch out for a new bag.
![]() IMPORTANT! All new carpet has loose fibers that can fill the bag quickly while vacuuming. This type of debris does not activate the “Check bag” indicator.
IMPORTANT! All new carpet has loose fibers that can fill the bag quickly while vacuuming. This type of debris does not activate the “Check bag” indicator.
DISPOSABLE BAG: WHAT TO BUY
Use only genuine HOOVER® bags with vacuum. When purchasing a new bag, ask Uline Customer Service for HOOVER® HEPA Type Y Bag Part #S-23470.
![]() CAUTION! Very fine materials, such as face powder or corn starch, may seal the disposable bag and may cause it to burst even though it is partially full of dirt. When the cleaner is used to remove material of this nature, change disposable bag often.
CAUTION! Very fine materials, such as face powder or corn starch, may seal the disposable bag and may cause it to burst even though it is partially full of dirt. When the cleaner is used to remove material of this nature, change disposable bag often.
DISPOSABLE BAG: HOW TO REPLACE
![]() CAUTION! To reduce risk of injury from moving parts, unplug before servicing. Do not use vacuum without filter bag in place.
CAUTION! To reduce risk of injury from moving parts, unplug before servicing. Do not use vacuum without filter bag in place.
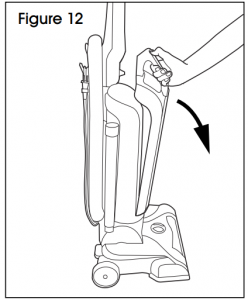
- To change filter bag, push up on door release latch and pull handle forward to remove (See Figure 12).
- Push on red lever over a trash receptacle and drop bag into trash. (See Figure 13).

![]() IMPORTANT! Do not clean out old disposable bag and reuse. Discard used bag.
IMPORTANT! Do not clean out old disposable bag and reuse. Discard used bag.
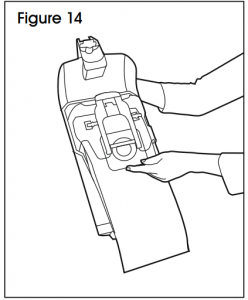
- Hold new filter bag as Slide the cardboard sleeve into the bag holder until bag is securely in place. (See Figure 14).
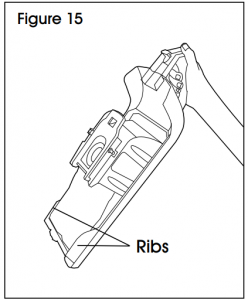
- Fold bottom of bag and tuck between ribs on bottom Make sure bag does not interfere with door seal. (See Figure 15).
- Replace bag door by placing tabs on bottom of door into Make sure filter bag is securely tucked into vacuum. (See Figure 16).
- Push door handle to snap securely shut.

FILTERS: HOW TO CLEAN
![]() CAUTION! To reduce risk of injury from moving parts, unplug vacuum before servicing.
CAUTION! To reduce risk of injury from moving parts, unplug vacuum before servicing.
Do not operate vacuum without either the secondary or final filter in place.
SECONDARY FILTER
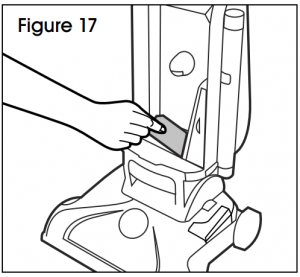
- The secondary filter protects the motor from dirt particles. If filter becomes dirty, pull off grill and lift out filter. Hand wash filter in cold water. Let filter air dry for 24 hours. Reposition dry filter and grill. (See Figure 17).
FINAL FILTER
- The final filter assists in the filtration process to return clean air to the (See Figure 18).
- To remove the filter, pull tab on filter holder down and remove filter.
- Lift out filter and hand wash it in cold water.
- Let filter air dry for 24 hours and reposition it on the side of the filter holder and push filter holder back into cleaner.

![]() IMPORTANT! Allow filter to dry completely before replacing. Dry filter on edge so air circulates on both sides of filter. This may take up to 24 hours.
IMPORTANT! Allow filter to dry completely before replacing. Dry filter on edge so air circulates on both sides of filter. This may take up to 24 hours.
BRUSHROLL: HOW TO CLEAN
![]() CAUTION! To reduce the risk of injury from moving parts, unplug before servicing.
CAUTION! To reduce the risk of injury from moving parts, unplug before servicing.
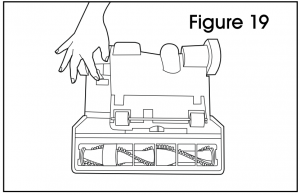
- Turn vacuum over so bottom side is facing Rotate red upper latch counterclockwise.(See Figure 19).
- Slide red lower latch to the unlock position (See Figure 20).
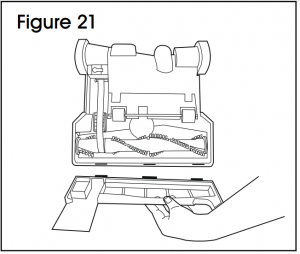
- Lift off bottom plate and remove any debris or hair from brushroll.(See Figure 21).
- Reposition bottom plate, aligning tabs along front edge of nozzle guard with slots in Rotate back into position. Slide red lower latch to lock position, and rotate red upper latch clockwise.

HOSE: HOW TO CLEAN
![]() CAUTION! To reduce the risk of injury from moving parts, unplug before servicing.
CAUTION! To reduce the risk of injury from moving parts, unplug before servicing.
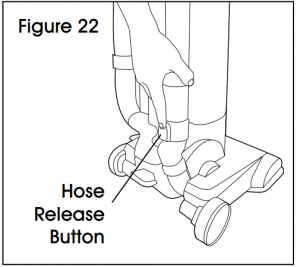
- To remove hose for tool use or maintenance, press the hose release button and pull hose end out. (See Figure 22).
- Clear away debris or obstructions from hose. Do not use sharp objects to clean debris from hose, as they can cause damage. To lock back into place, push hose into hose tube until it clicks.
BELT
![]() CAUTION! To reduce the risk of injury from moving parts, unplug before servicing.
CAUTION! To reduce the risk of injury from moving parts, unplug before servicing.
The belt is located under the bottom plate of the vacuum and should be checked from time to time to ensure it is in good condition.
BELT: WHEN TO REPLACE
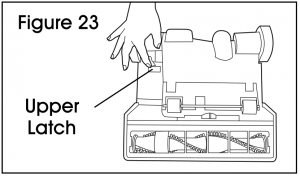
Replace belt if it is stretched, cut or broken. To check the belt, refer to Figures 23-25.
- Turn vacuum over so bottom side is facing Rotate red upper latch counterclockwise. (See Figure 23).
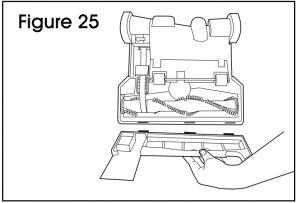
- Slide red lower latch to the unlock position. (See Figure 24).

- Lift off bottom plate.(See Figure 25).
- Remove used belt from brushroll and then from motor shaft (metal rod) and discard. (See Figure 26).

- With lettering on outside of belt, slide new belt over motor shaft (metal rod).

- Push other end of belt through belt guide, then slip around area of brushroll without bristles. (See Figure 27).
- With belt in place, pull and slide brushroll into nozzle, ensuring that the brushroll end caps are in the correct orientation.
![]() IMPORTANT! Rotate brushroll manually to ensure belt is not twisted.
IMPORTANT! Rotate brushroll manually to ensure belt is not twisted.
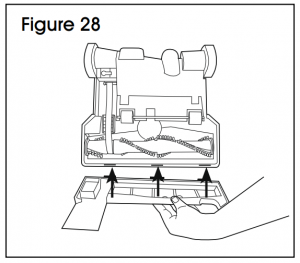
- Reposition bottom plate, aligning tabs along front edge of nozzle guard with slots in Rotate back into position. Slide red lower latch to lock position, and rotate red upper latch clockwise.(See Figure 28).
TROUBLESHOOTING
If a minor problem occurs, it usually can be solved using the checklist below.
An authorized service representative should complete any other servicing.
If appliance is not working as it should, has been dropped, damaged, left outdoors or dropped into water, take it to a service center before use.
![]() WARNING! To reduce risk of personal injury, unplug vacuum before servicing.
WARNING! To reduce risk of personal injury, unplug vacuum before servicing.
|
OPERATING ISSUE |
RECOMMENDATIONS |
|
Vacuum won’t run |
Power cord may not be firmly plugged into outlet. Plug unit in firmly. Blown fuse or tripped breaker. Check fuse or breaker. Replace fuse/reset breaker. Thermal protector is activated. Unplug and allow vacuum to cool for 30 minutes. (This will reset the thermal protector.) |
| Bag check indicator is red or vacuum won’t pick up or low suction |
Disposable bag is full and/or clogged. Replace disposable bag. Replace belt if broken or warn down. Brushroll and/or hose is clogged. Check hose and brushroll and remove any debris. Carpet height setting is incorrect. Set carpet height adjustment appropriately for carpet being cleaned. |
|
Dust escaping from vacuum |
Disposable bag is full. Replace disposable bag. Disposable bag is not installed correctly. Review disposable bag removal and replacement. Hose is not installed correctly. Review hose installation. |
| Vacuum is difficult to push or won’t move forward |
Carpet height setting is incorrect. Set carpet height adjustment knob to appropriate setting for carpet being cleaned. Bottom plate is not installed correctly. Review bottom plate installation. |
|
Smoky/burning smell detected |
Replace belt if broken or stretched. Brushroll is clogged. Clear/remove debris from brushroll. |
 1-800-295-5510Web: uline.com
[xyz-ips snippet=”download-snippet”]